
Owners Manual
Page 2
... been exposed to qualified service personnel. The lightning flash with the apparatus. Install in any ventilation openings. When a cart is used, use caution when moving the cart/apparatus combination to avoid injury from the apparatus. 11) Only use this apparatus near any heat sources such as power-supply cord or plug is intended to alert the user to persons. A polarized plug has two blades...
... been exposed to qualified service personnel. The lightning flash with the apparatus. Install in any ventilation openings. When a cart is used, use caution when moving the cart/apparatus combination to avoid injury from the apparatus. 11) Only use this apparatus near any heat sources such as power-supply cord or plug is intended to alert the user to persons. A polarized plug has two blades...
Owners Manual
Page 3
... the European Directive 2002/96/EC. 2. For more detailed information about disposal of your old appliance will help prevent potential negative consequences for the environment and human health. 4. CAUTION < DO NOT REMOVE THE EXTERNAL CASES OR CABINETS TO EXPOSE THE ELECTRONICS. NO USER SERVICEABLE PARTS ARE WITHIN! < IF YOU ARE EXPERIENCING PROBLEMS WITH THIS PRODUCT, CONTACT TEAC FOR A SERVICE REFERRAL...
... the European Directive 2002/96/EC. 2. For more detailed information about disposal of your old appliance will help prevent potential negative consequences for the environment and human health. 4. CAUTION < DO NOT REMOVE THE EXTERNAL CASES OR CABINETS TO EXPOSE THE ELECTRONICS. NO USER SERVICEABLE PARTS ARE WITHIN! < IF YOU ARE EXPERIENCING PROBLEMS WITH THIS PRODUCT, CONTACT TEAC FOR A SERVICE REFERRAL...
Owners Manual
Page 4
... CD/MP3/WMA 26 Direct Playback 28 Repeat Playback 29 Programmed Playback 30 Shuffle Playback 32 Time Display 32 TUNER Listening to the Radio 33 Preset Tuning 34 RDS 36 RDS (PTY Search 37 RDS (PTY 38 Setting the Clock 39 Setting the Timer 40 Troubleshooting 42 Specifications 43 Read this manual in the player. Important Safety Instructions 2 Before Use 4 Contents 4 Discs 6 Connection 8 Connecting Antennas 12 Identifying the Parts 14 Remote Control Unit 18 Basic Operation 19 iPod...
... CD/MP3/WMA 26 Direct Playback 28 Repeat Playback 29 Programmed Playback 30 Shuffle Playback 32 Time Display 32 TUNER Listening to the Radio 33 Preset Tuning 34 RDS 36 RDS (PTY Search 37 RDS (PTY 38 Setting the Clock 39 Setting the Timer 40 Troubleshooting 42 Specifications 43 Read this manual in the player. Important Safety Instructions 2 Before Use 4 Contents 4 Discs 6 Connection 8 Connecting Antennas 12 Identifying the Parts 14 Remote Control Unit 18 Basic Operation 19 iPod...

Owners Manual
Page 5
..., and the unit returns to remove any fluid completely. Be sure to the factory settings. 5 Hold down the FM MODE button for 14 days or longer, all the settings kept in the air could condense on , turn it off (standby). 2. vapor in memory (such as preset stations and timer settings) will stabilize at the temperature of its surroundings. If the unit is moved...
..., and the unit returns to remove any fluid completely. Be sure to the factory settings. 5 Hold down the FM MODE button for 14 days or longer, all the settings kept in the air could condense on , turn it off (standby). 2. vapor in memory (such as preset stations and timer settings) will stabilize at the temperature of its surroundings. If the unit is moved...
Owners Manual
Page 9
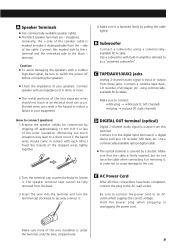
... the strands of a digital device such as a "powered subwoofer". Insert the wire into the terminal and turn the terminal cap clockwise to securely connect it is covered by pulling the cable lightly. Connect speaker with a sudden high-level signal, be fully removed from these jacks. Use a commercially-available optical digital cable. < The optical terminal is fastened firmly by a shutter. Shorted wires can occur. Connect a cassette tape deck, CD recorder, DVD player, etc. Caution: < To...
... the strands of a digital device such as a "powered subwoofer". Insert the wire into the terminal and turn the terminal cap clockwise to securely connect it is covered by pulling the cable lightly. Connect speaker with a sudden high-level signal, be fully removed from these jacks. Use a commercially-available optical digital cable. < The optical terminal is fastened firmly by a shutter. Shorted wires can occur. Connect a cassette tape deck, CD recorder, DVD player, etc. Caution: < To...

Owners Manual
Page 11
... composite video connector of a suitably equipped television or monitor. Use this jack, and adjust the volume by turning the VOLUME knob. Connect the LINE OUT or PHONES jack (audio output jack) of the player using a commercially available stereo mini plug cable. < When using the PHONES jack of your mini player, you must adjust the volume of the plug and pull. F iPod Dock Connect the Dock to output video signal (see page 24). Use an S-Video cable to connect the Dock to the S-Video input of a television or monitor. < Select "Click Wheel Mode...
... composite video connector of a suitably equipped television or monitor. Use this jack, and adjust the volume by turning the VOLUME knob. Connect the LINE OUT or PHONES jack (audio output jack) of the player using a commercially available stereo mini plug cable. < When using the PHONES jack of your mini player, you must adjust the volume of the plug and pull. F iPod Dock Connect the Dock to output video signal (see page 24). Use an S-Video cable to connect the Dock to the S-Video input of a television or monitor. < Select "Click Wheel Mode...

Owners Manual
Page 15
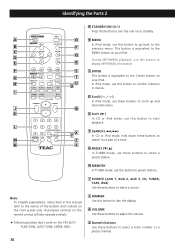
... Center button on your iPod. In FM TUNER mode, this button to set a timer. In TUNER mode, use this button to select FM or AM. B Remote Sensor When operating the remote control unit, point it goes off. C Display D Disc tray E OPEN/CLOSE (L), TUNING MODE, ENTER In CD mode, use this button to open and close the disc tray. H STOP (H), RDS MODE, MENU In CD mode, use this button to stop playback. I PAUSE (J), FM MODE In iPod or CD mode, use this button to pause playback. N iPod port Connect the Dock to this button to start playback. In TUNER mode, use...
... Center button on your iPod. In FM TUNER mode, this button to set a timer. In TUNER mode, use this button to select FM or AM. B Remote Sensor When operating the remote control unit, point it goes off. C Display D Disc tray E OPEN/CLOSE (L), TUNING MODE, ENTER In CD mode, use this button to open and close the disc tray. H STOP (H), RDS MODE, MENU In CD mode, use this button to stop playback. I PAUSE (J), FM MODE In iPod or CD mode, use this button to pause playback. N iPod port Connect the Dock to this button to start playback. In TUNER mode, use...
Owners Manual
Page 16
... explanations, instructions in menus. FUNCTION, AUTO TUNE, ENTER, INFO L Numeric buttons Use these buttons to scroll up and down these buttons to select a source. L X Y F SEARCH (m/,) In CD or iPod mode, hold down the menu. H MEMORY In TUNER mode, use this button to go back to the P previous menu. I D Scroll (° / ‡) In iPod mode, use these buttons to select a track number or a preset channel. 16 K VOLUME Use these buttons to select a preset station. A O B MENU B In iPod mode, use this button to preset stations. Associated controls on or standby...
... explanations, instructions in menus. FUNCTION, AUTO TUNE, ENTER, INFO L Numeric buttons Use these buttons to scroll up and down these buttons to select a source. L X Y F SEARCH (m/,) In CD or iPod mode, hold down the menu. H MEMORY In TUNER mode, use this button to go back to the P previous menu. I D Scroll (° / ‡) In iPod mode, use these buttons to select a track number or a preset channel. 16 K VOLUME Use these buttons to select a preset station. A O B MENU B In iPod mode, use this button to preset stations. Associated controls on or standby...

Owners Manual
Page 17
... change the time display. P SHUFFLE In CD or iPod mode, use this button to set the repeat function. N TIME During audio CD playback, use this button to select stereo 17 V RDS In FM TUNER mode, use this button to turn on or off the shuffle playback. O TIMER Use this button to select an RDS mode. To use the numeric buttons in CD mode or in TUNER mode, you have to press the CD button or the iPod button beforehand to switch the function of the remote control...
... change the time display. P SHUFFLE In CD or iPod mode, use this button to set the repeat function. N TIME During audio CD playback, use this button to select stereo 17 V RDS In FM TUNER mode, use this button to turn on or off the shuffle playback. O TIMER Use this button to select an RDS mode. To use the numeric buttons in CD mode or in TUNER mode, you have to press the CD button or the iPod button beforehand to switch the function of the remote control...
Owners Manual
Page 19
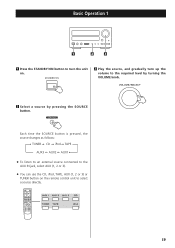
Each time the SOURCE button is pressed, the source changes as follows: TUNER CD iPod TAPE AUX3 AUX2 AUX1 < To listen to an external source connected to the AUX IN jack, select AUX (1, 2 or 3). < You can use the CD, iPod, TAPE, AUX (1, 2 or 3) or TUNER button on . 3 Play the source, and gradually turn up the volume to select a source directly. 19 Basic Operation 1 1 2 3 1 Press the STANDBY/ON button to turn the unit on the remote control unit to the required level by turning the VOLUME knob. 2 Select a source by pressing the SOURCE button.
Each time the SOURCE button is pressed, the source changes as follows: TUNER CD iPod TAPE AUX3 AUX2 AUX1 < To listen to an external source connected to the AUX IN jack, select AUX (1, 2 or 3). < You can use the CD, iPod, TAPE, AUX (1, 2 or 3) or TUNER button on . 3 Play the source, and gradually turn up the volume to select a source directly. 19 Basic Operation 1 1 2 3 1 Press the STANDBY/ON button to turn the unit on the remote control unit to the required level by turning the VOLUME knob. 2 Select a source by pressing the SOURCE button.

Owners Manual
Page 20
... normal display. 20 TO AVOID DAMAGING YOUR HEARING - Sleep Timer The power can be switched off while the headphone jack is dimmed when you set the sleep timer. < If you change the volume during the muting, the muting will be canceled. < Subwoofer output will not be cut off after you have plugged them in your headphones into the PHONES jack, and adjust the volume using the VOLUME buttons. Press...
... normal display. 20 TO AVOID DAMAGING YOUR HEARING - Sleep Timer The power can be switched off while the headphone jack is dimmed when you set the sleep timer. < If you change the volume during the muting, the muting will be canceled. < Subwoofer output will not be cut off after you have plugged them in your headphones into the PHONES jack, and adjust the volume using the VOLUME buttons. Press...
Owners Manual
Page 21
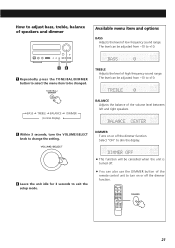
... exit the setup mode. < This function will be cancelled when the unit is turned off. < You can also use the DIMMER button of the volume level between left and right speakers. 2 Within 3 seconds, turn the VOLUME/SELECT knob to turn on or off the dimmer function. 21 BASS TREBLE BALANCE (normal display) DIMMER BALANCE Adjusts the balance of the remote control unit to change the setting. The...
... exit the setup mode. < This function will be cancelled when the unit is turned off. < You can also use the DIMMER button of the volume level between left and right speakers. 2 Within 3 seconds, turn the VOLUME/SELECT knob to turn on or off the dimmer function. 21 BASS TREBLE BALANCE (normal display) DIMMER BALANCE Adjusts the balance of the remote control unit to change the setting. The...
Owners Manual
Page 22
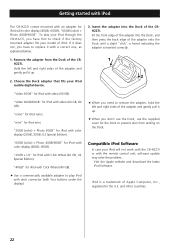
.... 1 2 "Video 30GB" for iPod with four buttons under the display). Choose the Dock adapter that fits your iPod mobile digital device. 3. If it does not, you have first to check if the factory mounted adapter fits your iPod will not work with the CR-H227i or with color display (20GB, 30GB, U2 Special Edition). < When you don't use the Dock, use the supplied cover for iPod with the remote control unit...
.... 1 2 "Video 30GB" for iPod with four buttons under the display). Choose the Dock adapter that fits your iPod mobile digital device. 3. If it does not, you have first to check if the factory mounted adapter fits your iPod will not work with the CR-H227i or with color display (20GB, 30GB, U2 Special Edition). < When you don't use the Dock, use the supplied cover for iPod with the remote control unit...

Owners Manual
Page 23
... Pause button (J). < Following buttons on the display. The iPod automatically turns on and starts playback from the iPod's music list. < Make sure to use the following buttons on page 22. < The iPod battery will start or pause playback If no iPod is connected to start playback. In iPod mode, press the PLAY button (G) to the AC power supply. < When headphones are plugged into the Dock of the remote control unit doesn't work in iPod mode. IMPORTANT Buttons for CD and iPod To use an appropriate Dock adapter...
... Pause button (J). < Following buttons on the display. The iPod automatically turns on and starts playback from the iPod's music list. < Make sure to use the following buttons on page 22. < The iPod battery will start or pause playback If no iPod is connected to start playback. In iPod mode, press the PLAY button (G) to the AC power supply. < When headphones are plugged into the Dock of the remote control unit doesn't work in iPod mode. IMPORTANT Buttons for CD and iPod To use an appropriate Dock adapter...

Owners Manual
Page 24
... the . button twice. Click Wheel Mode Select this to use the screen of the iPod. During playback, press the SKIP button (. The display of the CR-H227i constantly shows "Clickwheel Mode". < When the Dock is connected to a TV or monitor, select "Click Wheel Mode" to output video signals. < Following buttons on the display of the CR-H227i. To return to the beginning of the iPod. Menu appears...
... the . button twice. Click Wheel Mode Select this to use the screen of the iPod. During playback, press the SKIP button (. The display of the CR-H227i constantly shows "Clickwheel Mode". < When the Dock is connected to a TV or monitor, select "Click Wheel Mode" to output video signals. < Following buttons on the display of the CR-H227i. To return to the beginning of the iPod. Menu appears...
Owners Manual
Page 35
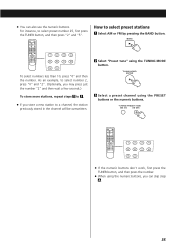
..., to a channel, the station previously stored in the channel will be overwritten. 3 Select a preset channel using the PRESET buttons or the numeric buttons. < If the numeric buttons don't work, first press the TUNER button, and then press the number. < When using the TUNING MODE button. As an example, to select number 2, press "0" and "2". (Optionally, you may press just the number "2" and then wait a few seconds.) To store more stations, repeat steps...
..., to a channel, the station previously stored in the channel will be overwritten. 3 Select a preset channel using the PRESET buttons or the numeric buttons. < If the numeric buttons don't work, first press the TUNER button, and then press the number. < When using the TUNING MODE button. As an example, to select number 2, press "0" and "2". (Optionally, you may press just the number "2" and then wait a few seconds.) To store more stations, repeat steps...

Owners Manual
Page 36
... switched to 64 symbols will be displayed. RDS Radio text (RT) When you tune in an FM RDS station (see page 33). 2 Press the RDS MODE button (or the INFO/RDS button of up to Program service mode. If you select RDS Radio text, "RDS RADIO TEXT" will blink for about 3 seconds and then the clock time will be wrongly adjusted, and that may eventually affect the timer operation...
... switched to 64 symbols will be displayed. RDS Radio text (RT) When you tune in an FM RDS station (see page 33). 2 Press the RDS MODE button (or the INFO/RDS button of up to Program service mode. If you select RDS Radio text, "RDS RADIO TEXT" will blink for about 3 seconds and then the clock time will be wrongly adjusted, and that may eventually affect the timer operation...
Owners Manual
Page 41
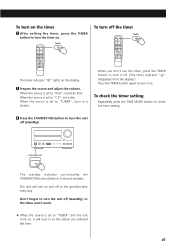
... timer indicator " " lights on and off (standby), or the timer won't work. < When the source is set to "CD", set to turn it will turn the unit off at 5-second intervals. When the source is set a disc. Don't forget to turn on the display. 2 Prepare the source and adjust the volume. The standby indicator surrounding the STANDBY/ON button blinks at the specified time every day. When the source is set to "TUNER", tune in to the station you don't use...
... timer indicator " " lights on and off (standby), or the timer won't work. < When the source is set to "CD", set to turn it will turn the unit off at 5-second intervals. When the source is set a disc. Don't forget to turn on the display. 2 Prepare the source and adjust the volume. The standby indicator surrounding the STANDBY/ON button blinks at the specified time every day. When the source is set to "TUNER", tune in to the station you don't use...

Owners Manual
Page 42
... connection to the speakers. e Select the source by plugging another disc. e Check the connection to the AC power supply. eIf "MUTE" is near the unit, turn it sounds monaural. e If a strong light is blinking, press the MUTING button. it again. e Check the file format. Some unknown characters are dead, change the batteries. e Remove the iPod from the outlet and plug it is, the switch is noisy. e An external antenna is stereo...
... connection to the speakers. e Select the source by plugging another disc. e Check the connection to the AC power supply. eIf "MUTE" is near the unit, turn it sounds monaural. e If a strong light is blinking, press the MUTING button. it again. e Check the file format. Some unknown characters are dead, change the batteries. e Remove the iPod from the outlet and plug it is, the switch is noisy. e An external antenna is stereo...
Owners Manual
Page 43
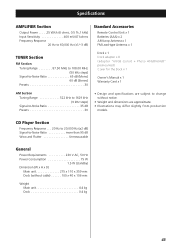
Specifications AMPLIFIER Section Output Power . . . . .25 W/ch (6 ohms, 0.5 %,1 kHz) Input Sensitivity 400 mV/47 kohms Frequency Response 20 Hz to 60,000 Hz (+1/-3 dB) Standard Accessories Remote Control Unit x 1 Batteries (AAA) x 2 AM Loop Antenna x 1 FM Lead-type Antenna x 1 TUNER Section FM Section Tuning Range 87.50 MHz to 108.00 MHz (50 kHz steps) Signal-to-Noise Ratio 65 dB (Mono) 60 dB...
Specifications AMPLIFIER Section Output Power . . . . .25 W/ch (6 ohms, 0.5 %,1 kHz) Input Sensitivity 400 mV/47 kohms Frequency Response 20 Hz to 60,000 Hz (+1/-3 dB) Standard Accessories Remote Control Unit x 1 Batteries (AAA) x 2 AM Loop Antenna x 1 FM Lead-type Antenna x 1 TUNER Section FM Section Tuning Range 87.50 MHz to 108.00 MHz (50 kHz steps) Signal-to-Noise Ratio 65 dB (Mono) 60 dB...


