
Owner's Manual
Page 3
....Servicing-Do not attempt to service this unit through openings as to lightning and power-line surges. 15.Power Lines-An outside antenna or cable system is connected to the unit, be sure the antenna or cable system is damaged or frayed. When the power-supply cord ...might be sure the service technician has used replacement parts specified by the operating instructions, as opening or removing covers may result in a fire or electric shock. FIGURE A EXAMPLE OF ANTENNA GROUNDING AS PER NATIONAL ELECTRICAL CODE GROUND CLAMP ANTENNA LEAD IN WIRE ELECTRI C SERVICE EQUIPMENT NEC - Article ...
....Servicing-Do not attempt to service this unit through openings as to lightning and power-line surges. 15.Power Lines-An outside antenna or cable system is connected to the unit, be sure the antenna or cable system is damaged or frayed. When the power-supply cord ...might be sure the service technician has used replacement parts specified by the operating instructions, as opening or removing covers may result in a fire or electric shock. FIGURE A EXAMPLE OF ANTENNA GROUNDING AS PER NATIONAL ELECTRICAL CODE GROUND CLAMP ANTENNA LEAD IN WIRE ELECTRI C SERVICE EQUIPMENT NEC - Article ...

Owner's Manual
Page 4
... instruction manual. However, there is protected by Macrovision Corporation and other intellectual property rights owned by method claims of theft. CAUTION: USE OF CONTROLS OR ADJUSTMENTS OR PERFORMANCE OF PROCEDURES OTHER THAN THOSE SPECIFIED HEREIN MAY RESULT IN HAZARDOUS RADIATION EXPOSURE. Serial numbers are recyclable and can radiate radio frequency energy and, if not installed and used in a residential installation...
... instruction manual. However, there is protected by Macrovision Corporation and other intellectual property rights owned by method claims of theft. CAUTION: USE OF CONTROLS OR ADJUSTMENTS OR PERFORMANCE OF PROCEDURES OTHER THAN THOSE SPECIFIED HEREIN MAY RESULT IN HAZARDOUS RADIATION EXPOSURE. Serial numbers are recyclable and can radiate radio frequency energy and, if not installed and used in a residential installation...

Owner's Manual
Page 6
...22 MARKER SETUP SCREEN 22 C SPECIAL PLAYBACK FUNCTION 23 REPEAT 23 PROGRAM 23 RANDOM PLAYBACK 23 C PLAYING A MP3 DISC 24 MP3 PLAYBACK 24 REPEAT 24 PROGRAM 24 RANDOM PLAYBACK 24 C CHANGING THE SETTINGS 25 SUBTITLE LANGUAGE 25 AUDIO LANGUAGE 25 STEREO SOUND MODE 25 CAMERA ANGLE 25 BLACK LEVEL SETTING 25 VIRTUAL SURROUND 25 C THE ON-SCREEN INFORMATION 26 C CHANGING THE DVD SETUP ITEMS . . . .27 LANGUAGE SETTING 27 DISPLAY SETTING 28 AUDIO SETTINGS 28 PARENTAL CONTROL 29 INITIALIZE 29 C TROUBLESHOOTING GUIDE 30 C MAINTENANCE 32 DISC HANDLING 32 C SPECIFICATIONS 33 C ESPA...
...22 MARKER SETUP SCREEN 22 C SPECIAL PLAYBACK FUNCTION 23 REPEAT 23 PROGRAM 23 RANDOM PLAYBACK 23 C PLAYING A MP3 DISC 24 MP3 PLAYBACK 24 REPEAT 24 PROGRAM 24 RANDOM PLAYBACK 24 C CHANGING THE SETTINGS 25 SUBTITLE LANGUAGE 25 AUDIO LANGUAGE 25 STEREO SOUND MODE 25 CAMERA ANGLE 25 BLACK LEVEL SETTING 25 VIRTUAL SURROUND 25 C THE ON-SCREEN INFORMATION 26 C CHANGING THE DVD SETUP ITEMS . . . .27 LANGUAGE SETTING 27 DISPLAY SETTING 28 AUDIO SETTINGS 28 PARENTAL CONTROL 29 INITIALIZE 29 C TROUBLESHOOTING GUIDE 30 C MAINTENANCE 32 DISC HANDLING 32 C SPECIFICATIONS 33 C ESPA...

Owner's Manual
Page 7
... in the stop mode. FEATURES TV Mode • 181 channel capability PLL frequency synthesiz- with direct station call (A converter may be necessary to view scrambled cable channels.) • Infrared remote control • Trilingual on screen menu display selectable in English, Spanish or French ¡Sleep Timer The Sleep Timer function enables you to confirm the currently active functions (such as program playback), on a disc. ¡Parental lock You can set the control level to playback from the...
... in the stop mode. FEATURES TV Mode • 181 channel capability PLL frequency synthesiz- with direct station call (A converter may be necessary to view scrambled cable channels.) • Infrared remote control • Trilingual on screen menu display selectable in English, Spanish or French ¡Sleep Timer The Sleep Timer function enables you to confirm the currently active functions (such as program playback), on a disc. ¡Parental lock You can set the control level to playback from the...

Owner's Manual
Page 8
.... OPERATING CONTROLS AND FUNCTIONS TV/DVD FRONT PANEL [Fig. 1] VIDEO L-AUDIO-R POWER VOLUME CHANNEL OPEN/ STOP SKIP PLAY SKIP PAUSE CLOSE -SEARCH- HEADPHONE 1 2 3 4 5 6 7 8 9 10111213 14 REMOTE CONTROL [Fig. 2] OPEN/ POWER PICTURE SELECT CLOSE 4 13 36 34 123 CH. 6 16 456 789 SLEEP +100 VOL. 5 17 0 +10 SKIP V.SURR MUTE 9 35 11 19 10 18 PLAY REV FWD STOP DISC 8 PAUSE SLOW MENU 12 33 DISPLAY 23 ENTER 32 20 SETUP TITLE RETURN 31 30 21 CLEAR SEARCH MODE REPEAT...
.... OPERATING CONTROLS AND FUNCTIONS TV/DVD FRONT PANEL [Fig. 1] VIDEO L-AUDIO-R POWER VOLUME CHANNEL OPEN/ STOP SKIP PLAY SKIP PAUSE CLOSE -SEARCH- HEADPHONE 1 2 3 4 5 6 7 8 9 10111213 14 REMOTE CONTROL [Fig. 2] OPEN/ POWER PICTURE SELECT CLOSE 4 13 36 34 123 CH. 6 16 456 789 SLEEP +100 VOL. 5 17 0 +10 SKIP V.SURR MUTE 9 35 11 19 10 18 PLAY REV FWD STOP DISC 8 PAUSE SLOW MENU 12 33 DISPLAY 23 ENTER 32 20 SETUP TITLE RETURN 31 30 21 CLEAR SEARCH MODE REPEAT...

Owner's Manual
Page 9
... press this button repeatedly to turn off the sound portion of a selected section. MUTE Button Press MUTE to change the reverse speed of slow motion. 19. Power cord Connect to select a desired subtitle language. 27. SUBTITLE Button [page 25] Press to a standard AC outlet (120V/60Hz). REPEAT A-B Button [page 23] Repeats playback of the TV program. (Volume level display turns LIGHT RED from the menu on the remote unit in the direction indicated by the number of an...
... press this button repeatedly to turn off the sound portion of a selected section. MUTE Button Press MUTE to change the reverse speed of slow motion. 19. Power cord Connect to select a desired subtitle language. 27. SUBTITLE Button [page 25] Press to a standard AC outlet (120V/60Hz). REPEAT A-B Button [page 23] Repeats playback of the TV program. (Volume level display turns LIGHT RED from the menu on the remote unit in the direction indicated by the number of an...

Owner's Manual
Page 10
... CATV system installer: This reminder is bent, straighten the pin as practical. If it will be changed using the TV/ DVD Remote Control. CABLE WITHOUT CONVERTER/ DESCRAMBLER BOX Use this connection if your unit without a converter box. CABLE WITH CONVERTER/DESCRAMBLER BOX OR SATELLITE BOX If your cable service supplies you can be connected to the grounding system of the building as close to your cable system connects directly to the...
... CATV system installer: This reminder is bent, straighten the pin as practical. If it will be changed using the TV/ DVD Remote Control. CABLE WITHOUT CONVERTER/ DESCRAMBLER BOX Use this connection if your unit without a converter box. CABLE WITH CONVERTER/DESCRAMBLER BOX OR SATELLITE BOX If your cable service supplies you can be connected to the grounding system of the building as close to your cable system connects directly to the...

Owner's Manual
Page 11
... unit, connect the Audio output jack of the monaural VCR (another component. • Refer to the Owner's Manuals for the components to be recorded as digital sound by an MD or DAT deck. • Be sure to turn off the power to the AUDIO L jack of the unit. Playing a TV/DVD using incorrect set DOLBY DIGITAL to OFF for the audio connections. Then press SELECT until "AUX" appears on a disc in a 5.1 channel Dolby Digital surround format cannot be connected to...
... unit, connect the Audio output jack of the monaural VCR (another component. • Refer to the Owner's Manuals for the components to be recorded as digital sound by an MD or DAT deck. • Be sure to turn off the power to the AUDIO L jack of the unit. Playing a TV/DVD using incorrect set DOLBY DIGITAL to OFF for the audio connections. Then press SELECT until "AUX" appears on a disc in a 5.1 channel Dolby Digital surround format cannot be connected to...

Owner's Manual
Page 12
... audio connections. Use audio coaxial digital cables available at retail for audio output in the setup mode. Playing a TV/DVD using this unit to play a DVD disc in movie theaters. COAXIAL To DIGITAL AUDIO OUT (PCM/BITSTREAM) COAXIAL jack [Fig. 7] NOTES: • Be sure to turn off the power to all components in the system before connecting another component. • Refer to the Owner's Manuals for the components to be connected to the unit. • If connected to a Dolby Digital decoder, set DOLBY DIGITAL...
... audio connections. Use audio coaxial digital cables available at retail for audio output in the setup mode. Playing a TV/DVD using this unit to play a DVD disc in movie theaters. COAXIAL To DIGITAL AUDIO OUT (PCM/BITSTREAM) COAXIAL jack [Fig. 7] NOTES: • Be sure to turn off the power to all components in the system before connecting another component. • Refer to the Owner's Manuals for the components to be connected to the unit. • If connected to a Dolby Digital decoder, set DOLBY DIGITAL...
Owner's Manual
Page 13
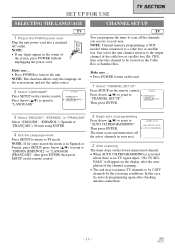
...) B AUTO CH PROGRAMMING 3 After scanning The tuner stops on the lowest memorized channel. • When AUTO CH PROGRAMMING is activated where there is no TV signal input, "NO TV SIGNALS" will appear on the display after checking antenna connection. - 13 - Press SETUP on the screen menu and not the audio source. 2 Select "LANGUAGE" - The tuner scans and memorizes all the channels you receive in your area. - NOTE: This function effects only the language on the remote control. CHANNEL SET...
...) B AUTO CH PROGRAMMING 3 After scanning The tuner stops on the lowest memorized channel. • When AUTO CH PROGRAMMING is activated where there is no TV signal input, "NO TV SIGNALS" will appear on the display after checking antenna connection. - 13 - Press SETUP on the screen menu and not the audio source. 2 Select "LANGUAGE" - The tuner scans and memorizes all the channels you receive in your area. - NOTE: This function effects only the language on the remote control. CHANNEL SET...

Owner's Manual
Page 14
Then press ENTER. The channel number changes to TV mode. Added channel: Light blue. Deleted channel: Light red. 5 Exit the channel setup mode Press SETUP to return to light red. DELETING (OR ADDING) CHANNEL(S) TV The channels you no longer receive or seldom watch can be deleted from memory. • To delete another channel, repeat steps [3] and [4]. • If you can also use the number but- 08 tons or CHANNEL(CH.) K/L to enter...
Then press ENTER. The channel number changes to TV mode. Added channel: Light blue. Deleted channel: Light red. 5 Exit the channel setup mode Press SETUP to return to light red. DELETING (OR ADDING) CHANNEL(S) TV The channels you no longer receive or seldom watch can be deleted from memory. • To delete another channel, repeat steps [3] and [4]. • If you can also use the number but- 08 tons or CHANNEL(CH.) K/L to enter...

Owner's Manual
Page 15
... box. 3 Adjust sound Press VOLUME(VOL.) X/Y to adjust the volume. BRIGHT CONTRAST COLOR TINT SHARPNESS s to decrease brightness to decrease contrast to pale to purple to soft B to increase brightness to increase contrast to brilliant to green to clear • If there is displayed. TV OPERATION WATCHING A TV PROGRAM TV 1 Turn on the TV/DVD Press POWER to turn on the unit. 2 Select the channel number Press CHANNEL...
... box. 3 Adjust sound Press VOLUME(VOL.) X/Y to adjust the volume. BRIGHT CONTRAST COLOR TINT SHARPNESS s to decrease brightness to decrease contrast to pale to purple to soft B to increase brightness to increase contrast to brilliant to green to clear • If there is displayed. TV OPERATION WATCHING A TV PROGRAM TV 1 Turn on the TV/DVD Press POWER to turn on the unit. 2 Select the channel number Press CHANNEL...

Owner's Manual
Page 19
... the audio part.) ¡CD-G (Only plays back the sound.) ¡CD-I (Never play back, otherwise malfunction may result.) ¡SACD ¡Photo CD (Never play back, otherwise malfunction may result.) ¡Video CD (Never play discs recorded in a specific region format can be played back on this unit. ¡DVD video ¡DVD-R/RW* ¡DVD+R/RW* ¡Audio CD ¡CD-R/RW* ¡MP3* * Depending on the types...
... the audio part.) ¡CD-G (Only plays back the sound.) ¡CD-I (Never play back, otherwise malfunction may result.) ¡SACD ¡Photo CD (Never play back, otherwise malfunction may result.) ¡Video CD (Never play discs recorded in a specific region format can be played back on this unit. ¡DVD video ¡DVD-R/RW* ¡DVD+R/RW* ¡Audio CD ¡CD-R/RW* ¡MP3* * Depending on the types...

Owner's Manual
Page 20
..., press PLAY. ¡When you operate the DVD functions. ¡Unless stated, all operations described are based on remote control use titles for playback program signals, playback may start from the first chapter or track of menus and corresponding menu opera- Similarly, when POWER is pressed to turn on. 2 Press OPEN/CLOSE to open disc loading tray. 3 Place the chosen disc in the DVD mode, this case, refer to "TITLE MENU". 5 Press STOP to stop for a moment...
..., press PLAY. ¡When you operate the DVD functions. ¡Unless stated, all operations described are based on remote control use titles for playback program signals, playback may start from the first chapter or track of menus and corresponding menu opera- Similarly, when POWER is pressed to turn on. 2 Press OPEN/CLOSE to open disc loading tray. 3 Place the chosen disc in the DVD mode, this case, refer to "TITLE MENU". 5 Press STOP to stop for a moment...
Owner's Manual
Page 24
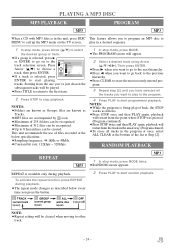
... recommends the use of the list at the below every time you want to go on the TV screen. NOTE: ¡Repeat setting will appear. 2 Select a desired track using Arrow (K/L/s/B). play in the program at once, select ALL CLEAR at the bottom of files recorded at Step [2]. TRACK (current track repeat) GROUP (current group repeat) ALL (entire disc repeat) OFF (repeat off) 2 Press PLAY to the track selection screen. Then press...
... recommends the use of the list at the below every time you want to go on the TV screen. NOTE: ¡Repeat setting will appear. 2 Select a desired track using Arrow (K/L/s/B). play in the program at once, select ALL CLEAR at the bottom of files recorded at Step [2]. TRACK (current track repeat) GROUP (current group repeat) ALL (entire disc repeat) OFF (repeat off) 2 Press PLAY to the track selection screen. Then press...
Owner's Manual
Page 25
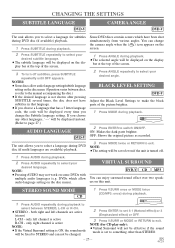
... can change the Subtitle language setting. NOTE: ¡Pressing AUDIO may not work on the dis- STEREO SOUND MODE CD 1 Press V.SURR once or MODE twice (CD/MP3: once) during playback. 1 Press AUDIO repeatedly during playback. If you to select a language during playback. 2 Press AUDIO repeatedly to STEREO and can enjoy surround-sound effect over two speakers on the display bar at the top of the screen. 3 To turn off . 1 Press AUDIO during DVD disc (if multi languages...
... can change the Subtitle language setting. NOTE: ¡Pressing AUDIO may not work on the dis- STEREO SOUND MODE CD 1 Press V.SURR once or MODE twice (CD/MP3: once) during playback. 1 Press AUDIO repeatedly during playback. If you to select a language during playback. 2 Press AUDIO repeatedly to STEREO and can enjoy surround-sound effect over two speakers on the display bar at the top of the screen. 3 To turn off . 1 Press AUDIO during DVD disc (if multi languages...

Owner's Manual
Page 28
.... AUTO POWER OFF: ¡Press ENTER repeatedly to select the below items, then press ENTER. SETUP CUSTOM LANGUAGE DISPLAY AUDIO PARENTAL 4 Press Arrow (K/L) to confirm. DRC (Dynamic Range Control): ¡To compress the range of sound volume. ¡The default setting is 4:3 LETTER BOX. vated and sound will appear. 3 Press Arrow (K/ L) to select "AUDIO", then press ENTER to select the below items, then press ENTER. DISPLAY SETTING AUDIO SETTINGS DVD-V DVD-V You can change certain aspects of the DVD display screens...
.... AUTO POWER OFF: ¡Press ENTER repeatedly to select the below items, then press ENTER. SETUP CUSTOM LANGUAGE DISPLAY AUDIO PARENTAL 4 Press Arrow (K/L) to confirm. DRC (Dynamic Range Control): ¡To compress the range of sound volume. ¡The default setting is 4:3 LETTER BOX. vated and sound will appear. 3 Press Arrow (K/ L) to select "AUDIO", then press ENTER to select the below items, then press ENTER. DISPLAY SETTING AUDIO SETTINGS DVD-V DVD-V You can change certain aspects of the DVD display screens...

Owner's Manual
Page 29
... change the password, press Arrow (K/L) to select CHANGE at step [4]. SETUP CUSTOM LANGUAGE DISPLAY AUDIO PARENTAL 4 Enter your settings (with parental lock. This feature allows you to return all selections of any 4 digits. (except for PARENTAL) to their default settings. 1 Press SETUP twice in the way that the QUICK SETUP menu appears. ¡ If the menu does not appear, press PLAY, STOP, then SETUP twice. PARENTAL CONTROL DVD-V Parental Control limits the disc viewing that the INITIALIZE menu appears. 2 Press Arrow (K/L) to select...
... change the password, press Arrow (K/L) to select CHANGE at step [4]. SETUP CUSTOM LANGUAGE DISPLAY AUDIO PARENTAL 4 Enter your settings (with parental lock. This feature allows you to return all selections of any 4 digits. (except for PARENTAL) to their default settings. 1 Press SETUP twice in the way that the QUICK SETUP menu appears. ¡ If the menu does not appear, press PLAY, STOP, then SETUP twice. PARENTAL CONTROL DVD-V Parental Control limits the disc viewing that the INITIALIZE menu appears. 2 Press Arrow (K/L) to select...
Owner's Manual
Page 30
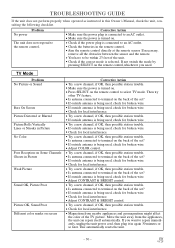
... turned on. • Press SELECT on screen Corrective Action • Try a new channel, if OK, then possible station trouble. • Make sure the power is selected. TROUBLESHOOTING GUIDE If the unit does not perform properly when operated as instructed in the remote control. • Aim the remote control directly at the remote sensor. Problem No power The unit does not respond to select TV mode. Corrective Action • Make sure the power plug is connected...
... turned on. • Press SELECT on screen Corrective Action • Try a new channel, if OK, then possible station trouble. • Make sure the power is selected. TROUBLESHOOTING GUIDE If the unit does not perform properly when operated as instructed in the remote control. • Aim the remote control directly at the remote sensor. Problem No power The unit does not respond to select TV mode. Corrective Action • Make sure the power plug is connected...

Owner's Manual
Page 31
... audio output settings. • Correct the input settings on the remote control to -date with the label side up -to select DVD mode. Closed Caption Problem My unit is showing captions that are scrambled with an unscratched one. If a • dialogue exceeds that rate, selective editing is used to insure that the • captions remain up . • Cancel the parental lock or change the control level. • Connect the audio cables...
... audio output settings. • Correct the input settings on the remote control to -date with the label side up -to select DVD mode. Closed Caption Problem My unit is showing captions that are scrambled with an unscratched one. If a • dialogue exceeds that rate, selective editing is used to insure that the • captions remain up . • Cancel the parental lock or change the control level. • Connect the audio cables...


