Owner's Manual
Page 1
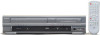
... 13-15. Supplied Accessory • Remote control • RF cable (NB108UD) (WPZ0901TM002) with Video Cassette Recorder SR90VE POWER REW F.FWD STOP/EJECT PLAY VCR RECORD OPEN/CLOSE CHANNEL DUBBING STOP PLAY OUTPUT SELECT VCR DVD DVD RECORD S-VIDEO VIDEO L - R Playing discs Editing Changing the SETUP menu VCR functions Others Español INSTRUCCIONES...
... 13-15. Supplied Accessory • Remote control • RF cable (NB108UD) (WPZ0901TM002) with Video Cassette Recorder SR90VE POWER REW F.FWD STOP/EJECT PLAY VCR RECORD OPEN/CLOSE CHANNEL DUBBING STOP PLAY OUTPUT SELECT VCR DVD DVD RECORD S-VIDEO VIDEO L - R Playing discs Editing Changing the SETUP menu VCR functions Others Español INSTRUCCIONES...
Owner's Manual
Page 4
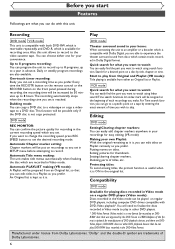
...from sources of intense heat.Avoid dusty or humid places. Reverse engineering or disassembly is not used. Symbol in VR mode Available to DVD-R discs Available to Audio CDs Available to CD-R/RW discs with MP3 files Available to VHS tapes Use only cassettes marked with a ...mild detergent solution. Symbol DVD-V Video DVD-RW VR DVD-RW DVD-R CD MP3 VCR First: DVD (Press:) First: VCR (Press:) Description Available to DVD Video discs Available to DVD-RW in Video mode Available to DVD-RW in this owner's manual Many functions of this unit ...
...from sources of intense heat.Avoid dusty or humid places. Reverse engineering or disassembly is not used. Symbol in VR mode Available to DVD-R discs Available to Audio CDs Available to CD-R/RW discs with MP3 files Available to VHS tapes Use only cassettes marked with a ...mild detergent solution. Symbol DVD-V Video DVD-RW VR DVD-RW DVD-R CD MP3 VCR First: DVD (Press:) First: VCR (Press:) Description Available to DVD Video discs Available to DVD-RW in Video mode Available to DVD-RW in this owner's manual Many functions of this unit ...
Owner's Manual
Page 5
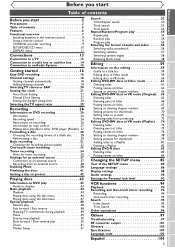
... Before you start 2 Precautions 2 Table of contents 5 Features 6 Functional overview 7 Installing batteries in the remote control 9 Using a remote control 9 VCR/DVD recorder switching 9 SETUP/DISC/CD menu 10 DISPLAY menu 11 Connections 13 Connection to a TV 13 Connection to a cable box or satellite box . . .... .14 Connection to an Audio System 15 Getting started 16 Easy DVD recording 16 Channel settings 18 Getting channels automatically 18 Adding/deleting channels 19 Selecting TV stereo or SAP 20 Setting the clock 21 Auto...
... Before you start 2 Precautions 2 Table of contents 5 Features 6 Functional overview 7 Installing batteries in the remote control 9 Using a remote control 9 VCR/DVD recorder switching 9 SETUP/DISC/CD menu 10 DISPLAY menu 11 Connections 13 Connection to a TV 13 Connection to a cable box or satellite box . . .... .14 Connection to an Audio System 15 Getting started 16 Easy DVD recording 16 Channel settings 18 Getting channels automatically 18 Adding/deleting channels 19 Selecting TV stereo or SAP 20 Setting the clock 21 Auto...
Owner's Manual
Page 6
... surround sound from an Original list, so that was approved by entering the exact amount of DVD playback devices, and there are DVDVideo players, DVD-ROM drives or other DVD players. * DVD-Video Format (Video mode) is reached. Automatic PLAYLIST making : The unit makes title menus ...automatically when finalizing the disc which is ON in Dolby Digital format. Editing DVD mode Setting/Clearing chapter markers: You can easily add chapter markers anywhere in your recordings for a desired point on Playlist variously as...
... surround sound from an Original list, so that was approved by entering the exact amount of DVD playback devices, and there are DVDVideo players, DVD-ROM drives or other DVD players. * DVD-Video Format (Video mode) is reached. Automatic PLAYLIST making : The unit makes title menus ...automatically when finalizing the disc which is ON in Dolby Digital format. Editing DVD mode Setting/Clearing chapter markers: You can easily add chapter markers anywhere in your recordings for a desired point on Playlist variously as...
Owner's Manual
Page 7
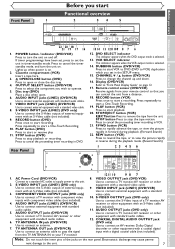
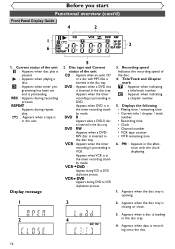
... start Connections Getting started Recording Front Panel 1 Before you wish to operate. 5. Press to turn the unit on . 2. OUTPUT SELECT button (DVD/VCR) Press to select the component you start Functional overview 2 34 5 POWER REW F.FWD STOP/EJECT PLAY VCR RECORD OPEN/CLOSE CHANNEL DUBBING...equipment with standard audio cables. 12. If timer programmings have been set, press to remove the tape from a distance. 18. DUBBING button (DVD/VCR) Press to start recording. STOP/EJECT button (VCR) EJECTbutton-Press to set in reverse during playback. (Forward Search) 22. R ...
... start Connections Getting started Recording Front Panel 1 Before you wish to operate. 5. Press to turn the unit on . 2. OUTPUT SELECT button (DVD/VCR) Press to select the component you start Functional overview 2 34 5 POWER REW F.FWD STOP/EJECT PLAY VCR RECORD OPEN/CLOSE CHANNEL DUBBING...equipment with standard audio cables. 12. If timer programmings have been set, press to remove the tape from a distance. 18. DUBBING button (DVD/VCR) Press to start recording. STOP/EJECT button (VCR) EJECTbutton-Press to set in reverse during playback. (Forward Search) 22. R ...
Owner's Manual
Page 8
... press to play forward step by step. Or during playback is paused, press to play or recording. 21. Press to select channel numbers. Number buttons (DVD/VCR) Press to cancel the timer standby mode, and turn the unit on -screen display. 4. Press repeatedly to clear the program once entered in slow..., press to play fast forward. • VCR mode Press to rapidly advance the tape, or view the picture rapidly in forward during playback or in DVD mode. (Refer to page 9) Press to reset the tape counter. 12. SEARCH MODE button (VCR) To call up and down. TIMER PROG. To change...
... press to play forward step by step. Or during playback is paused, press to play or recording. 21. Press to select channel numbers. Number buttons (DVD/VCR) Press to cancel the timer standby mode, and turn the unit on -screen display. 4. Press repeatedly to clear the program once entered in slow..., press to play fast forward. • VCR mode Press to rapidly advance the tape, or view the picture rapidly in forward during playback or in DVD mode. (Refer to page 9) Press to reset the tape counter. 12. SEARCH MODE button (VCR) To call up and down. TIMER PROG. To change...
Owner's Manual
Page 9
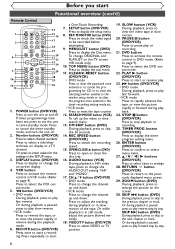
...REC hREV kPAUSE H P OTROIGPINMAELNU/ CSTOP PLABY gFWD ENTER K PLAYMLEINSUT SKIP G 60˚ OPEN/CLOSE CHANNEL DUBBING VCR OUTPUT SELECT STOP PLAY DVD DVD RECORD S-VIDEO VIDEO L - ton on the remote sensor of the remote control. Keep in the operating range of the unit. • ... GHI 4 PQRS 7 DISPLAY ABC 2 JKL 5 TUV 8 SPACE 0 VCR DEF 3 MNO CH 6 WXYZ VIDEO/TV 9 SLOW DVD PAUSE DVD button PLAY OUTPUT SELECT STOP VCR DVD DVD SELECT indicator REC/OTR SETUP TIMER PROG. AUDIO - VCR MODE Press the VCR button on the remote control. (Verify that the VCR...
...REC hREV kPAUSE H P OTROIGPINMAELNU/ CSTOP PLABY gFWD ENTER K PLAYMLEINSUT SKIP G 60˚ OPEN/CLOSE CHANNEL DUBBING VCR OUTPUT SELECT STOP PLAY DVD DVD RECORD S-VIDEO VIDEO L - ton on the remote sensor of the remote control. Keep in the operating range of the unit. • ... GHI 4 PQRS 7 DISPLAY ABC 2 JKL 5 TUV 8 SPACE 0 VCR DEF 3 MNO CH 6 WXYZ VIDEO/TV 9 SLOW DVD PAUSE DVD button PLAY OUTPUT SELECT STOP VCR DVD DVD SELECT indicator REC/OTR SETUP TIMER PROG. AUDIO - VCR MODE Press the VCR button on the remote control. (Verify that the VCR...
Owner's Manual
Page 10
... Video: To choose a line input to record to protect a disc from other video equipment. 5. Disc Protect (VR mode only) : Allows you to DVD discs from accidental editing or recording. 1. Program Play(Audio CD only): To activate the programmed playback feature. 10 SETUP/DISC/CD menu,Title list, and....), which allows you to change the playing status of disc during play discs as you need. 6. When playing back a DVD-Video disc (commercially available) or the finalized DVD-R disc, you to erase all main functions of the unit. Channel: To adjust the channel setting of the unit as ...
... Video: To choose a line input to record to protect a disc from other video equipment. 5. Disc Protect (VR mode only) : Allows you to DVD discs from accidental editing or recording. 1. Program Play(Audio CD only): To activate the programmed playback feature. 10 SETUP/DISC/CD menu,Title list, and....), which allows you to change the playing status of disc during play discs as you need. 6. When playing back a DVD-Video disc (commercially available) or the finalized DVD-R disc, you to erase all main functions of the unit. Channel: To adjust the channel setting of the unit as ...
Owner's Manual
Page 11
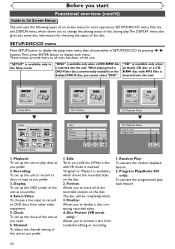
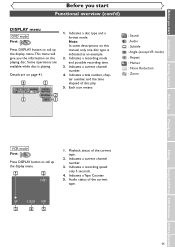
... are available while disc is indicated as an example. 2. Note: In some descriptions on page 41. 4 1 1 5 1 00:00:00 DVD-RW Video mode 2 SP 1:25 Rem. Indicates a current channel number. 3. Some operations are on this manual, only one disc type is playing.... Indicates a current channel number. 4. Before you start Functional overview (cont'd) DISPLAY menu DVD mode First: DVD Press DISPLAY button to call up the display menu. 1 2 CH21 1. Each icon means: : Search : Audio : Subtitle : Angle (except ...
... are available while disc is indicated as an example. 2. Note: In some descriptions on page 41. 4 1 1 5 1 00:00:00 DVD-RW Video mode 2 SP 1:25 Rem. Indicates a current channel number. 3. Some operations are on this manual, only one disc type is playing.... Indicates a current channel number. 4. Before you start Functional overview (cont'd) DISPLAY menu DVD mode First: DVD Press DISPLAY button to call up the display menu. 1 2 CH21 1. Each icon means: : Search : Audio : Subtitle : Angle (except ...
Owner's Manual
Page 12
... tray. : Appears when the timer recording is recording onto the disc. 12 Display message 1 5 2. Appears when data is proceeding in DVD. Appears when the disc tray is proceeding in VCR. Appears when the timer recording is closing or close. 2 4 3. Disc type and...paused. : Appears when playing a disc. : Appears when timer programming has been set and is proceeding. : Appears during recording process. : Appears during DVD to DVD duplication process. : Appears during repeat play. : Appears when a tape is in the disc tray. 4. Appears when a disc is opening. 2. ...
... tray. : Appears when the timer recording is recording onto the disc. 12 Display message 1 5 2. Appears when data is proceeding in DVD. Appears when the disc tray is proceeding in VCR. Appears when the timer recording is closing or close. 2 4 3. Disc type and...paused. : Appears when playing a disc. : Appears when timer programming has been set and is proceeding. : Appears during recording process. : Appears during DVD to DVD duplication process. : Appears during repeat play. : Appears when a tape is in the disc tray. 4. Appears when a disc is opening. 2. ...
Owner's Manual
Page 13
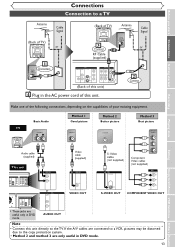
...connections, depending on the capabilities of this unit directly to the copy protection system. • Method 2 and method 3 are only useful in DVD mode. 13 Before you start Connections Getting started Recording Connections Connection to a TV Antenna Cable Signal (Back of TV) Antenna Cable Signal (...Back of TV) or 1 Disconnect 3 Connect RF Cable (supplied) DVD DIGITAL AUDIO AUDIO OUT OUT S-VIDEO COMPONENT VIDEO OUT Y L COAXIAL R CB IN CR OUT DVD/VCR AUDIO IN AUDIO OUT ANTENNA IN L L R R VIDEO IN VIDEO OUT OUT (Back of this unit...
...connections, depending on the capabilities of this unit directly to the copy protection system. • Method 2 and method 3 are only useful in DVD mode. 13 Before you start Connections Getting started Recording Connections Connection to a TV Antenna Cable Signal (Back of TV) Antenna Cable Signal (...Back of TV) or 1 Disconnect 3 Connect RF Cable (supplied) DVD DIGITAL AUDIO AUDIO OUT OUT S-VIDEO COMPONENT VIDEO OUT Y L COAXIAL R CB IN CR OUT DVD/VCR AUDIO IN AUDIO OUT ANTENNA IN L L R R VIDEO IN VIDEO OUT OUT (Back of this unit...
Owner's Manual
Page 14
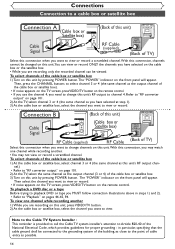
...may watch one channel while recording another . • You may not view or record a scrambled channel. Connection B (Back of this unit) Cable Signal DVD/VCR ANTENNA IN (Cable box or Satellite box) OUT E IN OUT RF Cable (supplied) RF Cable (Back of TV) Select this connection when you want... TV screen, press VIDEO/TV button on the front panel will appear. Connections Connection to a cable box or satellite box Connection A (Cable box or DVD/VCR Satellite box) ANTENNA IN IN OUT OUT Cable Signal (Back of this unit) RF Cable (supplied) E (Back of TV) Select this connection...
...may watch one channel while recording another . • You may not view or record a scrambled channel. Connection B (Back of this unit) Cable Signal DVD/VCR ANTENNA IN (Cable box or Satellite box) OUT E IN OUT RF Cable (supplied) RF Cable (Back of TV) Select this connection when you want... TV screen, press VIDEO/TV button on the front panel will appear. Connections Connection to a cable box or satellite box Connection A (Cable box or DVD/VCR Satellite box) ANTENNA IN IN OUT OUT Cable Signal (Back of this unit) RF Cable (supplied) E (Back of TV) Select this connection...
Owner's Manual
Page 15
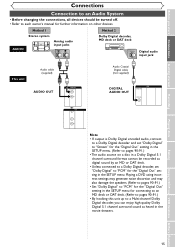
Playing a DVD using incorrect settings may generate noise distortion and may also damage the speakers. (Refer to pages 90-91.) • Set "Dolby Digital" to "PCM" for ... deck or DAT deck COAXIAL Digital audio input jack This unit Audio cable (supplied) AUDIO OUT DVD/VCR AUDIO OUT L R or DVD AUDIO OUT L R Audio Coaxial Digital cable (not supplied) DIGITAL AUDIO OUT DIGITAL AUDIO OUT DVD COAXIAL Note • If output is Dolby Digital encoded audio, connect to a Dolby Digital decoder and...
Playing a DVD using incorrect settings may generate noise distortion and may also damage the speakers. (Refer to pages 90-91.) • Set "Dolby Digital" to "PCM" for ... deck or DAT deck COAXIAL Digital audio input jack This unit Audio cable (supplied) AUDIO OUT DVD/VCR AUDIO OUT L R or DVD AUDIO OUT L R Audio Coaxial Digital cable (not supplied) DIGITAL AUDIO OUT DIGITAL AUDIO OUT DVD COAXIAL Note • If output is Dolby Digital encoded audio, connect to a Dolby Digital decoder and...
Owner's Manual
Page 16
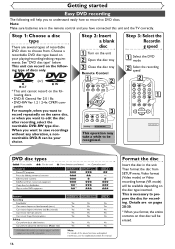
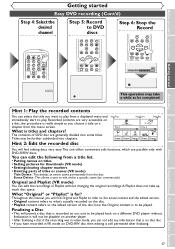
... type based on your choice. patible For example, when you want to record repeatedly on the same disc, or when you want to DVD discs. DVD disc types . Format the disc Insert the disc in the remote control and you to understand easily how to record to edit the disc ...2 Select the recording speed 2 POWER REC SPEED AUDIO OPEN/CLOSE .@/: 1 GHI 4 PQRS 7 DISPLAY ABC 2 JKL 5 TUV 8 SPACE 0 VCR DEF 3 MNO CH 6 WXYZ VIDEO/TV 9 SLOW DVD PAUSE 1 PLAY STOP SP 2:01 Rem. Note: Make sure batteries are on pages 28-30. * When you format, the entire contents on the following discs...
... type based on your choice. patible For example, when you want to record repeatedly on the same disc, or when you want to DVD discs. DVD disc types . Format the disc Insert the disc in the remote control and you to understand easily how to record to edit the disc ...2 Select the recording speed 2 POWER REC SPEED AUDIO OPEN/CLOSE .@/: 1 GHI 4 PQRS 7 DISPLAY ABC 2 JKL 5 TUV 8 SPACE 0 VCR DEF 3 MNO CH 6 WXYZ VIDEO/TV 9 SLOW DVD PAUSE 1 PLAY STOP SP 2:01 Rem. Note: Make sure batteries are on pages 28-30. * When you format, the entire contents on the following discs...
Owner's Manual
Page 17
... version of the disc; without changing the original recordings.A Playlist does not take a while to be completed. Recorded contents are possible only with DVD-R/RW discs. Throughout this manual, you will find Original and Playlist to refer to the actual content and the edited version. • Original ...a disc if the recording was in Playlist without finalization it will permit a disc that disc. • If you have recorded in VR mode on DVD-RW disc then editing is really simple as you choose a title on a disc, the procedure is still permitted after finalizing. What "Original" or ...
... version of the disc; without changing the original recordings.A Playlist does not take a while to be completed. Recorded contents are possible only with DVD-R/RW discs. Throughout this manual, you will find Original and Playlist to refer to the actual content and the edited version. • Original ...a disc if the recording was in Playlist without finalization it will permit a disc that disc. • If you have recorded in VR mode on DVD-RW disc then editing is really simple as you choose a title on a disc, the procedure is still permitted after finalizing. What "Original" or ...
Owner's Manual
Page 18
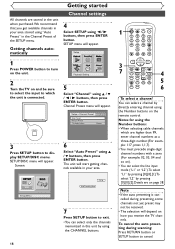
...The selection will depend on how you get available channels in your area stored using "Auto Preset" in your area. Setup > Channel Preset VCR DVD Auto Preset Manual Preset TV Audio Select Stereo 3 Press SETUP button to turn on the unit. The unit will appear. Setup Menu CH 18 Auto.... 18 1 POWER REC SPEED AUDIO OPEN/CLOSE .@/: 1 GHI 4 PQRS 7 DISPLAY ABC 2 JKL 5 TUV 8 SPACE 0 VCR DEF 3 MNO CH 6 WXYZ VIDEO/TV 9 SLOW DVD PAUSE 3 7 PLAY STOP REC/OTR SETUP TIMER PROG. Notes for using the Number buttons on page 38. celled during scanning: Press RETURN button or SETUP...
...The selection will depend on how you get available channels in your area stored using "Auto Preset" in your area. Setup > Channel Preset VCR DVD Auto Preset Manual Preset TV Audio Select Stereo 3 Press SETUP button to turn on the unit. The unit will appear. Setup Menu CH 18 Auto.... 18 1 POWER REC SPEED AUDIO OPEN/CLOSE .@/: 1 GHI 4 PQRS 7 DISPLAY ABC 2 JKL 5 TUV 8 SPACE 0 VCR DEF 3 MNO CH 6 WXYZ VIDEO/TV 9 SLOW DVD PAUSE 3 7 PLAY STOP REC/OTR SETUP TIMER PROG. Notes for using the Number buttons on page 38. celled during scanning: Press RETURN button or SETUP...

Owner's Manual
Page 19
...REC SPEED AUDIO OPEN/CLOSE .@/: 1 GHI 4 PQRS 7 DISPLAY ABC 2 JKL 5 TUV 8 SPACE 0 VCR DEF 3 MNO CH 6 WXYZ VIDEO/TV 9 SLOW DVD PAUSE PLAY Screen: 1 STOP REC/OTR SETUP TIMER PROG. 5 7 REC MONITOR ENTER MENU/LIST TOP MENU RETURN CLEAR/C-RESET ZOOM SKIP SKIP 2 3 Setup Menu ...Select the channel number to display SETUP/DISC menu. Setup > Channel Preset VCR DVD Auto Preset Manual Preset TV Audio Select Stereo 6 Select "Add" or "Delete" using K / L buttons, then press ENTER button. Manual Preset menu...
...REC SPEED AUDIO OPEN/CLOSE .@/: 1 GHI 4 PQRS 7 DISPLAY ABC 2 JKL 5 TUV 8 SPACE 0 VCR DEF 3 MNO CH 6 WXYZ VIDEO/TV 9 SLOW DVD PAUSE PLAY Screen: 1 STOP REC/OTR SETUP TIMER PROG. 5 7 REC MONITOR ENTER MENU/LIST TOP MENU RETURN CLEAR/C-RESET ZOOM SKIP SKIP 2 3 Setup Menu ...Select the channel number to display SETUP/DISC menu. Setup > Channel Preset VCR DVD Auto Preset Manual Preset TV Audio Select Stereo 6 Select "Add" or "Delete" using K / L buttons, then press ENTER button. Manual Preset menu...
Owner's Manual
Page 20
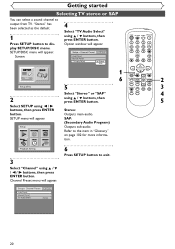
...SPEED AUDIO OPEN/CLOSE .@/: 1 GHI 4 PQRS 7 DISPLAY ABC 2 JKL 5 TUV 8 SPACE 0 VCR DEF 3 MNO CH 6 WXYZ VIDEO/TV 9 SLOW DVD PAUSE PLAY Setup Menu 2 Select SETUP using K / L buttons, then press ENTER button. Setup 5 Select "Stereo" or "SAP" using { / B ...Playback Setting 3 Select "Channel" using K / L buttons, then press ENTER button. Option window will appear. Stereo: Outputs main-audio. Setup > Channel Preset VCR DVD Auto Preset Manual Preset TV Audio Select Stereo 20 SAP: (Secondary Audio Program) Outputs sub-audio. Screen: 4 Select "TV Audio Select" using K / L /...
...SPEED AUDIO OPEN/CLOSE .@/: 1 GHI 4 PQRS 7 DISPLAY ABC 2 JKL 5 TUV 8 SPACE 0 VCR DEF 3 MNO CH 6 WXYZ VIDEO/TV 9 SLOW DVD PAUSE PLAY Setup Menu 2 Select SETUP using K / L buttons, then press ENTER button. Setup 5 Select "Stereo" or "SAP" using { / B ...Playback Setting 3 Select "Channel" using K / L buttons, then press ENTER button. Option window will appear. Stereo: Outputs main-audio. Setup > Channel Preset VCR DVD Auto Preset Manual Preset TV Audio Select Stereo 20 SAP: (Secondary Audio Program) Outputs sub-audio. Screen: 4 Select "TV Audio Select" using K / L /...
Owner's Manual
Page 21
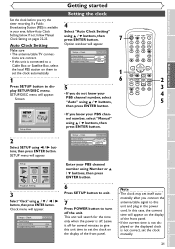
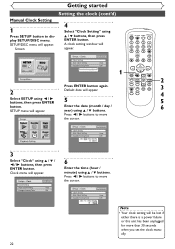
...PBS channel number, select "Manual" using K / L buttons, then press ENTER button. Setup > Clock Clock Setting Auto Clock Setting Daylight Saving Time VCR DVD OFF AAuuttoo OMfaf nual 7 POWER REC SPEED AUDIO OPEN/CLOSE .@/: 1 GHI 4 PQRS 7 DISPLAY ABC 2 JKL 5 TUV 8 SPACE 0 VCR DEF ... ZOOM SKIP SEARCH MODE CM SKIP SKIP 3 4 5 then press ENTER button. Setup > Clock Clock Setting Auto Clock Setting Daylight Saving Time VCR DVD Set CCAOhOAMHuafu1FaftntoFnonueallNo. Playback Setting 3 Select "Clock" using Number or K / L buttons, then press ENTER button. Setup > Clock Clock Setting Auto ...
...PBS channel number, select "Manual" using K / L buttons, then press ENTER button. Setup > Clock Clock Setting Auto Clock Setting Daylight Saving Time VCR DVD OFF AAuuttoo OMfaf nual 7 POWER REC SPEED AUDIO OPEN/CLOSE .@/: 1 GHI 4 PQRS 7 DISPLAY ABC 2 JKL 5 TUV 8 SPACE 0 VCR DEF ... ZOOM SKIP SEARCH MODE CM SKIP SKIP 3 4 5 then press ENTER button. Setup > Clock Clock Setting Auto Clock Setting Daylight Saving Time VCR DVD Set CCAOhOAMHuafu1FaftntoFnonueallNo. Playback Setting 3 Select "Clock" using Number or K / L buttons, then press ENTER button. Setup > Clock Clock Setting Auto ...
Owner's Manual
Page 22
... REC SPEED AUDIO OPEN/CLOSE .@/: 1 GHI 4 PQRS 7 DISPLAY ABC 2 JKL 5 TUV 8 SPACE 0 VCR DEF 3 MNO CH 6 WXYZ VIDEO/TV 9 SLOW DVD PAUSE 1 PLAY STOP REC/OTR SETUP TIMER PROG. Press { / B buttons to move the cursor. Press { / B buttons to display SETUP/DISC menu. SETUP menu... again. REC MONITOR ENTER MENU/LIST TOP MENU RETURN CLEAR/C-RESET ZOOM SKIP SEARCH MODE CM SKIP SKIP 2 3 4 5 6 Playback Setting Setup > Clock VCR DVD Clock Setting Auto Clock Setting Daylight Saving Time JAN / 12 / 2004 (MON) 12 : 00AM Auto ON 3 Select "Clock" using K / L buttons, ...
... REC SPEED AUDIO OPEN/CLOSE .@/: 1 GHI 4 PQRS 7 DISPLAY ABC 2 JKL 5 TUV 8 SPACE 0 VCR DEF 3 MNO CH 6 WXYZ VIDEO/TV 9 SLOW DVD PAUSE 1 PLAY STOP REC/OTR SETUP TIMER PROG. Press { / B buttons to move the cursor. Press { / B buttons to display SETUP/DISC menu. SETUP menu... again. REC MONITOR ENTER MENU/LIST TOP MENU RETURN CLEAR/C-RESET ZOOM SKIP SEARCH MODE CM SKIP SKIP 2 3 4 5 6 Playback Setting Setup > Clock VCR DVD Clock Setting Auto Clock Setting Daylight Saving Time JAN / 12 / 2004 (MON) 12 : 00AM Auto ON 3 Select "Clock" using K / L buttons, ...


