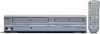

Owner's Manual
Page 1
... Default Setting 22 Information ■ Troubleshooting Guide 23 ■ Specifications 24 ■ Language List 24 ■ Limited Warranty 24 Quick Use Guide 27 Basic TV Connection Cable Antenna Signal or Disconnect (Back of TV) Cable Signal Antenna (Back of Electrical Shock and Fire 4 Moisture Condensation Warning 4 About Copyright 4 Symbol Used in From DVD/VCR From TV Owner's Manual Please read before using this owner's manual or to "Connections" on page 5. DVD/CD Player with Video Cassette Recorder CWF804 Precautions Setup Information DVD Functions VCR Functions...
... Default Setting 22 Information ■ Troubleshooting Guide 23 ■ Specifications 24 ■ Language List 24 ■ Limited Warranty 24 Quick Use Guide 27 Basic TV Connection Cable Antenna Signal or Disconnect (Back of TV) Cable Signal Antenna (Back of Electrical Shock and Fire 4 Moisture Condensation Warning 4 About Copyright 4 Symbol Used in From DVD/VCR From TV Owner's Manual Please read before using this owner's manual or to "Connections" on page 5. DVD/CD Player with Video Cassette Recorder CWF804 Precautions Setup Information DVD Functions VCR Functions...

Owner's Manual
Page 3
... of time, unplug it can result in installation such as the original part. Damage Requiring Service - Power Sources - Object and Liquid Entry - Do not attempt to dangerous voltage or other ). b. Ventilation - This is damaged. Power Cord Protection - d. Outdoor Antenna Grounding - Retain Instructions- This plug will prevent damage to the video product due to be sure the service technician has used replacement parts specified...
... of time, unplug it can result in installation such as the original part. Damage Requiring Service - Power Sources - Object and Liquid Entry - Do not attempt to dangerous voltage or other ). b. Ventilation - This is damaged. Power Cord Protection - d. Outdoor Antenna Grounding - Retain Instructions- This plug will prevent damage to the video product due to be sure the service technician has used replacement parts specified...
Owner's Manual
Page 4
... your local Audio/Video store and purchase a good quality VHS Video Head Cleaner. 2. DISC HANDLING ¡Handle the discs so that the cable ground should be connected to the grounding system of the building, as close to locate an Authorized Service Center. If a streaky or snowy picture appears during playback, the video heads in its inside gets dry. Please visit your DVD/VCR may occur...
... your local Audio/Video store and purchase a good quality VHS Video Head Cleaner. 2. DISC HANDLING ¡Handle the discs so that the cable ground should be connected to the grounding system of the building, as close to locate an Authorized Service Center. If a streaky or snowy picture appears during playback, the video heads in its inside gets dry. Please visit your DVD/VCR may occur...

Owner's Manual
Page 5
... TV screen, press the VCR/TV button on the remote control. 4) Press the PLAY button once. 5) After a few seconds, press the PLAY button on the DVD/VCR for 3 seconds. • The RF output channel will change when you will be delivered. Discs recorded in other color systems such as PAL cannot be played back. *2: Certain DVD-Video discs do not operate as described in this case, stop playback. -5- The sound recorded on the high density Super Audio CD...
... TV screen, press the VCR/TV button on the remote control. 4) Press the PLAY button once. 5) After a few seconds, press the PLAY button on the DVD/VCR for 3 seconds. • The RF output channel will change when you will be delivered. Discs recorded in other color systems such as PAL cannot be played back. *2: Certain DVD-Video discs do not operate as described in this case, stop playback. -5- The sound recorded on the high density Super Audio CD...
Owner's Manual
Page 6
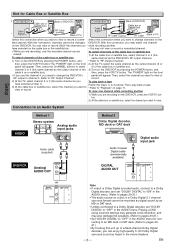
... recorded channel can enjoy high-quality 5.1ch Dolby Digital surround sound as heard in the AUDIO menu. then, press the VCR/TV button. The "POWER" light on the front • If you use the channel 4, you need to change channels on the bled channel. Connection to an Audio System Setup AUDIO Method 1 Stereo system Analog audio input jacks L R Audio cable (supplied) DVD/VCR (Analog) AUDIO OUT DVD/VCR VCR AUDIO OUT L AUDIO IN R VIDEO OUT VIDEO IN or DIGITAL AUDIO OUT DVD AUDIO OUT S-VIDEO OUT COMPONENT VIDEO OUT Y L CB COAXIAL R CR Method 2 Dolby Digital...
... recorded channel can enjoy high-quality 5.1ch Dolby Digital surround sound as heard in the AUDIO menu. then, press the VCR/TV button. The "POWER" light on the front • If you use the channel 4, you need to change channels on the bled channel. Connection to an Audio System Setup AUDIO Method 1 Stereo system Analog audio input jacks L R Audio cable (supplied) DVD/VCR (Analog) AUDIO OUT DVD/VCR VCR AUDIO OUT L AUDIO IN R VIDEO OUT VIDEO IN or DIGITAL AUDIO OUT DVD AUDIO OUT S-VIDEO OUT COMPONENT VIDEO OUT Y L CB COAXIAL R CR Method 2 Dolby Digital...

Owner's Manual
Page 8
...; To select the recording speed. DVD • To select the DVD output mode. • To select the DVD output mode. • To activate the remote control • To activate the remote control in program input. • To clear the numbers entered incorrectly. • To display the current disc mode. • To exit the VCR Menu. • To reset the tape counter. • To display the current time, tape counter, and channel. SKIP/CH. RESET SUBTITLE T-SET ANGLE REPEAT A-B Installing the Batteries for a timer recording. •...
...; To select the recording speed. DVD • To select the DVD output mode. • To select the DVD output mode. • To activate the remote control • To activate the remote control in program input. • To clear the numbers entered incorrectly. • To display the current disc mode. • To exit the VCR Menu. • To reset the tape counter. • To display the current time, tape counter, and channel. SKIP/CH. RESET SUBTITLE T-SET ANGLE REPEAT A-B Installing the Batteries for a timer recording. •...

Owner's Manual
Page 9
... the OUTPUT button on the remote control. EN VIDEO POWER AUDIO REW F.FWD STOP/EJECT PLAY TIMER REC REC /OTR OPEN/CLOSE CHANNEL VCR OUTPUT DVD DISC IN SKIP/REV STOP PLAY FWD/SKIP Lights up when the inserted disc is inserted. Flashes when a recording is installed. You MUST select the correct mode on the front panel DOES NOT switch the mode of a VCR and a DVD player, you must select first which component you wish to operate with the OUTPUT button. SEARCH MODE CLEAR/ C. Setup Front Panel Display Lights up during a recording. Lights up...
... the OUTPUT button on the remote control. EN VIDEO POWER AUDIO REW F.FWD STOP/EJECT PLAY TIMER REC REC /OTR OPEN/CLOSE CHANNEL VCR OUTPUT DVD DISC IN SKIP/REV STOP PLAY FWD/SKIP Lights up when the inserted disc is inserted. Flashes when a recording is installed. You MUST select the correct mode on the front panel DOES NOT switch the mode of a VCR and a DVD player, you must select first which component you wish to operate with the OUTPUT button. SEARCH MODE CLEAR/ C. Setup Front Panel Display Lights up during a recording. Lights up...
Owner's Manual
Page 10
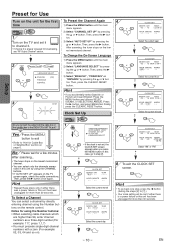
.... Clock Set Up VCR 1 MENU VCR -MENU- To Change the On-Screen Language 1) Press the MENU button until the main menu appears. 2) Select "CHANNEL SET UP" by directly entering channel using the Number buttons on the lowest memorized channel. Finally, press the CLEAR/C.RESET button. Select the current hour 6 or CLOCK SET MONTH DAY YEAR 0 3 / 1 5 MON 2 0 0 4 HOUR MINUTE AM/PM 05 : 40 - - YES Yes Press the MENU button to exit • Refer to "Hint for Cable Box or Satellite Box" section...
.... Clock Set Up VCR 1 MENU VCR -MENU- To Change the On-Screen Language 1) Press the MENU button until the main menu appears. 2) Select "CHANNEL SET UP" by directly entering channel using the Number buttons on the lowest memorized channel. Finally, press the CLEAR/C.RESET button. Select the current hour 6 or CLOCK SET MONTH DAY YEAR 0 3 / 1 5 MON 2 0 0 4 HOUR MINUTE AM/PM 05 : 40 - - YES Yes Press the MENU button to exit • Refer to "Hint for Cable Box or Satellite Box" section...
Owner's Manual
Page 11
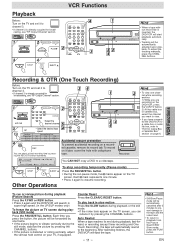
... select the channel you want to view. • If you have connected the DVD/VCR to a cable box or satellite box, refer to "Hint for Cable Box or Satellite Box" section on page 6. Other Operations To cue or review picture during playback (Still mode) Press the PAUSE/STILL button. Auto Rewind When a tape reaches its record tab. After rewinding finishes, the DVD/VCR will start V playback automati- VCR VCR 1 2 Remote Control TV Screen 2 PLAYB PLAY 3 STOP STOP 4 OPEN/CLOSE /EJECT EJECT A 4 1 POWER SPEED OPEN/CLOSE AUDIO /EJECT 1 2 4 5 7 8 0 DISPLAY VCR 3 SKIP/CH. 6 VCR...
... select the channel you want to view. • If you have connected the DVD/VCR to a cable box or satellite box, refer to "Hint for Cable Box or Satellite Box" section on page 6. Other Operations To cue or review picture during playback (Still mode) Press the PAUSE/STILL button. Auto Rewind When a tape reaches its record tab. After rewinding finishes, the DVD/VCR will start V playback automati- VCR VCR 1 2 Remote Control TV Screen 2 PLAYB PLAY 3 STOP STOP 4 OPEN/CLOSE /EJECT EJECT A 4 1 POWER SPEED OPEN/CLOSE AUDIO /EJECT 1 2 4 5 7 8 0 DISPLAY VCR 3 SKIP/CH. 6 VCR...

Owner's Manual
Page 12
... digit you want to change to timer stand-by pressing the K or L button. Then, continue with its record tab into the DVD/VCR. RESET 10 SUBTITLE T-SET • TIMER REC light on for timer recording. - 12 - 1 2 4 5 7 8 0 DISPLAY VCR 3 SKIP/CH. 6 VCR/TV 9 SLOW +10 DVD PAUSE 1 4 REC/OTR PLAY STOP MENU ENTER SETUP TOP MENU RETURN MODE V.SURR. The DVD/VCR will appear on the remote control. 2) Select main menu by pressing the MENU button. 3) Select "TIMER PROGRAMMING" by pressing the B or s button. Then, enter correct numbers...
... digit you want to change to timer stand-by pressing the K or L button. Then, continue with its record tab into the DVD/VCR. RESET 10 SUBTITLE T-SET • TIMER REC light on for timer recording. - 12 - 1 2 4 5 7 8 0 DISPLAY VCR 3 SKIP/CH. 6 VCR/TV 9 SLOW +10 DVD PAUSE 1 4 REC/OTR PLAY STOP MENU ENTER SETUP TOP MENU RETURN MODE V.SURR. The DVD/VCR will appear on the remote control. 2) Select main menu by pressing the MENU button. 3) Select "TIMER PROGRAMMING" by pressing the B or s button. Then, enter correct numbers...

Owner's Manual
Page 13
... can use a video disc player, satellite receiver, or other audio/video component with its record tab into the playing VCR. 2) Insert a tape with A/V outputs. • "L1" or "L2" is found before the lowest memorized channel. (Example: CH02) • "L2" input jacks are set the TIMER off , the VCR will become STANDBY status). • When all timer settings will stop, eject the tape, and switch to use the DVD player during dubbing, use the input jacks on the DVD. Standard audio cables...
... can use a video disc player, satellite receiver, or other audio/video component with its record tab into the playing VCR. 2) Insert a tape with A/V outputs. • "L1" or "L2" is found before the lowest memorized channel. (Example: CH02) • "L2" input jacks are set the TIMER off , the VCR will become STANDBY status). • When all timer settings will stop, eject the tape, and switch to use the DVD player during dubbing, use the input jacks on the DVD. Standard audio cables...

Owner's Manual
Page 15
... the correct channel. EN Resume DVD-V CD MP3 Press the STOP button. ing playback to change forward or reverse playback speed. DVD Functions Playback Before: Turn on the TV screen. Press appropriate Number buttons or use the SKIP/REV, FWD/SKIP buttons on the TV screen when the operation is pressed during the pause mode. Hint • Set "STILL MODE" to "FIELD" in the Display menu if pictures in the pause mode are set to specific programs. • During...
... the correct channel. EN Resume DVD-V CD MP3 Press the STOP button. ing playback to change forward or reverse playback speed. DVD Functions Playback Before: Turn on the TV screen. Press appropriate Number buttons or use the SKIP/REV, FWD/SKIP buttons on the TV screen when the operation is pressed during the pause mode. Hint • Set "STILL MODE" to "FIELD" in the Display menu if pictures in the pause mode are set to specific programs. • During...

Owner's Manual
Page 19
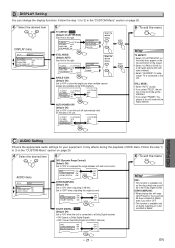
... select a sound mode during DVD playback. 1 PLAY 1.ENG/6 DVD DVD-V This unit allows you to select an audio language (if multiple languages are active) L-CH (left channel is active) R-CH (right channel is active) Note ¡If the Virtual Surround setting is set subtitle ON/OFF 1 PLAY 1.ENG/6 SUBTITLE T-SET 2 OFF Each time you press the AUDIO button; If you choose a language that language. OFF: Shows the original picture as recorded. 3 RETURN - 19 - Virtual Surround DVD-V CD DVD MP3 You can change...
... select a sound mode during DVD playback. 1 PLAY 1.ENG/6 DVD DVD-V This unit allows you to select an audio language (if multiple languages are active) L-CH (left channel is active) R-CH (right channel is active) Note ¡If the Virtual Surround setting is set subtitle ON/OFF 1 PLAY 1.ENG/6 SUBTITLE T-SET 2 OFF Each time you press the AUDIO button; If you choose a language that language. OFF: Shows the original picture as recorded. 3 RETURN - 19 - Virtual Surround DVD-V CD DVD MP3 You can change...

Owner's Manual
Page 20
...DVD Functions LANGUAGE menu SETUP LANGUAGE AUDIO SUBTITLE DISC MENU PLAYER MENU ORIGINAL OFF ENGLISH ENGLISH DISPLAY menu SETUP DISPLAY TV ASPECT STILL MODE ANGLE ICON AUTO POWER OFF 4:3 LETTER BOX AUTO ON ON AUDIO menu SETUP AUDIO DRC ON DOWN SAMPLING ON DOLBY DIGITAL ON PARENTAL menu SETUP PARENTAL PASSWORD Please enter a 4-digit password. TLE or DISC MENU screen, press four-digit number to enter the code for the desired language. (Refer to the language code list on page 24.) • Only the languages supported by the disc can change the DVD player's settings. 1 STOP...
...DVD Functions LANGUAGE menu SETUP LANGUAGE AUDIO SUBTITLE DISC MENU PLAYER MENU ORIGINAL OFF ENGLISH ENGLISH DISPLAY menu SETUP DISPLAY TV ASPECT STILL MODE ANGLE ICON AUTO POWER OFF 4:3 LETTER BOX AUTO ON ON AUDIO menu SETUP AUDIO DRC ON DOWN SAMPLING ON DOLBY DIGITAL ON PARENTAL menu SETUP PARENTAL PASSWORD Please enter a 4-digit password. TLE or DISC MENU screen, press four-digit number to enter the code for the desired language. (Refer to the language code list on page 24.) • Only the languages supported by the disc can change the DVD player's settings. 1 STOP...
Owner's Manual
Page 21
... DOLBY DIGITAL ON ON ENTER DOLBY DIGITAL: QUICK (Default: ON) Set to "ON" when the unit is connected to a Dolby Digital receiver. • ON: Outputs a Dolby Digital Signals • OFF: Convert the Dolby Digital into PCM (2 channel) DRC ON ON DOWN SAMPLING ON ON DOLBY DIGITAL ON OFF ENTER Hint DRC: • This function is available only on the discs which are available during the playback of the screen. • Select "4:3 PAN & SCAN" for your equipment. STILL MODE: • Select "AUTO...
... DOLBY DIGITAL ON ON ENTER DOLBY DIGITAL: QUICK (Default: ON) Set to "ON" when the unit is connected to a Dolby Digital receiver. • ON: Outputs a Dolby Digital Signals • OFF: Convert the Dolby Digital into PCM (2 channel) DRC ON ON DOWN SAMPLING ON ON DOLBY DIGITAL ON OFF ENTER Hint DRC: • This function is available only on the discs which are available during the playback of the screen. • Select "4:3 PAN & SCAN" for your equipment. STILL MODE: • Select "AUTO...
Owner's Manual
Page 22
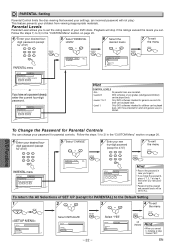
... ALL CHANGE ENTER 6 Enter your new four-digit password (except for 4737) 1 2 3 4 5 6 7 8 9 0 SETUP PARENTAL PASSWORD Please enter a 4-digit password. 7 To exit the menu SETUP ENTER Hint • Record the password in the "CUSTOM Menu" section on page 20. 4 Enter your desired four- Parental Levels Parental Level allows you to set to the Default Setting 1 STOP SETUP SETUP QUICK CUSTOM INITIALIZE 2 or Select INITIALIZE SETUP QUICK CUSTOM INITIALIZE ENTER 3 or Select "YES" SETUP Initialize? D PARENTAL Setting Parental Control limits the disc viewing...
... ALL CHANGE ENTER 6 Enter your new four-digit password (except for 4737) 1 2 3 4 5 6 7 8 9 0 SETUP PARENTAL PASSWORD Please enter a 4-digit password. 7 To exit the menu SETUP ENTER Hint • Record the password in the "CUSTOM Menu" section on page 20. 4 Enter your desired four- Parental Levels Parental Level allows you to set to the Default Setting 1 STOP SETUP SETUP QUICK CUSTOM INITIALIZE 2 or Select INITIALIZE SETUP QUICK CUSTOM INITIALIZE ENTER 3 or Select "YES" SETUP Initialize? D PARENTAL Setting Parental Control limits the disc viewing...
Owner's Manual
Page 23
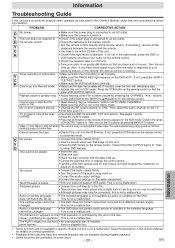
... picture. No sound. • Connect the audio cables firmly. • Turn the power of a video tape. panel flashes. V • Aim the remote control directly at the remote sensor. If not, press the SUBTI- R Cannot go into Record mode. • Make sure the VCR clock is not a malfunction. TV programs cannot be necessary. Check if the green VCR OUTPUT light is set up , then. V • Connect the video cables firmly. • Insert a correct video disc that you hear some signal sound...
... picture. No sound. • Connect the audio cables firmly. • Turn the power of a video tape. panel flashes. V • Aim the remote control directly at the remote sensor. If not, press the SUBTI- R Cannot go into Record mode. • Make sure the VCR clock is not a malfunction. TV programs cannot be necessary. Check if the green VCR OUTPUT light is set up , then. V • Connect the video cables firmly. • Insert a correct video disc that you hear some signal sound...

Owner's Manual
Page 24
... WARRANTY INSPECTIONS AND REPAIRS MUST BE PERFORMED BY AUTHORIZED SERVICE FACILITY. ATTENTION: FUNAI CORP. will provide parts to replace defective parts without notice. • If there is a discrepancy between languages, the default language will be English. FUNAI CORP. To locate your nearest AUTHORIZED SERVICE FACILITY or for Picture Tube. Specifications Video Heads : Four Heads Output signal format : NTSC color Power source : 120 V AC +/- 10%, 60 Hz +/- 0.5% Power consumption : 21 W (standby: 3.6W) Operating...
... WARRANTY INSPECTIONS AND REPAIRS MUST BE PERFORMED BY AUTHORIZED SERVICE FACILITY. ATTENTION: FUNAI CORP. will provide parts to replace defective parts without notice. • If there is a discrepancy between languages, the default language will be English. FUNAI CORP. To locate your nearest AUTHORIZED SERVICE FACILITY or for Picture Tube. Specifications Video Heads : Four Heads Output signal format : NTSC color Power source : 120 V AC +/- 10%, 60 Hz +/- 0.5% Power consumption : 21 W (standby: 3.6W) Operating...
Owner's Manual
Page 25
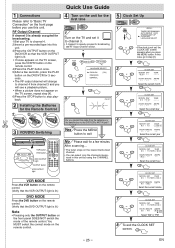
... PLAY button on the TV screen, repeat step [4]. 6)Press the STOP button to stop playback. 2 Installing the Batteries for the Remote Control 1 2 3 3 VCR/DVD Switching VIDEO POWER AUDIO REW F.FWD STOP/EJECT PLAY TIMER REC REC /OTR OPEN/CLOSE CHANNEL VCR OUTPUT DVD DISC IN SKIP/REV STOP PLAY FWD/SKIP VCR button VCR OUTPUT DVD SKI DVD button DVD OUTPUT light OUTPUT button POWER SPEED OPEN/CLOSE AUDIO /EJECT 1 2 4 5 7 8 0 DISPLAY VCR 3 SKIP/CH. 6 VCR/TV 9 SLOW +10 DVD PAUSE REC/OTR PLAY STOP MENU ENTER SETUP TOP MENU RETURN MODE V.SURR. After scanning...
... PLAY button on the TV screen, repeat step [4]. 6)Press the STOP button to stop playback. 2 Installing the Batteries for the Remote Control 1 2 3 3 VCR/DVD Switching VIDEO POWER AUDIO REW F.FWD STOP/EJECT PLAY TIMER REC REC /OTR OPEN/CLOSE CHANNEL VCR OUTPUT DVD DISC IN SKIP/REV STOP PLAY FWD/SKIP VCR button VCR OUTPUT DVD SKI DVD button DVD OUTPUT light OUTPUT button POWER SPEED OPEN/CLOSE AUDIO /EJECT 1 2 4 5 7 8 0 DISPLAY VCR 3 SKIP/CH. 6 VCR/TV 9 SLOW +10 DVD PAUSE REC/OTR PLAY STOP MENU ENTER SETUP TOP MENU RETURN MODE V.SURR. After scanning...

Owner's Manual
Page 26
...) • To select camera angles on a disc. • To select audio languages on • To select STEREO, a disc. VCR 1 3 STOP VCR 2 Remote Control TV Screen POWER SPEED OPEN/CLOSE AUDIO /EJECT PLAY STOP 4 OPEN/CLOSE /EJECT PLAYB 1 2 4 5 7 8 0 DISPLAY VCR 3 SKIP/CH. 6 VCR/TV 9 SLOW +10 DVD PAUSE EJECT A REC/OTR PLAY STOP 2 8 Remote Control Before: Turn on the TV, amplifier and any other components which are set to this unit. SEARCH MODE CLEAR/ C. playback during playback. • To view the tape in DVD mode. • To call up the Menu on a disc. •...
...) • To select camera angles on a disc. • To select audio languages on • To select STEREO, a disc. VCR 1 3 STOP VCR 2 Remote Control TV Screen POWER SPEED OPEN/CLOSE AUDIO /EJECT PLAY STOP 4 OPEN/CLOSE /EJECT PLAYB 1 2 4 5 7 8 0 DISPLAY VCR 3 SKIP/CH. 6 VCR/TV 9 SLOW +10 DVD PAUSE EJECT A REC/OTR PLAY STOP 2 8 Remote Control Before: Turn on the TV, amplifier and any other components which are set to this unit. SEARCH MODE CLEAR/ C. playback during playback. • To view the tape in DVD mode. • To call up the Menu on a disc. •...


