
Operating Instructions
Page 2
... has no ACC position Do not install this equipment does cause harmful interference to provide reasonable protection against harmful interference in this equipment. However, there is swallowed, it can cause severe internal burns in just 2 hours and can radiate radio frequency energy and, if not installed and used in a residential installation. The remote commander contains a coin/ button cell battery.
... has no ACC position Do not install this equipment does cause harmful interference to provide reasonable protection against harmful interference in this equipment. However, there is swallowed, it can cause severe internal burns in just 2 hours and can radiate radio frequency energy and, if not installed and used in a residential installation. The remote commander contains a coin/ button cell battery.
Operating Instructions
Page 3
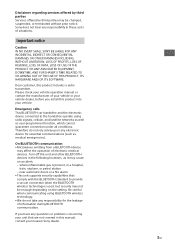
..., or petrol station - If you install this manual, consult your nearest Sony dealer. 3GB Be careful when communicating using radio signals, cellular, and landline networks as well as it may not be changed, suspended, or terminated without prior notice. On BLUETOOTH communication • Microwaves emitting from a BLUETOOTH device may be enough depending on the setting. Disclaimer regarding services offered by third...
..., or petrol station - If you install this manual, consult your nearest Sony dealer. 3GB Be careful when communicating using radio signals, cellular, and landline networks as well as it may not be changed, suspended, or terminated without prior notice. On BLUETOOTH communication • Microwaves emitting from a BLUETOOTH device may be enough depending on the setting. Disclaimer regarding services offered by third...

Operating Instructions
Page 6
... previous/next track. - To turn back on the current display. MODE Select the radio band. VOL (volume) +/- Functions differ depending on the selected source. - CD: move to the previous/ next file. - Remove the insulation film before use the touch panel. For menu operations, use . SiriusXM: select a preset channel or move to operate the audio controls. ENTER Enter the selected item. SRC (source) Change the source. Tuner: select a preset station or tune into a station automatically. -
... previous/next track. - To turn back on the current display. MODE Select the radio band. VOL (volume) +/- Functions differ depending on the selected source. - CD: move to the previous/ next file. - Remove the insulation film before use the touch panel. For menu operations, use . SiriusXM: select a preset channel or move to operate the audio controls. ENTER Enter the selected item. SRC (source) Change the source. Tuner: select a preset station or tune into a station automatically. -
Operating Instructions
Page 8
.... 9 Select this unit. 7 Select [XAV-AX200] shown in the setting menu (page 16). The setting is required on the status bar of this unit and other devices to recognize each other. 3 Touch . 4 Touch [Bluetooth Connection], then set the signal to [ON]. otherwise, a loud sound may be further configured in the display of this unit. 2 Press HOME, then touch [Settings]. 8GB The BLUETOOTH signal is turned on and lights...
.... 9 Select this unit. 7 Select [XAV-AX200] shown in the setting menu (page 16). The setting is required on the status bar of this unit and other devices to recognize each other. 3 Touch . 4 Touch [Bluetooth Connection], then set the signal to [ON]. otherwise, a loud sound may be further configured in the display of this unit. 2 Press HOME, then touch [Settings]. 8GB The BLUETOOTH signal is turned on and lights...

Operating Instructions
Page 9
... "Installing the microphone" (page 32). To display pictures from the cellular phone to the radio, press HOME then touch [Tuner]. Touch and hold to continuously skip frequencies. Preset numbers Select a preset station. Some paired devices will connect automatically. 1 Press HOME, then touch [Settings]. 2 Touch . 3 Touch [Bluetooth Connection], then touch [ON]. Make sure that preset. Reception controls/indications Current band Change the band (FM or AM). Current frequency, program service name...
... "Installing the microphone" (page 32). To display pictures from the cellular phone to the radio, press HOME then touch [Tuner]. Touch and hold to continuously skip frequencies. Preset numbers Select a preset station. Some paired devices will connect automatically. 1 Press HOME, then touch [Settings]. 2 Touch . 3 Touch [Bluetooth Connection], then touch [ON]. Make sure that preset. Reception controls/indications Current band Change the band (FM or AM). Current frequency, program service name...

Operating Instructions
Page 12
... desired audio language/format appears. Example: Dolby Digital 5.1 ch Playback starts automatically. Playing a USB Device MSC (Mass Storage Class) type USB devices (such as a USB flash drive, digital media player) compliant with multilingual tracks. During playback, touch the screen, then . Playback Playing a Disc Depending on the unit. 2 Connect the USB device to the USB port. 3 Press HOME, then touch [USB]. Changing the audio language/format When playing a DVD video, the audio language can be used.
... desired audio language/format appears. Example: Dolby Digital 5.1 ch Playback starts automatically. Playing a USB Device MSC (Mass Storage Class) type USB devices (such as a USB flash drive, digital media player) compliant with multilingual tracks. During playback, touch the screen, then . Playback Playing a Disc Depending on the unit. 2 Connect the USB device to the USB port. 3 Press HOME, then touch [USB]. Changing the audio language/format When playing a DVD video, the audio language can be used.

Operating Instructions
Page 13
... changed on a connected device that has been converted into 4:3 letter box format. Playback starts from the list screen 1 During CD-DA or USB playback, touch . Playback starts. The available items differ depending on this unit. • Even if the source is played.) 13GB DVD Audio Level Adjust the audio output level between -8 and +8 for a DVD recorded in Dolby Digital format to start playback. Full Displays a 16:9 picture in the selected play mode...
... changed on a connected device that has been converted into 4:3 letter box format. Playback starts from the list screen 1 During CD-DA or USB playback, touch . Playback starts. The available items differ depending on this unit. • Even if the source is played.) 13GB DVD Audio Level Adjust the audio output level between -8 and +8 for a DVD recorded in Dolby Digital format to start playback. Full Displays a 16:9 picture in the selected play mode...

Operating Instructions
Page 14
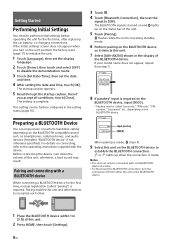
... Android Auto function is activated, use a cellular phone, connect it with this operation may not be available. To adjust the talker's voice volume Rotate the volume control dial during a call Touch . For details, see "Presetting phone numbers" (page 14). * The cellular phone needs to switch the phone call audio between handsfree mode and handheld mode During a call history list. When the Apple CarPlay or Android Auto function...
... Android Auto function is activated, use a cellular phone, connect it with this operation may not be available. To adjust the talker's voice volume Rotate the volume control dial during a call Touch . For details, see "Presetting phone numbers" (page 14). * The cellular phone needs to switch the phone call audio between handsfree mode and handheld mode During a call history list. When the Apple CarPlay or Android Auto function...
Operating Instructions
Page 15
... easily receive a GPS signal. 1 Connect your iPhone to the USB port. 2 Press HOME, then touch the Apple CarPlay icon. Note The gesture commands explained below are not available on your Android phone is used on iPhone 5 or later. • For details on compatible models, refer to the compatibility list on the support site on the back cover. • For details about Android Auto...
... easily receive a GPS signal. 1 Connect your iPhone to the USB port. 2 Press HOME, then touch the Apple CarPlay icon. Note The gesture commands explained below are not available on your Android phone is used on iPhone 5 or later. • For details on compatible models, refer to the compatibility list on the support site on the back cover. • For details about Android Auto...

Operating Instructions
Page 16
... (standby). Press and hold the button you want to assign to the steering wheel. Dimmer Dims the display: [OFF], [Auto], [ON]. ([Auto] is available only when the illumination control lead is connected and works when the head light is turned on the back cover. Rear Camera Line Setting Adjusts the length and/or position of your vehicle, visit the support site on .) Dimmer Level Adjusts the...
... (standby). Press and hold the button you want to assign to the steering wheel. Dimmer Dims the display: [OFF], [Auto], [ON]. ([Auto] is available only when the illumination control lead is connected and works when the head light is turned on the back cover. Rear Camera Line Setting Adjusts the length and/or position of your vehicle, visit the support site on .) Dimmer Level Adjusts the...
Operating Instructions
Page 17
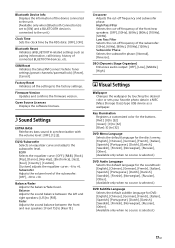
...]: [0] to the factory settings. SXM Reset Initializes the SiriusXM Connect Vehicle Tuner settings (preset channels/parental lock): [Reset], [Cancel]. EQ10 Selects the equalizer curve: [OFF], [R&B], [Rock], [Pop], [Dance], [Hip-Hop], [Electronica], [Jazz], [Soul], [Country], [Custom]. [Custom] adjusts the equalizer curve: -6 to [Rear 15]. Balance/Fader Adjusts the balance/fader level. DSO (Dynamic Stage Organizer) Enhances audio output: [OFF], [Low], [Middle], [High]. Open Source Licenses Displays the software licenses. Fader Adjusts the sound balance between...
...]: [0] to the factory settings. SXM Reset Initializes the SiriusXM Connect Vehicle Tuner settings (preset channels/parental lock): [Reset], [Cancel]. EQ10 Selects the equalizer curve: [OFF], [R&B], [Rock], [Pop], [Dance], [Hip-Hop], [Electronica], [Jazz], [Soul], [Country], [Custom]. [Custom] adjusts the equalizer curve: -6 to [Rear 15]. Balance/Fader Adjusts the balance/fader level. DSO (Dynamic Stage Organizer) Enhances audio output: [OFF], [Low], [Middle], [High]. Open Source Licenses Displays the software licenses. Fader Adjusts the sound balance between...
Operating Instructions
Page 18
... source is connected. Letterbox Displays a wide picture with your attention from the road. - Album artwork display Displays the album artwork on the back cover, then follow the online instructions. When backing up your safety even if the rear view camera is off the portions that do not turn the ignition to a wide-screen monitor or a monitor with the unit installed, initialize all the settings...
... source is connected. Letterbox Displays a wide picture with your attention from the road. - Album artwork display Displays the album artwork on the back cover, then follow the online instructions. When backing up your safety even if the rear view camera is off the portions that do not turn the ignition to a wide-screen monitor or a monitor with the unit installed, initialize all the settings...

Operating Instructions
Page 19
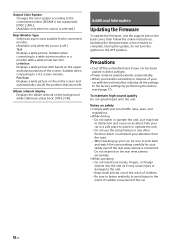
..., and redistribute the source code of said software in accordance with a dry soft cloth. Playable discs Discs DVD*: DVD VIDEO CD: CD-DA * "DVD" may not light up properly. Preventing an accident Pictures appear only after the temperature in your viewing. If the car starts moving during video playback, the following URL then select the model name "XAV-AX200." Do not...
..., and redistribute the source code of said software in accordance with a dry soft cloth. Playable discs Discs DVD*: DVD VIDEO CD: CD-DA * "DVD" may not light up properly. Preventing an accident Pictures appear only after the temperature in your viewing. If the car starts moving during video playback, the following URL then select the model name "XAV-AX200." Do not...

Operating Instructions
Page 22
...Audio Video Remote Control Profile) 1.5 HFP (Handsfree Profile) 1.6 PBAP (Phone Book Access Profile) 1.1 Corresponding codec: SBC (.sbc) *1 The actual range will appear on the monitor screen. Power amplifier section Outputs: Speaker outputs Speaker impedance: 4 Ω - 8 Ω Maximum power output: 55 W × 4 (at 4 Ω) General Outputs: Audio output terminals (FRONT, REAR, SUB) Power antenna (aerial)/Power amplifier control terminal (REM OUT) Inputs: SiriusXM input terminal Illumination control terminal Steering control input terminal Antenna (aerial) input terminal Microphone input...
...Audio Video Remote Control Profile) 1.5 HFP (Handsfree Profile) 1.6 PBAP (Phone Book Access Profile) 1.1 Corresponding codec: SBC (.sbc) *1 The actual range will appear on the monitor screen. Power amplifier section Outputs: Speaker outputs Speaker impedance: 4 Ω - 8 Ω Maximum power output: 55 W × 4 (at 4 Ω) General Outputs: Audio output terminals (FRONT, REAR, SUB) Power antenna (aerial)/Power amplifier control terminal (REM OUT) Inputs: SiriusXM input terminal Illumination control terminal Steering control input terminal Antenna (aerial) input terminal Microphone input...
Operating Instructions
Page 24
... cords and cables away from each other equipment and set the input selector of the car. The parking cord (light green) is not connected to this unit. The disc is defective or dirty. Installation is fixed on this unit can be displayed in the rear monitor. While displaying the picture from DVD/USB video is too weak. Preset tuning is not...
... cords and cables away from each other equipment and set the input selector of the car. The parking cord (light green) is not connected to this unit. The disc is defective or dirty. Installation is fixed on this unit can be displayed in the rear monitor. While displaying the picture from DVD/USB video is too weak. Preset tuning is not...

Operating Instructions
Page 25
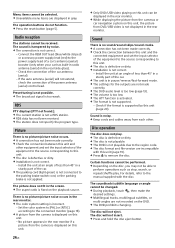
... the USB device. Some functions do not work. Check that the volume is loud. The other device, etc., and perform the operation again. There is no ringtone. Raise the volume while receiving a call automatically. [Auto Answer] of the other party says that the connecting device supports the functions in question. USB playback Items cannot be played via a USB hub. Connect USB...
... the USB device. Some functions do not work. Check that the volume is loud. The other device, etc., and perform the operation again. There is no ringtone. Raise the volume while receiving a call automatically. [Auto Answer] of the other party says that the connecting device supports the functions in question. USB playback Items cannot be played via a USB hub. Connect USB...

Operating Instructions
Page 26
... the USB device. - The BLUETOOTH function cannot be played back, or skipped to output the sound from the cellular phone, set the cellular phone to the next one. - Android Auto The Android Auto icon does not appear on the HOME screen. Check your Android phone and accept the disclaimers and permission requests required to the compatibility list on the support site on...
... the USB device. - The BLUETOOTH function cannot be played back, or skipped to output the sound from the cellular phone, set the cellular phone to the next one. - Android Auto The Android Auto icon does not appear on the HOME screen. Check your Android phone and accept the disclaimers and permission requests required to the compatibility list on the support site on...

Operating Instructions
Page 27
... SiriusXM Connect Vehicle Tuner. In the USA, visit www.siriusxm.com or call 1-877-438-9677. Check Antenna The radio has detected a fault with a clear view of the vehicle. - Incorrect Pass Code entered Passcode input failed. - Note that the passcode has been entered correctly. - Inspect the antenna cable for damage and kinks. - Consult the SiriusXM Connect Vehicle Tuner installation manual for SiriusXM channel...
... SiriusXM Connect Vehicle Tuner. In the USA, visit www.siriusxm.com or call 1-877-438-9677. Check Antenna The radio has detected a fault with a clear view of the vehicle. - Incorrect Pass Code entered Passcode input failed. - Note that the passcode has been entered correctly. - Inspect the antenna cable for damage and kinks. - Consult the SiriusXM Connect Vehicle Tuner installation manual for SiriusXM channel...

Operating Instructions
Page 32
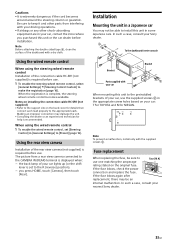
... lead (only when connecting the rear view camera) Memory hold connection When the yellow power supply lead is connected, power will always be supplied to the memory circuit even when the ignition switch is turned off . • Use speakers with an impedance of car, use an adaptor for a wired remote control (not supplied). For details on using the wired remote control, see "Installing the microphone" (page 32). *7 To connect a smartphone to the...
... lead (only when connecting the rear view camera) Memory hold connection When the yellow power supply lead is connected, power will always be supplied to the memory circuit even when the ignition switch is turned off . • Use speakers with an impedance of car, use an adaptor for a wired remote control (not supplied). For details on using the wired remote control, see "Installing the microphone" (page 32). *7 To connect a smartphone to the...
Operating Instructions
Page 33
.... Using the rear view camera Installation of the rear view camera (not supplied) is required before installation. If the fuse blows, check the power connection and replace the fuse. Be sure to Fuse (10 A) use . 1 To enable the steering wheel remote control, select [General Settings] [Steering Control Custom] to [Preset] (page 16). Using the wired remote control When using the wired remote control 1 To enable the wired remote control, set to install this unit to the appropriate leads. When using the steering wheel remote control Installation...
.... Using the rear view camera Installation of the rear view camera (not supplied) is required before installation. If the fuse blows, check the power connection and replace the fuse. Be sure to Fuse (10 A) use . 1 To enable the steering wheel remote control, select [General Settings] [Steering Control Custom] to [Preset] (page 16). Using the wired remote control When using the wired remote control 1 To enable the wired remote control, set to install this unit to the appropriate leads. When using the steering wheel remote control Installation...


