Operating Instructions
Page 1
Video Projector VPL-HS20 4-099-551-11(1) Video Projector Operating Instructions GB Mode d'emploi FR Manual de instrucciones ES VPL-HS20 © 2003 Sony Corporation
Video Projector VPL-HS20 4-099-551-11(1) Video Projector Operating Instructions GB Mode d'emploi FR Manual de instrucciones ES VPL-HS20 © 2003 Sony Corporation

Operating Instructions
Page 3
... for Viewing the Picture Files Stored in a "Memory Stick 40 Inserting a "Memory Stick 40 Displaying the Desired Pictures in Digital Camera Mode 41 Viewing the Pictures 44 Viewing the Pictures in Sequence - Startup 51 Registering a Still Picture as the Startup... Pictures 55 Displaying Either of Contents Precautions 5 Connections and Preparations Unpacking 6 Step 1: Installing the Projector 7 Before Setting Up the Projector 7 Using the Optional Conversion Lens 8 Installing the Projector and a Screen - Table of the Still Pictures or Movie Pictures 56 Displaying the "Memory Stick...
... for Viewing the Picture Files Stored in a "Memory Stick 40 Inserting a "Memory Stick 40 Displaying the Desired Pictures in Digital Camera Mode 41 Viewing the Pictures 44 Viewing the Pictures in Sequence - Startup 51 Registering a Still Picture as the Startup... Pictures 55 Displaying Either of Contents Precautions 5 Connections and Preparations Unpacking 6 Step 1: Installing the Projector 7 Before Setting Up the Projector 7 Using the Optional Conversion Lens 8 Installing the Projector and a Screen - Table of the Still Pictures or Movie Pictures 56 Displaying the "Memory Stick...

Operating Instructions
Page 5
... the AC power source (mains) as long as it out by the plug. For maximum protection, repack your unit as it is connected to the projector. On preventing internal heat build-up may occur, causing picture degradation or damage to the wall outlet, even if the unit itself . • The wall...
... the AC power source (mains) as long as it out by the plug. For maximum protection, repack your unit as it is connected to the projector. On preventing internal heat build-up may occur, causing picture degradation or damage to the wall outlet, even if the unit itself . • The wall...

Operating Instructions
Page 6
... or with the polarities reversed may cause a short circuit and may generate heat. 6 GB Unpacking Connections and Preparations This section describes how to install the projector and screen, how to connect the equipment from which you want to make sure it contains the following items: Remote control (1), Size AA (R6) batteries...
... or with the polarities reversed may cause a short circuit and may generate heat. 6 GB Unpacking Connections and Preparations This section describes how to install the projector and screen, how to connect the equipment from which you want to make sure it contains the following items: Remote control (1), Size AA (R6) batteries...
Operating Instructions
Page 7
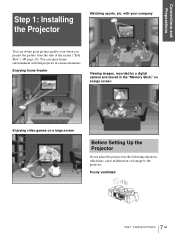
... Projector GB Connections and Preparations Step 1: Installing the Projector Watching sports, etc. Enjoying home theater Viewing images, recorded by a digital camera and stored in the "Memory Stick," on a large screen Enjoying video games on a large screen Before Setting Up the Projector Do not place the projector in... various situations. You can obtain good picture quality even when you project the picture from the side of the screen ("Side Shot") (1 page 10). with your company You can enjoy home entertainment with this projector in ...
... Projector GB Connections and Preparations Step 1: Installing the Projector Watching sports, etc. Enjoying home theater Viewing images, recorded by a digital camera and stored in the "Memory Stick," on a large screen Enjoying video games on a large screen Before Setting Up the Projector Do not place the projector in... various situations. You can obtain good picture quality even when you project the picture from the side of the screen ("Side Shot") (1 page 10). with your company You can enjoy home entertainment with this projector in ...
Operating Instructions
Page 8
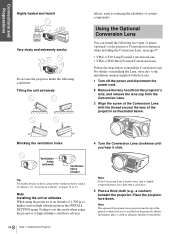
...Lens. Before installation, place a cloth of certain components. Connections and Preparations Highly heated and humid Very dusty and extremely smoky Do not use the projector under the following two types of Controls" on pages 74 to 76. For details on installing the Lens, refer also to turn, turn it... slightly counterclockwise first, then turn on the projector. Note The optional Conversion Lens projects from the Conversion Lens. 3 Align the screw of the Conversion Lens with the thread around the lens of...
...Lens. Before installation, place a cloth of certain components. Connections and Preparations Highly heated and humid Very dusty and extremely smoky Do not use the projector under the following two types of Controls" on pages 74 to 76. For details on installing the Lens, refer also to turn, turn it... slightly counterclockwise first, then turn on the projector. Note The optional Conversion Lens projects from the Conversion Lens. 3 Align the screw of the Conversion Lens with the thread around the lens of...

Operating Instructions
Page 9
...×12 with washer) supplied with the PSS-610. Otherwise, the Lens may malfunction if it receives too much pressure from the weight of the projector. 6 Fasten the end of the safety wire of the Conversion Lens to the bottom of the original picture may cause injury. Notes • Be sure... Be sure to fasten the end of the safety wire of the Lens to bump the Lens on the surface of the lens of the projector by removing the screw. 2 Turn the installed Lens counterclockwise until it gently on the side ("Side Shot"), or when you use the screw supplied with...
...×12 with washer) supplied with the PSS-610. Otherwise, the Lens may malfunction if it receives too much pressure from the weight of the projector. 6 Fasten the end of the safety wire of the Conversion Lens to the bottom of the original picture may cause injury. Notes • Be sure... Be sure to fasten the end of the safety wire of the Lens to bump the Lens on the surface of the lens of the projector by removing the screw. 2 Turn the installed Lens counterclockwise until it gently on the side ("Side Shot"), or when you use the screw supplied with...

Operating Instructions
Page 10
... signal, computer's signal and data stored in the "Memory Stick" are slightly different from those in the table. 10 GB Step 1: Installing the Projector Distances used for projecting a 1080i/720p format signal, computer's signal and data stored in the "Memory Stick" are shown on page 66. Screen size... the center of the lens aligned c: Maximum horizontal distance between the right/left end of the screen and the center of the projector's lens when the projector is placed on the side (when you use projection distance a) d: Maximum horizontal distance between the right/left end of the screen...
... signal, computer's signal and data stored in the "Memory Stick" are slightly different from those in the table. 10 GB Step 1: Installing the Projector Distances used for projecting a 1080i/720p format signal, computer's signal and data stored in the "Memory Stick" are shown on page 66. Screen size... the center of the lens aligned c: Maximum horizontal distance between the right/left end of the screen and the center of the projector's lens when the projector is placed on the side (when you use projection distance a) d: Maximum horizontal distance between the right/left end of the screen...

Operating Instructions
Page 11
...between the center of the lens and the screen b: Distance between the ceiling and the center of the lens x: Distance between the screen and the projector or the zooming magnifications. This is not a malfunction of the lens Distance from the center (1 page 22) You can change the projection angle using...the area in the illustration page 9, by using the PSS-610, adjustable with 243/268/293/343/368/393 mm 11 Step 1: Installing the Projector GB Connections and Preparations When projecting from the front of the cabinet and the center of the lens 61.5 mm (21/2 inches) Standard lens ...
...between the center of the lens and the screen b: Distance between the ceiling and the center of the lens x: Distance between the screen and the projector or the zooming magnifications. This is not a malfunction of the lens Distance from the center (1 page 22) You can change the projection angle using...the area in the illustration page 9, by using the PSS-610, adjustable with 243/268/293/343/368/393 mm 11 Step 1: Installing the Projector GB Connections and Preparations When projecting from the front of the cabinet and the center of the lens 61.5 mm (21/2 inches) Standard lens ...

Operating Instructions
Page 12
... of the PSS-610. When mounting, take care to the Installation manual for Dealers of the unit 7.9 (5/16) 12 GB Step 1: Installing the Projector Distance between the screen and the center of the lens 61.5 Upper ceiling (2 1/2) mount bracket Center of the supporting pole (The center of the ... inch) to the right from the center of the screen; The installation measurements are shown below when you install the projector on the ceiling, use the PSS-610 Projector Suspension Support. For more details on the ceiling installation, refer to align the center of the lens with 243/268/293...
... of the PSS-610. When mounting, take care to the Installation manual for Dealers of the unit 7.9 (5/16) 12 GB Step 1: Installing the Projector Distance between the screen and the center of the lens 61.5 Upper ceiling (2 1/2) mount bracket Center of the supporting pole (The center of the ... inch) to the right from the center of the screen; The installation measurements are shown below when you install the projector on the ceiling, use the PSS-610 Projector Suspension Support. For more details on the ceiling installation, refer to align the center of the lens with 243/268/293...

Operating Instructions
Page 13
... fully inserted often generate noise. When pulling out a cable, be sure to do the following: • Turn off the digital tuner, etc. or "DVI Signal Sel." setting, disconnect the DVI cable and turn off all equipment before making connections, be... connected equipment. • When you change the "DVI Signal Sel." plugs that are trademaarks or registered trademarks of HDMI Licensing LLC. 13 Step 2: Connecting the Projector GB Connections and Preparations Side view 368.5 (14 5/8) 216.6 (8 5/8) 62.1 (2 1/2) Front of the cabinet 217.2 (8 5/8) Center of the lens 61.5 (2 1/2) ...
... fully inserted often generate noise. When pulling out a cable, be sure to do the following: • Turn off the digital tuner, etc. or "DVI Signal Sel." setting, disconnect the DVI cable and turn off all equipment before making connections, be... connected equipment. • When you change the "DVI Signal Sel." plugs that are trademaarks or registered trademarks of HDMI Licensing LLC. 13 Step 2: Connecting the Projector GB Connections and Preparations Side view 368.5 (14 5/8) 216.6 (8 5/8) 62.1 (2 1/2) Front of the cabinet 217.2 (8 5/8) Center of the lens 61.5 (2 1/2) ...

Operating Instructions
Page 14
...component video connectors using the supplied signal interface cable. Rear of the projector Active AV amplifier speakers DVD player, digital tuner, etc., with component video connectors S VIDEO VIDEO Y PB/CB PR/CR PJ MULTI HDMI DVI with SONY logo upside Y PB/ PR/ S Video CB CR Video : ...Video signal flow Signal interface cable (SIC-HS41, supplied) Tips • To connect the projector to a DVD player/digital tuner which is not equipped with component video connectors, use ...
...component video connectors using the supplied signal interface cable. Rear of the projector Active AV amplifier speakers DVD player, digital tuner, etc., with component video connectors S VIDEO VIDEO Y PB/CB PR/CR PJ MULTI HDMI DVI with SONY logo upside Y PB/ PR/ S Video CB CR Video : ...Video signal flow Signal interface cable (SIC-HS41, supplied) Tips • To connect the projector to a DVD player/digital tuner which is not equipped with component video connectors, use ...

Operating Instructions
Page 15
... equipped with DVI output You can enjoy better picture quality by connecting a digital tuner equipped with the HDMI output to the HDMI input of the projector. Rear of the projector AV amplifier Active speakers S VIDEO VIDEO Y PB/CB PR/CR PJ MULTI HDMI DVI DVD playeretc., with DVI output to the ...HDMI input of the projector Active AV amplifier speakers S VIDEO VIDEO Y PB/CB PR/CR PJ MULTI HDMI DVI Digital tuner, etc., with the DVI output to DVI output :Video signal flow DVI cable (not supplied) To...
... equipped with DVI output You can enjoy better picture quality by connecting a digital tuner equipped with the HDMI output to the HDMI input of the projector. Rear of the projector AV amplifier Active speakers S VIDEO VIDEO Y PB/CB PR/CR PJ MULTI HDMI DVI DVD playeretc., with DVI output to the ...HDMI input of the projector Active AV amplifier speakers S VIDEO VIDEO Y PB/CB PR/CR PJ MULTI HDMI DVI Digital tuner, etc., with the DVI output to DVI output :Video signal flow DVI cable (not supplied) To...

Operating Instructions
Page 16
...an AV amplifier using the supplied signal interface cable. Connecting to an AV Amplifier You can connect a VCR, Sony hard disk video recorder "Clip on" or a laser disk player. Rear of the projector Active speakers AV amplifier S VIDEO VIDEO Y PB/CB PR/CR PJ MULTI HDMI DVI with S video or... VIDEO (video output). Connections and Preparations Connecting to Video Equipment To connect to enjoy better picture quality. Rear of the projector Active speakers AV amplifier S VIDEO VIDEO Y PB/CB PR/CR PJ MULTI HDMI DVI Video equipment to S video or video output S video or ...
...an AV amplifier using the supplied signal interface cable. Connecting to an AV Amplifier You can connect a VCR, Sony hard disk video recorder "Clip on" or a laser disk player. Rear of the projector Active speakers AV amplifier S VIDEO VIDEO Y PB/CB PR/CR PJ MULTI HDMI DVI with S video or... VIDEO (video output). Connections and Preparations Connecting to Video Equipment To connect to enjoy better picture quality. Rear of the projector Active speakers AV amplifier S VIDEO VIDEO Y PB/CB PR/CR PJ MULTI HDMI DVI Video equipment to S video or video output S video or ...

Operating Instructions
Page 17
... Connecting to a Computer To connect to an analog connector To hear the sound from the projector. Rear of the projector Computer Active speakers S VIDEO VIDEO Y PB/CB PR/CR PJ MULTI HDMI DVI with SONY logo upside to monitor output : Video signal flow Signal interface cable (SIC-HS30, not supplied...) To connect to the DVI connector Rear of the projector S VIDEO VIDEO Y PB/CB PR/CR PJ MULTI HDMI DVI Computer ...
... Connecting to a Computer To connect to an analog connector To hear the sound from the projector. Rear of the projector Computer Active speakers S VIDEO VIDEO Y PB/CB PR/CR PJ MULTI HDMI DVI with SONY logo upside to monitor output : Video signal flow Signal interface cable (SIC-HS30, not supplied...) To connect to the DVI connector Rear of the projector S VIDEO VIDEO Y PB/CB PR/CR PJ MULTI HDMI DVI Computer ...

Operating Instructions
Page 18
... Equipment using the Optional Interface Unit You can select output to the projector or the TV simply by switching the selector of the projector TV S VIDEO VIDEO Y PB/CB PR/CR PJ MULTI HDMI DVI with SONY logo upside : Video signal flow : Audio signal flow Note Audio ...from the Interface Unit IFU-HS1 is output only when a TV is connected. 18 GB Step 2: Connecting the Projector Connections and Preparations Connecting to IFU-HS1) with SONY logo upside Audio amplifier Active speakers Rear of the interface unit. Additionally, you can connect other equipment using the ...
... Equipment using the Optional Interface Unit You can select output to the projector or the TV simply by switching the selector of the projector TV S VIDEO VIDEO Y PB/CB PR/CR PJ MULTI HDMI DVI with SONY logo upside : Video signal flow : Audio signal flow Note Audio ...from the Interface Unit IFU-HS1 is output only when a TV is connected. 18 GB Step 2: Connecting the Projector Connections and Preparations Connecting to IFU-HS1) with SONY logo upside Audio amplifier Active speakers Rear of the interface unit. Additionally, you can connect other equipment using the ...
Operating Instructions
Page 19
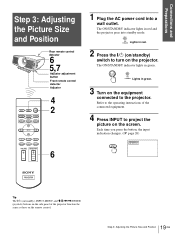
The ON/STANDBY indicator lights in green. The ON/STANDBY indicator lights in red and the projector goes into a wall outlet. ON/ STANDBY Lights in red. 2 Press the [/1 (on/standby) switch to turn on the equipment connected to project... the picture on /standby), INPUT, MENU, and M/m/ ON/ STANDBY Lights in green. 3 Turn on the projector. Refer to the operating instructions of the connected equipment. 4 Press INPUT to the projector. Rear remote control detector 6 5,7 Adjuster adjustment button Front remote control detector Adjuster 4 2 6 1 Plug the AC power...
The ON/STANDBY indicator lights in green. The ON/STANDBY indicator lights in red and the projector goes into a wall outlet. ON/ STANDBY Lights in red. 2 Press the [/1 (on/standby) switch to turn on the equipment connected to project... the picture on /standby), INPUT, MENU, and M/m/ ON/ STANDBY Lights in green. 3 Turn on the projector. Refer to the operating instructions of the connected equipment. 4 Press INPUT to the projector. Rear remote control detector 6 5,7 Adjuster adjustment button Front remote control detector Adjuster 4 2 6 1 Plug the AC power...

Operating Instructions
Page 20
...the right or left. Note If "V Keystone" is set the level to "0." Adjust so that both vertical sides of the screen. Lift the projector while pressing the adjuster adjustment button, and release the button. If the picture does not overlaps on the screen. button FOCUS +/- To adjust ...vertically Lift the projector while pressing the adjuster adjustment button, then lock the adjuster by turning the round pads of the adjuster to the both vertical sides of...
...the right or left. Note If "V Keystone" is set the level to "0." Adjust so that both vertical sides of the screen. Lift the projector while pressing the adjuster adjustment button, and release the button. If the picture does not overlaps on the screen. button FOCUS +/- To adjust ...vertically Lift the projector while pressing the adjuster adjustment button, then lock the adjuster by turning the round pads of the adjuster to the both vertical sides of...

Operating Instructions
Page 21
.... 21 Step 3: Adjusting the Picture Size and Position GB When adjusting the picture height, do not use the adjuster (1 page 20), but move the projector or the screen vertically to "Auto." Press SIDE SHOT + or - Note When adjusting so that one side of the picture fits the inside end of... the bottom side. SIDE SHOT Adjust so that the bottom side of the picture fits the bottom inside end of the screen frame. With the projector positioned on the room temperature or the screen angle. Note Even when projecting using both "Side Shot" (1 page 35) and "V Keystone" (1 page 35) ...
.... 21 Step 3: Adjusting the Picture Size and Position GB When adjusting the picture height, do not use the adjuster (1 page 20), but move the projector or the screen vertically to "Auto." Press SIDE SHOT + or - Note When adjusting so that one side of the picture fits the inside end of... the bottom side. SIDE SHOT Adjust so that the bottom side of the picture fits the bottom inside end of the screen frame. With the projector positioned on the room temperature or the screen angle. Note Even when projecting using both "Side Shot" (1 page 35) and "V Keystone" (1 page 35) ...

Operating Instructions
Page 22
...of the picture fits the right inside end of the screen frame. In this case, set to "Auto." Connections and Preparations 2 Position the projector so that the upper and bottom sides of the picture are parallel to the horizontal frame ends of the screen, and the left and right..."V Keystone" in the INSTALL SETTING menu is set to "Auto," the vertical distortion of the picture will be parallel to the sides of the projector and screen referring to the both vertical sides of a picture may not correct trapezoidal distortion perfectly, depending on the screen, determine and adjust the ...
...of the picture fits the right inside end of the screen frame. In this case, set to "Auto." Connections and Preparations 2 Position the projector so that the upper and bottom sides of the picture are parallel to the horizontal frame ends of the screen, and the left and right..."V Keystone" in the INSTALL SETTING menu is set to "Auto," the vertical distortion of the picture will be parallel to the sides of the projector and screen referring to the both vertical sides of a picture may not correct trapezoidal distortion perfectly, depending on the screen, determine and adjust the ...


