
Operating Instructions
Page 4
... the Menu Language 26 Projecting Projecting the Picture on the Screen 28 Turning Off the Power 29 Operating the BRAVIA Sync Compatible Equipment with the Remote Control of the Projector ......30 Selecting the Wide Screen Mode .....32 Selecting the Picture Viewing Mode 35 Adjusting the Picture Quality ...........36 Selecting to Directly Adjust the Desired Menu Item 36 Selecting Desired Adjust Menu Items in the Order 37 Adjusting the Picture Using Real Color Processing 38 Using the Supplied Software to Adjust the Picture Quality...
... the Menu Language 26 Projecting Projecting the Picture on the Screen 28 Turning Off the Power 29 Operating the BRAVIA Sync Compatible Equipment with the Remote Control of the Projector ......30 Selecting the Wide Screen Mode .....32 Selecting the Picture Viewing Mode 35 Adjusting the Picture Quality ...........36 Selecting to Directly Adjust the Desired Menu Item 36 Selecting Desired Adjust Menu Items in the Order 37 Adjusting the Picture Using Real Color Processing 38 Using the Supplied Software to Adjust the Picture Quality...
Operating Instructions
Page 5
... High-Definition Multimedia Interface are trademarks or registered trademarks of HDMI standards. Control for HDMI ...........60 About the x.v.Color 61 Troubleshooting 62 Warning Indicators 65 Message Lists 66 Replacing the Lamp and the Air Filter and Cleaning the Ventilation Holes (intake 68 Cleaning the Air Filter 71 Cleaning and the Screen of the Projector 71 Specifications 73 Preset Signals 75 Input Signals and Adjustable/ Setting Items 78 Ceiling Installation 80 Index 84 Trademark Information "PS3" is a registered trademark of Sony...
... High-Definition Multimedia Interface are trademarks or registered trademarks of HDMI standards. Control for HDMI ...........60 About the x.v.Color 61 Troubleshooting 62 Warning Indicators 65 Message Lists 66 Replacing the Lamp and the Air Filter and Cleaning the Ventilation Holes (intake 68 Cleaning the Air Filter 71 Cleaning and the Screen of the Projector 71 Specifications 73 Preset Signals 75 Input Signals and Adjustable/ Setting Items 78 Ceiling Installation 80 Index 84 Trademark Information "PS3" is a registered trademark of Sony...

Operating Instructions
Page 7
Location of Controls Location of Controls Front/Right Side You can use the buttons on the control panel with the same names as those on the remote control to operate the projector. Press the button and open the cover. Control panel LENS button M/m/
Location of Controls Location of Controls Front/Right Side You can use the buttons on the control panel with the same names as those on the remote control to operate the projector. Press the button and open the cover. Control panel LENS button M/m/
Operating Instructions
Page 18
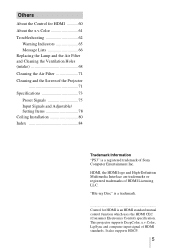
Press the LENS button repeatedly until the Lens Focus adjustment window (test pattern) appears. Then adjust the focus of seconds) and then lights in green. Flashes in green for a while (tens of the picture by pressing the M/m/ appears on the projector. The ON/STANDBY indicator flashes in green, and then lights in green. 2 Press the ?/1 (ON/STANDBY) switch to turn on the screen. 3 Adjust the focus. The lens protector will open. When the ON/STANDBY indicator flashes, "Starting..."
Press the LENS button repeatedly until the Lens Focus adjustment window (test pattern) appears. Then adjust the focus of seconds) and then lights in green. Flashes in green for a while (tens of the picture by pressing the M/m/ appears on the projector. The ON/STANDBY indicator flashes in green, and then lights in green. 2 Press the ?/1 (ON/STANDBY) switch to turn on the screen. 3 Adjust the focus. The lens protector will open. When the ON/STANDBY indicator flashes, "Starting..."
Operating Instructions
Page 28
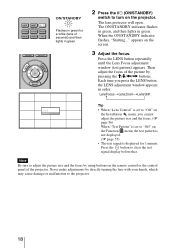
... INPUT button to switch between input terminals in the Function menu, the input terminal with effective signals is set to display images. Projecting the Picture on the Screen 1 Power on the screen. When you want to "Off" in the Setup menu according to display Video S-Video Input-A* Component HDMI 1 HDMI 2 * Set the "Input-A Signal Sel." It also describes how to adjust the quality of the picture to display the input palette on both the projector and the equipment connected to the projector. 2 Press INPUT...
... INPUT button to switch between input terminals in the Function menu, the input terminal with effective signals is set to display images. Projecting the Picture on the Screen 1 Power on the screen. When you want to "Off" in the Setup menu according to display Video S-Video Input-A* Component HDMI 1 HDMI 2 * Set the "Input-A Signal Sel." It also describes how to adjust the quality of the picture to display the input palette on both the projector and the equipment connected to the projector. 2 Press INPUT...

Operating Instructions
Page 29
... the Picture menu of the connected equipment to Limited (16-235). Projecting Notes on the screen. 2 Press the ?/1 (ON/STANDBY) switch again before the message disappears. When video signal is input: Limited (16-235) When computer signal is flashing. A message "POWER OFF?" First, the ON/STANDBY indicator flashes quickly, during which you can turn off completely, and you will close. The fan stops and the ON/STANDBY indicator changes from flashing green to suit the HDMI...
... the Picture menu of the connected equipment to Limited (16-235). Projecting Notes on the screen. 2 Press the ?/1 (ON/STANDBY) switch again before the message disappears. When video signal is input: Limited (16-235) When computer signal is flashing. A message "POWER OFF?" First, the ON/STANDBY indicator flashes quickly, during which you can turn off completely, and you will close. The fan stops and the ON/STANDBY indicator changes from flashing green to suit the HDMI...
Operating Instructions
Page 44
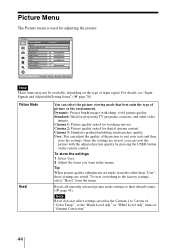
Picture Menu The Picture menu is used for digital cinema content. Note These items may not be available, depending on the remote control. User: You can adjust the quality of input signal. To store the settings 1 Select User. 2 Adjust the items you can select the picture viewing mode that best suits the type of "Gamma Correction." 44 Picture Mode Reset You can view the picture with sharp, vivid picture quality. Dynamic: Project bright images with the adjusted picture quality by...
Picture Menu The Picture menu is used for digital cinema content. Note These items may not be available, depending on the remote control. User: You can adjust the quality of input signal. To store the settings 1 Select User. 2 Adjust the items you can select the picture viewing mode that best suits the type of "Gamma Correction." 44 Picture Mode Reset You can view the picture with sharp, vivid picture quality. Dynamic: Project bright images with the adjusted picture quality by...
Operating Instructions
Page 53
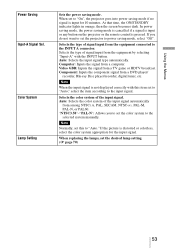
... a signal is input or any button on the projector or the remote control is distorted or colorless, select the color system appropriate for 10 minutes. Auto: Selects the color system of the input signal. If the picture is pressed. When replacing the lamps, set the color system to power saving mode, select "Off". Auto: Selects the input signal type automatically. Video GBR: Inputs the signal from a DVD player/ recorder, Blu-ray Disc player/recorder, digital...
... a signal is input or any button on the projector or the remote control is distorted or colorless, select the color system appropriate for 10 minutes. Auto: Selects the color system of the input signal. If the picture is pressed. When replacing the lamps, set the color system to power saving mode, select "Off". Auto: Selects the input signal type automatically. Video GBR: Inputs the signal from a DVD player/ recorder, Blu-ray Disc player/recorder, digital...

Operating Instructions
Page 59
Signal type Using the Menus Model name Serial No. Signal type Lamp Timer Displays the model name (VPL-VW85). When an unpreset signal is input for inputting analog computer signals. Model name: VPL-VW85 Serial No. Displays the vertical frequency of the input signal. If more than 20 user memories are displayed in the Screen menu, it to an optimum picture. Note When the aspect ratio of input signal does not match the screen size, a part of the screen is displayed as 0. fH (horizontal frequency...
Signal type Using the Menus Model name Serial No. Signal type Lamp Timer Displays the model name (VPL-VW85). When an unpreset signal is input for inputting analog computer signals. Model name: VPL-VW85 Serial No. Displays the vertical frequency of the input signal. If more than 20 user memories are displayed in the Screen menu, it to an optimum picture. Note When the aspect ratio of input signal does not match the screen size, a part of the screen is displayed as 0. fH (horizontal frequency...
Operating Instructions
Page 60
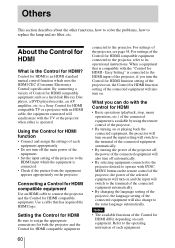
... input setting of the Control for HDMI function setting of the connected equipment will also change to replace the lamp and air filter, etc. For settings of the projector, see page 54. Use a cable that is operated. What you can do with the Control for HDMI • Basic operations (playback, stop, menu operations, etc.) of the connected equipment is connected to the HDMI input of the projector, if you turn the Control for HDMI function setting of the projector on, the Control...
... input setting of the Control for HDMI function setting of the connected equipment will also change to replace the lamp and air filter, etc. For settings of the projector, see page 54. Use a cable that is operated. What you can do with the Control for HDMI • Basic operations (playback, stop, menu operations, etc.) of the connected equipment is connected to the HDMI input of the projector, if you turn the Control for HDMI function setting of the projector on, the Control...

Operating Instructions
Page 62
... The power is not turned on the Setup menu according to the input signal. (1 page 53) The picture from the VIDEO INPUT or S VIDEO INPUT connector is colored strange. on . c Check that the proper connections have been made. (1 page 22) c Select the input source correctly using the INPUT button. (1 page 28) c Set the computer signal to diagnose and correct the problem using the following instructions. on again in a short time. Troubleshooting If the projector appears to be operating...
... The power is not turned on the Setup menu according to the input signal. (1 page 53) The picture from the VIDEO INPUT or S VIDEO INPUT connector is colored strange. on . c Check that the proper connections have been made. (1 page 22) c Select the input source correctly using the INPUT button. (1 page 28) c Set the computer signal to diagnose and correct the problem using the following instructions. on again in a short time. Troubleshooting If the projector appears to be operating...

Operating Instructions
Page 63
... remote control detector, the projector may be weak. c For pictures from the screen. c Check if the ON/STANDBY indicator should light in the Setup menu to "Front & Rear" on the lens. Leave the projector for a while will eliminate the retained image. c Select the desired color registration in the Screen menu properly. (1 page 51) The color of Installation menu (1 page 57). On-screen display Symptom Cause and Remedy On-screen display does not c Set "Status" in green. The model...
... remote control detector, the projector may be weak. c For pictures from the screen. c Check if the ON/STANDBY indicator should light in the Setup menu to "Front & Rear" on the lens. Leave the projector for a while will eliminate the retained image. c Select the desired color registration in the Screen menu properly. (1 page 51) The color of Installation menu (1 page 57). On-screen display Symptom Cause and Remedy On-screen display does not c Set "Status" in green. The model...

Operating Instructions
Page 64
... 25°C. c "Control for HDMI", "Device Auto Power Off", and "PJ Auto Power ON" are set to "Off". c Check the installation conditions. (1 page 11) The number of fan rotation increases to maintain the product reliability of "Cooling Setting" in a room, where the temperature is noisy. Adjust the lens shift within the range of movement. Others Symptom The fan is higher than normal. The projector and connected equipment turn On/Off...
... 25°C. c "Control for HDMI", "Device Auto Power Off", and "PJ Auto Power ON" are set to "Off". c Check the installation conditions. (1 page 11) The number of fan rotation increases to maintain the product reliability of "Cooling Setting" in a room, where the temperature is noisy. Adjust the lens shift within the range of movement. Others Symptom The fan is higher than normal. The projector and connected equipment turn On/Off...
Operating Instructions
Page 65
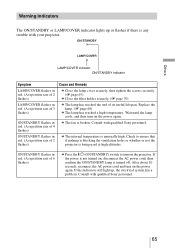
... the indicators still light up or flashes if there is broken. Replace the lamp. (1 page 68) c The lamp has reached a high temperature. Check to turn on the power again. LAMP/COVER indicator ON/STANDBY indicator Symptom LAMP/COVER flashes in red. (A repetition rate of 2 flashes) LAMP/COVER flashes in red. (A repetition rate of 3 flashes) ON/STANDBY flashes in red. (A repetition rate of 4 flashes) ON/STANDBY flashes in red. (A repetition rate of its useful lifespan. c The fan is any trouble with your projector. Others Warning Indicators The ON/STANDBY or LAMP/COVER indicator lights up...
... the indicators still light up or flashes if there is broken. Replace the lamp. (1 page 68) c The lamp has reached a high temperature. Check to turn on the power again. LAMP/COVER indicator ON/STANDBY indicator Symptom LAMP/COVER flashes in red. (A repetition rate of 2 flashes) LAMP/COVER flashes in red. (A repetition rate of 3 flashes) ON/STANDBY flashes in red. (A repetition rate of 4 flashes) ON/STANDBY flashes in red. (A repetition rate of its useful lifespan. c The fan is any trouble with your projector. Others Warning Indicators The ON/STANDBY or LAMP/COVER indicator lights up...
Operating Instructions
Page 66
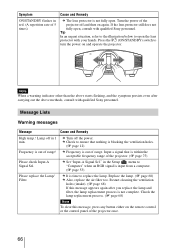
... ?/1 (ON/STANDBY) switch to replace the lamp. Message Lists Warning messages Message Cause and Remedy High temp.! If the lens protector still does not fully open . c Frequency is out of the projector off the power. c It is time to turn the power on the remote control or the control panel of the projector once. 66 Restart cleaning the ventilation holes (intake). (1 page 68) If this message, press any button either on and operate the projector. c Check to "Computer...
... ?/1 (ON/STANDBY) switch to replace the lamp. Message Lists Warning messages Message Cause and Remedy High temp.! If the lens protector still does not fully open . c Frequency is out of the projector off the power. c It is time to turn the power on the remote control or the control panel of the projector once. 66 Restart cleaning the ventilation holes (intake). (1 page 68) If this message, press any button either on and operate the projector. c Check to "Computer...
Operating Instructions
Page 67
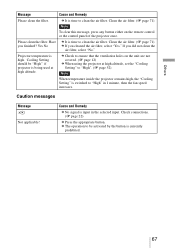
... air filter. c Check to "High" in the selected input. Cause and Remedy c No signal is time to clean the air filter. c The operation to be "High" if projector is being used at high altitude, set the "Cooling Setting" to "High". (1 page 52) Note When temperature inside the projector remains high, the "Cooling Setting" is currently prohibited. 67 Clean the air filter. (1 page 71) Note To clear this message, press any button either on the unit are not covered...
... air filter. c Check to "High" in the selected input. Cause and Remedy c No signal is time to clean the air filter. c The operation to be "High" if projector is being used at high altitude, set the "Cooling Setting" to "High". (1 page 52) Note When temperature inside the projector remains high, the "Cooling Setting" is currently prohibited. 67 Clean the air filter. (1 page 71) Note To clear this message, press any button either on the unit are not covered...

Operating Instructions
Page 68
... . Replace the lamp with a new one (not supplied) without delay. When a warning message for replacing the air filter appears, replace the air filter immediately. 1 Turn off with the LMP-H201 Projector Lamp. The air filter is crucial to maintain the good performance of the projector or to prevent malfunction to it on the screen, the lamp may scatter, causing injury. • When you replace the lamp, be exhausted. Replacing the Lamp and the Air Filter and Cleaning...
... . Replace the lamp with a new one (not supplied) without delay. When a warning message for replacing the air filter appears, replace the air filter immediately. 1 Turn off with the LMP-H201 Projector Lamp. The air filter is crucial to maintain the good performance of the projector or to prevent malfunction to it on the screen, the lamp may scatter, causing injury. • When you replace the lamp, be exhausted. Replacing the Lamp and the Air Filter and Cleaning...
Operating Instructions
Page 71
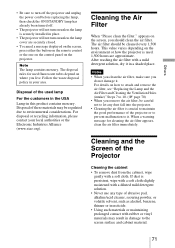
Cleaning the Air Filter When "Please clean the filter." The air filter should clean the air filter. For disposal or recycling information, please contact your area. This value varies depending on the environment or how the projector is used. 1,500 hours are securely closed. • To cancel a message displayed on the screen, press either the button on the remote control or the one on the control panel on the projector. Follow the waste...
Cleaning the Air Filter When "Please clean the filter." The air filter should clean the air filter. For disposal or recycling information, please contact your area. This value varies depending on the environment or how the projector is used. 1,500 hours are securely closed. • To cancel a message displayed on the screen, press either the button on the remote control or the one on the control panel on the projector. Follow the waste...
Marketing Specifications
Page 1
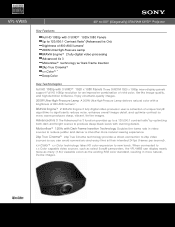
... Cinema™ x.v.Color™ 4 Deep Color Key Technologies Full HD 1080p with 3 SXRD™ 1920 x 1080 Panels Three SXRDTM 1920 x 1080p micro-display panels support Full HD 1080p resolution for an impressive combination of 800 ANSI lumens3 . VPL-VW85 40" to 300" (Diagonally) BRAVIA® SXRD™ Projector Key Features Full HD 1080p with 3 SXRD™ 1920x1080 Panels Up to new levels. Enjoy cinematic-quality images. 200W Ultra-High-Pressure Lamp A 200W Ultra-High-Pressure Lamp...
... Cinema™ x.v.Color™ 4 Deep Color Key Technologies Full HD 1080p with 3 SXRD™ 1920 x 1080 Panels Three SXRDTM 1920 x 1080p micro-display panels support Full HD 1080p resolution for an impressive combination of 800 ANSI lumens3 . VPL-VW85 40" to 300" (Diagonally) BRAVIA® SXRD™ Projector Key Features Full HD 1080p with 3 SXRD™ 1920x1080 Panels Up to new levels. Enjoy cinematic-quality images. 200W Ultra-High-Pressure Lamp A 200W Ultra-High-Pressure Lamp...

Marketing Specifications
Page 2
... Operation): 320W max Power Consumption (in Standby): 8W; 0.5W in Supplied Accessories Remote Control (RM-PJVW85) Instruction Manual AC Cord CD ROM (Image Director 3) Size AA (R6) batteries x2 Sony Electronics Inc. •16530 Via Esprillo •San Diego, CA 92127 •1.800.222.7669 •www.sony.com Optional Accessories Ultra High Pressure Replacement Lamp (LMP-H201) Black Ceiling Mount (PSS-H10) UPC Code: 27242774346 1. When used with PC timing support1...
... Operation): 320W max Power Consumption (in Standby): 8W; 0.5W in Supplied Accessories Remote Control (RM-PJVW85) Instruction Manual AC Cord CD ROM (Image Director 3) Size AA (R6) batteries x2 Sony Electronics Inc. •16530 Via Esprillo •San Diego, CA 92127 •1.800.222.7669 •www.sony.com Optional Accessories Ultra High Pressure Replacement Lamp (LMP-H201) Black Ceiling Mount (PSS-H10) UPC Code: 27242774346 1. When used with PC timing support1...


