
Operating Instructions
Page 2
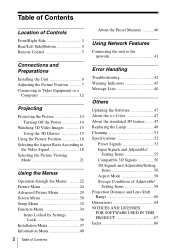
... Advanced Picture Menu 29 Screen Menu 30 Setup Menu 32 Function Menu 34 Items Locked by Settings Lock 36 Installation Menu 37 Information Menu 40 2 Table of Contents About the Preset Memory ...........40 Using Network Features Connecting the unit to the network 41 Error Handling Troubleshooting 42 Warning Indicators 45 Message Lists 46 Others Updating the Software 47 About the x.v.Color 47 About the simulated 3D feature ........47 Replacing the Lamp 48 Cleaning 51 Specifications 52 Preset Signals 53 Input Signals and Adjustable/ Setting...
... Advanced Picture Menu 29 Screen Menu 30 Setup Menu 32 Function Menu 34 Items Locked by Settings Lock 36 Installation Menu 37 Information Menu 40 2 Table of Contents About the Preset Memory ...........40 Using Network Features Connecting the unit to the network 41 Error Handling Troubleshooting 42 Warning Indicators 45 Message Lists 46 Others Updating the Software 47 About the x.v.Color 47 About the simulated 3D feature ........47 Replacing the Lamp 48 Cleaning 51 Specifications 52 Preset Signals 53 Input Signals and Adjustable/ Setting...

Operating Instructions
Page 8
Press the LENS ADJUSTMENT (FOCUS) button to display the Lens Focus adjustment window (test pattern). Then adjust the focus of the picture by pressing the M/m/ 3 Adjust the focus.
Press the LENS ADJUSTMENT (FOCUS) button to display the Lens Focus adjustment window (test pattern). Then adjust the focus of the picture by pressing the M/m/ 3 Adjust the focus.

Operating Instructions
Page 14
.../STANDBY) button again before the message disappears. To view the picture from Press INPUT to display Equipment connected to the HDMI 1 HDMI 1 connector Equipment connected to the HDMI 2 HDMI 2 connector Tip When "Status" is set to display images. The fan stops and the ON/STANDBY indicator changes from flashing green to switch between input terminals in green and the fan continues to run to suit your taste. The power is flashing. It also describes how to project. appears on the Setup menu...
.../STANDBY) button again before the message disappears. To view the picture from Press INPUT to display Equipment connected to the HDMI 1 HDMI 1 connector Equipment connected to the HDMI 2 HDMI 2 connector Tip When "Status" is set to display images. The fan stops and the ON/STANDBY indicator changes from flashing green to switch between input terminals in green and the fan continues to run to suit your taste. The power is flashing. It also describes how to project. appears on the Setup menu...

Operating Instructions
Page 15
... video images from the projector • There are other communication devices, such as from 3D games and 3D Blu-ray Discs, using the optional Active 3D Glasses (TDG-BT500A). 1 Turn on the HDMI equipment for 3D compatibility connected to the unit, then play 3D content, refer to the operating instructions for the connected equipment. 2 Turn on the remote control or with the "3D Settings...
... video images from the projector • There are other communication devices, such as from 3D games and 3D Blu-ray Discs, using the optional Active 3D Glasses (TDG-BT500A). 1 Turn on the HDMI equipment for 3D compatibility connected to the unit, then play 3D content, refer to the operating instructions for the connected equipment. 2 Turn on the remote control or with the "3D Settings...

Operating Instructions
Page 24
... on the remote control. Photo: Ideal for each input. 24 Picture Menu Game: Picture quality suited to reproduce faithfully the original image quality, or for watching TV programs, sports, concerts, and other video images. Reference: A picture quality setup suitable for when you want to gaming, with a digital camera. Bright TV: Picture quality suited for enjoying image quality, without any adjustment. The factory default setting is used for adjusting the picture. User: You...
... on the remote control. Photo: Ideal for each input. 24 Picture Menu Game: Picture quality suited to reproduce faithfully the original image quality, or for watching TV programs, sports, concerts, and other video images. Reference: A picture quality setup suitable for when you want to gaming, with a digital camera. Bright TV: Picture quality suited for enjoying image quality, without any adjustment. The factory default setting is used for adjusting the picture. User: You...

Operating Instructions
Page 29
... Check: Checks the color difference against the factory default settings, before calibration starts. Adjust: Performs Auto Calibration. Reset: Resets the calibration results, and returns to its previous position automatically. • If the environment changes, such as the brightness of use. Advanced Picture Menu 29 Using the Menus Notes • Auto Calibration results in color that have occurred after the calibration at a certain frequency. Tips • dE is an indicator...
... Check: Checks the color difference against the factory default settings, before calibration starts. Adjust: Performs Auto Calibration. Reset: Resets the calibration results, and returns to its previous position automatically. • If the environment changes, such as the brightness of use. Advanced Picture Menu 29 Using the Menus Notes • Auto Calibration results in color that have occurred after the calibration at a certain frequency. Tips • dE is an indicator...

Operating Instructions
Page 36
... NR MPEG NR Smooth Gradation Film Mode Gamma Correction Color Correction Clear White x.v.Color Color Space Advanced Picture menu Auto Calibration Group 2 Setup menu Status Language Menu Position Cooling Setting Remote Start Lamp Setting Function menu Dynamic Range Test Pattern Installation menu Image Flip Lens Control Anamorphic Lens Trigger Select IR Receiver Blanking Panel Alignment Network Setting 36 Function Menu Items Locked by Settings Lock Group 1 Picture menu Reset Reality Creation Advanced Iris Contrast Enhancer Lamp Control Motionflow Contrast Brightness Color Hue Color Temp.
... NR MPEG NR Smooth Gradation Film Mode Gamma Correction Color Correction Clear White x.v.Color Color Space Advanced Picture menu Auto Calibration Group 2 Setup menu Status Language Menu Position Cooling Setting Remote Start Lamp Setting Function menu Dynamic Range Test Pattern Installation menu Image Flip Lens Control Anamorphic Lens Trigger Select IR Receiver Blanking Panel Alignment Network Setting 36 Function Menu Items Locked by Settings Lock Group 1 Picture menu Reset Reality Creation Advanced Iris Contrast Enhancer Lamp Control Motionflow Contrast Brightness Color Hue Color Temp.

Operating Instructions
Page 39
Setting items Description When "Zone" is selected: Select the position to adjust with
Setting items Description When "Zone" is selected: Select the position to adjust with
Operating Instructions
Page 42
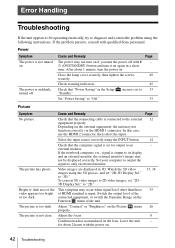
... Display Sel." The picture is set for about 1 minute, turn it on the Picture menu 26 properly. Check warning indicators. 45 Check that the computer signal is input. menu is not clear. Select the input source correctly using the INPUT button. 14 Check that "Power Saving" in the Setup "Standby." Watch the 3D video images using the following instructions. to "2D." 15, 34 Bright or dark area of the or too dark. In this case, use the HDMI...
... Display Sel." The picture is set for about 1 minute, turn it on the Picture menu 26 properly. Check warning indicators. 45 Check that the computer signal is input. menu is not clear. Select the input source correctly using the INPUT button. 14 Check that "Power Saving" in the Setup "Standby." Watch the 3D video images using the following instructions. to "2D." 15, 34 Bright or dark area of the or too dark. In this case, use the HDMI...
Operating Instructions
Page 43
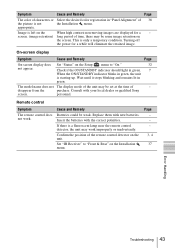
... the picture is not the Installation menu. Page - - - 3, 4 37 Error Handling Troubleshooting 43 personnel. The model name does not The display mode of the unit may be set at the time of time, there may work . If there is left on the screen. Image is a fluorescent lamp near the remote control detector, the unit may be weak. Replace them with new batteries. Turning off the power for a - screen. (image retention) long period of - Remote control...
... the picture is not the Installation menu. Page - - - 3, 4 37 Error Handling Troubleshooting 43 personnel. The model name does not The display mode of the unit may be set at the time of time, there may work . If there is left on the screen. Image is a fluorescent lamp near the remote control detector, the unit may be weak. Replace them with new batteries. Turning off the power for a - screen. (image retention) long period of - Remote control...
Operating Instructions
Page 48
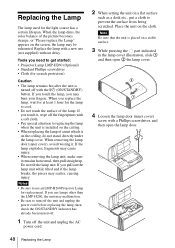
... touch the lamp, you use an LMP-H260 Projector Lamp for the light source has a certain lifespan. Note Be sure that the unit is turned off the unit and unplug the AC power cord. 2 When setting the unit on a stable surface. 3 While pressing the part indicated in the lamp cover illustration, slide 1 and then open the lamp door. 48 Replacing the Lamp When removing the lamp door (inner cover), avoid twisting...
... touch the lamp, you use an LMP-H260 Projector Lamp for the light source has a certain lifespan. Note Be sure that the unit is turned off the unit and unplug the AC power cord. 2 When setting the unit on a stable surface. 3 While pressing the part indicated in the lamp cover illustration, slide 1 and then open the lamp door. 48 Replacing the Lamp When removing the lamp door (inner cover), avoid twisting...

Operating Instructions
Page 52
... Projector Lamp: LMP-H260 (for replacement) Projector Suspension Support: PSS-H10 Active 3D Glasses: TDG-BT500A 52 Specifications Specifications Item Description Display system SXRD panel, projection system Display device Size of effective 0.74-inch (18.8 mm) SXRD display area Number of pixels 26,542,080 pixels (8,847,360 pixels × 3) Projection lens 2.06 times zoom lens (motorized) f = 21.7 mm to 44.7 mm F3.0 to F4.0 Light source Ultra High Pressure Lamp 265 W type Screen size...
... Projector Lamp: LMP-H260 (for replacement) Projector Suspension Support: PSS-H10 Active 3D Glasses: TDG-BT500A 52 Specifications Specifications Item Description Display system SXRD panel, projection system Display device Size of effective 0.74-inch (18.8 mm) SXRD display area Number of pixels 26,542,080 pixels (8,847,360 pixels × 3) Projection lens 2.06 times zoom lens (motorized) f = 21.7 mm to 44.7 mm F3.0 to F4.0 Light source Ultra High Pressure Lamp 265 W type Screen size...
Operating Instructions
Page 80
... OF SUBSTITUTE GOODS OR SERVICES; LOSS OF USE, DATA, OR PROFITS; this code cannot simply be included in part of the work of the FreeType Team Notification of the Software, and to permit persons to whom the Software is furnished to do ...software and associated documentation files (the "Software"), to use , copy, modify, merge, publish, distribute, sublicense, and/or sell copies of MIT EXPAT Copyright (c) 1998, 1999, 2000 Thai Open Source Software Center Ltd and Clark Cooper Copyright (c) 2001, 2002, 2003, 2004, 2005, 2006 Expat maintainers. i.e. Raymond Permission is hereby granted, free...
... OF SUBSTITUTE GOODS OR SERVICES; LOSS OF USE, DATA, OR PROFITS; this code cannot simply be included in part of the work of the FreeType Team Notification of the Software, and to permit persons to whom the Software is furnished to do ...software and associated documentation files (the "Software"), to use , copy, modify, merge, publish, distribute, sublicense, and/or sell copies of MIT EXPAT Copyright (c) 1998, 1999, 2000 Thai Open Source Software Center Ltd and Clark Cooper Copyright (c) 2001, 2002, 2003, 2004, 2005, 2006 Expat maintainers. i.e. Raymond Permission is hereby granted, free...
Operating Instructions
Page 87
... This projector supports DeepColor, x.v.Color, LipSync, computer input signal, 3D signal and 4K signal of Sony Computer Entertainment Inc. • The terms HDMI and HDMI High- It also supports HDCP. Picture 24 Screen 30 Setup 32 Menu Position 32 Messages Caution 46 Warning 46 Motionflow 26 MPEG NR (MPEG Noise Reduction) .....27 N Network connection 41 Network Setting 39 NR (Noise Reduction 27 P Panel Alignment 38 Picture Position Picture Position 30 Using the Picture Position 16 Picture position adjustment 7 Power Saving...
... This projector supports DeepColor, x.v.Color, LipSync, computer input signal, 3D signal and 4K signal of Sony Computer Entertainment Inc. • The terms HDMI and HDMI High- It also supports HDCP. Picture 24 Screen 30 Setup 32 Menu Position 32 Messages Caution 46 Warning 46 Motionflow 26 MPEG NR (MPEG Noise Reduction) .....27 N Network connection 41 Network Setting 39 NR (Noise Reduction 27 P Panel Alignment 38 Picture Position Picture Position 30 Using the Picture Position 16 Picture position adjustment 7 Power Saving...

Quick Reference Manual
Page 5
...; The wall outlet should only use by qualified personnel before use multiple LCD projectors to project onto a screen, even if they will come in handy if you turn off the power with the ?/1 (ON/STANDBY) button, do not disconnect the unit from the wall outlet while the cooling fan is still running. On watching 3D video images Safety precautions • You should be...
...; The wall outlet should only use by qualified personnel before use multiple LCD projectors to project onto a screen, even if they will come in handy if you turn off the power with the ?/1 (ON/STANDBY) button, do not disconnect the unit from the wall outlet while the cooling fan is still running. On watching 3D video images Safety precautions • You should be...
Quick Reference Manual
Page 9
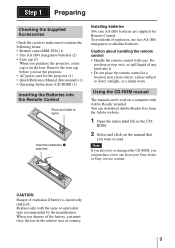
.... You can download Adobe Reader free from your Sony dealer or Sony service counter. Note If you have lost or damaged the CD-ROM, you want to open. Using the CD-ROM manual The manual can purchase a new one from the Adobe website. 1 Open the index.html file in the CD- CAUTION Danger of explosion, use the projector. • AC power cord for Remote Control. Installing batteries Two size AA...
.... You can download Adobe Reader free from your Sony dealer or Sony service counter. Note If you have lost or damaged the CD-ROM, you want to open. Using the CD-ROM manual The manual can purchase a new one from the Adobe website. 1 Open the index.html file in the CD- CAUTION Danger of explosion, use the projector. • AC power cord for Remote Control. Installing batteries Two size AA...

Quick Reference Manual
Page 13
... power cord while the indicator is turned off completely, and you want to light up the ON/STANDBY indicator with the ?/1 (ON/STANDBY) button. Example: To view the picture from the video equipment connected to the HDMI 1 connector of performing the above steps. 3 Select the equipment from flashing green to display the input palette on the screen. 2 Press the ?/1 (ON/STANDBY) button again before the message disappears. The ON/STANDBY indicator flashes in green and the fan...
... power cord while the indicator is turned off completely, and you want to light up the ON/STANDBY indicator with the ?/1 (ON/STANDBY) button. Example: To view the picture from the video equipment connected to the HDMI 1 connector of performing the above steps. 3 Select the equipment from flashing green to display the input palette on the screen. 2 Press the ?/1 (ON/STANDBY) button again before the message disappears. The ON/STANDBY indicator flashes in green and the fan...
Quick Reference Manual
Page 15
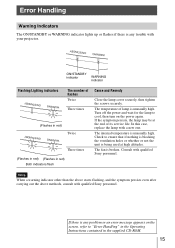
The temperature of flashes Twice Three times (Flashes in red) Twice Three times (Flashes in red) (Flashes in the supplied CD-ROM. 15 The internal temperature is broken. Check to "Error Handling" in the Operating Instructions contained in red) Both indicators flash Cause and Remedy Close the lamp cover securely, then tighten the screws securely. The fan is unusually high. ON/STANDBY indicator WARNING indicator Flashing/Lighting indicators The number of lamp is unusually high. Note When a warning indicator other than the above starts flashing, and the symptom...
The temperature of flashes Twice Three times (Flashes in red) Twice Three times (Flashes in red) (Flashes in the supplied CD-ROM. 15 The internal temperature is broken. Check to "Error Handling" in the Operating Instructions contained in red) Both indicators flash Cause and Remedy Close the lamp cover securely, then tighten the screws securely. The fan is unusually high. ON/STANDBY indicator WARNING indicator Flashing/Lighting indicators The number of lamp is unusually high. Note When a warning indicator other than the above starts flashing, and the symptom...

Quick Reference Manual
Page 16
... lamp, you use an LMP-H260 Projector Lamp for the light source has a certain lifespan. Notes • Be sure to use lamps other than the LMP-H260, the unit may malfunction. • Be sure to turn off the unit and unplug the power cord before replacing the lamp, then check the ON/STANDBY indicator has already been turned off. 1 Turn off the unit and unplug the AC power cord. 2 When setting...
... lamp, you use an LMP-H260 Projector Lamp for the light source has a certain lifespan. Notes • Be sure to use lamps other than the LMP-H260, the unit may malfunction. • Be sure to turn off the unit and unplug the power cord before replacing the lamp, then check the ON/STANDBY indicator has already been turned off. 1 Turn off the unit and unplug the AC power cord. 2 When setting...
Marketing Specifications
Page 1
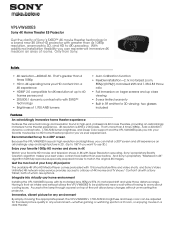
... experience • HDMI® 2.0 compatible for up close viewing • 3-year limited warranty • Built in a brand new 4K Ultra HD projector with greater than 4x 1080p resolution, anamorphic 3D, and HD to a 200" screen Because the VPL-VW600ES has such high resolution and brightness, you 've ever experienced. That's greater than 4 times 1080p • HD to match the original 4K images.
... experience • HDMI® 2.0 compatible for up close viewing • 3-year limited warranty • Built in a brand new 4K Ultra HD projector with greater than 4x 1080p resolution, anamorphic 3D, and HD to a 200" screen Because the VPL-VW600ES has such high resolution and brightness, you 've ever experienced. That's greater than 4 times 1080p • HD to match the original 4K images.


