
Operating Instructions
Page 5
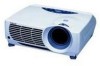
... 9 (GB) Control Panel 11 (GB) Connector Panel 13 (GB) Remote Commander (supplied with the VPL-PX15/PX10 14 (GB) Remote Commander (supplied with the VPL-PS10 16 (GB) Setting Up and Projecting Installing the Projector 18 (GB) Connecting the Projector 18 (GB) Connecting to a Computer 18 (GB) Connecting to a VCR or 15k RGB/Component Equipment...
... 9 (GB) Control Panel 11 (GB) Connector Panel 13 (GB) Remote Commander (supplied with the VPL-PX15/PX10 14 (GB) Remote Commander (supplied with the VPL-PS10 16 (GB) Setting Up and Projecting Installing the Projector 18 (GB) Connecting the Projector 18 (GB) Connecting to a Computer 18 (GB) Connecting to a VCR or 15k RGB/Component Equipment...

Operating Instructions
Page 8
.... • Digital zoom / freeze functions This projector has a digital zoom function that converts the input signal to enlarge the image at a desired location on the picture. • High resolution VPL-PX15/PX10 Three 0.9-inch, approximately 790,000 pixel, XGA panels provide a resolution of 1024 × 768... with a PC CARD slot and ETHER connector, which allows you to 1024 × 768 dots (VPLPX15/PX10) or 800 × 600 dots (VPL-PS10). • Compatible input signals This projector accepts composite, S video, and component video signals as well as 15k RGB, VGA2), SVGA2), XGA2), ...
.... • Digital zoom / freeze functions This projector has a digital zoom function that converts the input signal to enlarge the image at a desired location on the picture. • High resolution VPL-PX15/PX10 Three 0.9-inch, approximately 790,000 pixel, XGA panels provide a resolution of 1024 × 768... with a PC CARD slot and ETHER connector, which allows you to 1024 × 768 dots (VPLPX15/PX10) or 800 × 600 dots (VPL-PS10). • Compatible input signals This projector accepts composite, S video, and component video signals as well as 15k RGB, VGA2), SVGA2), XGA2), ...

Operating Instructions
Page 9
..."Connector Panel" on page 13 (GB). 9 Connector panel cover If necessary, open this cover to make the handle pop up from the projector for carrying. qs Rear remote control detector qd Left speaker 9 (GB) You can remove the cover by releasing the connector panel cover lock... Connector panel cover q; Location and Function of Controls Front / Left Side qa q; 1 2 3 PUSH 4 5 89 6 7 PUSH (This illustration shows the VPL-PX15.) Location and Function of Controls 1 Zoom ring Adjusts the size of the picture. 2 Focus ring Adjusts the picture focus. 3 Front remote control detector 4 ...
..."Connector Panel" on page 13 (GB). 9 Connector panel cover If necessary, open this cover to make the handle pop up from the projector for carrying. qs Rear remote control detector qd Left speaker 9 (GB) You can remove the cover by releasing the connector panel cover lock... Connector panel cover q; Location and Function of Controls Front / Left Side qa q; 1 2 3 PUSH 4 5 89 6 7 PUSH (This illustration shows the VPL-PX15.) Location and Function of Controls 1 Zoom ring Adjusts the size of the picture. 2 Focus ring Adjusts the picture focus. 3 Front remote control detector 4 ...
Operating Instructions
Page 12
...the power saving mode, none of the keys function for the INPUT-A and INPUT-B. 8 I / 1 key twice following conditions: • Lights up when the projector is pressed. Although the lamp goes out, the cooling fan keeps running. Once in the power saving mode. Each time you can select INPUT-B only...mode, you press the key, the input signal switches as follows: INPUT-A INPUT-B (VPL-PX15 only) S-VIDEO VIDEO Notes • You can turn off the power, press the I / 1 (on / standby) key Turns the projector on the screen, or press and hold the key for the first 60 seconds of ...
...the power saving mode, none of the keys function for the INPUT-A and INPUT-B. 8 I / 1 key twice following conditions: • Lights up when the projector is pressed. Although the lamp goes out, the cooling fan keeps running. Once in the power saving mode. Each time you can select INPUT-B only...mode, you press the key, the input signal switches as follows: INPUT-A INPUT-B (VPL-PX15 only) S-VIDEO VIDEO Notes • You can turn off the power, press the I / 1 (on / standby) key Turns the projector on the screen, or press and hold the key for the first 60 seconds of ...

Operating Instructions
Page 13
...PLUG IN POWER CTRL S AUDIO AUDIO VIDEO S VIDEO INPUT A ~AC IN 32 1 (This illustration shows the VPL-PX15.) 1 AC IN socket Connects the supplied AC power cord. 2 INPUT A connectors Connect to external equipment ...control the mouse function of the computer connected to the computer via this connector, the projector recognizes that a USB mouse is supplied from this jack. VIDEO jack (phono type):... to the S video output (Y/C video output) of video equipment. Location and Function of Sony equipment. S VIDEO connector (mini DIN 4-pin): Connects to use the appropriate cable. Connects...
...PLUG IN POWER CTRL S AUDIO AUDIO VIDEO S VIDEO INPUT A ~AC IN 32 1 (This illustration shows the VPL-PX15.) 1 AC IN socket Connects the supplied AC power cord. 2 INPUT A connectors Connect to external equipment ...control the mouse function of the computer connected to the computer via this connector, the projector recognizes that a USB mouse is supplied from this jack. VIDEO jack (phono type):... to the S video output (Y/C video output) of video equipment. Location and Function of Sony equipment. S VIDEO connector (mini DIN 4-pin): Connects to use the appropriate cable. Connects...
Operating Instructions
Page 14
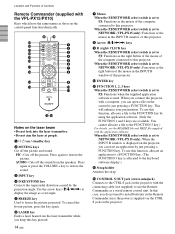
... MENU/ TAB LASER 1 2 3 4 5 6 7 8 qg qf ENTER R CLICK D ZOOM RESET/ ESCAPE 1 3 2 FUNCTION RM-PJM15 PROJECTOR 9 q; AUDIO: Cuts off the picture. Use the arrow keys (M/m/ wd ws wa w; Location and Function of Controls Remote Commander (supplied with the VPL-PX15/PX10) Keys which have the same names as those on / standby) key 2 MUTING keys Cut...
... MENU/ TAB LASER 1 2 3 4 5 6 7 8 qg qf ENTER R CLICK D ZOOM RESET/ ESCAPE 1 3 2 FUNCTION RM-PJM15 PROJECTOR 9 q; AUDIO: Cuts off the picture. Use the arrow keys (M/m/ wd ws wa w; Location and Function of Controls Remote Commander (supplied with the VPL-PX15/PX10) Keys which have the same names as those on / standby) key 2 MUTING keys Cut...

Operating Instructions
Page 15
Use an arrow key (M/m/ When the PJ/NETWORK select switch is set to PJ: Functions as the ESCAPE key of the keyboard when the INPUT B window is input. +: Pressing the + key once displays the icon. This key works only when a signal from a computer is displayed. qg D ZOOM +/- key Enlarges the image at a desired location on the screen. This icon indicates the point you want to enlarge. qf RESET/ESCAPE key When the PJ/NETWORK select switch is set to NETWORK (VPL-PX15 only): Functions as the RESET key.
Use an arrow key (M/m/ When the PJ/NETWORK select switch is set to PJ: Functions as the ESCAPE key of the keyboard when the INPUT B window is input. +: Pressing the + key once displays the icon. This key works only when a signal from a computer is displayed. qg D ZOOM +/- key Enlarges the image at a desired location on the screen. This icon indicates the point you want to enlarge. qf RESET/ESCAPE key When the PJ/NETWORK select switch is set to NETWORK (VPL-PX15 only): Functions as the RESET key.
Operating Instructions
Page 16
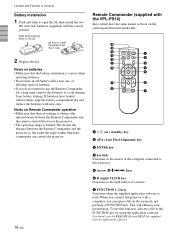
... Battery installation 1 Push and slide to obstruct the infrared beam between the Remote Commander and the projector is, the wider the angle within which the commander can control the projector. 16 (GB) Remote Commander (supplied with the VPL-PS10) Keys which have leaked, remove them, wipe the battery compartment dry and replace the...
... Battery installation 1 Push and slide to obstruct the infrared beam between the Remote Commander and the projector is, the wider the angle within which the commander can control the projector. 16 (GB) Remote Commander (supplied with the VPL-PS10) Keys which have leaked, remove them, wipe the battery compartment dry and replace the...

Operating Instructions
Page 18
...the following : • Turn off all equipment before making connections, be sure to the operating instructions supplied with qualified Sony personnel (fee charged). PUSH Connecting the Projector When making any connections. • Use the proper cables for the external monitor. • If you set your ... between the screen and the center of the screen. Connecting to a Computer This section describes how to connect the projector to SVGA (VPL-PS10) or XGA (VPL-PX15/PX10) mode for each connection. • Insert the cable plugs properly; plugs that you set the output mode of your...
...the following : • Turn off all equipment before making connections, be sure to the operating instructions supplied with qualified Sony personnel (fee charged). PUSH Connecting the Projector When making any connections. • Use the proper cables for the external monitor. • If you set your ... between the screen and the center of the screen. Connecting to a Computer This section describes how to connect the projector to SVGA (VPL-PS10) or XGA (VPL-PX15/PX10) mode for each connection. • Insert the cable plugs properly; plugs that you set the output mode of your...

Operating Instructions
Page 21
...card. PC card Insert the card with the INPUT-A setting in the INPUT SETTING menu according to the input signal. You can connect the projector to a wireless or wired LAN. The eject button pops out when the card is networking compatible. To remove the PC card from 15k ...(not supplied) HD D-sub 15-pin (male) y 3 × phono jack to RGB/ component output 15k RGB/Component equipment Connecting the Projector Connecting to a LAN (VPL-PX15 only) This projector is inserted. Using a wireless LAN PC card or a 10BASE-T/100BASE-TX LAN cable, you input the external sync signal from the slot...
...card. PC card Insert the card with the INPUT-A setting in the INPUT SETTING menu according to the input signal. You can connect the projector to a wireless or wired LAN. The eject button pops out when the card is networking compatible. To remove the PC card from 15k ...(not supplied) HD D-sub 15-pin (male) y 3 × phono jack to RGB/ component output 15k RGB/Component equipment Connecting the Projector Connecting to a LAN (VPL-PX15 only) This projector is inserted. Using a wireless LAN PC card or a 10BASE-T/100BASE-TX LAN cable, you input the external sync signal from the slot...

Operating Instructions
Page 24
... Selects the video signal input from the VIDEO jack on the Remote Commander (VPL-PX15/PX10 only). S-VIDEO: Selects the video signal input from the computer is projecting an image may cause injury to the projector. To clear the menu display Press the MENU key. VIDEO: Selects the video... connector. The menu changes to turn on all equipment is connected completely, plug the AC power cord into the lens when the projector is input. INPUT-B (VPL-PX15 only): Selects display of the picture. 5 Turn the focus ring to select the input source. The ON/STANDBY indicator lights...
... Selects the video signal input from the VIDEO jack on the Remote Commander (VPL-PX15/PX10 only). S-VIDEO: Selects the video signal input from the computer is projecting an image may cause injury to the projector. To clear the menu display Press the MENU key. VIDEO: Selects the video... connector. The menu changes to turn on all equipment is connected completely, plug the AC power cord into the lens when the projector is input. INPUT-B (VPL-PX15 only): Selects display of the picture. 5 Turn the focus ring to select the input source. The ON/STANDBY indicator lights...

Operating Instructions
Page 27
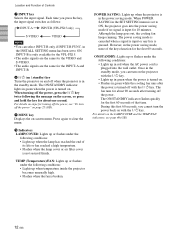
...33 (GB). 27 (GB) About the retention of the menu items as a yellow button. Adjustments and Settings Using the Menu Using the Menu The projector is pressed for making various adjustments and settings. "Complete!" Items that can set to select a menu, then press the , or ENTER key. ...For details on the Remote Commander. To select the language used in the projector memory. Note (VPL-PX15/PX10 only) Before operation, confirm that have been adjusted Press the RESET key. To reset items that the PJ/NETWORK select switch on an...
...33 (GB). 27 (GB) About the retention of the menu items as a yellow button. Adjustments and Settings Using the Menu Using the Menu The projector is pressed for making various adjustments and settings. "Complete!" Items that can set to select a menu, then press the , or ENTER key. ...For details on the Remote Commander. To select the language used in the projector memory. Note (VPL-PX15/PX10 only) Before operation, confirm that have been adjusted Press the RESET key. To reset items that the PJ/NETWORK select switch on an...

Operating Instructions
Page 30
... Adjusts the position of the LCD. As the setting for the first time, the memory number is displayed as the setting decreases, the picture moves to the left. VPL-PS10: When an SVGA, XGA or SXGA signal is input.... - 2) : Adjustable/can be set 1) The RGB signals of 16:9 (squeezed) is input. This projector has 37 kinds of user memories for preset signals, see page 31 (GB). If the input signal is...the dots of the picture. ON: Displays the picture according to the screen size. VPL-PX15/PX10: When an XGA or SXGA signal is input. PHASE SIZE H - The higher the setting, the ...
... Adjusts the position of the LCD. As the setting for the first time, the memory number is displayed as the setting decreases, the picture moves to the left. VPL-PS10: When an SVGA, XGA or SXGA signal is input.... - 2) : Adjustable/can be set 1) The RGB signals of 16:9 (squeezed) is input. This projector has 37 kinds of user memories for preset signals, see page 31 (GB). If the input signal is...the dots of the picture. ON: Displays the picture according to the screen size. VPL-PX15/PX10: When an XGA or SXGA signal is input. PHASE SIZE H - The higher the setting, the ...
Operating Instructions
Page 32
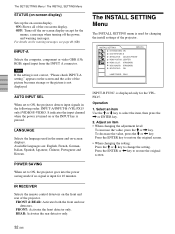
...VPLPX15. The INSTALL SETTING Menu The INSTALL SETTING menu is used in the following order: INPUT-A/INPUT-B (VPL-PX15 only)/VIDEO/S-VIDEO. Select an item Use the M or m key to ON, the projector goes into the power saving mode if no signal is turned on the front and rear of the...: Activates the rear detector only. 32 (GB) It indicates the input channel when the power is input for changing the install settings of the projector. Press the ENTER or < key to change the setting. Press the ENTER key to restore the original screen. • When changing the setting: Press the...
...VPLPX15. The INSTALL SETTING Menu The INSTALL SETTING menu is used in the following order: INPUT-A/INPUT-B (VPL-PX15 only)/VIDEO/S-VIDEO. Select an item Use the M or m key to ON, the projector goes into the power saving mode if no signal is turned on the front and rear of the...: Activates the rear detector only. 32 (GB) It indicates the input channel when the power is input for changing the install settings of the projector. Press the ENTER or < key to change the setting. Press the ENTER key to restore the original screen. • When changing the setting: Press the...
Operating Instructions
Page 33
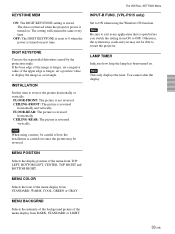
... Selects the intensity of the background picture of the menu from DARK, STANDARD or LIGHT. 33 (GB) The data is retrieved when the projector power is longer, set a negative value; DIGIT KEYSTONE Corrects the trapezoidal distortion caused by the projection angle. KEYSTONE MEM ON: The DIGIT ...crash and you switch the setting from STANDARD, WARM, COOL, GREEN or GRAY. The INSTALL SETTING Menu INPUT-B FUNC. (VPL-PX15 only) Set to restart the projector. Otherwise, the system may be careful of how the installation is reversed horizontally. LAMP TIMER Indicates how long the lamp ...
... Selects the intensity of the background picture of the menu from DARK, STANDARD or LIGHT. 33 (GB) The data is retrieved when the projector power is longer, set a negative value; DIGIT KEYSTONE Corrects the trapezoidal distortion caused by the projection angle. KEYSTONE MEM ON: The DIGIT ...crash and you switch the setting from STANDARD, WARM, COOL, GREEN or GRAY. The INSTALL SETTING Menu INPUT-B FUNC. (VPL-PX15 only) Set to restart the projector. Otherwise, the system may be careful of how the installation is reversed horizontally. LAMP TIMER Indicates how long the lamp ...

Operating Instructions
Page 34
Center of the projector x: Free ;;;;;;;; of the lens b: Distance from the floor to the center of the ... front of the cabinet and the center of the lens Standard lens: + 0 - -25.4 mm (-1 inch) b c Floor VPL-PX15/PX10 SS Minimum a Maximum b c Unit: mm (inches) 40 60 80 100 120 150 180 200 250 300 1458 2217 2977 3736... × 42.376846/0.9071) - 59.62151} × 0.975 b = x - (SS/0.9071 × 6.912) c = x - (SS/0.9071 × 6.912 + 83.4) VPL-PS10 SS Minimum a Maximum b c Unit: mm (inches) 40 60 80 100 120 150 180 200 250 300 1461 2221 2982 3742 4503 5644 6784 7545...
Center of the projector x: Free ;;;;;;;; of the lens b: Distance from the floor to the center of the ... front of the cabinet and the center of the lens Standard lens: + 0 - -25.4 mm (-1 inch) b c Floor VPL-PX15/PX10 SS Minimum a Maximum b c Unit: mm (inches) 40 60 80 100 120 150 180 200 250 300 1458 2217 2977 3736... × 42.376846/0.9071) - 59.62151} × 0.975 b = x - (SS/0.9071 × 6.912) c = x - (SS/0.9071 × 6.912 + 83.4) VPL-PS10 SS Minimum a Maximum b c Unit: mm (inches) 40 60 80 100 120 150 180 200 250 300 1461 2221 2982 3742 4503 5644 6784 7545...

Operating Instructions
Page 39
...pixels on the VPL-PX15/ PX10 Remote Commander to ON again (see page 29 (GB)). Press the AUDIO MUTING key on the LCD panel. through... before turning on the VPL-PX15/ PX10 Remote Commander to 23 (GB)). The sound is incorrect. Troubleshooting Troubleshooting If the projector appears to be operating ...erratically, try to diagnose and correct the problem, using the INPUT key (see page 18 (GB)). If the problem still persists, consult with qualified Sony...
...pixels on the VPL-PX15/ PX10 Remote Commander to ON again (see page 29 (GB)). Press the AUDIO MUTING key on the LCD panel. through... before turning on the VPL-PX15/ PX10 Remote Commander to 23 (GB)). The sound is incorrect. Troubleshooting Troubleshooting If the projector appears to be operating ...erratically, try to diagnose and correct the problem, using the INPUT key (see page 18 (GB)). If the problem still persists, consult with qualified Sony...

Operating Instructions
Page 40
...PJ/NETWORK select switch on the screen. Replace the lamp (see pages 18 (GB) to XGA (VPL-PX15/PX10) or SVGA (VPL-PS10) (see page 33 (GB)). Consult with qualified Sony personnel. Backup Battery Very Low (VPL-PX15 only) Meaning Remedy Internal temperature is broken. Set the setting of output to 23 (GB...key. Press the appropriate key. 40 (GB) Set INPUT-B FUNC. Message High temp.! The resolution setting of the output signal of the projector. Message NO INPUT Not applicable! Cause The lamp cover or the air filter cover is too high. The TEMP/FAN indicator lights up. ...
...PJ/NETWORK select switch on the screen. Replace the lamp (see pages 18 (GB) to XGA (VPL-PX15/PX10) or SVGA (VPL-PS10) (see page 33 (GB)). Consult with qualified Sony personnel. Backup Battery Very Low (VPL-PX15 only) Meaning Remedy Internal temperature is broken. Set the setting of output to 23 (GB...key. Press the appropriate key. 40 (GB) Set INPUT-B FUNC. Message High temp.! The resolution setting of the output signal of the projector. Message NO INPUT Not applicable! Cause The lamp cover or the air filter cover is too high. The TEMP/FAN indicator lights up. ...

Operating Instructions
Page 43
For details, please consult your nearest Sony dealer. Pin assignment INPUT A connector (HD D-sub 15-pin, female) 1 R/R-Y 2 G/Y 3 B/B-Y 4 GND 5 GND 6 GND (R) 7 GND (G) 8 GND (B) 9 N.C. 10 GND 11 GND 12 DDC/SDA 13... DATA 2 N.C. 3 GND 4 +5 V 5 CLK 6 N.C. 43 (GB) Specifications AC power cord (1) Air filter (for replacement) (1) Lens cap (1) Operating Instructions (1) Operating Instructions for Networking (VPL-PX15 only) (1) Installation Manual for replacement) Projector Suspension Support PSS-610 Monitor Cable SMF-410 (HD D-sub 15-pin (male) y HD D-sub 15-pin (male)) Signal Cable SMF-402...
For details, please consult your nearest Sony dealer. Pin assignment INPUT A connector (HD D-sub 15-pin, female) 1 R/R-Y 2 G/Y 3 B/B-Y 4 GND 5 GND 6 GND (R) 7 GND (G) 8 GND (B) 9 N.C. 10 GND 11 GND 12 DDC/SDA 13... DATA 2 N.C. 3 GND 4 +5 V 5 CLK 6 N.C. 43 (GB) Specifications AC power cord (1) Air filter (for replacement) (1) Lens cap (1) Operating Instructions (1) Operating Instructions for Networking (VPL-PX15 only) (1) Installation Manual for replacement) Projector Suspension Support PSS-610 Monitor Cable SMF-410 (HD D-sub 15-pin (male) y HD D-sub 15-pin (male)) Signal Cable SMF-402...


