
Operating Instructions
Page 1
Please check with your local Sony Authorized Dealer. © 2010 Sony Corporation 4-186-250-12 (1) Data Projector Operating Instructions Before operating the unit, please read this manual and supplied Quick Reference Manual thoroughly and retain it for future reference. VPL-FX35/FX30 Not all models are available in all countries and area.
Please check with your local Sony Authorized Dealer. © 2010 Sony Corporation 4-186-250-12 (1) Data Projector Operating Instructions Before operating the unit, please read this manual and supplied Quick Reference Manual thoroughly and retain it for future reference. VPL-FX35/FX30 Not all models are available in all countries and area.

Operating Instructions
Page 2
... Overview Location and Function of Controls .... 3 Main Unit 3 Connector Panel 4 Remote Commander and Control Panel 5 Preparation Connecting the Projector 8 Connecting a Computer 8 Connecting a Video Equipment ... 9 Connecting an External Monitor and Audio Equipment 11 Projecting/Adjusting an Image ...Information Menu 23 Network Using Network Features 24 Displaying the Control Window of the Projector with a Web Browser 24 Confirming the Information regarding the Projector 25 Operating the Projector from a Computer 25 Using the e-mail report Function 25 Others Indicators 27 Messages...
... Overview Location and Function of Controls .... 3 Main Unit 3 Connector Panel 4 Remote Commander and Control Panel 5 Preparation Connecting the Projector 8 Connecting a Computer 8 Connecting a Video Equipment ... 9 Connecting an External Monitor and Audio Equipment 11 Projecting/Adjusting an Image ...Information Menu 23 Network Using Network Features 24 Displaying the Control Window of the Projector with a Web Browser 24 Confirming the Information regarding the Projector 25 Operating the Projector from a Computer 25 Using the e-mail report Function 25 Others Indicators 27 Messages...
Operating Instructions
Page 3
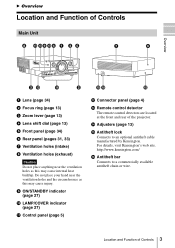
... indicator (page 27) k Control panel (page 5) l Connector panel (page 4) m Remote control detector The remote control detectors are located at the front and rear of the projector. n Adjusters (page 13) o Antitheft lock Connects to a commercially available antitheft chain or wire.
... indicator (page 27) k Control panel (page 5) l Connector panel (page 4) m Remote control detector The remote control detectors are located at the front and rear of the projector. n Adjusters (page 13) o Antitheft lock Connects to a commercially available antitheft chain or wire.

Operating Instructions
Page 4
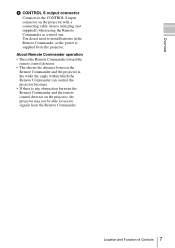
... input connector (AUDIO L [MONO]/R) e VIDEO (VIDEO IN) Video: Video input connector Audio: Audio input connector (AUDIO L [MONO]/R) Notes • The audio input connectors of the projector are shared. 1 6 Output (page 11) f OUTPUT Video: Monitor output connector (MONITOR) Audio: Audio output connector (AUDIO) Note This connector outputs the projected image or audio...
... input connector (AUDIO L [MONO]/R) e VIDEO (VIDEO IN) Video: Video input connector Audio: Audio input connector (AUDIO L [MONO]/R) Notes • The audio input connectors of the projector are shared. 1 6 Output (page 11) f OUTPUT Video: Monitor output connector (MONITOR) Audio: Audio output connector (AUDIO) Note This connector outputs the projected image or audio...
Operating Instructions
Page 5
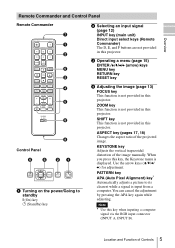
... signal (page 12) INPUT key (main unit) Direct input select keys (Remote Commander) The D, E, and F buttons are not provided in this projector. When you press this key when inputing a computer signal via the RGB input connector (INPUT A, INPUT B). You can cancel the adjustment by pressing ... (page 15) ENTER /V/v/B/b (arrow) keys MENU key RETURN key RESET key d Adjusting the image (page 13) FOCUS key This function is not provided in this projector. APA TWIN FREEZE ID MODE 1 2 3 7 1 2 6 3 4 5 8 Control Panel 63 9 21 ECO MODE ENTER MENU INPUT a Turning on the power/Going...
... signal (page 12) INPUT key (main unit) Direct input select keys (Remote Commander) The D, E, and F buttons are not provided in this projector. When you press this key when inputing a computer signal via the RGB input connector (INPUT A, INPUT B). You can cancel the adjustment by pressing ... (page 15) ENTER /V/v/B/b (arrow) keys MENU key RETURN key RESET key d Adjusting the image (page 13) FOCUS key This function is not provided in this projector. APA TWIN FREEZE ID MODE 1 2 3 7 1 2 6 3 4 5 8 Control Panel 63 9 21 ECO MODE ENTER MENU INPUT a Turning on the power/Going...
Operating Instructions
Page 6
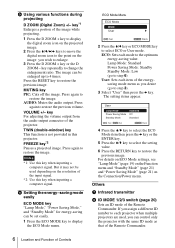
... key PIC: Cuts off the image. Press again to restore the previous image. But it may not be enlarged up to each projector when multiple projectors are used depending on the Connection/Power menu. User Lamp Mode Power Saving Mode Standby Mode Standard Off Standard Sel Set Back 4 ...not provided in this key when inputting a computer signal. Others g Infrared transmitter h ID MODE 1/2/3 switch (page 20) Sets an ID mode of the projector. If you assign a different ID number to 4 times. Press the RESET key to restore the image. AUDIO: Mutes the audio output. The image ...
... key PIC: Cuts off the image. Press again to restore the previous image. But it may not be enlarged up to each projector when multiple projectors are used depending on the Connection/Power menu. User Lamp Mode Power Saving Mode Standby Mode Standard Off Standard Sel Set Back 4 ...not provided in this key when inputting a computer signal. Others g Infrared transmitter h ID MODE 1/2/3 switch (page 20) Sets an ID mode of the projector. If you assign a different ID number to 4 times. Press the RESET key to restore the image. AUDIO: Mutes the audio output. The image ...
Operating Instructions
Page 7
...toward the remote control detector. • The shorter the distance between the Remote Commander and the projector is, the wider the angle within which the Remote Commander can control the projector becomes. • If there is any obstruction between the Remote Commander and the remote control ...detector on the projector with a connecting cable (stereo mini plug (not supplied)) when using the Remote Commander as...
...toward the remote control detector. • The shorter the distance between the Remote Commander and the projector is, the wider the angle within which the Remote Commander can control the projector becomes. • If there is any obstruction between the Remote Commander and the remote control ...detector on the projector with a connecting cable (stereo mini plug (not supplied)) when using the Remote Commander as...
Operating Instructions
Page 8
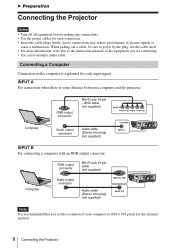
B Preparation Connecting the Projector Notes • Turn off all equipment before making any connections. • Use the proper cables for each connection. &#..., not the cable itself. • For more information, refer also to 1024 × 768 pixels for the external monitor. 8 Connecting the Projector RGB output connector Mini D-sub 15-pin - BNC cable (not supplied) Computer Audio output connector Audio cable (Stereo mini plug) (not supplied)... output connector Audio cable (Stereo mini plug) (not supplied) Note It is some distance between a computer and the projector.
B Preparation Connecting the Projector Notes • Turn off all equipment before making any connections. • Use the proper cables for each connection. &#..., not the cable itself. • For more information, refer also to 1024 × 768 pixels for the external monitor. 8 Connecting the Projector RGB output connector Mini D-sub 15-pin - BNC cable (not supplied) Computer Audio output connector Audio cable (Stereo mini plug) (not supplied)... output connector Audio cable (Stereo mini plug) (not supplied) Note It is some distance between a computer and the projector.
Operating Instructions
Page 9
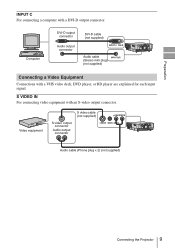
Preparation INPUT C For connecting a computer with an S-video output connector. Video equipment S video output connector Audio output connector S video cable (not supplied) Audio cable (Phone plug × 2) (not supplied) Connecting the Projector 9 S VIDEO IN For connecting video equipment with a DVI-D output connector. Computer DVI-D output connector Audio output connector DVI-D cable (not supplied) Audio cable (Stereo mini plug) (not supplied) Connecting a Video Equipment Connections with a VHS video deck, DVD player, or BD player are explained for each input signal.
Preparation INPUT C For connecting a computer with an S-video output connector. Video equipment S video output connector Audio output connector S video cable (not supplied) Audio cable (Phone plug × 2) (not supplied) Connecting the Projector 9 S VIDEO IN For connecting video equipment with a DVI-D output connector. Computer DVI-D output connector Audio output connector DVI-D cable (not supplied) Audio cable (Stereo mini plug) (not supplied) Connecting a Video Equipment Connections with a VHS video deck, DVD player, or BD player are explained for each input signal.

Operating Instructions
Page 10
stereo mini plug) (not supplied) 10 Connecting the Projector BNC cable (not supplied) Audio cable (Phone plug × 2 - Video equipment Video output connector Audio output connector Video cable (not supplied) Audio cable (Phone plug × 2) (not supplied) INPUT A For connection when there is some long distance between the video equipment and projector. Video equipment YPBPR output connector Audio output connector Component - VIDEO IN For connecting video equipment with a video output connector.
stereo mini plug) (not supplied) 10 Connecting the Projector BNC cable (not supplied) Audio cable (Phone plug × 2 - Video equipment Video output connector Audio output connector Video cable (not supplied) Audio cable (Phone plug × 2) (not supplied) INPUT A For connection when there is some long distance between the video equipment and projector. Video equipment YPBPR output connector Audio output connector Component - VIDEO IN For connecting video equipment with a video output connector.
Operating Instructions
Page 11
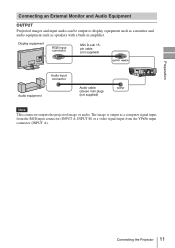
... equipment such as a computer signal input from the RGB input connector (INPUT A, INPUT B) or a video signal input from the YPBPR input connector (INPUT A). Connecting the Projector 11 Display equipment RGB input connector Mini D-sub 15pin cable (not supplied) Audio input connector Audio equipment Audio cable (stereo mini plug) (not supplied) Note...
... equipment such as a computer signal input from the RGB input connector (INPUT A, INPUT B) or a video signal input from the YPBPR input connector (INPUT A). Connecting the Projector 11 Display equipment RGB input connector Mini D-sub 15pin cable (not supplied) Audio input connector Audio equipment Audio cable (stereo mini plug) (not supplied) Note...

Operating Instructions
Page 12
...You can select the input source using Direct input select keys on the Remote Commander (page 5). 6 Switch your computer to output to the projector (page 8). 3 Turn on projection distances and projected image sizes, see "Projection Distance and Lens Shift Range" (page 42). 5 Input ...Video 4 S-Videoo Input-A Input-B Input-C Sel Skip 6 Computer 2 3 Video equipment INPUT 5 Projector 1 Wall outlet 1 Plug the AC power cord into a wall outlet. 2 Connect all equipment to external display by changing your computer's setting. Press ...
...You can select the input source using Direct input select keys on the Remote Commander (page 5). 6 Switch your computer to output to the projector (page 8). 3 Turn on projection distances and projected image sizes, see "Projection Distance and Lens Shift Range" (page 42). 5 Input ...Video 4 S-Videoo Input-A Input-B Input-C Sel Skip 6 Computer 2 3 Video equipment INPUT 5 Projector 1 Wall outlet 1 Plug the AC power cord into a wall outlet. 2 Connect all equipment to external display by changing your computer's setting. Press ...
Operating Instructions
Page 13
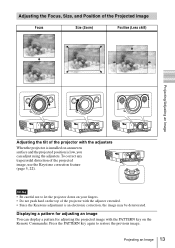
.... • Since the Keystone adjustment is low, you can display a pattern for adjusting the projected image with the adjusters When the projector is installed on the Remote Commander. Projecting an Image 13 Displaying a pattern for adjusting an image You can adjust using the adjusters. To..., Size, and Position of the Projected image Focus Size (Zoom) Position (Lens shift) Projecting/Adjusting an Image Adjusting the tilt of the projector with the PATTERN key on an uneven surface and the projected position is an electronic correction, the image may be deteriorated. Notes • ...
.... • Since the Keystone adjustment is low, you can display a pattern for adjusting the projected image with the adjusters When the projector is installed on the Remote Commander. Projecting an Image 13 Displaying a pattern for adjusting an image You can adjust using the adjusters. To..., Size, and Position of the Projected image Focus Size (Zoom) Position (Lens shift) Projecting/Adjusting an Image Adjusting the tilt of the projector with the PATTERN key on an uneven surface and the projected position is an electronic correction, the image may be deteriorated. Notes • ...
Operating Instructions
Page 17
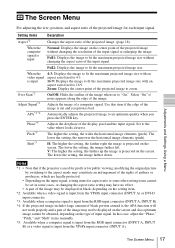
...). Shift*5 H: The higher the setting, the farther right the image is input Normal: Displays the image on the screen. Notes *1: • Note that if the projector is bad.
...). Shift*5 H: The higher the setting, the farther right the image is input Normal: Displays the image on the screen. Notes *1: • Note that if the projector is bad.
Operating Instructions
Page 19
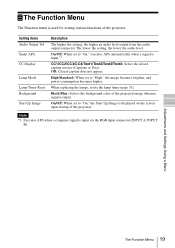
..., resets the lamp timer (page 31). Setting items Audio Output Vol. Off: Closed caption does not appear. Black/Blue: Selects the background color of the projector. The Function Menu The Function menu is used for setting various functions of the projected image when no signal is input. On/Off; On/Off...
..., resets the lamp timer (page 31). Setting items Audio Output Vol. Off: Closed caption does not appear. Black/Blue: Selects the background color of the projector. The Function Menu The Function menu is used for setting various functions of the projected image when no signal is input. On/Off; On/Off...

Operating Instructions
Page 20
... for the menus, message when turning off the on the power again. On/Off: When set to use the projector if you can cancel the security lock. If you call qualified Sony personnel because you have forgotten the password, you will provide you turn on -screen displays except for approximately 10 seconds...
... for the menus, message when turning off the on the power again. On/Off: When set to use the projector if you can cancel the security lock. If you call qualified Sony personnel because you have forgotten the password, you will provide you turn on -screen displays except for approximately 10 seconds...
Operating Instructions
Page 21
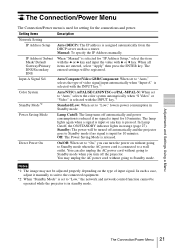
...is selected with the INPUT key.*1 Standard/Low: When set to a wall outlet. Standby: The power will be turned off the projector. You can turn off automatically and the projector goes to Standby mode if no signal is connected to "Auto," selects the color system automatically when "S Video" or "Video"... DNS When "Manual" is pressed. Input-A Signal Sel. Off: The Power Saving Mode is in standby mode. You may not be operated while the projector is released. Direct Power On On/Off: When set to "Low," lowers power consumption in orange (page 27). In such a case, adjust it ...
...is selected with the INPUT key.*1 Standard/Low: When set to a wall outlet. Standby: The power will be turned off the projector. You can turn off automatically and the projector goes to Standby mode if no signal is connected to "Auto," selects the color system automatically when "S Video" or "Video"... DNS When "Manual" is pressed. Input-A Signal Sel. Off: The Power Saving Mode is in standby mode. You may not be operated while the projector is released. Direct Power On On/Off: When set to "Low," lowers power consumption in orange (page 27). In such a case, adjust it ...
Operating Instructions
Page 22
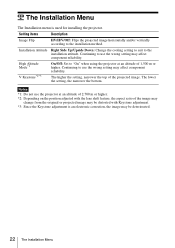
...image may be deteriorated. 22 The Installation Menu High Altitude Mode*1 V Keystone*2*3 On/Off: Set to "On" when using the projector at an altitude of 2,700 m or higher. *2: Depending on the position adjusted with Keystone adjustment. *3: Since the Keystone adjustment is ...used for installing the projector. Continuing to use the wrong setting may affect component reliability. Continuing to use the projector at an altitude of the projected image. The lower the setting, the narrower the bottom...
...image may be deteriorated. 22 The Installation Menu High Altitude Mode*1 V Keystone*2*3 On/Off: Set to "On" when using the projector at an altitude of 2,700 m or higher. *2: Depending on the position adjusted with Keystone adjustment. *3: Since the Keystone adjustment is ...used for installing the projector. Continuing to use the wrong setting may affect component reliability. Continuing to use the projector at an altitude of the projected image. The lower the setting, the narrower the bottom...
Operating Instructions
Page 23
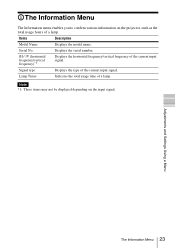
.../vertical frequency of the current input signal. Items Description Model Name Displays the model name. Note *1: These items may not be displayed depending on the projector, such as the total usage hours of a lamp. The Information Menu The Information menu enables you to confirm various information on the input signal. Adjustments...
.../vertical frequency of the current input signal. Items Description Model Name Displays the model name. Note *1: These items may not be displayed depending on the projector, such as the total usage hours of a lamp. The Information Menu The Information menu enables you to confirm various information on the input signal. Adjustments...
Operating Instructions
Page 24
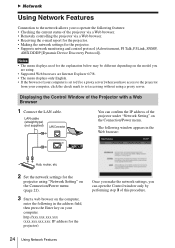
... are using. • Supported Web browsers are Internet Explorer 6/7/8. • The menu displays only English. • If the browser of the projector under "Network Setting" on the Connection/Power menu. LAN cable (straight type) (not supplied) LAN Connector You can open the Control window only... by performing step 3 of the Projector with a Web Browser 1 Connect the LAN cable. B Network Using Network Features Connection to the network allows you to set to [Use a proxy...
... are using. • Supported Web browsers are Internet Explorer 6/7/8. • The menu displays only English. • If the browser of the projector under "Network Setting" on the Connection/Power menu. LAN cable (straight type) (not supplied) LAN Connector You can open the Control window only... by performing step 3 of the Projector with a Web Browser 1 Connect the LAN cable. B Network Using Network Features Connection to the network allows you to set to [Use a proxy...


