Operating Instructions
Page 3
... negative consequences for EMC and product safety is Sony Corporation, 1-7-1 Konan, Minato-ku, Tokyo, Japan. For the customers in separate service or guarantee documents. Disposal of the used lamp For the customers in the USA Lamp in Taiwan only For kundene i Norge Dette utstyret... Authorized Representative for the environment and human health, which could otherwise be regulated due to the safety regulations of this product is Sony Deutschland GmbH, Hedelfinger Strasse 61, 70327 Stuttgart, Germany. WARNING: THIS WARNING IS APPLICABLE FOR OTHER COUNTRIES. 1. For any service...
... negative consequences for EMC and product safety is Sony Corporation, 1-7-1 Konan, Minato-ku, Tokyo, Japan. For the customers in separate service or guarantee documents. Disposal of the used lamp For the customers in the USA Lamp in Taiwan only For kundene i Norge Dette utstyret... Authorized Representative for the environment and human health, which could otherwise be regulated due to the safety regulations of this product is Sony Deutschland GmbH, Hedelfinger Strasse 61, 70327 Stuttgart, Germany. WARNING: THIS WARNING IS APPLICABLE FOR OTHER COUNTRIES. 1. For any service...
Operating Instructions
Page 4
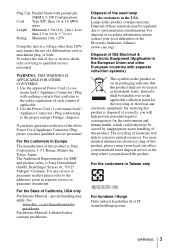
... Side/Front 10 Rear/Bottom 10 Control Panel 12 Connector Panel 14 Remote Commander 15 Projecting the Picture Installing the Projector 17 Connecting the Projector 18 Connecting a Computer 18 Connecting a VCR 19 Projecting 20 Turning Off the Power 22 Convenient Functions Selecting the ... SETTING Menu 33 The MENU SETTING Menu ...........35 The INSTALL SETTING Menu .......36 The INFORMATION Menu 38 Maintenance Replacing the Lamp 40 Cleaning the Air Filter 42 Others Troubleshooting 43 Messages List 45 Specifications 47 Installation Diagram 52 Floor Installation (Front Projection...
... Side/Front 10 Rear/Bottom 10 Control Panel 12 Connector Panel 14 Remote Commander 15 Projecting the Picture Installing the Projector 17 Connecting the Projector 18 Connecting a Computer 18 Connecting a VCR 19 Projecting 20 Turning Off the Power 22 Convenient Functions Selecting the ... SETTING Menu 33 The MENU SETTING Menu ...........35 The INSTALL SETTING Menu .......36 The INFORMATION Menu 38 Maintenance Replacing the Lamp 40 Cleaning the Air Filter 42 Others Troubleshooting 43 Messages List 45 Specifications 47 Installation Diagram 52 Floor Installation (Front Projection...
Operating Instructions
Page 5
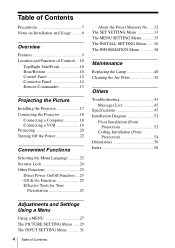
... of your fingers caught in a room where floor and walls are of reflecting material, it is recommended that face the screen with qualified Sony personnel. • Should any windows that the carpet and wall paper be used for the air filter cleaning. Cleaning the air filter &#...8226; Clean the air filter whenever you replace the lamp. • Refer to the following: • Avoid touching the lens. Stubborn stains may impair the performance of the projector, take care with respect to the "Cleaning the Air Filter" on . • Do...
... of your fingers caught in a room where floor and walls are of reflecting material, it is recommended that face the screen with qualified Sony personnel. • Should any windows that the carpet and wall paper be used for the air filter cleaning. Cleaning the air filter &#...8226; Clean the air filter whenever you replace the lamp. • Refer to the following: • Avoid touching the lens. Stubborn stains may impair the performance of the projector, take care with respect to the "Cleaning the Air Filter" on . • Do...
Operating Instructions
Page 7
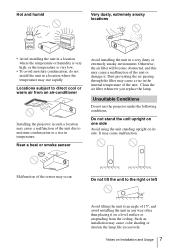
...the unit to the right or left Avoid tilting the unit to an angle of the unit. It may cause color shading or shorten the lamp life excessively. Locations subject to moisture condensation or a rise in such a location may cause a malfunction of the sensor may cause a ...cause a malfunction of the unit or damage it on a level surface or suspending from an air-conditioner Installing the projector in temperature. Unsuitable Conditions Do not use the projector under the following conditions. Otherwise, the air filter will become obstructed, and this may rise rapidly. Hot and humid...
...the unit to the right or left Avoid tilting the unit to an angle of the unit. It may cause color shading or shorten the lamp life excessively. Locations subject to moisture condensation or a rise in such a location may cause a malfunction of the sensor may cause a ...cause a malfunction of the unit or damage it on a level surface or suspending from an air-conditioner Installing the projector in temperature. Unsuitable Conditions Do not use the projector under the following conditions. Otherwise, the air filter will become obstructed, and this may rise rapidly. Hot and humid...
Operating Instructions
Page 9
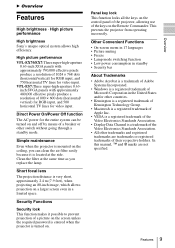
... when the projector is located at the same time as you replace the lamp. Simple maintenance Even when the projector is mounted on the ceiling, you can be turned on . High picture performance VPL-EX70/EX7:Three super-high-aperture 0.63-inch XGA panels with ...approximately 480,000 effective pixels produce a resolution of a breaker or other trademarks and registered trademarks are not specified. Clean the filter at the side. Overview B Overview Features High brightness · High picture performance High brightness Sony...
... when the projector is located at the same time as you replace the lamp. Simple maintenance Even when the projector is mounted on the ceiling, you can be turned on . High picture performance VPL-EX70/EX7:Three super-high-aperture 0.63-inch XGA panels with ...approximately 480,000 effective pixels produce a resolution of a breaker or other trademarks and registered trademarks are not specified. Clean the filter at the side. Overview B Overview Features High brightness · High picture performance High brightness Sony...
Operating Instructions
Page 11
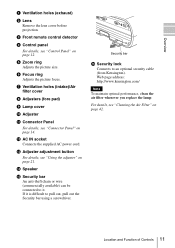
g Ventilation holes (intake)/Air filter cover h Adjusters (fore pad) i Lamp cover j Adjuster k Connector Panel For details, see "Using the adjuster" on page 14. m Adjuster adjustment button For details, see "Connector Panel" on page 21. If ... Air Filter" on page 12. Web page address: http://www.kensington.com/ Note To maintain optimal performance, clean the air filter whenever you replace the lamp.
g Ventilation holes (intake)/Air filter cover h Adjusters (fore pad) i Lamp cover j Adjuster k Connector Panel For details, see "Using the adjuster" on page 14. m Adjuster adjustment button For details, see "Connector Panel" on page 21. If ... Air Filter" on page 12. Web page address: http://www.kensington.com/ Note To maintain optimal performance, clean the air filter whenever you replace the lamp.
Operating Instructions
Page 12
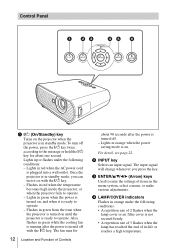
...when the power is turned on, and when it on . Control Panel 1 23 45 6 a ?/1 (On/Standby) key Turns on the projector when the projector is ready to operate. Once the projector is in orange when the power saving mode is plugged into a wall outlet. Lights in standby mode, you press the key.... The input signal will change whenever you can turn off . - d LAMP/COVER indicators Flashes in red when the AC power cord is on ...
...when the power is turned on, and when it on . Control Panel 1 23 45 6 a ?/1 (On/Standby) key Turns on the projector when the projector is ready to operate. Once the projector is in orange when the power saving mode is plugged into a wall outlet. Lights in standby mode, you press the key.... The input signal will change whenever you can turn off . - d LAMP/COVER indicators Flashes in red when the AC power cord is on ...
Operating Instructions
Page 27
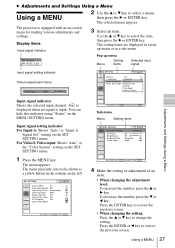
... and Settings Using a Menu Using a MENU 2 Use the v or V key to select the item, then press the B or ENTER key. The projector is input. Input signal setting indicator For Input-A: Shows "Auto" or "Input-A Signal Sel." Press the ENTER key to restore the previous screen. •... On Auto Input Search: Off Input-A Signal Sel.: Component Color System: Auto Power Saving: Off Panel Key Lock: Off CC Display: Off Lamp Timer Reset Sub menu Menu Setting items PICTURE SETTING Input A ADJUST PICTURE Contrast: Brightness: Gamma Mode: Color Temp.: Standard 80 50 Graphics High...
... and Settings Using a Menu Using a MENU 2 Use the v or V key to select the item, then press the B or ENTER key. The projector is input. Input signal setting indicator For Input-A: Shows "Auto" or "Input-A Signal Sel." Press the ENTER key to restore the previous screen. •... On Auto Input Search: Off Input-A Signal Sel.: Component Color System: Auto Power Saving: Off Panel Key Lock: Off CC Display: Off Lamp Timer Reset Sub menu Menu Setting items PICTURE SETTING Input A ADJUST PICTURE Contrast: Brightness: Gamma Mode: Color Temp.: Standard 80 50 Graphics High...
Operating Instructions
Page 33
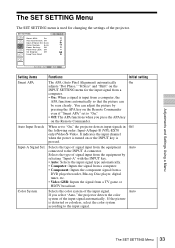
... by pressing the APA key on the Remote Commander even if "Smart APA" set to "On," the projector detects input signals in Off the following order: Input-A/Input-B (VPL-EX70 only)/Video/S-Video. Auto The SET SETTING Menu 33 It indicates the input channel when the power is... t APA: On Auto Input Search: Off Input-A Signal Sel.: Auto Color System: Auto Power Saving: Off Panel Key Lock: Off CC Display: Off Lamp Timer Reset Input-A Setting items Functions Initial setting Smart APA The APA (Auto Pixel Alignment) automatically On adjusts "Dot Phase," "H Size" and "Shift"...
... by pressing the APA key on the Remote Commander even if "Smart APA" set to "On," the projector detects input signals in Off the following order: Input-A/Input-B (VPL-EX70 only)/Video/S-Video. Auto The SET SETTING Menu 33 It indicates the input channel when the power is... t APA: On Auto Input Search: Off Input-A Signal Sel.: Auto Color System: Auto Power Saving: Off Panel Key Lock: Off CC Display: Off Lamp Timer Reset Input-A Setting items Functions Initial setting Smart APA The APA (Auto Pixel Alignment) automatically On adjusts "Dot Phase," "H Size" and "Shift"...
Operating Instructions
Page 34
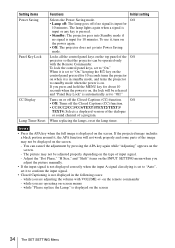
...10 minutes. Setting items Power Saving Panel Key Lock CC Display Lamp Timer Reset Functions Initial setting Selects the Power Saving mode. The lamp lights again when a signal is input or any key is pressed. • Standby: The projector goes into Power Saving mode. When it is in the ...following cases: - When replacing the lamps, reset the lamp timer. - Off • Lamp off: The lamp goes off if no signal is on the screen. - To lock the control...
...10 minutes. Setting items Power Saving Panel Key Lock CC Display Lamp Timer Reset Functions Initial setting Selects the Power Saving mode. The lamp lights again when a signal is input or any key is pressed. • Standby: The projector goes into Power Saving mode. When it is in the ...following cases: - When replacing the lamps, reset the lamp timer. - Off • Lamp off: The lamp goes off if no signal is on the screen. - To lock the control...
Operating Instructions
Page 36
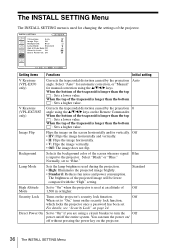
...Turns on the projector. 36 The INSTALL SETTING Menu When the bottom of the trapezoid is longer than the bottom : Sets a higher value. The INSTALL SETTING Menu The INSTALL SETTING menu is used for manual correction using the v/V/b/B keys. Auto V Keystone (VPL-EX7/ES7 only) ...V Keystone (VPL-EX70 only) Corrects the trapezoidal distortion caused by the projection 0 angle using the v/V/b/B keys on the security lock function, which locks the projector once a password has been set to "On" when the projector is input to the projector. Lamp Mode Sets the lamp brightness used ...
...Turns on the projector. 36 The INSTALL SETTING Menu When the bottom of the trapezoid is longer than the bottom : Sets a higher value. The INSTALL SETTING Menu The INSTALL SETTING menu is used for manual correction using the v/V/b/B keys. Auto V Keystone (VPL-EX7/ES7 only) ...V Keystone (VPL-EX70 only) Corrects the trapezoidal distortion caused by the projection 0 angle using the v/V/b/B keys on the security lock function, which locks the projector once a password has been set to "On" when the projector is input to the projector. Lamp Mode Sets the lamp brightness used ...
Operating Instructions
Page 37
...Keystone setting to "Manual", then return it is set "High Altitude Mode" to "Manual" from "Auto". The INSTALL SETTING Menu 37 Notes on VPL-EX70 • The auto V Keystone adjustment may not correct the trapezoidal distortion perfectly, depending on the control panel or the remote commander, and ...change the V Keystone setting to "On" at an altitude of under 1,500 m, the reliability of the lamp may deteriorate when the V Keystone function is used, because it to "Auto". • When you set to "Manual" from "Auto". The setting...
...Keystone setting to "Manual", then return it is set "High Altitude Mode" to "Manual" from "Auto". The INSTALL SETTING Menu 37 Notes on VPL-EX70 • The auto V Keystone adjustment may not correct the trapezoidal distortion perfectly, depending on the control panel or the remote commander, and ...change the V Keystone setting to "On" at an altitude of under 1,500 m, the reliability of the lamp may deteriorate when the V Keystone function is used, because it to "Auto". • When you set to "Manual" from "Auto". The setting...

Operating Instructions
Page 38
Indicates how long the lamp has been turned on the screen. The INFORMATION Menu The INFORMATION menu displays the model name, serial number, the horizontal and vertical frequencies of the ... The INFORMATION Menu Note These are only displayed on . You cannot alter the display, and these is approximate. The displayed value is approximate. INFORMATION VPL-EX70 fH: fV: Lamp Timer: Input A Serial No. 3 3 3 3 3 3 3 48,47kHz 60,00Hz No.23 1024x768 2 H Model name Serial number Memory number of an input signal Signal type...
Indicates how long the lamp has been turned on the screen. The INFORMATION Menu The INFORMATION menu displays the model name, serial number, the horizontal and vertical frequencies of the ... The INFORMATION Menu Note These are only displayed on . You cannot alter the display, and these is approximate. The displayed value is approximate. INFORMATION VPL-EX70 fH: fV: Lamp Timer: Input A Serial No. 3 3 3 3 3 3 3 48,47kHz 60,00Hz No.23 1024x768 2 H Model name Serial number Memory number of an input signal Signal type...

Operating Instructions
Page 40
... screws on the screen • The LAMP/COVER indicator lights up . B Maintenance Replacing the Lamp The lamp used as the replacement lamp. Turn the projector over . 3 Open the lamp cover by the handle (c). Thus replace the lamp with the Phillips screwdriver (a). Notes • If the lamp breaks, ask qualified Sony personnel to replace the lamp and to check inside. •...
... screws on the screen • The LAMP/COVER indicator lights up . B Maintenance Replacing the Lamp The lamp used as the replacement lamp. Turn the projector over . 3 Open the lamp cover by the handle (c). Thus replace the lamp with the Phillips screwdriver (a). Notes • If the lamp breaks, ask qualified Sony personnel to replace the lamp and to check inside. •...
Operating Instructions
Page 41
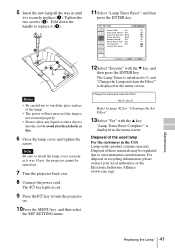
...Notes • Be careful not to touch the glass surface of the lamp. • The power will not turn the projector on . 7 Turn the projector back over. 8 Connect the power cord. Change the Lamp and clean the Filter? 5 Insert the new lamp all the way in until it is displayed in the menu screen.... or the Electronic Industries Alliance (www.eiae.org). The ?/1 key lights in this product contains mercury. If not, the projector cannot be regulated due to turn on if the lamp is not secured properly. • Do not allow any liquid or other objects into the slot to replace it (c). 11Select...
...Notes • Be careful not to touch the glass surface of the lamp. • The power will not turn the projector on . 7 Turn the projector back over. 8 Connect the power cord. Change the Lamp and clean the Filter? 5 Insert the new lamp all the way in until it is displayed in the menu screen.... or the Electronic Industries Alliance (www.eiae.org). The ?/1 key lights in this product contains mercury. If not, the projector cannot be regulated due to turn on if the lamp is not secured properly. • Do not allow any liquid or other objects into the slot to replace it (c). 11Select...
Operating Instructions
Page 42
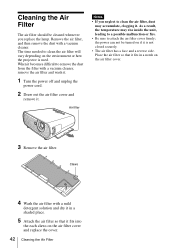
... the each claws on the air filter cover and replace the cover. 42 Cleaning the Air Filter Air filter Notes • If you replace the lamp. Claws 4 Wash the air filter with a mild detergent solution and dry it in a notch on the air filter cover. 3 Remove the air filter. When it... the unit, leading to a possible malfunction or fire. • Be sure to clean the air filter will vary depending on the environment or how the projector is not closed securely. • The air filter has a face and a reverse side. Cleaning the Air Filter The air filter should be turned on if...
... the each claws on the air filter cover and replace the cover. 42 Cleaning the Air Filter Air filter Notes • If you replace the lamp. Claws 4 Wash the air filter with a mild detergent solution and dry it in a notch on the air filter cover. 3 Remove the air filter. When it... the unit, leading to a possible malfunction or fire. • Be sure to clean the air filter will vary depending on the environment or how the projector is not closed securely. • The air filter has a face and a reverse side. Cleaning the Air Filter The air filter should be turned on if...
Operating Instructions
Page 43
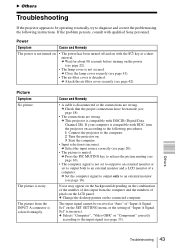
... according to the following procedures. 1 Connect the projector to diagnose and correct the problem using the following instructions. c Set the computer signal to output only to an external monitor and a LCD monitor of a computer. c Close the lamp cover securely (see page 18). • The ...page 20). • The picture is incorrect. If your computer is compatible with qualified Sony personnel. c Attach the air filter cover securely (see page 33). B Others Troubleshooting If the projector appears to be received at a short interval. c Wait for about 90 seconds before turning...
... according to the following procedures. 1 Connect the projector to diagnose and correct the problem using the following instructions. c Set the computer signal to output only to an external monitor and a LCD monitor of a computer. c Close the lamp cover securely (see page 18). • The ...page 20). • The picture is incorrect. If your computer is compatible with qualified Sony personnel. c Attach the air filter cover securely (see page 33). B Others Troubleshooting If the projector appears to be received at a short interval. c Wait for about 90 seconds before turning...
Operating Instructions
Page 44
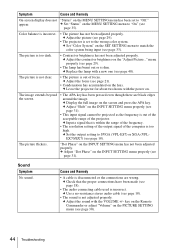
... Set the output setting to SVGA (VPL-ES7) or XGA (VPLEX70/EX7) (see page 18). • The audio connecting cable used is dim. c Adjust the picture (see page 29). • The lamp has burnt out or is incorrect. menu properly (see page 29). • The projector is not adjusted properly. c Use ... on the INPUT SETTING menu properly (see page 30). 44 Troubleshooting c Leave the projector for about two hours with the VOLUME +/- c Set "Status" on the SET SETTING menu to "Off." c Replace the lamp with a new one (see page 18). • The sound is set to match...
... Set the output setting to SVGA (VPL-ES7) or XGA (VPLEX70/EX7) (see page 18). • The audio connecting cable used is dim. c Adjust the picture (see page 29). • The lamp has burnt out or is incorrect. menu properly (see page 29). • The projector is not adjusted properly. c Use ... on the INPUT SETTING menu properly (see page 30). 44 Troubleshooting c Leave the projector for about two hours with the VOLUME +/- c Set "Status" on the SET SETTING menu to "Off." c Replace the lamp with a new one (see page 18). • The sound is set to match...
Operating Instructions
Page 45
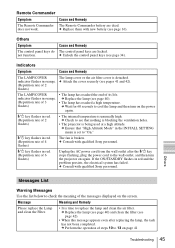
... task has not been completed. c Replace them with qualified Sony personnel. indicator flashes in red and the problem persists, the electrical system has failed. c Replace the lamp (see page 34). c Ensure that nothing is blocking the ventilation holes. • The projector is being used at a high altitude. If the ON/STANDBY flashes in...
... task has not been completed. c Replace them with qualified Sony personnel. indicator flashes in red and the problem persists, the electrical system has failed. c Replace the lamp (see page 34). c Ensure that nothing is blocking the ventilation holes. • The projector is being used at a high altitude. If the ON/STANDBY flashes in...
Operating Instructions
Page 47
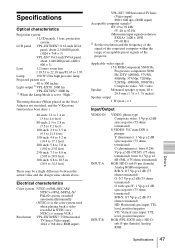
... 3 LCD panels, 1 lens, projection system LCD panel VPL-EX70/EX7: 0.63-inch XGA panel, about 2,360,000 pixels (1024 × 768 × 3) VPL-ES7: 0.63-inch SVGA panel, about 1,440,000 pixels (800 × 600 × 3) Lens 1.2 times zoom lens f 18.53 to 22.18 mm/F1.65 to 1.93 Lamp 190...the connected computer within the range of acceptable preset signals of the projector. Throwing distance (When placed on a NTSC4.43 system VCR.) Resolution VPL-EX70/EX7: 750 horizontal TV lines (Video input) 1024 × 768 dots (RGB input) VPL-ES7: 500 horizontal TV lines (Video input) 800 × 600...
... 3 LCD panels, 1 lens, projection system LCD panel VPL-EX70/EX7: 0.63-inch XGA panel, about 2,360,000 pixels (1024 × 768 × 3) VPL-ES7: 0.63-inch SVGA panel, about 1,440,000 pixels (800 × 600 × 3) Lens 1.2 times zoom lens f 18.53 to 22.18 mm/F1.65 to 1.93 Lamp 190...the connected computer within the range of acceptable preset signals of the projector. Throwing distance (When placed on a NTSC4.43 system VCR.) Resolution VPL-EX70/EX7: 750 horizontal TV lines (Video input) 1024 × 768 dots (RGB input) VPL-ES7: 500 horizontal TV lines (Video input) 800 × 600...


