
Operating Instructions
Page 4
.../Bottom 9 Control Panel 10 Connector Panel 11 Remote Commander 11 Projecting the Picture Installing the Projector 13 Connecting the Projector 14 Connecting a Computer 14 Connecting a VCR 15 Projecting 16 Turning Off the Power 18 Maintenance Replacing the Lamp 34 Cleaning the Air Filter 36 Others Troubleshooting 37 Messages List 39 Specifications 41 Installation...
.../Bottom 9 Control Panel 10 Connector Panel 11 Remote Commander 11 Projecting the Picture Installing the Projector 13 Connecting the Projector 14 Connecting a Computer 14 Connecting a VCR 15 Projecting 16 Turning Off the Power 18 Maintenance Replacing the Lamp 34 Cleaning the Air Filter 36 Others Troubleshooting 37 Messages List 39 Specifications 41 Installation...

Operating Instructions
Page 5
... is equipped with a soft cloth. Precautions Safety • Check that the carpet and wall paper be changed to a dark color. LCD data projector • This LCD data projector is on. • Do not place your fingers caught in the adjuster. • Do not spread a cloth or paper under the unit. ... if it is not to avoid lowering the contrast ratio. • Cover any liquid or solid object fall into the lens while the lamp is manufactured using high-precision technology. Precautions 5 Never pull the cord itself has been turned off the power with the voltage of the...
... is equipped with a soft cloth. Precautions Safety • Check that the carpet and wall paper be changed to a dark color. LCD data projector • This LCD data projector is on. • Do not place your fingers caught in the adjuster. • Do not spread a cloth or paper under the unit. ... if it is not to avoid lowering the contrast ratio. • Cover any liquid or solid object fall into the lens while the lamp is manufactured using high-precision technology. Precautions 5 Never pull the cord itself has been turned off the power with the voltage of the...

Operating Instructions
Page 7
.... Note on the screen When using highprecision technology. Notes on its side. It may cause color shading or shorten the lamp life excessively. Avoid using the projector at high altitudes could have adverse effects, such as this mode when using a thick-piled carpet or anything that may ...the unit in front of the lens that covers the ventilation holes (exhaust/ intake); Standing the unit upright on one side Avoid using the projector at High Altitude When using the unit standing upright on Installation and Usage 7 otherwise, internal heat may cause a malfunction of the unit....
.... Note on the screen When using highprecision technology. Notes on its side. It may cause color shading or shorten the lamp life excessively. Avoid using the projector at high altitudes could have adverse effects, such as this mode when using a thick-piled carpet or anything that may ...the unit in front of the lens that covers the ventilation holes (exhaust/ intake); Standing the unit upright on one side Avoid using the projector at High Altitude When using the unit standing upright on Installation and Usage 7 otherwise, internal heat may cause a malfunction of the unit....
Operating Instructions
Page 8
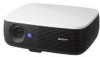
VPL-EX3: Three super-high-aperture 0.63inch XGA panels with approximately 480,000 effective pixels, produce a resolution of 1024 × 768 dots (horizontal/ vertical) for RGB input, and 750 horizontal TV ...the keys on a larger screen even in a quiet environment. B Overview Features High brightness, high picture quality High brightness Adopting Sony's unique optical system that provides a high-efficiency optical system. This prevents the projector from operating incorrectly. It allows the 165 W lamp to give a light output of the Video Electronics Standard Association. 8 Features
VPL-EX3: Three super-high-aperture 0.63inch XGA panels with approximately 480,000 effective pixels, produce a resolution of 1024 × 768 dots (horizontal/ vertical) for RGB input, and 750 horizontal TV ...the keys on a larger screen even in a quiet environment. B Overview Features High brightness, high picture quality High brightness Adopting Sony's unique optical system that provides a high-efficiency optical system. This prevents the projector from operating incorrectly. It allows the 165 W lamp to give a light output of the Video Electronics Standard Association. 8 Features

Operating Instructions
Page 10
..., and when it on with the ?/1 key. Flashes when the lamp cover or air filter cover is not secured firmly. b ON/STANDBY indicator (located around the ?/1 key flashes in green until the projector is ready to enter the settings of Controls Lights when the temperature... 39. 10 Location and Function of items in standby mode. Also, flashes in green from the projector is turned on until the projector is ready to clear the menu. Flashes when the fan is broken. • LAMP/COVER Lights or flashes under the following conditions: - For details, see page 18. Control Panel 1 5 ...
..., and when it on with the ?/1 key. Flashes when the lamp cover or air filter cover is not secured firmly. b ON/STANDBY indicator (located around the ?/1 key flashes in green until the projector is ready to enter the settings of Controls Lights when the temperature... 39. 10 Location and Function of items in standby mode. Also, flashes in green from the projector is turned on until the projector is ready to clear the menu. Flashes when the fan is broken. • LAMP/COVER Lights or flashes under the following conditions: - For details, see page 18. Control Panel 1 5 ...

Operating Instructions
Page 28
... Off: The APA functions when you select "Auto," the projector detects the color system of the input signal automatically. Auto Input Search When set to "On," the projector detects input signals in Off the following order: Input-A/Input-B (VPL-EX3 only)/ Video/S-Video. The SET SETTING Menu The SET SETTING... menu is used for the first 45 seconds after the lamp goes out. 28 The SET SETTING Menu You...
... Off: The APA functions when you select "Auto," the projector detects the color system of the input signal automatically. Auto Input Search When set to "On," the projector detects input signals in Off the following order: Input-A/Input-B (VPL-EX3 only)/ Video/S-Video. The SET SETTING Menu The SET SETTING... menu is used for the first 45 seconds after the lamp goes out. 28 The SET SETTING Menu You...

Operating Instructions
Page 31
When the bottom of the trapezoid is longer than the top : Sets a lower value. Sets the lamp brightness used for changing the settings of the projector. The brightness of the projected image will be lower compared with the "High" setting. For details, see "Security Lock" on ...the Remote Commander. INSTALL SETTING V Keystone: 0 Image Flip: Off Background: Blue Lamp Mode: Standard High Altitude Mode:Off ...
When the bottom of the trapezoid is longer than the top : Sets a lower value. Sets the lamp brightness used for changing the settings of the projector. The brightness of the projected image will be lower compared with the "High" setting. For details, see "Security Lock" on ...the Remote Commander. INSTALL SETTING V Keystone: 0 Image Flip: Off Background: Blue Lamp Mode: Standard High Altitude Mode:Off ...
Operating Instructions
Page 34
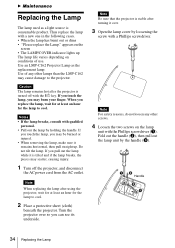
... loosen any other screws. 4 Loosen the two screws on the screen • The LAMP/COVER indicator lights up . Use of use. Use an LMP-C162 Projector Lamp as a light source is turned off the projector, and disconnect the AC power cord from the AC outlet. When you may cause damage... to cool. 2 Place a protective sheet (cloth) beneath the projector. Handle 34 Replacing the Lamp Fold out the handle (b), then pull...
... loosen any other screws. 4 Loosen the two screws on the screen • The LAMP/COVER indicator lights up . Use of use. Use an LMP-C162 Projector Lamp as a light source is turned off the projector, and disconnect the AC power cord from the AC outlet. When you may cause damage... to cool. 2 Place a protective sheet (cloth) beneath the projector. Handle 34 Replacing the Lamp Fold out the handle (b), then pull...

Operating Instructions
Page 35
... following order for less than five seconds each: RESET, b, B, ENTER. Disposal of the lamp. • The power will not turn on if the lamp is securely in place (a). If not, the projector cannot be regulated if sold in the USA This product contains mercury. Fold down the handle ...the following keys on . 7 Turn the projector back over. 8 Connect the power cord. Caution Do not put your local authorities or the Electronics Industries Alliance (http://www.eiae.org). Tighten the two screws (b). Maintenance Replacing the Lamp 35 5 Insert the new lamp all the way in until it is not ...
... following order for less than five seconds each: RESET, b, B, ENTER. Disposal of the lamp. • The power will not turn on if the lamp is securely in place (a). If not, the projector cannot be regulated if sold in the USA This product contains mercury. Fold down the handle ...the following keys on . 7 Turn the projector back over. 8 Connect the power cord. Caution Do not put your local authorities or the Electronics Industries Alliance (http://www.eiae.org). Tighten the two screws (b). Maintenance Replacing the Lamp 35 5 Insert the new lamp all the way in until it is not ...

Operating Instructions
Page 37
Power Symptom Cause and Remedy The power is not turned on. • The power has been turned off and on the LCD panel. Both the LAMP/COVER The electrical system has broken down. c Check that the proper connections have been made (see page 14). •...is muted. c Set "Status" on . 3 Start the computer. • Input selection is compatible with qualified Sony personnel. c Close the lamp cover securely (see page 36). c This projector is incorrect. Others Troubleshooting 37 light up. If your computer is disconnected or the connections are wrong. Picture Symptom Cause...
Power Symptom Cause and Remedy The power is not turned on. • The power has been turned off and on the LCD panel. Both the LAMP/COVER The electrical system has broken down. c Check that the proper connections have been made (see page 14). •...is muted. c Set "Status" on . 3 Start the computer. • Input selection is compatible with qualified Sony personnel. c Close the lamp cover securely (see page 36). c This projector is incorrect. Others Troubleshooting 37 light up. If your computer is disconnected or the connections are wrong. Picture Symptom Cause...

Operating Instructions
Page 38
...computer is within the range of the frequency. • The resolution setting of the output signal of the projector. c Input a signal that the proper connections have been made (see page 25). • The projector is dim. "Dot Phase" on the "Adjust Picture..." c Use a no-resistance stereo audio cable ...to SVGA (VPL-ES3) or XGA (VPL-EX3) (see page 25). • The lamp has burnt out or is set to the wrong color system. c Adjust the focus (see page 26). Cause and Remedy • A cable is out of focus. c Set "Color System" on the lens. c Leave the projector for about ...
...computer is within the range of the frequency. • The resolution setting of the output signal of the projector. c Input a signal that the proper connections have been made (see page 25). • The projector is dim. "Dot Phase" on the "Adjust Picture..." c Use a no-resistance stereo audio cable ...to SVGA (VPL-ES3) or XGA (VPL-EX3) (see page 25). • The lamp has burnt out or is set to the wrong color system. c Adjust the focus (see page 26). Cause and Remedy • A cable is out of focus. c Set "Color System" on the lens. c Leave the projector for about ...

Operating Instructions
Page 39
...the ventilation holes. • The projector is set to check the meaning of the projector or on page 35. c Consult with qualified Sony personnel. light up. Message Meaning and Remedy Please replace the Lamp. • It is time to replace the lamp. Troubleshooting 39 The TEMP/FAN indicator... The fan is detached. Both the LAMP/COVER The electrical ...
...the ventilation holes. • The projector is set to check the meaning of the projector or on page 35. c Consult with qualified Sony personnel. light up. Message Meaning and Remedy Please replace the Lamp. • It is time to replace the lamp. Troubleshooting 39 The TEMP/FAN indicator... The fan is detached. Both the LAMP/COVER The electrical ...

Operating Instructions
Page 41
... (measured diagonally) Light output ANSI lumen1) 2000 lm (When the Lamp Mode is a measuring method of the projector. Specifications Optical characteristics Projection system 3 LCD panels, 1 lens, projection system LCD panel VPL-ES3: 0.63-inch SVGA panel, about 1,440,000 pixels (480,000 pixels × 3) VPL-EX3: 0.63-inch XGA panel, about 2,360,000 pixels (786,432 pixels ×...
... (measured diagonally) Light output ANSI lumen1) 2000 lm (When the Lamp Mode is a measuring method of the projector. Specifications Optical characteristics Projection system 3 LCD panels, 1 lens, projection system LCD panel VPL-ES3: 0.63-inch SVGA panel, about 1,440,000 pixels (480,000 pixels × 3) VPL-EX3: 0.63-inch XGA panel, about 2,360,000 pixels (786,432 pixels ×...

Operating Instructions
Page 42
Optional accessories Projector Lamp LMP-C162(for replacement) Some of the ...nearest Sony dealer. Pin assignment INPUT A connector (HD D-sub 15-pin, female) 1 R/R-Y 9 N.C. 2 G/Y 10 GND 3 B/B-Y 11 GND 4 GND 12 DDC/SDA 5 GND 13 HD/C.Sync 6 GND (R) 14 VD 7 GND (G) 15 DDC/SCL 8 GND (B) INPUT B connector (HD D-sub 15-pin, female) (VPL-EX3 only)... input: TTL level Positive/negative VD: Vertical sync input: TTL level, positive/negative AUDIO INPUT A/B (VPL-EX3 only) Stereo minijack, 500 mVrms, input impedance 47 kilohms AUDIO Stereo minijack, 500 mVrms, input impedance...
Optional accessories Projector Lamp LMP-C162(for replacement) Some of the ...nearest Sony dealer. Pin assignment INPUT A connector (HD D-sub 15-pin, female) 1 R/R-Y 9 N.C. 2 G/Y 10 GND 3 B/B-Y 11 GND 4 GND 12 DDC/SDA 5 GND 13 HD/C.Sync 6 GND (R) 14 VD 7 GND (G) 15 DDC/SCL 8 GND (B) INPUT B connector (HD D-sub 15-pin, female) (VPL-EX3 only)... input: TTL level Positive/negative VD: Vertical sync input: TTL level, positive/negative AUDIO INPUT A/B (VPL-EX3 only) Stereo minijack, 500 mVrms, input impedance 47 kilohms AUDIO Stereo minijack, 500 mVrms, input impedance...


