
Product Brochure (Data Projectors)
Page 2
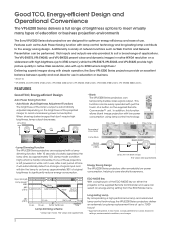
... a static signal feed, the lamp dims by approximately 15% (lamp mode condition: high) which is left powered on the brightness of up to save electricity expenses. Long-lasting Lamp By incorporating a high-performance lamp and advanced lamp-control technology, the VPL-E200 Series projectors deliver an extremely long lamp replacement time of the projected image, to 7,000 hours.4 4 Approximate period, in use In use . Actual performance varies based on the supplied Remote Commander™...
... a static signal feed, the lamp dims by approximately 15% (lamp mode condition: high) which is left powered on the brightness of up to save electricity expenses. Long-lasting Lamp By incorporating a high-performance lamp and advanced lamp-control technology, the VPL-E200 Series projectors deliver an extremely long lamp replacement time of the projected image, to 7,000 hours.4 4 Approximate period, in use In use . Actual performance varies based on the supplied Remote Commander™...
Product Brochure (Data Projectors)
Page 3
... operator can project PC images simultaneously; up to fit wide range of installations, and simplifies replacement of inorganic LCD panels that utilize the Sony BrightEra™ technology with various control systems Creston Connected certified The VPL-E200 Series projectors shipping from any additional network software on the USB memory device. WLAN (wireless) Broad Range of Applications Convenient, Simple Projector Adjustment The projectors' 1.6x* flexible standard zoom lens allows the projector to 7,000 hours...
... operator can project PC images simultaneously; up to fit wide range of installations, and simplifies replacement of inorganic LCD panels that utilize the Sony BrightEra™ technology with various control systems Creston Connected certified The VPL-E200 Series projectors shipping from any additional network software on the USB memory device. WLAN (wireless) Broad Range of Applications Convenient, Simple Projector Adjustment The projectors' 1.6x* flexible standard zoom lens allows the projector to 7,000 hours...
Product Brochure (Data Projectors)
Page 5
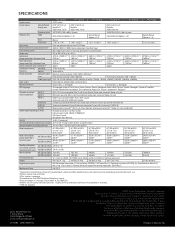
...pixels Zoom Focus Throw ratio Light source Recommended lamp replacement time*1 Filter cleaning cycle*1 Screen size Light output (Lamp mode: High / Standard / Low) Color light output (Lamp mode: High / Standard / Low) Contrast ratio (full white / full black)*3 Displayable scanning Horizontal frequency Vertical Display resolution Computer signal input Video signal input Color system Keystone correction OSD language Computer and video signal input/output INPUT A INPUT B INPUT C S VIDEO IN VIDEO IN OUTPUT Control signal input/output, Others Speaker Operating temperature (Operating...
...pixels Zoom Focus Throw ratio Light source Recommended lamp replacement time*1 Filter cleaning cycle*1 Screen size Light output (Lamp mode: High / Standard / Low) Color light output (Lamp mode: High / Standard / Low) Contrast ratio (full white / full black)*3 Displayable scanning Horizontal frequency Vertical Display resolution Computer signal input Video signal input Color system Keystone correction OSD language Computer and video signal input/output INPUT A INPUT B INPUT C S VIDEO IN VIDEO IN OUTPUT Control signal input/output, Others Speaker Operating temperature (Operating...

Operating Instructions
Page 2
... 12 Connecting a USB memory device 12 Connecting a USB wireless LAN module 13 Connecting an External Monitor and Audio Equipment 13 Projecting/Adjusting an Image Projecting an Image 14 Adjusting the Projected image ... 15 Turning Off the Power 18 Adjustments and Settings Using a Menu Using a MENU 19 The Picture Menu 20 The Screen Menu 21 The Function Menu 25 The Operation Menu 26 2 Table of Contents The Connection/Power Menu ...........27 The Installation Menu 29 The Information Menu 30 Network Using Network Features 31 Displaying the Control Window of the Projector with...
... 12 Connecting a USB memory device 12 Connecting a USB wireless LAN module 13 Connecting an External Monitor and Audio Equipment 13 Projecting/Adjusting an Image Projecting an Image 14 Adjusting the Projected image ... 15 Turning Off the Power 18 Adjustments and Settings Using a Menu Using a MENU 19 The Picture Menu 20 The Screen Menu 21 The Function Menu 25 The Operation Menu 26 2 Table of Contents The Connection/Power Menu ...........27 The Installation Menu 29 The Information Menu 30 Network Using Network Features 31 Displaying the Control Window of the Projector with...

Operating Instructions
Page 7
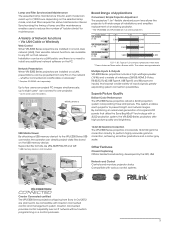
... be used depending on the Connection/Power menu (page 27). The setting items appear. Picture muting helps reduce power consumption. For details on ECO Mode settings, see "Lamp Mode," "With No Input," "With Static Signal" and "Standby Mode" on the resolution of "Lamp Mode," "With No Input," "With Static Signal" and "Standby Mode." 1 Press the ECO MODE key to restore the previous image. BLANK key Cuts off the projected image temporarily. Press again to change the enlargement ratio. Lamp Mode...
... be used depending on the Connection/Power menu (page 27). The setting items appear. Picture muting helps reduce power consumption. For details on ECO Mode settings, see "Lamp Mode," "With No Input," "With Static Signal" and "Standby Mode" on the resolution of "Lamp Mode," "With No Input," "With Static Signal" and "Standby Mode." 1 Press the ECO MODE key to restore the previous image. BLANK key Cuts off the projected image temporarily. Press again to change the enlargement ratio. Lamp Mode...

Operating Instructions
Page 14
... power cord into the wall outlet. 2 Connect all equipment to the projector (page 9). 3 Press the ?/1 key to turn on the unit. 4 Turn on the type of a projected image depends on the screen. Install the projector so that the projected image fits the screen size. Press the INPUT key repeatedly, or press the V/v key to select an image to external display. To project an image using USB Connection" (page 38). The method to display the menu...
... power cord into the wall outlet. 2 Connect all equipment to the projector (page 9). 3 Press the ?/1 key to turn on the unit. 4 Turn on the type of a projected image depends on the screen. Install the projector so that the projected image fits the screen size. Press the INPUT key repeatedly, or press the V/v key to select an image to external display. To project an image using USB Connection" (page 38). The method to display the menu...
Operating Instructions
Page 17
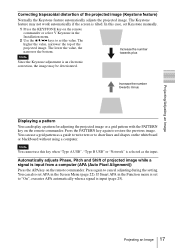
... "Network" is an electronic correction, the image may not work automatically if the screen is input (page 25). Increase the number towards minus Displaying a pattern You can also set APA in the Function menu is set the value. Note You cannot use a grid pattern as the input. Projecting/Adjusting an Image Correcting trapezoidal distortion of the projected image. The Keystone feature may be deteriorated. You can use this case, set Keystone manually...
... "Network" is an electronic correction, the image may not work automatically if the screen is input (page 25). Increase the number towards minus Displaying a pattern You can also set APA in the Function menu is set the value. Note You cannot use a grid pattern as the input. Projecting/Adjusting an Image Correcting trapezoidal distortion of the projected image. The Keystone feature may be deteriorated. You can use this case, set Keystone manually...

Operating Instructions
Page 25
... *1: APA functions when a computer signal is input via the RGB input connector (INPUT A/INPUT B). *2: The maximum available mic volume is used for setting various functions of the projector. To not output sound from the speaker, select "Off." Items Volume*3 Mic Volume*3 Speaker*3 Smart APA CC Display Lamp Timer Reset Start Up Image Item descriptions The higher the value, the louder an audio volume and the lower...
... *1: APA functions when a computer signal is input via the RGB input connector (INPUT A/INPUT B). *2: The maximum available mic volume is used for setting various functions of the projector. To not output sound from the speaker, select "Off." Items Volume*3 Mic Volume*3 Speaker*3 Smart APA CC Display Lamp Timer Reset Start Up Image Item descriptions The higher the value, the louder an audio volume and the lower...

Operating Instructions
Page 26
... users by using the menu or the remote commander. Items Language Status Security Lock*1 Control Key Lock Item descriptions Selects the language used in other countries/regions.) Once your identity. (This process may differ in the menu and messages. c "Control Key Lock" is set to "Off," you can cancel the security lock. The Operation Menu The Operation menu is used for setting for the operations by password. On: All on -screen displays, except for menus, warning messages and messages...
... users by using the menu or the remote commander. Items Language Status Security Lock*1 Control Key Lock Item descriptions Selects the language used in other countries/regions.) Once your identity. (This process may differ in the menu and messages. c "Control Key Lock" is set to "Off," you can cancel the security lock. The Operation Menu The Operation menu is used for setting for the operations by password. On: All on -screen displays, except for menus, warning messages and messages...
Operating Instructions
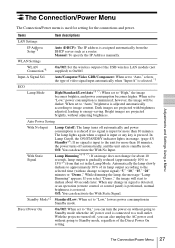
Page 27
... LAN Settings IP Address Setup*9 Auto (DHCP): The IP address is used for setting for more than 10 minutes, the power turns off automatically and power consumption is reduced if no change in signal is detected, or an operation (remote control or control panel) is performed, normal brightness is connected to darken about 10 seconds, lamp output is minimized; however, the image will start to a wall outlet. In Lamp Cutoff, the ON/STANDBY indicator lights in Standby mode...
... LAN Settings IP Address Setup*9 Auto (DHCP): The IP address is used for setting for more than 10 minutes, the power turns off automatically and power consumption is reduced if no change in signal is detected, or an operation (remote control or control panel) is performed, normal brightness is connected to darken about 10 seconds, lamp output is minimized; however, the image will start to a wall outlet. In Lamp Cutoff, the ON/STANDBY indicator lights in Standby mode...

Operating Instructions
Page 37
...the screen. Display the strength of the screen. Using the Controller Network Presentation User 000001 8 Items Projection method Functions Start projecting an image. Project in the upper right quadrant of the screen. Project in the upper left quadrant of users connected to the projector. Pause projecting an image. Not projecting an image. Display the number of the screen. Presentation Function via Network Using Presentation Function via Network 37 Stop projecting an image (screen turns black). Disconnect from the projector. Display the users' status. Project...
...the screen. Display the strength of the screen. Using the Controller Network Presentation User 000001 8 Items Projection method Functions Start projecting an image. Project in the upper right quadrant of the screen. Project in the upper left quadrant of users connected to the projector. Pause projecting an image. Not projecting an image. Display the number of the screen. Presentation Function via Network Using Presentation Function via Network 37 Stop projecting an image (screen turns black). Disconnect from the projector. Display the users' status. Project...

Operating Instructions
Page 43
... projector is set correctly. (page 29) Unplug the AC power cord from a wall outlet. ON/STANDBY indicator Status Lights in red Flashes in green Lights in green Lights in orange Flashes in red Flashes twice Flashes six times Other number of flashes Meaning/Remedies The projector is in red Symptoms are indicated by number of lamp is on the projector. After checking that the ON/STANDBY indicator goes out, plug the power cord to operate after having been turned on the power again. Address the problem in abnormal status...
... projector is set correctly. (page 29) Unplug the AC power cord from a wall outlet. ON/STANDBY indicator Status Lights in red Flashes in green Lights in green Lights in orange Flashes in red Flashes twice Flashes six times Other number of flashes Meaning/Remedies The projector is in red Symptoms are indicated by number of lamp is on the projector. After checking that the ON/STANDBY indicator goes out, plug the power cord to operate after having been turned on the power again. Address the problem in abnormal status...

Operating Instructions
Page 44
... holes. • Check if the air filter is not clogged. • Check if the Installation Attitude in the Installation menu is set correctly. Not applicable! Messages List When any change in signal is detected, or an operation (remote control or control panel) is performed, normal brightness is set to the input signal. Check the items below . Set "Input-A Signal Sel." The and clean the Filter. When not using the projector at high altitude. The control keys are locked! Projector will shutdown...
... holes. • Check if the air filter is not clogged. • Check if the Installation Attitude in the Installation menu is set correctly. Not applicable! Messages List When any change in signal is detected, or an operation (remote control or control panel) is performed, normal brightness is set to the input signal. Check the items below . Set "Input-A Signal Sel." The and clean the Filter. When not using the projector at high altitude. The control keys are locked! Projector will shutdown...

Operating Instructions
Page 45
... work properly. Check if the input source is correctly selected. 14 Check if the picture is muted by pressing the BLANK key. 7 The application "USB Display" or "Projector Station for the applications. 35, 38 The computer cannot • Check "LAN Settings" of the wireless connection. If the lamp or lamp cover is not attached securely, the projector 47 cannot be judged correctly. Check the computer signal is set "V Keystone" manually. Check if the application "USB Display...
... work properly. Check if the input source is correctly selected. 14 Check if the picture is muted by pressing the BLANK key. 7 The application "USB Display" or "Projector Station for the applications. 35, 38 The computer cannot • Check "LAN Settings" of the wireless connection. If the lamp or lamp cover is not attached securely, the projector 47 cannot be judged correctly. Check the computer signal is set "V Keystone" manually. Check if the application "USB Display...

Operating Instructions
Page 46
... Signal" is often greater than normal to reduce - The image is noisy. The image is not clear. EW225/EX275/EX245/ EX225 only) Check if the external audio equipment is high. Check "Lamp Timer," and replace the lamp with the power on the lens. "High Altitude Mode" is set to "On." • The unit is used at a high altitude. Check that the connecting cables between the projector and 9 EW275/EW245/ external video or audio equipment are installed...
... Signal" is often greater than normal to reduce - The image is noisy. The image is not clear. EW225/EX275/EX245/ EX225 only) Check if the external audio equipment is high. Check "Lamp Timer," and replace the lamp with the power on the lens. "High Altitude Mode" is set to "On." • The unit is used at a high altitude. Check that the connecting cables between the projector and 9 EW275/EW245/ external video or audio equipment are installed...

Operating Instructions
Page 47
... power cord from a wall outlet. 2 When the lamp has cooled sufficiently, open the lamp cover by holding the designated location. Caution • The lamp remains hot after the projector is tilted, the pieces may scatter if the lamp breaks any metallic or inflammable objects into the slot. 1 Turn off the projector for replacement. Do not put your finger. Replacing the Lamp Replace the lamp with a new one if a message displayed...
... power cord from a wall outlet. 2 When the lamp has cooled sufficiently, open the lamp cover by holding the designated location. Caution • The lamp remains hot after the projector is tilted, the pieces may scatter if the lamp breaks any metallic or inflammable objects into the slot. 1 Turn off the projector for replacement. Do not put your finger. Replacing the Lamp Replace the lamp with a new one if a message displayed...

Operating Instructions
Page 78
... IN 6 Acceptable input signal 57 Adjust Signal 22 Air filter 49 Air filter cover/Ventilation holes (intake 4 APA 6 Aspect 6, 21, 23 B BLANK 7 Brightness 20 C CC Display 25 Color 20 Color Temp 20 Connecting a computer 9 Connecting a Video equipment 10 Connecting an external monitor and audio equipment 13 Connector panel 4, 5 Contrast 20 Control Key Lock 26 Control Panel Keys 6 Correcting trapezoidal distortion of the projected image (Keystone feature 6, 17 D Digital Zoom 7 E ECO MODE (Energy-saving mode) ......... 7 F fH 30 Focus 15 Focus ring 4 Freeze 7 Front...
... IN 6 Acceptable input signal 57 Adjust Signal 22 Air filter 49 Air filter cover/Ventilation holes (intake 4 APA 6 Aspect 6, 21, 23 B BLANK 7 Brightness 20 C CC Display 25 Color 20 Color Temp 20 Connecting a computer 9 Connecting a Video equipment 10 Connecting an external monitor and audio equipment 13 Connector panel 4, 5 Contrast 20 Control Key Lock 26 Control Panel Keys 6 Correcting trapezoidal distortion of the projected image (Keystone feature 6, 17 D Digital Zoom 7 E ECO MODE (Energy-saving mode) ......... 7 F fH 30 Focus 15 Focus ring 4 Freeze 7 Front...

Startup Guide
Page 29
... a glass cleaning cloth. This is manufactured using high-precision technology. On Lamp The lamp used . • The lamp may , however, see tiny black points and/or bright points (red, blue, or green) that has high internal pressure. Therefore, it may be exposed to use solvent such as a light source contains mercury that continuously appear on the LCD projector. Never use multiple LCD projectors to the next. On LCD Projector The LCD projector is...
... a glass cleaning cloth. This is manufactured using high-precision technology. On Lamp The lamp used . • The lamp may , however, see tiny black points and/or bright points (red, blue, or green) that has high internal pressure. Therefore, it may be exposed to use solvent such as a light source contains mercury that continuously appear on the LCD projector. Never use multiple LCD projectors to the next. On LCD Projector The LCD projector is...

Startup Guide
Page 37
... a signal is selected as a guide to write text or to set the value. In this key when "Type A USB", "Type B USB" or "Network" is input. Projecting an Image 15 GB Correcting trapezoidal distortion of the projected image. Increase the number towards minus Displaying a pattern You can use this case, set Keystone manually. 1 Press the KEYSTONE key on the remote commander. Press the PATTERN key again to cancel adjusting during the setting. You...
... a signal is selected as a guide to write text or to set the value. In this key when "Type A USB", "Type B USB" or "Network" is input. Projecting an Image 15 GB Correcting trapezoidal distortion of the projected image. Increase the number towards minus Displaying a pattern You can use this case, set Keystone manually. 1 Press the KEYSTONE key on the remote commander. Press the PATTERN key again to cancel adjusting during the setting. You...

Startup Guide
Page 39
... turn on the power again. The internal temperature is not attached securely (page 18). Address the problem in accordance with qualified Sony personnel. Flashes twice The lamp cover is unusually high. Check the items below . The projector is in With No Input (Lamp Cutoff). The projector is in abnormal status. Consult with the following . In this case, replace the lamp with qualified Sony personnel. ON/STANDBY indicator Status Lights in red Flashes in green Lights in green Lights in orange Flashes...
... turn on the power again. The internal temperature is not attached securely (page 18). Address the problem in accordance with qualified Sony personnel. Flashes twice The lamp cover is unusually high. Check the items below . The projector is in With No Input (Lamp Cutoff). The projector is in abnormal status. Consult with the following . In this case, replace the lamp with qualified Sony personnel. ON/STANDBY indicator Status Lights in red Flashes in green Lights in green Lights in orange Flashes...


