Operating Instructions
Page 4
... Altitude 8 Unsuitable Conditions 8 About the Supplied Manuals 9 Features 9 Location and Function of Controls . 12 Top/Front/Left Side 12 Rear/Right Side/Bottom 12 Control Panel 13 Connector Panel 14 Remote Commander 15 Presentation Tool 17 Setting Up and Projecting Installing the Projector 19 Connecting the Projector 20 Connecting with a Computer ..... 20 Connecting...
... Altitude 8 Unsuitable Conditions 8 About the Supplied Manuals 9 Features 9 Location and Function of Controls . 12 Top/Front/Left Side 12 Rear/Right Side/Bottom 12 Control Panel 13 Connector Panel 14 Remote Commander 15 Presentation Tool 17 Setting Up and Projecting Installing the Projector 19 Connecting the Projector 20 Connecting with a Computer ..... 20 Connecting...
Operating Instructions
Page 9
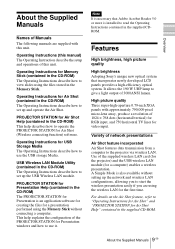
... for Presentation is also available without connecting a computer. PROJECTOR STATION for Air Shot Help (contained in the Memory Stick. Note It is necessary that incorporates newly developed LCD panels provides a high-efficiency optical system. Variety of network presentations Air Shot feature incorporated ...lumen. High picture quality Three super-high-aperture 0.79-inch XGA panels with this unit. Use of this manual) The Operating Instruction describe the setup and operations of the supplied wireless LAN card (for the projector) and the USB wireless LAN module (for a computer) ...
... for Presentation is also available without connecting a computer. PROJECTOR STATION for Air Shot Help (contained in the Memory Stick. Note It is necessary that incorporates newly developed LCD panels provides a high-efficiency optical system. Variety of network presentations Air Shot feature incorporated ...lumen. High picture quality Three super-high-aperture 0.79-inch XGA panels with this unit. Use of this manual) The Operating Instruction describe the setup and operations of the supplied wireless LAN card (for the projector) and the USB wireless LAN module (for a computer) ...
Operating Instructions
Page 16
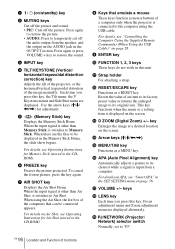
...: Press to restore the sound. 3 INPUT key 4 TILT/KEYSTONE (Vertical/ horizontal trapezoidal distortion correction) key Adjusts the tilt of the projector, or the horizonal/vertical trapezoidal distortion of the image manually. Press again or press VOLUME + key to temporarily cut off the audio output from the speaker, and the output on /standby...
...: Press to restore the sound. 3 INPUT key 4 TILT/KEYSTONE (Vertical/ horizontal trapezoidal distortion correction) key Adjusts the tilt of the projector, or the horizonal/vertical trapezoidal distortion of the image manually. Press again or press VOLUME + key to temporarily cut off the audio output from the speaker, and the output on /standby...
Operating Instructions
Page 20
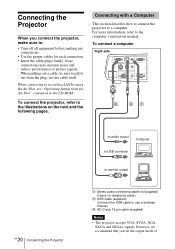
... mouse.) 3 HD D-sub 15-pin cable (supplied) Notes • The projector accepts VGA, SVGA, XGA, SXGA and SXGA+ signals. loose connections may increase noise and reduce performance of Connecting the Projector When you set the output mode of picture signals. To connect a computer Right...OUTPUT MONITOR AUDIO REMOTE RS-232C 3 21 20 GB Connecting the Projector to audio output Computer to USB connector to monitor output 1 Stereo audio connecting cable (not supplied) (Use a no-resistance cable.) 2 USB cable (supplied) (Connect the USB cable to the computer's instruction manual.
... mouse.) 3 HD D-sub 15-pin cable (supplied) Notes • The projector accepts VGA, SVGA, XGA, SXGA and SXGA+ signals. loose connections may increase noise and reduce performance of Connecting the Projector When you set the output mode of picture signals. To connect a computer Right...OUTPUT MONITOR AUDIO REMOTE RS-232C 3 21 20 GB Connecting the Projector to audio output Computer to USB connector to monitor output 1 Stereo audio connecting cable (not supplied) (Use a no-resistance cable.) 2 USB cable (supplied) (Connect the USB cable to the computer's instruction manual.
Operating Instructions
Page 22
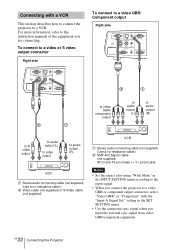
...signal when you input the external sync signal from video GBR/component equipment. 22 GB Connecting the Projector For more information, refer to the instruction manuals of the equipment you connect the projector to a video GBR or component output connector, select "Video GBR" or "Component" with a... VCR This section describes how to connect the projector to the input signal. • When you are connecting....
...signal when you input the external sync signal from video GBR/component equipment. 22 GB Connecting the Projector For more information, refer to the instruction manuals of the equipment you connect the projector to a video GBR or component output connector, select "Video GBR" or "Component" with a... VCR This section describes how to connect the projector to the input signal. • When you are connecting....
Operating Instructions
Page 24
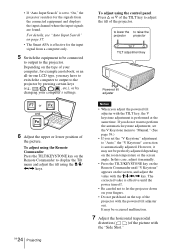
... Powered tilt adjuster F7 or Fx and Fn 6 Adjust the upper or lower position of the projector. For details, see "Auto Input Search" on page 37. • The Smart APA is set to "On," the projector searches for the signals from a computer only. 5 Switch the equipment to be connected to output... tilt using the Remote Commander Press the TILT/KEYSTONE key on the type of your computer, for example a notebook, or an all-in-one LCD type, you may have to switch the computer to output to the projector by pressing certain keys (e.g., / LCD VGA , / , etc.), or by changing your computer's settings.
... Powered tilt adjuster F7 or Fx and Fn 6 Adjust the upper or lower position of the projector. For details, see "Auto Input Search" on page 37. • The Smart APA is set to "On," the projector searches for the signals from a computer only. 5 Switch the equipment to be connected to output... tilt using the Remote Commander Press the TILT/KEYSTONE key on the type of your computer, for example a notebook, or an all-in-one LCD type, you may have to switch the computer to output to the projector by pressing certain keys (e.g., / LCD VGA , / , etc.), or by changing your computer's settings.
Operating Instructions
Page 28
... the Computer Using the Supplied Remote Commander (When Using the USB Cable) When you connect a computer to the projector by using the menu. • V Keystone correction (correction of the Intelligent Auto-setup to manual adjustments using the USB cable, you will provide you with the movements of the computer using the Air...
... the Computer Using the Supplied Remote Commander (When Using the USB Cable) When you connect a computer to the projector by using the menu. • V Keystone correction (correction of the Intelligent Auto-setup to manual adjustments using the USB cable, you will provide you with the movements of the computer using the Air...
Operating Instructions
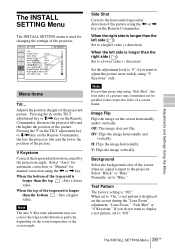
Page 37
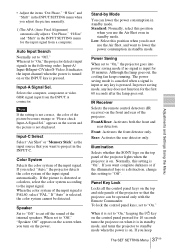
... according to cut off the sound of the input signal automatically. Illumination Selects whether the SONY logo on . If you turn on . The power saving mode is canceled when a... the INPUT A connector. Standard: Normally, select this setting is in standby mode, and turns the projector to "On." Selects the computer, component or video GBR signal input from a computer. • Adjust...items "Dot Phase," "H Size" and "Shift" in the INPUT SETTING menu when you adjust the picture manually. 1) The APA (Auto Pixel Alignment) automatically adjusts "Dot Phase," "H Size" and "Shift" in ...
... according to cut off the sound of the input signal automatically. Illumination Selects whether the SONY logo on . If you turn on . The power saving mode is canceled when a... the INPUT A connector. Standard: Normally, select this setting is in standby mode, and turns the projector to "On." Selects the computer, component or video GBR signal input from a computer. • Adjust...items "Dot Phase," "H Size" and "Shift" in the INPUT SETTING menu when you adjust the picture manually. 1) The APA (Auto Pixel Alignment) automatically adjusts "Dot Phase," "H Size" and "Shift" in ...
Operating Instructions
Page 39
...the image horizontally and vertically. direction). Normally, set to a lower value (- INSTALL SETTING Tilt... Select "Auto" for automatic correction, or "Manual" for changing the settings of the picture. Set the adjustment level to "0" if you do not want to "Blue." Background Select the ..."Off". 39 The INSTALL SETTING Menu GB H: Flips the image horizontally. When set to adjust the picture more the projector tilts and the higher the position of the projector. When the top of the screen when no signal is "Off." Note Even when projecting using "V Keystone" only....
...the image horizontally and vertically. direction). Normally, set to a lower value (- INSTALL SETTING Tilt... Select "Auto" for automatic correction, or "Manual" for changing the settings of the picture. Set the adjustment level to "0" if you do not want to "Blue." Background Select the ..."Off". 39 The INSTALL SETTING Menu GB H: Flips the image horizontally. When set to adjust the picture more the projector tilts and the higher the position of the projector. When the top of the screen when no signal is "Off." Note Even when projecting using "V Keystone" only....
Operating Instructions
Page 49
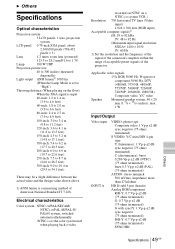
Electrical characteristics Color system NTSC3.58/PAL/SECAM/ NTSC4.43/PAL-M/PAL-N/ PAL60 system, switched automatically/manually (NTSC4.43 is a measuring method of the projector. Applicable video signals 15 k RGB 50/60 Hz, Progressive component 50/60 Hz, DTV (480/60I... Vp-p ±2 dB (75 ohms terminated) SYNC/HD: Others Specifications 49 GB B Others Specifications Optical characteristics Projection system 3 LCD panels, 1 lens, projection system LCD panel 0.79-inch XGA panel, about 2,360,000 pixels (786,432 pixels × 3) Lens 1.2 times zoom lens (powered) f 23.5 to 28...
Electrical characteristics Color system NTSC3.58/PAL/SECAM/ NTSC4.43/PAL-M/PAL-N/ PAL60 system, switched automatically/manually (NTSC4.43 is a measuring method of the projector. Applicable video signals 15 k RGB 50/60 Hz, Progressive component 50/60 Hz, DTV (480/60I... Vp-p ±2 dB (75 ohms terminated) SYNC/HD: Others Specifications 49 GB B Others Specifications Optical characteristics Projection system 3 LCD panels, 1 lens, projection system LCD panel 0.79-inch XGA panel, about 2,360,000 pixels (786,432 pixels × 3) Lens 1.2 times zoom lens (powered) f 23.5 to 28...


