Operating Instructions
Page 42
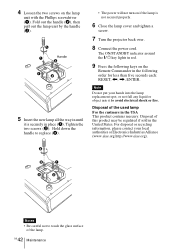
...it is not secured properly. 6 Close the lamp cover and tighten a screw. 7 Turn the projector back over. 8 Connect the power cord. The ON/STANDBY indicator around the =/1 key lights in red. 9 Press the following order for less than five seconds each: RESET, Hold down the handle to replace (3). &#...8226; The power will not turn on the lamp unit with the Phillips...
...it is not secured properly. 6 Close the lamp cover and tighten a screw. 7 Turn the projector back over. 8 Connect the power cord. The ON/STANDBY indicator around the =/1 key lights in red. 9 Press the following order for less than five seconds each: RESET, Hold down the handle to replace (3). &#...8226; The power will not turn on the lamp unit with the Phillips...
Operating Instructions
Page 64
...Sel. ........ 37 Input-C Select 37 Installation examples ..... 19 notes 7 unsuitable conditions .... 8 unsuitable installation .. 7 L Lamp Mode 40 Lamp replacement .......... 41 Lamp Timer 40 Language 38 selecting the menu language 26 Lens Control 40 Lens protector 12 Location and function of controls connector panel...Remote Commander ...... 15 front remote control detector 12 location and function of controls 15 rear remote control detector 12 Reset resettable items 32 resetting the item ........ 32 S Scan Converter 35 Screen size 19, 49 Security Lock 40 SET SETTING menu ..... 36...
...Sel. ........ 37 Input-C Select 37 Installation examples ..... 19 notes 7 unsuitable conditions .... 8 unsuitable installation .. 7 L Lamp Mode 40 Lamp replacement .......... 41 Lamp Timer 40 Language 38 selecting the menu language 26 Lens Control 40 Lens protector 12 Location and function of controls connector panel...Remote Commander ...... 15 front remote control detector 12 location and function of controls 15 rear remote control detector 12 Reset resettable items 32 resetting the item ........ 32 S Scan Converter 35 Screen size 19, 49 Security Lock 40 SET SETTING menu ..... 36...


