Operating Instructions
Page 4
... Tool 17 Setting Up and Projecting Installing the Projector 19 Connecting the Projector 20 Connecting with a Computer ..... 20 Connecting with a VCR 22 Projecting 23 Turning Off the Power 25 Convenient Function Selecting the Menu Language .......... ...26 Security Lock 27 Other Functions 28 Switching from the Intelligent Autosetup Function to Manual Adjustments 28 Controlling the Computer Using the Supplied...
... Tool 17 Setting Up and Projecting Installing the Projector 19 Connecting the Projector 20 Connecting with a Computer ..... 20 Connecting with a VCR 22 Projecting 23 Turning Off the Power 25 Convenient Function Selecting the Menu Language .......... ...26 Security Lock 27 Other Functions 28 Switching from the Intelligent Autosetup Function to Manual Adjustments 28 Controlling the Computer Using the Supplied...
Operating Instructions
Page 6
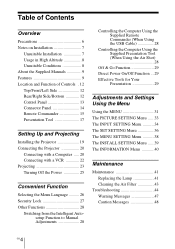
...not of lightreflecting material. To remove dust on . • Do not place your hand or objects near the ventilation holes. On LCD data projector • The LCD data projector is in a room where floor and walls are of reflecting material, it further. • Unplug the unit from the wall outlet...out is hot. • Be careful not to the projector. Caution The unit is equipped with a soft cloth. B Overview Precautions On safety • Check that the operating voltage of your unit is identical with the voltage of your local power supply. • Should any windows that face the screen ...
...not of lightreflecting material. To remove dust on . • Do not place your hand or objects near the ventilation holes. On LCD data projector • The LCD data projector is in a room where floor and walls are of reflecting material, it further. • Unplug the unit from the wall outlet...out is hot. • Be careful not to the projector. Caution The unit is equipped with a soft cloth. B Overview Precautions On safety • Check that the operating voltage of your unit is identical with the voltage of your local power supply. • Should any windows that face the screen ...
Operating Instructions
Page 8
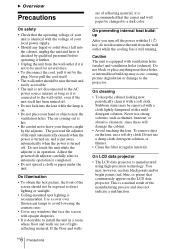
...over on the distance between the screen and the projector or the zooming magnifications. Avoid using as reducing the reliability of 15°, and avoid installing the unit in any way other connecting cables or cards, and store the supplied accessories in the carrying case, do not drop ...Altitude Mode" in High Altitude When using the projector at an altitude of 1,500 m or higher, turn on carrying the projector The unit is not a malfunction of the carrying case. When storing the unit in the carrying case, disconnect the AC power cord and all other than placing on Installation ...
...over on the distance between the screen and the projector or the zooming magnifications. Avoid using as reducing the reliability of 15°, and avoid installing the unit in any way other connecting cables or cards, and store the supplied accessories in the carrying case, do not drop ...Altitude Mode" in High Altitude When using the projector at an altitude of 1,500 m or higher, turn on carrying the projector The unit is not a malfunction of the carrying case. When storing the unit in the carrying case, disconnect the AC power cord and all other than placing on Installation ...
Operating Instructions
Page 10
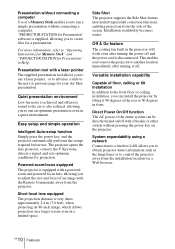
... installation, you can be directly turned on the projector. Installation availability becomes wider. For more information, refer to run an optimum presentation even in a quiet environment. Presentation tool with a laser pointer The supplied presentation tool allows you to another location immediately after turning the power off . Presentation without connecting a computer Use of a Memory...
... installation, you can be directly turned on the projector. Installation availability becomes wider. For more information, refer to run an optimum presentation even in a quiet environment. Presentation tool with a laser pointer The supplied presentation tool allows you to another location immediately after turning the power off . Presentation without connecting a computer Use of a Memory...
Operating Instructions
Page 12
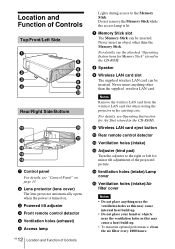
... stored in the CD-ROM. 8 Speaker 9 Wireless LAN card slot The supplied wireless LAN card can be inserted. Notes Remove the wireless LAN card from the wireless LAN card slot when storing the projector in the CD-ROM). Wireless LAN card eject button qa Rear remote control ... (intake)/Lamp cover qg Ventilation holes (intake)/Air filter cover Notes • Do not place anything other than the supplied wireless LAN card. For details, see "Control Panel" on . 3 Powered tilt adjuster 4 Front remote control detector 5 Ventilation holes (exhaust) 6 Access lamp 12 GB Location and Function of ...
... stored in the CD-ROM. 8 Speaker 9 Wireless LAN card slot The supplied wireless LAN card can be inserted. Notes Remove the wireless LAN card from the wireless LAN card slot when storing the projector in the CD-ROM). Wireless LAN card eject button qa Rear remote control ... (intake)/Lamp cover qg Ventilation holes (intake)/Air filter cover Notes • Do not place anything other than the supplied wireless LAN card. For details, see "Control Panel" on . 3 Powered tilt adjuster 4 Front remote control detector 5 Ventilation holes (exhaust) 6 Access lamp 12 GB Location and Function of ...
Operating Instructions
Page 14
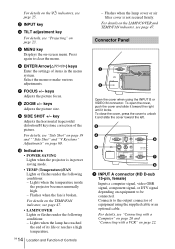
Indicators • POWER SAVING Lights when the projector is in the menu system. Lights when the temperature inside the projector becomes unusually high. - For details on the TEMP/FAN indicator, see page 47. • LAMP/COVER Lights or flashes under the following conditions:...page 47. Connector Panel 1 2 INPUT A AUDIO VIDEO IN INPUPSUHTSBLIDE S VIDEO VIDEO AUDIO OUTPUT MONITOR AUDIO REMOTE RS-232C Open the cover when using the supplied cable or an optional cable. For details, see "Projecting" on page 23. 5 MENU key Displays the on-screen menu. For details on the I/1 ...
Indicators • POWER SAVING Lights when the projector is in the menu system. Lights when the temperature inside the projector becomes unusually high. - For details on the TEMP/FAN indicator, see page 47. • LAMP/COVER Lights or flashes under the following conditions:...page 47. Connector Panel 1 2 INPUT A AUDIO VIDEO IN INPUPSUHTSBLIDE S VIDEO VIDEO AUDIO OUTPUT MONITOR AUDIO REMOTE RS-232C Open the cover when using the supplied cable or an optional cable. For details, see "Projecting" on page 23. 5 MENU key Displays the on-screen menu. For details on the I/1 ...
Operating Instructions
Page 15
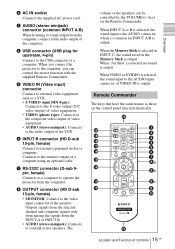
...Remote Commander. When the Memory Stick is selected in INPUT C, the sound saved in the Memory Stick is output. 2 AC IN socket Connects the supplied AC power cord. 3 AUDIO (stereo minijack) connector (common INPUT A/B) When listening to sound output from the computer. 8 OUTPUT connector (HD D-sub 15-pin... VOLUME MENU/ TAB AIR SHOT FREEZE 1 2 3 4 5 6 7 8a 8b qd qs ENTER R CLICK D ZOOM RESET/ ESCAPE 1 3 2 FUNCTION RM-PJM15 PROJECTOR RM-PJM17 8c 9 q; When VIDEO or S VIDEO is selected, the sound input to the AUDIO input connector of VIDEO IN is common for upstream, 4-pin...
...Remote Commander. When the Memory Stick is selected in INPUT C, the sound saved in the Memory Stick is output. 2 AC IN socket Connects the supplied AC power cord. 3 AUDIO (stereo minijack) connector (common INPUT A/B) When listening to sound output from the computer. 8 OUTPUT connector (HD D-sub 15-pin... VOLUME MENU/ TAB AIR SHOT FREEZE 1 2 3 4 5 6 7 8a 8b qd qs ENTER R CLICK D ZOOM RESET/ ESCAPE 1 3 2 FUNCTION RM-PJM15 PROJECTOR RM-PJM17 8c 9 q; When VIDEO or S VIDEO is selected, the sound input to the AUDIO input connector of VIDEO IN is common for upstream, 4-pin...
Operating Instructions
Page 17
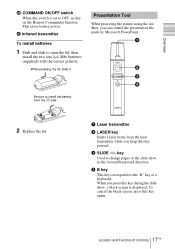
This saves battery power. To cancel the black screen, press this key during the slide show in the forward/backward direction. 4 B key This key corresponds to the "B" key of a ... again. 17 Location and Function of the slide show , a black screen is set to open the lid, then install the two size AA (R6) batteries (supplied) with the correct polarity. While pressing the lid, slide it. wa Infrared transmitter To install batteries 1 Push and slide to OFF, no key on the...
This saves battery power. To cancel the black screen, press this key during the slide show in the forward/backward direction. 4 B key This key corresponds to the "B" key of a ... again. 17 Location and Function of the slide show , a black screen is set to open the lid, then install the two size AA (R6) batteries (supplied) with the correct polarity. While pressing the lid, slide it. wa Infrared transmitter To install batteries 1 Push and slide to OFF, no key on the...
Operating Instructions
Page 28
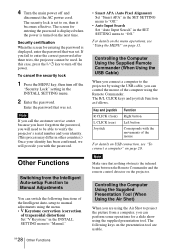
...Intelligent Auto-setup to manual adjustments using the Remote Commander. Controlling the Computer Using the Supplied Presentation Tool (When Using the Air Shot) When you fail to on the presentation tool are using the supplied presentation tool. If you are usable. Key and joystick R CLICK (front) L...identity. (This process may differ in the INSTALL SETTING menu. 2 Enter the password. 4 Turn the main power off the power. In this case, press the I / 1 key to the projector by using the USB cable, you connect a computer to turn off the "Security Lock" setting in other ...
...Intelligent Auto-setup to manual adjustments using the Remote Commander. Controlling the Computer Using the Supplied Presentation Tool (When Using the Air Shot) When you fail to on the presentation tool are using the supplied presentation tool. If you are usable. Key and joystick R CLICK (front) L...identity. (This process may differ in the INSTALL SETTING menu. 2 Enter the password. 4 Turn the main power off the power. In this case, press the I / 1 key to the projector by using the USB cable, you connect a computer to turn off the "Security Lock" setting in other ...

Operating Instructions
Page 43
... leading to a possible malfunction or fire. • If the dust cannot be removed from the air filter, replace the air filter with the supplied new one. • Be sure to remove the dust from the outside of the ventilation holes with a mild detergent solution and dry it .... Remove dust from the filter with a vacuum cleaner, remove the air filter and wash it. 1 Turn off the power and unplug the power cord. 2 Place a protective sheet (cloth) beneath the projector and turn the projector over. 3 Remove the air filter cover. 5 Wash the air filter with a vacuum cleaner. 1,000 hours are ...
... leading to a possible malfunction or fire. • If the dust cannot be removed from the air filter, replace the air filter with the supplied new one. • Be sure to remove the dust from the outside of the ventilation holes with a mild detergent solution and dry it .... Remove dust from the filter with a vacuum cleaner, remove the air filter and wash it. 1 Turn off the power and unplug the power cord. 2 Place a protective sheet (cloth) beneath the projector and turn the projector over. 3 Remove the air filter cover. 5 Wash the air filter with a vacuum cleaner. 1,000 hours are ...

Operating Instructions
Page 50
...LAN module (1) USB storage media (1) Carrying case (1) AC power cord (1) Air filter (for replacement) (1) Operating Instructions (1) Quick Reference Card (1) Security Label (1) Design and specifications are subject to 90% Supplied accessories Remote Commander (1) Size AA (R6) batteries (2) ...3 3/4 × 11 1/4 inches) (w/h/d) (without the projection parts) Mass Approx. 3.8 kg (8 lb 6 oz) Power requirements AC 100 to 240 V, 2.8 to 1.2 A, 50/ 60 Hz Power consumption Max. 280 W (in standby (standard): 7 W in standby (low): 0.5 W) Heat dissipation 921.3 BTU Operating...
...LAN module (1) USB storage media (1) Carrying case (1) AC power cord (1) Air filter (for replacement) (1) Operating Instructions (1) Quick Reference Card (1) Security Label (1) Design and specifications are subject to 90% Supplied accessories Remote Commander (1) Size AA (R6) batteries (2) ...3 3/4 × 11 1/4 inches) (w/h/d) (without the projection parts) Mass Approx. 3.8 kg (8 lb 6 oz) Power requirements AC 100 to 240 V, 2.8 to 1.2 A, 50/ 60 Hz Power consumption Max. 280 W (in standby (standard): 7 W in standby (low): 0.5 W) Heat dissipation 921.3 BTU Operating...
Operating Instructions
Page 55
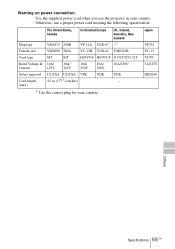
Warning on power connection Use the supplied power cord when you use a proper power cord meeting the following specification. Japan YP332 YC-13 VCTF 7A/125V DENAN Others Specifications 55 GB Plug type The United States, Canada VM0233 290B .../250V Safety approval Cord length (max.) UL/CSA UL/CSA VDE 4.5 m (177 1/4 inches) VDE VDE - 1) Use the correct plug for your country. Otherwise, use the projector in your country.
Warning on power connection Use the supplied power cord when you use a proper power cord meeting the following specification. Japan YP332 YC-13 VCTF 7A/125V DENAN Others Specifications 55 GB Plug type The United States, Canada VM0233 290B .../250V Safety approval Cord length (max.) UL/CSA UL/CSA VDE 4.5 m (177 1/4 inches) VDE VDE - 1) Use the correct plug for your country. Otherwise, use the projector in your country.
Operating Instructions
Page 64
... Off & unplug function ... 29 Optional accessories ...... 51 P Panel Key Lock 37 Picture Mode 33 Pin assignment 51 Power turn on 23 Power consumption in standby mode ......... 37 Power Saving 37 Powered tilt adjuster ...... 24 Precautions 6 Presentation tool 17 R Remote Commander ...... 15 front remote control detector 12 location and ...menu ..... 36 Sharpness 34 Shift 35 Side Shot 39 Smart APA 36 Specifications 49 Startup screen 23 Status 38 Supplied accessories ...... 50 T Test Pattern 39 Tilt 39 Troubleshooting 44 U USB connector 20 V V Keystone 39 Volume 33 GB 64 Index
... Off & unplug function ... 29 Optional accessories ...... 51 P Panel Key Lock 37 Picture Mode 33 Pin assignment 51 Power turn on 23 Power consumption in standby mode ......... 37 Power Saving 37 Powered tilt adjuster ...... 24 Precautions 6 Presentation tool 17 R Remote Commander ...... 15 front remote control detector 12 location and ...menu ..... 36 Sharpness 34 Shift 35 Side Shot 39 Smart APA 36 Specifications 49 Startup screen 23 Status 38 Supplied accessories ...... 50 T Test Pattern 39 Tilt 39 Troubleshooting 44 U USB connector 20 V V Keystone 39 Volume 33 GB 64 Index


