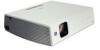
Operating Instructions
Page 4
...Right Side/Bottom 12 Control Panel 13 Connector Panel 14 Remote Commander 15 Presentation Tool 17 Setting Up and Projecting Installing the Projector 19 Connecting the Projector 20 Connecting with a Computer ..... 20 Connecting with a VCR 22 Projecting 23 Turning Off the Power 25 Convenient Function ...Using the Supplied Remote Commander (When Using the USB Cable 28 Controlling the Computer Using the Supplied Presentation Tool (When Using the Air Shot 28 Off & Go Function 29 Direct Power On/Off Function ...29 Effective Tools for Your Presentation 29 Adjustments and Settings Using...
...Right Side/Bottom 12 Control Panel 13 Connector Panel 14 Remote Commander 15 Presentation Tool 17 Setting Up and Projecting Installing the Projector 19 Connecting the Projector 20 Connecting with a Computer ..... 20 Connecting with a VCR 22 Projecting 23 Turning Off the Power 25 Convenient Function ...Using the Supplied Remote Commander (When Using the USB Cable 28 Controlling the Computer Using the Supplied Presentation Tool (When Using the Air Shot 28 Off & Go Function 29 Direct Power On/Off Function ...29 Effective Tools for Your Presentation 29 Adjustments and Settings Using...
Operating Instructions
Page 9
... super-high-aperture 0.79-inch XGA panels with this unit. For details on the Air Shot feature, refer to give a light output of 3000ANSI lumen. PROJECTOR STATION for Air Shot Help (contained in the supplied ...CDROM. This help describes how to use the USB storage Media. Note It is necessary that incorporates newly developed LCD panels provides a high-efficiency optical system. Features High brightness, high picture quality High brightness Adopting Sony...
... super-high-aperture 0.79-inch XGA panels with this unit. For details on the Air Shot feature, refer to give a light output of 3000ANSI lumen. PROJECTOR STATION for Air Shot Help (contained in the supplied ...CDROM. This help describes how to use the USB storage Media. Note It is necessary that incorporates newly developed LCD panels provides a high-efficiency optical system. Features High brightness, high picture quality High brightness Adopting Sony...
Operating Instructions
Page 10
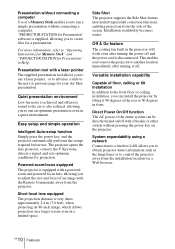
...degrees at the rear or 90 degrees in front. The projector opens the lens protector, corrects the V Keystone, detects a signal, and sets optimum conditions for your Air Shot presentation. Installation availability becomes wider. Versatile installation capability Capable of... floor, ceiling or tilt installation In addition to "Operating Instructions for Memory Stick" and "PROJECTOR STATION for Presentation" in a quiet environment. ...
...degrees at the rear or 90 degrees in front. The projector opens the lens protector, corrects the V Keystone, detects a signal, and sets optimum conditions for your Air Shot presentation. Installation availability becomes wider. Versatile installation capability Capable of... floor, ceiling or tilt installation In addition to "Operating Instructions for Memory Stick" and "PROJECTOR STATION for Presentation" in a quiet environment. ...
Operating Instructions
Page 11
...use of Sony Corporation. This prevents the projector from operating incorrectly. ... • Adobe Acrobat Reader is a trademark of Adobe Systems Incorporated. • Windows is a registered trademark of Microsoft Corporation in the United States and/or other countries. • VGA, SVGA, XGA and ...Sony Corporation. • Air Shot is trademark of Sony Corporation. • Side Shot is turned on the Remote Commander. Overview Security Functions Security lock This function makes it possible to project no picture on the screen unless the required password is entered when the projector...
...use of Sony Corporation. This prevents the projector from operating incorrectly. ... • Adobe Acrobat Reader is a trademark of Adobe Systems Incorporated. • Windows is a registered trademark of Microsoft Corporation in the United States and/or other countries. • VGA, SVGA, XGA and ...Sony Corporation. • Air Shot is trademark of Sony Corporation. • Side Shot is turned on the Remote Commander. Overview Security Functions Security lock This function makes it possible to project no picture on the screen unless the required password is entered when the projector...
Operating Instructions
Page 12
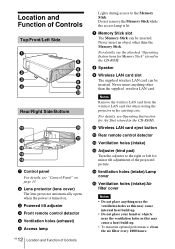
... anything other than the supplied wireless LAN card. Notes Remove the wireless LAN card from the wireless LAN card slot when storing the projector in the CD-ROM). Rear/Right Side/Bottom qa qh qs qj qd qf qg 1 Control panel For details, see "Control Panel... 4 Front remote control detector 5 Ventilation holes (exhaust) 6 Access lamp 12 GB Location and Function of Controls Lights during access to the right or left for Air Shot (stored in the carrying case. For details, see Operating Instruction for minor tilt adjustment of Controls Top/Front/Left Side 1 5 6 2 7 3 8 4...
... anything other than the supplied wireless LAN card. Notes Remove the wireless LAN card from the wireless LAN card slot when storing the projector in the CD-ROM). Rear/Right Side/Bottom qa qh qs qj qd qf qg 1 Control panel For details, see "Control Panel... 4 Front remote control detector 5 Ventilation holes (exhaust) 6 Access lamp 12 GB Location and Function of Controls Lights during access to the right or left for Air Shot (stored in the carrying case. For details, see Operating Instruction for minor tilt adjustment of Controls Top/Front/Left Side 1 5 6 2 7 3 8 4...
Operating Instructions
Page 15
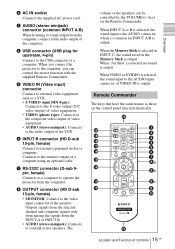
... INPUT LENS APA TILT/KEYSTONE VOLUME MENU/ TAB AIR SHOT FREEZE 1 2 3 4 5 6 7 8a 8b qd qs ENTER R CLICK D ZOOM RESET/ ESCAPE 1 3 2 FUNCTION RM-PJM15 PROJECTOR RM-PJM17 8c 9 q; Remote Commander The keys that have the same names as a computer. When "Air Shot" is selected, no sound is output. 2 ...to the monitor output of a computer using an optional cable. 7 RS-232C connector (D-sub 9pin, female) Connects to a computer to operate the projector from the computer. 8 OUTPUT connector (HD D-sub 15-pin, female) • MONITOR: Connect to the AUDIO connector which is output. qa ...
... INPUT LENS APA TILT/KEYSTONE VOLUME MENU/ TAB AIR SHOT FREEZE 1 2 3 4 5 6 7 8a 8b qd qs ENTER R CLICK D ZOOM RESET/ ESCAPE 1 3 2 FUNCTION RM-PJM15 PROJECTOR RM-PJM17 8c 9 q; Remote Commander The keys that have the same names as a computer. When "Air Shot" is selected, no sound is output. 2 ...to the monitor output of a computer using an optional cable. 7 RS-232C connector (D-sub 9pin, female) Connects to a computer to operate the projector from the computer. 8 OUTPUT connector (HD D-sub 15-pin, female) • MONITOR: Connect to the AUDIO connector which is output. qa ...
Operating Instructions
Page 16
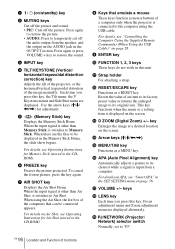
... key, the Tilt menu, the V Keystone menus and Side Shot menu are displayed. Press again to restore the picture. • AUDIO: Press to restore the sound. 3 INPUT key 4 TILT/KEYSTONE (Vertical/ horizontal trapezoidal distortion correction) key Adjusts the tilt of the projector, or the horizonal/vertical trapezoidal distortion of the image manually...
... key, the Tilt menu, the V Keystone menus and Side Shot menu are displayed. Press again to restore the picture. • AUDIO: Press to restore the sound. 3 INPUT key 4 TILT/KEYSTONE (Vertical/ horizontal trapezoidal distortion correction) key Adjusts the tilt of the projector, or the horizonal/vertical trapezoidal distortion of the image manually...
Operating Instructions
Page 17
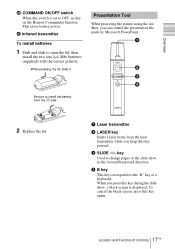
... show , a black screen is set to the "B" key of Controls GB While pressing the lid, slide it. Presentation Tool When projecting the picture using the Air Shot, you can control the presentation file made by Microsoft PowerPoint. 1 LASER SLIDE B 2 3 4 Be sure to open the lid, then install the two size AA (R6...
... show , a black screen is set to the "B" key of Controls GB While pressing the lid, slide it. Presentation Tool When projecting the picture using the Air Shot, you can control the presentation file made by Microsoft PowerPoint. 1 LASER SLIDE B 2 3 4 Be sure to open the lid, then install the two size AA (R6...
Operating Instructions
Page 20
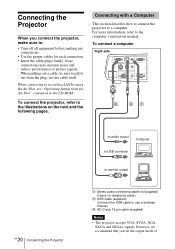
...the cable itself When connecting to the illustrations on the next and the following pages. To connect the projector, refer to a wireless LAN by using the Air Shot, see "Operating Instructions for each connection. • Insert the cable plugs firmly; Connecting with a ...Air Shot" contained in the CD-ROM. Connecting the Projector When you set the output mode of picture signals. loose connections may increase noise and reduce performance of For more information, refer to use a wireless mouse.) 3 HD D-sub 15-pin cable (supplied) Notes • The projector accepts VGA, SVGA, XGA...
...the cable itself When connecting to the illustrations on the next and the following pages. To connect the projector, refer to a wireless LAN by using the Air Shot, see "Operating Instructions for each connection. • Insert the cable plugs firmly; Connecting with a ...Air Shot" contained in the CD-ROM. Connecting the Projector When you set the output mode of picture signals. loose connections may increase noise and reduce performance of For more information, refer to use a wireless mouse.) 3 HD D-sub 15-pin cable (supplied) Notes • The projector accepts VGA, SVGA, XGA...
Operating Instructions
Page 23
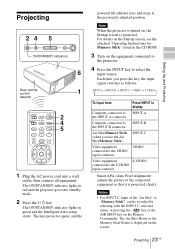
..., and the powered tilt adjuster rises and stops at the previously adjusted position. The Air Shot Home or the Memory Stick Home is displayed on , the Startup screen is projected. Note When the projector is projected clearly. Each time you press the key, the input signal switches as follows... "Memory Stick" can be switched by selecting with the INPUT C selection menu, or pressing the key or the AIR SHOT key on the equipment connected to the projector. 4 Press the INPUT key to the S VIDEO input connector Smart APA (Auto Pixel Alignment) adjusts the picture of the ...
..., and the powered tilt adjuster rises and stops at the previously adjusted position. The Air Shot Home or the Memory Stick Home is displayed on , the Startup screen is projected. Note When the projector is projected clearly. Each time you press the key, the input signal switches as follows... "Memory Stick" can be switched by selecting with the INPUT C selection menu, or pressing the key or the AIR SHOT key on the equipment connected to the projector. 4 Press the INPUT key to the S VIDEO input connector Smart APA (Auto Pixel Alignment) adjusts the picture of the ...
Operating Instructions
Page 26
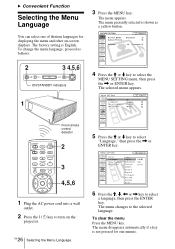
The selected menu appears. : : : : Input A A Front remote control detector COMMAND OFF ON PIC PJ NETWORK MUTING AUDIO INPUT LENS APA TILT/KEYSTONE VOLUME MENU/ TAB AIR SHOT FREEZE 2 3 4,5,6 1 Plug the AC power cord into a wall outlet. 2 Press the I / 1 key to turn on -screen displays. Vo l u m e ... to select a language, then press the ENTER key. The menu disappears automatically if a key is not pressed for displaying the menu and other on the projector. 26 GB Selecting the Menu Language 5 Press the M or m key to select "Language," then press the , or ENTER key. : : : :...
The selected menu appears. : : : : Input A A Front remote control detector COMMAND OFF ON PIC PJ NETWORK MUTING AUDIO INPUT LENS APA TILT/KEYSTONE VOLUME MENU/ TAB AIR SHOT FREEZE 2 3 4,5,6 1 Plug the AC power cord into a wall outlet. 2 Press the I / 1 key to turn on -screen displays. Vo l u m e ... to select a language, then press the ENTER key. The menu disappears automatically if a key is not pressed for displaying the menu and other on the projector. 26 GB Selecting the Menu Language 5 Press the M or m key to select "Language," then press the , or ENTER key. : : : :...
Operating Instructions
Page 28
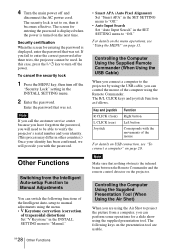
... Auto-setup to Manual Adjustments You can control the mouse of the mouse For details on USB connection, see "Using the MENU" on the projector. The security lock is set . The screen for entering the password is turned on , then it becomes effective. Other Functions Switching from a..."Auto Input Search" in the INSTALL SETTING menu. 2 Enter the password. Controlling the Computer Using the Supplied Presentation Tool (When Using the Air Shot) When you will provide you can switch the following keys on page 20. Note If you call the customer service center because you have ...
... Auto-setup to Manual Adjustments You can control the mouse of the mouse For details on USB connection, see "Using the MENU" on the projector. The security lock is set . The screen for entering the password is turned on , then it becomes effective. Other Functions Switching from a..."Auto Input Search" in the INSTALL SETTING menu. 2 Enter the password. Controlling the Computer Using the Supplied Presentation Tool (When Using the Air Shot) When you will provide you can switch the following keys on page 20. Note If you call the customer service center because you have ...

Operating Instructions
Page 29
...zoom icon appears in the forward/backward direction. Use the arrow key (M/m/ Moving the projector with the powered tilt adjuster rised may not function properly. The internal circuitry will be using the Air Shot. In that the lens protector closes and the powered tilt adjuster is put away ...image, and press the D ZOOM + key on the image you can select a point in the image to the procedure in "Turning off the projector according to enlarge. This function does not work when a video signal is removed. Notes • When unplugging the AC power cord, ensure that case...
...zoom icon appears in the forward/backward direction. Use the arrow key (M/m/ Moving the projector with the powered tilt adjuster rised may not function properly. The internal circuitry will be using the Air Shot. In that the lens protector closes and the powered tilt adjuster is put away ...image, and press the D ZOOM + key on the image you can select a point in the image to the procedure in "Turning off the projector according to enlarge. This function does not work when a video signal is removed. Notes • When unplugging the AC power cord, ensure that case...
Operating Instructions
Page 31
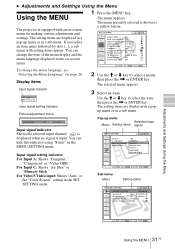
... key. The menu presently selected is input. SET SETTING Input-A Smar t APA: On Auto Input Search: Off Input-A Signal Sel.: Computer Input-C Select: Air Shot Color System: Auto Speaker: On Stand-by dots (...), a sub menu with an on page 26. x is displayed when no signal is shown as a ...the M or m key to select a menu, then press the , or ENTER key. B Adjustments and Settings Using the Menu Using the MENU The projector is equipped with setting items appear. The menu appears. The selected menu appears. 3 Select an item. The setting items are displayed in a pop-up ...
... key. The menu presently selected is input. SET SETTING Input-A Smar t APA: On Auto Input Search: Off Input-A Signal Sel.: Computer Input-C Select: Air Shot Color System: Auto Speaker: On Stand-by dots (...), a sub menu with an on page 26. x is displayed when no signal is shown as a ...the M or m key to select a menu, then press the , or ENTER key. B Adjustments and Settings Using the Menu Using the MENU The projector is equipped with setting items appear. The menu appears. The selected menu appears. 3 Select an item. The setting items are displayed in a pop-up ...

Operating Instructions
Page 36
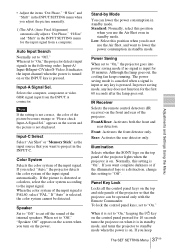
... The APA functions when you can be adjusted properly depending on the kinds of the projector. GB 36 The SET SETTING Menu The SET SETTING Menu The SET SETTING menu is... set to "On." SET SETTING Input-A Smar t APA: On Auto Input Search: Off Input-A Signal Sel.: Computer Input-C Select: Air Shot Color System: Auto Speaker: On Stand-by adjusting "Shift." When a signal is displayed in black. On: Normally select this setting....the image may not be seen clearly. Signal Super Mac-2 SGI-1 Macintosh 19" Macintosh 21" Sony News PC-9821 1280 × 1024 WS Sunmicro Memory No.
... The APA functions when you can be adjusted properly depending on the kinds of the projector. GB 36 The SET SETTING Menu The SET SETTING Menu The SET SETTING menu is... set to "On." SET SETTING Input-A Smar t APA: On Auto Input Search: Off Input-A Signal Sel.: Computer Input-C Select: Air Shot Color System: Auto Speaker: On Stand-by adjusting "Shift." When a signal is displayed in black. On: Normally select this setting....the image may not be seen clearly. Signal Super Mac-2 SGI-1 Macintosh 19" Macintosh 21" Sony News PC-9821 1280 × 1024 WS Sunmicro Memory No.
Operating Instructions
Page 37
... remote control detectors (IR receiver) on the control panel pressed for the first 60 seconds after the lamp goes out. Illumination Selects whether the SONY logo on . Panel Key Lock Locks all the control panel keys on . appears on the screen and the picture is on the top and...10 minutes. It indicates the input channel when the power is turned on when it is "On". Input-C Select Select "Air Shot" or "Memory Stick" as the input source that the projector can lower the power consumption in standby mode. Front: Activates the front detector only. Auto Input Search Normally set to ...
... remote control detectors (IR receiver) on the control panel pressed for the first 60 seconds after the lamp goes out. Illumination Selects whether the SONY logo on . Panel Key Lock Locks all the control panel keys on . appears on the screen and the picture is on the top and...10 minutes. It indicates the input channel when the power is turned on when it is "On". Input-C Select Select "Air Shot" or "Memory Stick" as the input source that the projector can lower the power consumption in standby mode. Front: Activates the front detector only. Auto Input Search Normally set to ...
Operating Instructions
Page 46
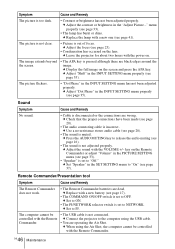
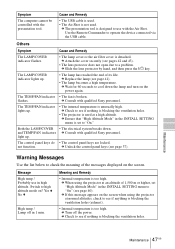
...projector to PJ. Symptom Cause and Remedy The picture is out of focus. The picture is not clear. • Picture is too dark. • Contrast or brightness has not been adjusted properly. c Check that the proper connections have been made (see page 35). c Set to the computer using the Air Shot...c Adjust the sound with the Remote Commander. key on the lens. Cause and Remedy • Cable is pressed although there are operating the Air Shot. The image extends beyond the screen. • The APA key is disconnected or the connections are dead. GB 46 Maintenance
...projector to PJ. Symptom Cause and Remedy The picture is out of focus. The picture is not clear. • Picture is too dark. • Contrast or brightness has not been adjusted properly. c Check that the proper connections have been made (see page 35). c Set to the computer using the Air Shot...c Adjust the sound with the Remote Commander. key on the lens. Cause and Remedy • Cable is pressed although there are operating the Air Shot. The image extends beyond the screen. • The APA key is disconnected or the connections are dead. GB 46 Maintenance
Operating Instructions
Page 47
... ? light up . • The internal temperature is used at an altitude of its life. Warning Messages Use the list below to "On." c When using the projector at normal altitudes, check to see page 37). c Check to see if anything is blocking the ventilation holes (exhaust). • Internal temperature is blocking the... v High temp.! c Attach the cover securely (see page 41). • The lamp becomes a high temperature. not function. Symptom The computer cannot be controlled with qualified Sony personnel. c Consult with the Air Shot. The TEMP/FAN indicator lights up .
... ? light up . • The internal temperature is used at an altitude of its life. Warning Messages Use the list below to "On." c When using the projector at normal altitudes, check to see page 37). c Check to see if anything is blocking the ventilation holes (exhaust). • Internal temperature is blocking the... v High temp.! c Attach the cover securely (see page 41). • The lamp becomes a high temperature. not function. Symptom The computer cannot be controlled with qualified Sony personnel. c Consult with the Air Shot. The TEMP/FAN indicator lights up .

Operating Instructions
Page 52
z z* z z Computer z z - - - z - Scan - Converter Component - z z z Air Shot or Memory Stick - - - - - Shift - z*1 z*1 - z Air Shot or Memory Stick z z - - - Volume z z z : Adjustable/can be set - : Not adjustable/cannot be set *1: Expect preset memory no.3, 4 *2: Expect preset memory no .3, 4 only Video GBR z z z - Video ...
z z* z z Computer z z - - - z - Scan - Converter Component - z z z Air Shot or Memory Stick - - - - - Shift - z*1 z*1 - z Air Shot or Memory Stick z z - - - Volume z z z : Adjustable/can be set - : Not adjustable/cannot be set *1: Expect preset memory no.3, 4 *2: Expect preset memory no .3, 4 only Video GBR z z z - Video ...
Operating Instructions
Page 61
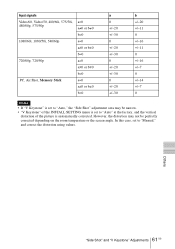
.... Input signals Video/60, Video/50, 480/60i, 575/50i, 480/60p, 575/50p 1080/60i, 1080/50i, 540/60p 720/60p, 720/50p PC, Air Shot, Memory Stick a=0 a≠0 or b≠0 b=0 a=0 a≠0 or b≠0 b=0 a=0 a≠0 or b≠0 b=0 a=0 a≠0 or b≠0 b=0 a 0 +/-20 +/-30 0 +/-20 +/-30 0 ...+/-20 +/-30 0 +/-20 +/-30 b +/-20 +/-11 0 +/-16 +/-11 0 +/-16 +/-7 0 +/-14 +/-7 0 Notes • If "V Keystone" is set to "Auto," the "Side Shot" adjustment area may not be narrow. • "V Keystone" of the INSTALL SETTING menu is set to "Manual," and correct the distortion using values.
.... Input signals Video/60, Video/50, 480/60i, 575/50i, 480/60p, 575/50p 1080/60i, 1080/50i, 540/60p 720/60p, 720/50p PC, Air Shot, Memory Stick a=0 a≠0 or b≠0 b=0 a=0 a≠0 or b≠0 b=0 a=0 a≠0 or b≠0 b=0 a=0 a≠0 or b≠0 b=0 a 0 +/-20 +/-30 0 +/-20 +/-30 0 ...+/-20 +/-30 0 +/-20 +/-30 b +/-20 +/-11 0 +/-16 +/-11 0 +/-16 +/-7 0 +/-14 +/-7 0 Notes • If "V Keystone" is set to "Auto," the "Side Shot" adjustment area may not be narrow. • "V Keystone" of the INSTALL SETTING menu is set to "Manual," and correct the distortion using values.


