Operating Instructions
Page 10
...can be directly turned on a larger screen even in Help. GB 10 Features Off & Go feature The cooling fan built in the projector will work even after turning it 90 degrees at the rear or 90 degrees in a quiet environment. Versatile installation capability Capable of floor...the ear is very short, approximately 2.4 m (7.8 feet), when projecting an 80-inch image, which allows projection on /off . Easy setup and simple operation Intelligent Auto-setup function Simply press the power key, and the projector automatically performs the setups required before use a laser pointer, or to advance ...
...can be directly turned on a larger screen even in Help. GB 10 Features Off & Go feature The cooling fan built in the projector will work even after turning it 90 degrees at the rear or 90 degrees in a quiet environment. Versatile installation capability Capable of floor...the ear is very short, approximately 2.4 m (7.8 feet), when projecting an 80-inch image, which allows projection on /off . Easy setup and simple operation Intelligent Auto-setup function Simply press the power key, and the projector automatically performs the setups required before use a laser pointer, or to advance ...
Operating Instructions
Page 19
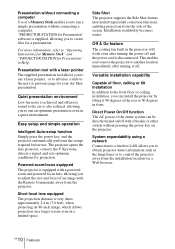
...table above. Setting Up and Projecting B Setting Up and Projecting Installing the Projector The distance between the lens and the screen varies depending on page 56. 19 Installing the Projector GB For details on installation, see "Installation Diagram" on the size of ...the lens Unit: m (feet) Screen size (inches) 40 60 80 100 120 150 180 200 250 300 Minimum 1.2 1.8 2.4 3.0 3.6 4.5 5.4 6.0 7.5 9.0 Distance (3.9)...
...table above. Setting Up and Projecting B Setting Up and Projecting Installing the Projector The distance between the lens and the screen varies depending on page 56. 19 Installing the Projector GB For details on installation, see "Installation Diagram" on the size of ...the lens Unit: m (feet) Screen size (inches) 40 60 80 100 120 150 180 200 250 300 Minimum 1.2 1.8 2.4 3.0 3.6 4.5 5.4 6.0 7.5 9.0 Distance (3.9)...
Operating Instructions
Page 31
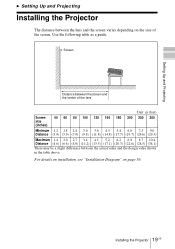
... Color: Bottom Left Center Top Right Bottom Right Sub menu Menu Setting items PICTURE SETTING Input A ADJUST PICTURE Contrast: Brightness: Gamma Mode: Color Temp: Standard 80 50 Graphics High Adjustments and Settings Using the Menu Using the MENU 31 GB You can hide this indicator using "Status" in the SET SETTING...-screen menu for making various adjustments and settings. The selected menu appears. 3 Select an item. B Adjustments and Settings Using the Menu Using the MENU The projector is equipped with setting items appear.
... Color: Bottom Left Center Top Right Bottom Right Sub menu Menu Setting items PICTURE SETTING Input A ADJUST PICTURE Contrast: Brightness: Gamma Mode: Color Temp: Standard 80 50 Graphics High Adjustments and Settings Using the Menu Using the MENU 31 GB You can hide this indicator using "Status" in the SET SETTING...-screen menu for making various adjustments and settings. The selected menu appears. 3 Select an item. B Adjustments and Settings Using the Menu Using the MENU The projector is equipped with setting items appear.
Operating Instructions
Page 33
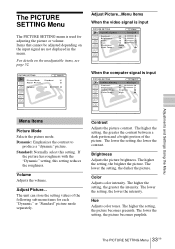
...Input A Adjust Picture...Menu Items When the video signal is input PICTURE SETTING ADJUST PICTURE Contrast: Brightness: Color: Hue: Sharpness: Color Temp.: 80 50 50 50 Middle Low Video Standard When the computer signal is used for each "Dynamic" or "Standard" picture mode separately. Standard: ... SETTING Menu The PICTURE SETTING menu is input PICTURE SETTING Input A ADJUST PICTURE Contrast: Brightness: Gamma Mode: Color Temp.: Standard 80 50 Graphics High Adjustments and Settings Using the Menu Menu Items Picture Mode Selects the picture mode. The unit can store the setting...
...Input A Adjust Picture...Menu Items When the video signal is input PICTURE SETTING ADJUST PICTURE Contrast: Brightness: Color: Hue: Sharpness: Color Temp.: 80 50 50 50 Middle Low Video Standard When the computer signal is used for each "Dynamic" or "Standard" picture mode separately. Standard: ... SETTING Menu The PICTURE SETTING menu is input PICTURE SETTING Input A ADJUST PICTURE Contrast: Brightness: Gamma Mode: Color Temp.: Standard 80 50 Graphics High Adjustments and Settings Using the Menu Menu Items Picture Mode Selects the picture mode. The unit can store the setting...
Operating Instructions
Page 49
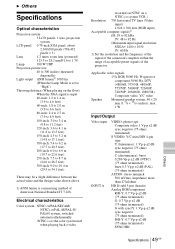
... (75 ohms terminated) SYNC/HD: Others Specifications 49 GB B Others Specifications Optical characteristics Projection system 3 LCD panels, 1 lens, projection system LCD panel 0.79-inch XGA panel, about 2,360,000 pixels (786,432 pixels × 3) Lens 1.2 times zoom lens (powered...the Lamp Mode is set to "High") Throwing distance (When placing on the floor) When the XGA signal is input 40-inch: 1.2 to 1.4 m (3.9 to 4.6 feet) 60-inch: 1.8 to 2.0 m (5.9 to 6.6 feet) 80-inch: 2.4 to 2.7 m (7.9 to 8.9 feet) 100-inch: 3.0 to 3.4 m (9.8...43 is a measuring method of the projector.
... (75 ohms terminated) SYNC/HD: Others Specifications 49 GB B Others Specifications Optical characteristics Projection system 3 LCD panels, 1 lens, projection system LCD panel 0.79-inch XGA panel, about 2,360,000 pixels (786,432 pixels × 3) Lens 1.2 times zoom lens (powered...the Lamp Mode is set to "High") Throwing distance (When placing on the floor) When the XGA signal is input 40-inch: 1.2 to 1.4 m (3.9 to 4.6 feet) 60-inch: 1.8 to 2.0 m (5.9 to 6.6 feet) 80-inch: 2.4 to 2.7 m (7.9 to 8.9 feet) 100-inch: 3.0 to 3.4 m (9.8...43 is a measuring method of the projector.
Operating Instructions
Page 57
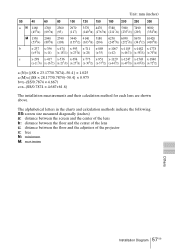
...the center of the lens b: distance between the floor and the center of the lens c: distance between the floor and the adjusters of the projector x: free N: minimum M: maximum Others Installation Diagram 57 GB The alphabetical letters in the charts and calculation methods indicate the following. Unit: ...mm (inches) SS 40 60 80 100 120 150 180 200 250 300 a N 1160 1760 2360 2970 3570 4470 5380 5980 7490 9000 (453/4) (693/8) (93) (117) (1405/8)...
...the center of the lens b: distance between the floor and the center of the lens c: distance between the floor and the adjusters of the projector x: free N: minimum M: maximum Others Installation Diagram 57 GB The alphabetical letters in the charts and calculation methods indicate the following. Unit: ...mm (inches) SS 40 60 80 100 120 150 180 200 250 300 a N 1160 1760 2360 2970 3570 4470 5380 5980 7490 9000 (453/4) (693/8) (93) (117) (1405/8)...
Operating Instructions
Page 59
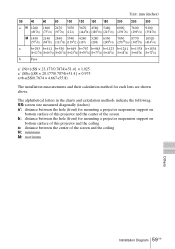
The alphabetical letters in the charts and calculation methods indicate the following. Unit: mm (inches) SS 40 60 80 100 120 150 180 200 250 300 a' N 1260 1860 2470 3070 3670 4580 5480 6090 7600 9100 (495/8) (731/4) (973/8) (121) (1445/8) (1803/8) (...177/0.7874)+51.4} × 0.975 x=b+(SS/0.7874 × 4.667+55.8) The installation measurements and their calculation method for mounting a projector suspension support on bottom surface of this projector and the center of the screen b: distance between the hole (front) for each lens are shown above. SS: screen size measured diagonally...
The alphabetical letters in the charts and calculation methods indicate the following. Unit: mm (inches) SS 40 60 80 100 120 150 180 200 250 300 a' N 1260 1860 2470 3070 3670 4580 5480 6090 7600 9100 (495/8) (731/4) (973/8) (121) (1445/8) (1803/8) (...177/0.7874)+51.4} × 0.975 x=b+(SS/0.7874 × 4.667+55.8) The installation measurements and their calculation method for mounting a projector suspension support on bottom surface of this projector and the center of the screen b: distance between the hole (front) for each lens are shown above. SS: screen size measured diagonally...