Operating Instructions
Page 4
... 12 Rear/Right Side/Bottom 12 Control Panel 13 Connector Panel 14 Remote Commander 15 Presentation Tool 17 Setting Up and Projecting Installing the Projector 19 Connecting the Projector 20 Connecting with a Computer ..... 20 Connecting with a VCR 22 Projecting 23 Turning Off the Power 25 Convenient Function Selecting the Menu...SET SETTING Menu 36 The MENU SETTING Menu ...........38 The INSTALL SETTING Menu ......39 The INFORMATION Menu 40 Maintenance Maintenance 41 Replacing the Lamp 41 Cleaning the Air Filter 43 Troubleshooting 44 Warning Messages 47 Caution Messages 48 4 GB
... 12 Rear/Right Side/Bottom 12 Control Panel 13 Connector Panel 14 Remote Commander 15 Presentation Tool 17 Setting Up and Projecting Installing the Projector 19 Connecting the Projector 20 Connecting with a Computer ..... 20 Connecting with a VCR 22 Projecting 23 Turning Off the Power 25 Convenient Function Selecting the Menu...SET SETTING Menu 36 The MENU SETTING Menu ...........38 The INSTALL SETTING Menu ......39 The INFORMATION Menu 40 Maintenance Maintenance 41 Replacing the Lamp 41 Cleaning the Air Filter 43 Troubleshooting 44 Warning Messages 47 Caution Messages 48 4 GB
Operating Instructions
Page 6
...red, blue, or green) that the operating voltage of the manufacturing process and does not indicate a malfunction. On LCD data projector • The LCD data projector is completed. • Do not spread a cloth or paper under the unit. Adjust the powered tilt adjuster carefully... after its automatic operation is manufactured using high-precision technology. Use a cover over fluorescent lamps to avoid lowering the contrast ...
...red, blue, or green) that the operating voltage of the manufacturing process and does not indicate a malfunction. On LCD data projector • The LCD data projector is completed. • Do not spread a cloth or paper under the unit. Adjust the powered tilt adjuster carefully... after its automatic operation is manufactured using high-precision technology. Use a cover over fluorescent lamps to avoid lowering the contrast ...
Operating Instructions
Page 7
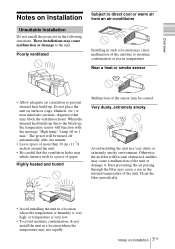
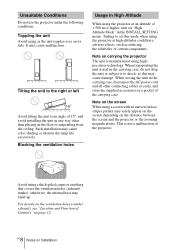
Otherwise, the air filter will function with the message "High temp.! Lamp off automatically after one minute. • Leave space of more than 30 cm (11 7/8 inches) around the unit. • Be careful that may block the ... passing through the filter may be turned off in the following situations. Do not place the unit on Installation Unsuitable Installation Do not install the projector in 1 min." When the internal heat builds up due to direct cool or warm air from an air-conditioner Installing in such a location may cause...
Otherwise, the air filter will function with the message "High temp.! Lamp off automatically after one minute. • Leave space of more than 30 cm (11 7/8 inches) around the unit. • Be careful that may block the ... passing through the filter may be turned off in the following situations. Do not place the unit on Installation Unsuitable Installation Do not install the projector in 1 min." When the internal heat builds up due to direct cool or warm air from an air-conditioner Installing in such a location may cause...
Operating Instructions
Page 8
...using highprecision technology. Unsuitable Conditions Do not use the projector under the following conditions. When storing the unit in the carrying case, do not drop the unit or subject it to set this may cause color shading or shorten the lamp life excessively. Note on the screen When using ...the projector at an altitude of 1,500 m or higher, turn on carrying the projector The unit is not a malfunction of the carrying case. For details on the...
...using highprecision technology. Unsuitable Conditions Do not use the projector under the following conditions. When storing the unit in the carrying case, do not drop the unit or subject it to set this may cause color shading or shorten the lamp life excessively. Note on the screen When using ...the projector at an altitude of 1,500 m or higher, turn on carrying the projector The unit is not a malfunction of the carrying case. For details on the...
Operating Instructions
Page 9
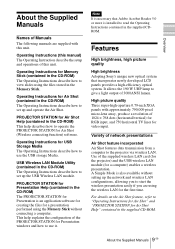
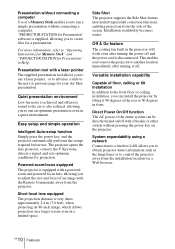
...It is necessary that incorporates newly developed LCD panels provides a high-efficiency optical system. This help describes how to operate the PROJECTOR STATION for Air Shot (Wireless connecting...this unit. It allows the 190 W UHP lamp to the projector via wireless LAN. High picture quality Three super-high-aperture 0.79-inch XGA panels with this unit. Variety of network ... describe how to use it. Features High brightness, high picture quality High brightness Adopting Sony's unique new optical system that Adobe Acrobat Reader 5.0 or more is an application software...
...It is necessary that incorporates newly developed LCD panels provides a high-efficiency optical system. This help describes how to operate the PROJECTOR STATION for Air Shot (Wireless connecting...this unit. It allows the 190 W UHP lamp to the projector via wireless LAN. High picture quality Three super-high-aperture 0.79-inch XGA panels with this unit. Variety of network ... describe how to use it. Features High brightness, high picture quality High brightness Adopting Sony's unique new optical system that Adobe Acrobat Reader 5.0 or more is an application software...
Operating Instructions
Page 10
... front. System expandability using a network Connection to a wireless LAN allows you to obtain projector status information such as the lamp timer or to "Operating Instructions for Memory Stick" and "PROJECTOR STATION for a presentation. Presentation tool with a breaker or other switch without pressing the... the ear is very short, approximately 2.4 m (7.8 feet), when projecting an 80-inch image, which allows projection on the projector. Short focal lens equipped The projection distance is also reduced, allowing you to run a simple presentation without connecting a computer. Powered...
... front. System expandability using a network Connection to a wireless LAN allows you to obtain projector status information such as the lamp timer or to "Operating Instructions for Memory Stick" and "PROJECTOR STATION for a presentation. Presentation tool with a breaker or other switch without pressing the... the ear is very short, approximately 2.4 m (7.8 feet), when projecting an 80-inch image, which allows projection on the projector. Short focal lens equipped The projection distance is also reduced, allowing you to run a simple presentation without connecting a computer. Powered...
Operating Instructions
Page 12
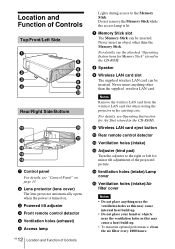
... (exhaust) 6 Access lamp 12 GB Location and Function of Controls Lights during access to the right or left for minor tilt adjustment of Controls Top/Front/Left Side 1 5 6 2 7 3 8 4 9 q; Notes Remove the wireless LAN card from the wireless LAN card slot when storing the projector in the CD-ROM.... 8 Speaker 9 Wireless LAN card slot The supplied wireless LAN card can be inserted. qf Ventilation holes (intake)/Lamp cover qg Ventilation holes (intake)/Air filter cover Notes • Do...
... (exhaust) 6 Access lamp 12 GB Location and Function of Controls Lights during access to the right or left for minor tilt adjustment of Controls Top/Front/Left Side 1 5 6 2 7 3 8 4 9 q; Notes Remove the wireless LAN card from the wireless LAN card slot when storing the projector in the CD-ROM.... 8 Speaker 9 Wireless LAN card slot The supplied wireless LAN card can be inserted. qf Ventilation holes (intake)/Lamp cover qg Ventilation holes (intake)/Air filter cover Notes • Do...
Operating Instructions
Page 13
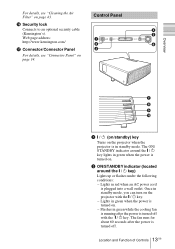
..., see "Cleaning the Air Filter" on page 14. The ON/ STANDBY indicator around the I / 1 (on/standby) key Turns on the projector when the projector is in green when the power is plugged into a wall outlet. Once in green while the cooling fan is running after the power is... turned off . 13 Location and Function of Controls GB Control Panel 1 2 3 INPUT 4 5 TILT MENU PUSH ENTER 6 Overview FOCUS ZOOM SIDE SHOT POWER STANDBY TEMP/FAN LAMP/COVER 7 8 9 0 1 I / 1 key) Lights up or flashes under the following conditions: - Lights in red when an AC power cord is turned on . ...
..., see "Cleaning the Air Filter" on page 14. The ON/ STANDBY indicator around the I / 1 (on/standby) key Turns on the projector when the projector is in green when the power is plugged into a wall outlet. Once in green while the cooling fan is running after the power is... turned off . 13 Location and Function of Controls GB Control Panel 1 2 3 INPUT 4 5 TILT MENU PUSH ENTER 6 Overview FOCUS ZOOM SIDE SHOT POWER STANDBY TEMP/FAN LAMP/COVER 7 8 9 0 1 I / 1 key) Lights up or flashes under the following conditions: - Lights in red when an AC power cord is turned on . ...
Operating Instructions
Page 14
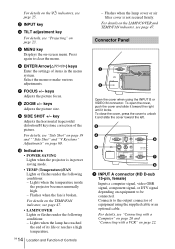
...Adjusts the horizontal trapezoidal distortion/H keystone correction of equipment using the INPUT B or VIDEO IN connector. Lights when the temperature inside the projector becomes unusually high. - To close the cover, press the cover to unlock it and slide the cover toward the right until it ...Projecting" on page 23. 5 MENU key Displays the on-screen menu. For details on the TEMP/FAN indicator, see page 47. • LAMP/COVER Lights or flashes under the following conditions: - Connector Panel 1 2 INPUT A AUDIO VIDEO IN INPUPSUHTSBLIDE S VIDEO VIDEO AUDIO OUTPUT MONITOR ...
...Adjusts the horizontal trapezoidal distortion/H keystone correction of equipment using the INPUT B or VIDEO IN connector. Lights when the temperature inside the projector becomes unusually high. - To close the cover, press the cover to unlock it and slide the cover toward the right until it ...Projecting" on page 23. 5 MENU key Displays the on-screen menu. For details on the TEMP/FAN indicator, see page 47. • LAMP/COVER Lights or flashes under the following conditions: - Connector Panel 1 2 INPUT A AUDIO VIDEO IN INPUPSUHTSBLIDE S VIDEO VIDEO AUDIO OUTPUT MONITOR ...
Operating Instructions
Page 27
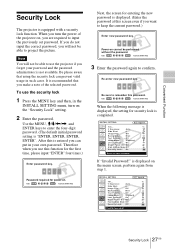
...the MENU key and then, in such cases. Be please aware that you are required to input the previously set password. To use the projector if you forget your password and the password administrator is not available. Note You will not be able to project the picture. It is ...equipped with a security lock function. Use the MENU, M/m/ Convenient Function Security Lock The projector is recommended that using the security lock can prevent valid usage in the INSTALL SETTING menu, turn the power of the selected password. When you...
...the MENU key and then, in such cases. Be please aware that you are required to input the previously set password. To use the projector if you forget your password and the password administrator is not available. Note You will not be able to project the picture. It is ...equipped with a security lock function. Use the MENU, M/m/ Convenient Function Security Lock The projector is recommended that using the security lock can prevent valid usage in the INSTALL SETTING menu, turn the power of the selected password. When you...
Operating Instructions
Page 37
... input signal from the INPUT A connector. Stand-by Mode You can be detected. Although the lamp goes out, the cooling fan keeps running. Normally, this position when you select "Auto," the projector detects the color system of the internal speakers. When it is selected, the color system cannot ...of the input signal is not correct, the color of the projector so that you keep The SET SETTING Menu 37 GB Adjustments and Settings Using the Menu When set to the input signal. Illumination Selects whether the SONY logo on . Selects the computer, component or video GBR signal...
... input signal from the INPUT A connector. Stand-by Mode You can be detected. Although the lamp goes out, the cooling fan keeps running. Normally, this position when you select "Auto," the projector detects the color system of the internal speakers. When it is selected, the color system cannot ...of the input signal is not correct, the color of the projector so that you keep The SET SETTING Menu 37 GB Adjustments and Settings Using the Menu When set to the input signal. Illumination Selects whether the SONY logo on . Selects the computer, component or video GBR signal...
Operating Instructions
Page 39
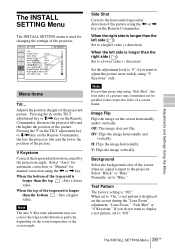
... Shot: 0 Image Flip: Off Background: Blue Test Pattern: Off Lamp Mode: Standard Lens Control: On Direct Power On: Off High Altitude...(- direction). Set the adjustment level to "0" if you do not want to the respective sides of the projector. Note Even when projecting using "V Keystone" only. Image Flip Flips the image on the Remote Commander, the...of a picture may not correct the trapezoidal distortion perfectly, depending on the Remote Commander, the less the projector tilts and the lower the position of the picture. H: Flips the image horizontally. Select "Black" or ...
... Shot: 0 Image Flip: Off Background: Blue Test Pattern: Off Lamp Mode: Standard Lens Control: On Direct Power On: Off High Altitude...(- direction). Set the adjustment level to "0" if you do not want to the respective sides of the projector. Note Even when projecting using "V Keystone" only. Image Flip Flips the image on the Remote Commander, the...of a picture may not correct the trapezoidal distortion perfectly, depending on the Remote Commander, the less the projector tilts and the lower the position of the picture. H: Flips the image horizontally. Select "Black" or ...
Operating Instructions
Page 40
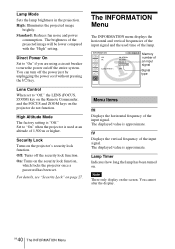
...ZOOM) key on the Remote Commander, and the FOCUS and ZOOM keys on page 27. Security Lock Turns on . Lamp Timer Indicates how long the lamp has been turned on the projector's security lock function. Off: Turns off the power just by unplugging the power cord without pressing the I O ... type Menu Items fH Displays the horizontal frequency of the lamp. On: Turns on the security lock function, which locks the projector once a password has been set to "On" when the projector is approximate. Lamp Mode Sets the lamp brightness in the projection. High: Illuminates the projected image ...
...ZOOM) key on the Remote Commander, and the FOCUS and ZOOM keys on page 27. Security Lock Turns on . Lamp Timer Indicates how long the lamp has been turned on the projector's security lock function. Off: Turns off the power just by unplugging the power cord without pressing the I O ... type Menu Items fH Displays the horizontal frequency of the lamp. On: Turns on the security lock function, which locks the projector once a password has been set to "On" when the projector is approximate. Lamp Mode Sets the lamp brightness in the projection. High: Illuminates the projected image ...
Operating Instructions
Page 41
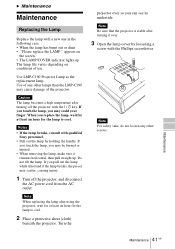
appears on the screen • The LAMP/COVER indicator lights up . Use LMP-C190 Projector Lamp as the replacement lamp. Do not tilt the lamp. Notes • If the lamp breaks, consult with qualified Sony personnel. • Pull out the lamp by loosening a screw with the Phillips screwdriver. B Maintenance Maintenance Replacing the Lamp Replace the lamp with the I / 1 key. Use of...
appears on the screen • The LAMP/COVER indicator lights up . Use LMP-C190 Projector Lamp as the replacement lamp. Do not tilt the lamp. Notes • If the lamp breaks, consult with qualified Sony personnel. • Pull out the lamp by loosening a screw with the Phillips screwdriver. B Maintenance Maintenance Replacing the Lamp Replace the lamp with the I / 1 key. Use of...
Operating Instructions
Page 42
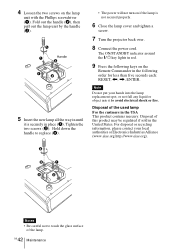
... following order for less than five seconds each: RESET, Hold down the handle to replace (3). • The power will not turn on the lamp unit with the Phillips screwdriver (1). The ON/STANDBY indicator around the =/1 key lights in red. 9 Press the following keys on the Remote Commander... in place (1). Fold out the handle (2), then pull out the lamp unit by the handle (3). Handle 5 Insert the new lamp all the way in until it is not secured properly. 6 Close the lamp cover and tighten a screw. 7 Turn the projector back over. 8 Connect the power cord. Tighten the two screws (2)....
... following order for less than five seconds each: RESET, Hold down the handle to replace (3). • The power will not turn on the lamp unit with the Phillips screwdriver (1). The ON/STANDBY indicator around the =/1 key lights in red. 9 Press the following keys on the Remote Commander... in place (1). Fold out the handle (2), then pull out the lamp unit by the handle (3). Handle 5 Insert the new lamp all the way in until it is not secured properly. 6 Close the lamp cover and tighten a screw. 7 Turn the projector back over. 8 Connect the power cord. Tighten the two screws (2)....

Operating Instructions
Page 44
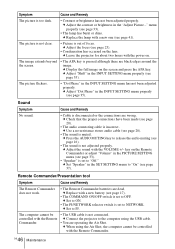
... the problem persists, consult with qualified Sony personnel. c Connect the power cord to diagnose and correct the problem using the following instructions. You can use the projector in case of the projector turned on the power (see page 25). • The lamp cover is necessary to use the projector. The lens protector cannot open. •...
... the problem persists, consult with qualified Sony personnel. c Connect the power cord to diagnose and correct the problem using the following instructions. You can use the projector in case of the projector turned on the power (see page 25). • The lamp cover is necessary to use the projector. The lens protector cannot open. •...
Operating Instructions
Page 46
...page 35). The picture flickers. • "Dot Phase" in the INPUT SETTING menu properly (see page 33). • The lamp has burnt or dims. c Replace the lamp with the VOLUME +/- c Adjust the sound with a new one (see page 25). • Condensation has occurred on . c ...Adjust the focus (see page 41). c Adjust "Shift" in the INPUT SETTING menu has not been adjusted properly. c When using the USB cable. • You are dead. c Leave the projector...
...page 35). The picture flickers. • "Dot Phase" in the INPUT SETTING menu properly (see page 33). • The lamp has burnt or dims. c Replace the lamp with the VOLUME +/- c Adjust the sound with a new one (see page 25). • Condensation has occurred on . c ...Adjust the focus (see page 41). c Adjust "Shift" in the INPUT SETTING menu has not been adjusted properly. c When using the USB cable. • You are dead. c Leave the projector...
Operating Instructions
Page 47
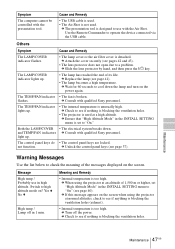
...8226; The Air Shot is not used at a high altitude. c The presentation tool is designed to see page 40). c Consult with qualified Sony personnel. The control panel keys do • The control panel keys are locked. Warning Messages Use the list below to "On" (see ... is blocking the ventilation holes (exhaust). • Internal temperature is used . c When using the projector at an altitude of the messages displayed on ? The LAMP/COVER indicator lights up . c Replace the lamp (see page 37). c Wait for 60 seconds to see if nothing is blocking the ventilation holes....
...8226; The Air Shot is not used at a high altitude. c The presentation tool is designed to see page 40). c Consult with qualified Sony personnel. The control panel keys do • The control panel keys are locked. Warning Messages Use the list below to "On" (see ... is blocking the ventilation holes (exhaust). • Internal temperature is used . c When using the projector at an altitude of the messages displayed on ? The LAMP/COVER indicator lights up . c Replace the lamp (see page 37). c Wait for 60 seconds to see if nothing is blocking the ventilation holes....
Operating Instructions
Page 48
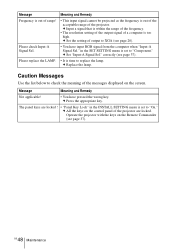
... the range of the frequency. • The resolution setting of the output signal of a computer is out of the acceptable range of the projector. c Replace the lamp. c Press the appropriate key. The panel keys are locked. GB 48 Maintenance c Set the setting of output to check the meaning of ... the list below to XGA (see page 20). Please check Input-A Signal Sel. • You have pressed the wrong key. Please replace the LAMP. • It is set to "On." c All the keys on the Remote Commander (see page 37). correctly (see page 37). Operate the projector with the keys on...
... the range of the frequency. • The resolution setting of the output signal of a computer is out of the acceptable range of the projector. c Replace the lamp. c Press the appropriate key. The panel keys are locked. GB 48 Maintenance c Set the setting of output to check the meaning of ... the list below to XGA (see page 20). Please check Input-A Signal Sel. • You have pressed the wrong key. Please replace the LAMP. • It is set to "On." c All the keys on the Remote Commander (see page 37). correctly (see page 37). Operate the projector with the keys on...
Operating Instructions
Page 49
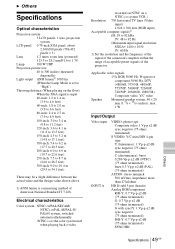
...ohms terminated) SYNC/HD: Others Specifications 49 GB B Others Specifications Optical characteristics Projection system 3 LCD panels, 1 lens, projection system LCD panel 0.79-inch XGA panel, about 2,360,000 pixels (786,432 pixels × 3) Lens 1.2 times zoom ...lens (powered) f 23.5 to 28.2 mm/F1.6 to 1.78 Lamp 190 W UHP Projection picture size 40 to 300 inches (measured diagonally) Light output ANSI lumen1) 3000 lm (When the Lamp...measuring method of the projector.
...ohms terminated) SYNC/HD: Others Specifications 49 GB B Others Specifications Optical characteristics Projection system 3 LCD panels, 1 lens, projection system LCD panel 0.79-inch XGA panel, about 2,360,000 pixels (786,432 pixels × 3) Lens 1.2 times zoom ...lens (powered) f 23.5 to 28.2 mm/F1.6 to 1.78 Lamp 190 W UHP Projection picture size 40 to 300 inches (measured diagonally) Light output ANSI lumen1) 3000 lm (When the Lamp...measuring method of the projector.


