Operating Instructions
Page 1
2-634-403-11 (1) Data Projector Operating Instructions VPL-CX76 VPL-CX70 © 2005 Sony Corporation
2-634-403-11 (1) Data Projector Operating Instructions VPL-CX76 VPL-CX70 © 2005 Sony Corporation
Operating Instructions
Page 2
...of Controls .... 6 Top/Front/Left Side 6 Rear/Right Side/Bottom 6 Control Panel 7 Connector Panel 8 Remote Commander 9 Presentation Tool (VPL-CX76 only 11 Adjustments and Settings Using a Menu Using a MENU 24 The PICTURE SETTING Menu ......26 The INPUT SETTING Menu ...........27 About the ...The MENU SETTING Menu ...........31 The INSTALL SETTING Menu .......32 The INFORMATION Menu 34 Projecting the Picture Installing the Projector 12 Connecting the Projector 13 Connecting a Computer 13 Connecting a VCR 14 Projecting 15 Turning Off the Power 18 Convenient Functions Selecting ...
...of Controls .... 6 Top/Front/Left Side 6 Rear/Right Side/Bottom 6 Control Panel 7 Connector Panel 8 Remote Commander 9 Presentation Tool (VPL-CX76 only 11 Adjustments and Settings Using a Menu Using a MENU 24 The PICTURE SETTING Menu ......26 The INPUT SETTING Menu ...........27 About the ...The MENU SETTING Menu ...........31 The INSTALL SETTING Menu .......32 The INFORMATION Menu 34 Projecting the Picture Installing the Projector 12 Connecting the Projector 13 Connecting a Computer 13 Connecting a VCR 14 Projecting 15 Turning Off the Power 18 Convenient Functions Selecting ...
Operating Instructions
Page 3
... for creating the files for a presentation performed using files sorted in a "Memory Stick". Operating Instructions (for the VPLCX86/VPL-CX80) (on the CD-ROM) (VPL-CX76 only) This Operating Instructions describes how to the projector via wireless LAN. Operating Instructions for "Memory Stick" (on the CD-ROM) This Operating Instructions has been prepared for the...
... for creating the files for a presentation performed using files sorted in a "Memory Stick". Operating Instructions (for the VPLCX86/VPL-CX80) (on the CD-ROM) (VPL-CX76 only) This Operating Instructions describes how to the projector via wireless LAN. Operating Instructions for "Memory Stick" (on the CD-ROM) This Operating Instructions has been prepared for the...

Operating Instructions
Page 4
... adjust the size and focus of an image with a powered zoom and powered focus lens, allowing you to the projector via a wireless LAN. Use of the screen. Quiet presentation environment Low fan noise reduces distraction allowing you to give a light output... Presentation without connecting a computer Use of network presentations (VPL-CX76 only) Air Shot Air Shot features data transmission from a computer to run a simple presentation without connecting a computer. Features High brightness, high picture quality High brightness Adopting Sony's unique optical system that does not require...
... adjust the size and focus of an image with a powered zoom and powered focus lens, allowing you to the projector via a wireless LAN. Use of the screen. Quiet presentation environment Low fan noise reduces distraction allowing you to give a light output... Presentation without connecting a computer Use of network presentations (VPL-CX76 only) Air Shot Air Shot features data transmission from a computer to run a simple presentation without connecting a computer. Features High brightness, high picture quality High brightness Adopting Sony's unique optical system that does not require...
Operating Instructions
Page 5
... work even after turning it possible to SNMP. This prevents the projector from the installation location via a Web browser. System expandability using a network (VPL-CX76 only) Connection to a wireless LAN allows you to move the projector to control the projector away from operating incorrectly. About Trademarks • Adobe Acrobat is a trademark of Adobe Systems Incorporated. • Windows...
... work even after turning it possible to SNMP. This prevents the projector from the installation location via a Web browser. System expandability using a network (VPL-CX76 only) Connection to a wireless LAN allows you to move the projector to control the projector away from operating incorrectly. About Trademarks • Adobe Acrobat is a trademark of Adobe Systems Incorporated. • Windows...
Operating Instructions
Page 7
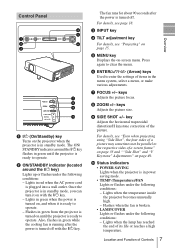
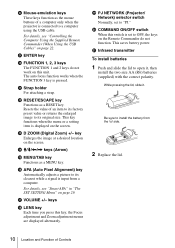
...: - Location and Function of its life or reaches a high temperature. Control Panel a ?/1 (On/Standby) key Turns on the projector when the projector is ready to operate. - Once the projector is turned off . Also, flashes in green when the power is turned on, and when it on page 49. c INPUT key... mode, you can turn it is in red when the AC power cord is ready to clear the menu. Lights when the temperature inside the projector becomes unusually high. - keys Adjusts the picture focus. Flashes when the fan is turned off with the ?/1 key. - The ON/ STANDBY indicator ...
...: - Location and Function of its life or reaches a high temperature. Control Panel a ?/1 (On/Standby) key Turns on the projector when the projector is ready to operate. - Once the projector is turned off . Also, flashes in green when the power is turned on, and when it on page 49. c INPUT key... mode, you can turn it is in red when the AC power cord is ready to clear the menu. Lights when the temperature inside the projector becomes unusually high. - keys Adjusts the picture focus. Flashes when the fan is turned off with the ?/1 key. - The ON/ STANDBY indicator ...
Operating Instructions
Page 8
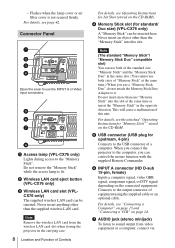
.../ Duo size) (VPL-CX76 only) A "Memory Stick" can control the mouse function with the supplied Remote Commander. Connects to the USB connector of equipment using the supplied cable or an optional cable. g AUDIO jack (stereo minijack) To listen to sound output from the wireless LAN card slot when storing the projector in the same...
.../ Duo size) (VPL-CX76 only) A "Memory Stick" can control the mouse function with the supplied Remote Commander. Connects to the USB connector of equipment using the supplied cable or an optional cable. g AUDIO jack (stereo minijack) To listen to sound output from the wireless LAN card slot when storing the projector in the same...
Operating Instructions
Page 9
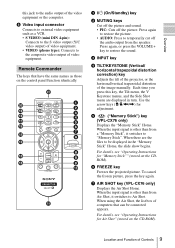
... equipment such as those on the control panel function identically. c INPUT key d TILT/KEYSTONE (Vertical/ horizontal trapezoidal distortion correction) key Adjusts the tilt of the projector, or the horizonal/vertical trapezoidal distortion of the video equipment or the computer. Use the arrow keys (M/m/ Overview this key, the Tilt menu, the V Keystone...
... equipment such as those on the control panel function identically. c INPUT key d TILT/KEYSTONE (Vertical/ horizontal trapezoidal distortion correction) key Adjusts the tilt of the projector, or the horizonal/vertical trapezoidal distortion of the video equipment or the computer. Use the arrow keys (M/m/ Overview this key, the Tilt menu, the V Keystone...
Operating Instructions
Page 10
Resets the value of a computer only when the projector is connected to its original size. m D ZOOM (Digital Zoom) +/- h Mouse-emulation keys These keys function as a RESET key. For details, see "Controlling the Computer Using ...
Resets the value of a computer only when the projector is connected to its original size. m D ZOOM (Digital Zoom) +/- h Mouse-emulation keys These keys function as a RESET key. For details, see "Controlling the Computer Using ...
Operating Instructions
Page 11
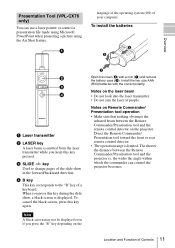
...depending on Remote Commander/ Presentation tool operation • Make sure that nothing obstructs the infrared beam between the Remote Commander/Presentation tool and the projector is displayed. Install the two size AAA (R03) batteries with a coin (a) and remove the battery case (c). The shorter the distance ... screen may not be displayed even if you keep this key pressed. Location and Function of your computer. Presentation Tool (VPL-CX76 only) You can control the projector becomes. To install the batteries Overview a Laser transmitter b LASER key A laser beam is limited.
...depending on Remote Commander/ Presentation tool operation • Make sure that nothing obstructs the infrared beam between the Remote Commander/Presentation tool and the projector is displayed. Install the two size AAA (R03) batteries with a coin (a) and remove the battery case (c). The shorter the distance ... screen may not be displayed even if you keep this key pressed. Location and Function of your computer. Presentation Tool (VPL-CX76 only) You can control the projector becomes. To install the batteries Overview a Laser transmitter b LASER key A laser beam is limited.
Operating Instructions
Page 12
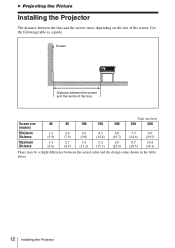
....5) (34.1) There may be a slight difference between the lens and the screen varies depending on the size of the screen. B Projecting the Picture Installing the Projector The distance between the actual value and the design value shown in the table above. 12 Installing the...
....5) (34.1) There may be a slight difference between the lens and the screen varies depending on the size of the screen. B Projecting the Picture Installing the Projector The distance between the actual value and the design value shown in the table above. 12 Installing the...
Operating Instructions
Page 13
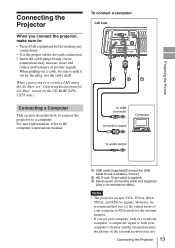
... to a computer. AUDIO INPUT A S VIDEO VIDEO STD/DUO 3 21 Connecting a Computer This section describes how to connect the projector to use a wireless mouse.) B HD D-sub 15-pin cable (supplied) C Stereo audio connecting cable (not supplied) (Use a no-resistance cable.) Notes •...+ signals. However, we recommend that you set the output mode of picture signals. loose connections may not Connecting the Projector 13 For more information, refer to a wireless LAN using the Air Shot, see "Operating Instructions for each connection. • Insert the cable plugs firmly; When ...
... to a computer. AUDIO INPUT A S VIDEO VIDEO STD/DUO 3 21 Connecting a Computer This section describes how to connect the projector to use a wireless mouse.) B HD D-sub 15-pin cable (supplied) C Stereo audio connecting cable (not supplied) (Use a no-resistance cable.) Notes •...+ signals. However, we recommend that you set the output mode of picture signals. loose connections may not Connecting the Projector 13 For more information, refer to a wireless LAN using the Air Shot, see "Operating Instructions for each connection. • Insert the cable plugs firmly; When ...

Operating Instructions
Page 14
...the computer, then connect the computer to a VCR. Connecting a VCR This section describes how to connect the projector to the projector using the USB cable for Presentation (VPL-CX76 only). Note To connect a Macintosh computer equipped with your computer to output the signal to a computer using ...ME, Windows 2000, or Windows XP (preinstalled models.) Notes • Your computer may not start correctly when connected to the projector using the USB cable, wireless mouse functions become available. • A "Memory Stick" inserted into the Memory Stick slot on the computer. • ...
...the computer, then connect the computer to a VCR. Connecting a VCR This section describes how to connect the projector to the projector using the USB cable for Presentation (VPL-CX76 only). Note To connect a Macintosh computer equipped with your computer to output the signal to a computer using ...ME, Windows 2000, or Windows XP (preinstalled models.) Notes • Your computer may not start correctly when connected to the projector using the USB cable, wireless mouse functions become available. • A "Memory Stick" inserted into the Memory Stick slot on the computer. • ...
Operating Instructions
Page 15
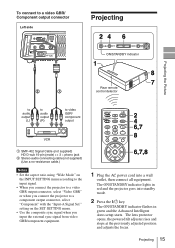
...Notes • Set the aspect ratio using "Wide Mode" on the SET SETTING menu. • Use the composite sync signal when you connect the projector to a video GBR output connector, select "Video GBR" or when you input the external sync signal from video GBR/component equipment. 1 Plug the AC... adjusted position and adjusts the focus. setting on the INPUT SETTING menu according to the input signal. • When you connect the projector to a component output connector, select "Component" with the "Input-A Signal Sel." Projecting 15 The ON/STANDBY indicator flashes in red and the...
...Notes • Set the aspect ratio using "Wide Mode" on the SET SETTING menu. • Use the composite sync signal when you connect the projector to a video GBR output connector, select "Video GBR" or when you input the external sync signal from video GBR/component equipment. 1 Plug the AC... adjusted position and adjusts the focus. setting on the INPUT SETTING menu according to the input signal. • When you connect the projector to a component output connector, select "Component" with the "Input-A Signal Sel." Projecting 15 The ON/STANDBY indicator flashes in red and the...
Operating Instructions
Page 16
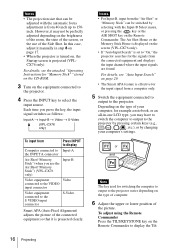
... room, the state of the screen, or the use the Air Shot/"Memory Stick") (VPL-CX76 only) Input-B Video equipment Video connected to the VIDEO input connector Video equipment connected to "On," the projector searches for example a notebook, or an all-in step 8 on page 17. •...(VPLCX76 only). Notes • For Input-B, input from a computer only. 5 Switch the equipment connected to output to the projector by pressing certain keys (e.g., / , LCD VGA / , etc.), or by selecting with the automatic focus adjustment is from the connected equipment and displays the input channel...
... room, the state of the screen, or the use the Air Shot/"Memory Stick") (VPL-CX76 only) Input-B Video equipment Video connected to the VIDEO input connector Video equipment connected to "On," the projector searches for example a notebook, or an all-in step 8 on page 17. •...(VPLCX76 only). Notes • For Input-B, input from a computer only. 5 Switch the equipment connected to output to the projector by pressing certain keys (e.g., / , LCD VGA / , etc.), or by selecting with the automatic focus adjustment is from the connected equipment and displays the input channel...

Operating Instructions
Page 17
Projecting the Picture menu and adjust the tilt using the M/m/
Projecting the Picture menu and adjust the tilt using the M/m/
Operating Instructions
Page 18
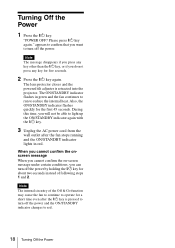
... up the ON/STANDBY indicator again with the ?/1 key. 3 Unplug the AC power cord from the wall outlet after the ?/1 key is retracted into the projector. The ON/STANDBY indicator flashes in red. During this time, you do not press any key for the first 45 seconds. Note The internal circuitry...
... up the ON/STANDBY indicator again with the ?/1 key. 3 Unplug the AC power cord from the wall outlet after the ?/1 key is retracted into the projector. The ON/STANDBY indicator flashes in red. During this time, you do not press any key for the first 45 seconds. Note The internal circuitry...
Operating Instructions
Page 19
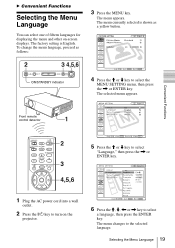
... the , or ENTER key. B Convenient Functions Selecting the Menu Language You can select one of fifteen languages for displaying the menu and other on the projector. 6 Press the M, m, < or , key to select a language, then press the ENTER key. Selecting the Menu Language 19 The menu changes to the selected language...
... the , or ENTER key. B Convenient Functions Selecting the Menu Language You can select one of fifteen languages for displaying the menu and other on the projector. 6 Press the M, m, < or , key to select a language, then press the ENTER key. Selecting the Menu Language 19 The menu changes to the selected language...
Operating Instructions
Page 20
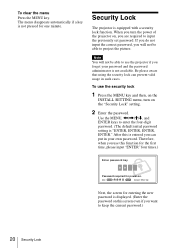
... the security lock 1 Press the MENU key and then, on the INSTALL SETTING menu, turn the power of the projector on the "Security Lock" setting. 2 Enter the password. Use the MENU, Security Lock The projector is equipped with a security lock function. To clear the menu Press the MENU key. To use the...
... the security lock 1 Press the MENU key and then, on the INSTALL SETTING menu, turn the power of the projector on the "Security Lock" setting. 2 Enter the password. Use the MENU, Security Lock The projector is equipped with a security lock function. To clear the menu Press the MENU key. To use the...

Operating Instructions
Page 21
...Cancel: Other key 3 Enter the password again to remember this case, press the ?/1 key to enter the correct password after three tries, the projector cannot be performed without the password. Use: Cancel: Other key When the following message is displayed, the setting for entering the password is displayed.... Note If you call the customer service center because you have forgotten the password, you will need to be able to verify the projector's serial number and your identity. (This process may differ in other countries/regions.) Once your identity has been confirmed, we will provide...
...Cancel: Other key 3 Enter the password again to remember this case, press the ?/1 key to enter the correct password after three tries, the projector cannot be performed without the password. Use: Cancel: Other key When the following message is displayed, the setting for entering the password is displayed.... Note If you call the customer service center because you have forgotten the password, you will need to be able to verify the projector's serial number and your identity. (This process may differ in other countries/regions.) Once your identity has been confirmed, we will provide...


