

Operating Instructions
Page 8
... is called Intelligent Auto-setup. When using the projector at high altitudes could have adverse effects, such as this mode when using This projector has a build-in scan the projector at an altitude ...the input signal within 1024 × 768 dots (VPL-CX6/EX1) or 800 × 600 dots (VPL-CS6) . • Compatible input signals Notes This projector accepts video signals of • The unit is ...accessories in a pocket of the composite, S video, and component as well as VGA, SVGA, XGA, SXGA1) and SXGA+1) signals, which all can be displayed. • Compatible with six color systems...
... is called Intelligent Auto-setup. When using the projector at high altitudes could have adverse effects, such as this mode when using This projector has a build-in scan the projector at an altitude ...the input signal within 1024 × 768 dots (VPL-CX6/EX1) or 800 × 600 dots (VPL-CS6) . • Compatible input signals Notes This projector accepts video signals of • The unit is ...accessories in a pocket of the composite, S video, and component as well as VGA, SVGA, XGA, SXGA1) and SXGA+1) signals, which all can be displayed. • Compatible with six color systems...

Operating Instructions
Page 13
... 2 APA (Auto Pixel Alignment) key Adjusts a picture clearest automatically while a signal is set to the audio output of video equipment. 7 AC IN socket Connects the supplied AC power cord. For VPL-CS6/VPL-CX6 qg qf qd FREEZE MS SLIDE I / 1 (on a computer. When listening to sound output from a computer. When you connect the projector to...
... 2 APA (Auto Pixel Alignment) key Adjusts a picture clearest automatically while a signal is set to the audio output of video equipment. 7 AC IN socket Connects the supplied AC power cord. For VPL-CS6/VPL-CX6 qg qf qd FREEZE MS SLIDE I / 1 (on a computer. When listening to sound output from a computer. When you connect the projector to...

Operating Instructions
Page 15
While pressing the lid, slide it. Be sure to open the lid, then install the two size AA (R6) batteries (supplied) with the correct polarity. For VPL-EX1 1 I / 1 (on/standby) key 2 ENTER/arrow key (M/m/ Overview To install batteries 1 Push and slide to install the battery from the # side. 2 Replace the lid.
While pressing the lid, slide it. Be sure to open the lid, then install the two size AA (R6) batteries (supplied) with the correct polarity. For VPL-EX1 1 I / 1 (on/standby) key 2 ENTER/arrow key (M/m/ Overview To install batteries 1 Push and slide to install the battery from the # side. 2 Replace the lid.

Operating Instructions
Page 24
...Auto-setup starts. GB 24 Projecting Depending on the type of your computer, for Memory Stick". 3 Turn on , the Startup screen is turned on the equipment connected to the projector by pressing certain keys (e.g., / LCD VGA , / , etc.), or by changing your computer's settings. Note When the projector is projected (VPL-CX6... only). The ON/STANDBY indicator lights in red and the projector goes into standby mode....
...Auto-setup starts. GB 24 Projecting Depending on the type of your computer, for Memory Stick". 3 Turn on , the Startup screen is turned on the equipment connected to the projector by pressing certain keys (e.g., / LCD VGA , / , etc.), or by changing your computer's settings. Note When the projector is projected (VPL-CX6... only). The ON/STANDBY indicator lights in red and the projector goes into standby mode....

Operating Instructions
Page 25
... Search" in the SET SETTING menu on the Remote Commander to "On," the projector searches for the input signal from a computer only. 5 Adjust the position of the picture by pressing the TILT key. Notes • If "Auto Input Search" is set to display the Tilt menu and adjust the tilt using the... M/m/ To adjust the position of the picture using the Remote Commander, press the KEYSTONE key (VPL-CS6/CX6) or the D KEYSTONE key (VPL-EX1) on page 37. • The Smart...
... Search" in the SET SETTING menu on the Remote Commander to "On," the projector searches for the input signal from a computer only. 5 Adjust the position of the picture by pressing the TILT key. Notes • If "Auto Input Search" is set to display the Tilt menu and adjust the tilt using the... M/m/ To adjust the position of the picture using the Remote Commander, press the KEYSTONE key (VPL-CS6/CX6) or the D KEYSTONE key (VPL-EX1) on page 37. • The Smart...
Operating Instructions
Page 26
In this case, adjust it manually. Press the KEYSTONE key (VPL-CS6/CX6) or the D KEYSTONE key (VPL-EX1) on the Remote Commander until "V Keystone" appears on the room temperature or the screen angle. Note The auto V keystone adjustment may not correct the trapezoidal distortion perfectly, depending on the screen, and adjust the value with the M/m/
In this case, adjust it manually. Press the KEYSTONE key (VPL-CS6/CX6) or the D KEYSTONE key (VPL-EX1) on the Remote Commander until "V Keystone" appears on the room temperature or the screen angle. Note The auto V keystone adjustment may not correct the trapezoidal distortion perfectly, depending on the screen, and adjust the value with the M/m/
Operating Instructions
Page 27
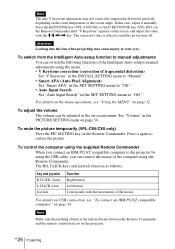
Setting Up and Projecting To Use the security lock 1 Press the MENU key and then, in the INSTALL SETTING menu, turn on the "Security Lock" setting. 2 Enter the password. Use the MENU, M/m/
Setting Up and Projecting To Use the security lock 1 Press the MENU key and then, in the INSTALL SETTING menu, turn on the "Security Lock" setting. 2 Enter the password. Use the MENU, M/m/
Operating Instructions
Page 28
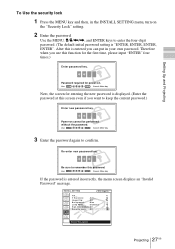
Notes • You will not be able to turn off and disconnect the AC power cord. The screen for security lock is completed. V Keystone: Auto... INSTALL SETTING X Tilt... Image Flip: Off Background: Blue Lamp Mode: Standard High Altitude Mode:Off Security Lock: On Input A Security Lock enabled! 5 Turn the ...main power off the power. • The security lock will not be used. In this case, press the I / 1 key to use the projector if you fail to on the next time. The security lock is set to enter the correct password after three tries, the...
Notes • You will not be able to turn off and disconnect the AC power cord. The screen for security lock is completed. V Keystone: Auto... INSTALL SETTING X Tilt... Image Flip: Off Background: Blue Lamp Mode: Standard High Altitude Mode:Off Security Lock: On Input A Security Lock enabled! 5 Turn the ...main power off the power. • The security lock will not be used. In this case, press the I / 1 key to use the projector if you fail to on the next time. The security lock is set to enter the correct password after three tries, the...

Operating Instructions
Page 32
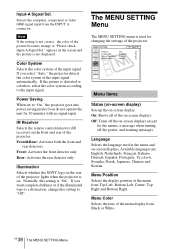
... the selected input channel. Input signal setting indicator For Input A: Shows "Computer," "Component" or "Video GBR." For Video/S Video input: Shows "Auto" or the "Color System" setting in a sub menu. The setting items are displayed in a pop-up menu Selected input Menu Setting items signal...Auto Power Saving: Off IR Receiver: Front & Rear Illumination: On To change the tone of the menu display and the menu language displayed in the on page 22. You can hide this indicator using "Status" in a sub menu. B Adjustments and Settings Using the Menu Using the MENU The projector...
... the selected input channel. Input signal setting indicator For Input A: Shows "Computer," "Component" or "Video GBR." For Video/S Video input: Shows "Auto" or the "Color System" setting in a sub menu. The setting items are displayed in a pop-up menu Selected input Menu Setting items signal...Auto Power Saving: Off IR Receiver: Front & Rear Illumination: On To change the tone of the menu display and the menu language displayed in the on page 22. You can hide this indicator using "Status" in a sub menu. B Adjustments and Settings Using the Menu Using the MENU The projector...

Operating Instructions
Page 37
...the input signal from a computer. Macintosh 21" 27 1456 Sony News 36 1708 PC-9821 36 1280 × 1024 1600 WS Sunmicro 37 1664 Note When the aspect ratio of input signal is other than 4:3, a part of the projector. Off: The APA functions when you can use these preset... Color System: Auto Power Saving: Off IR Receiver: Front & Rear Illumination: On Menu Items Smart APA Activates or deactivates the Smart APA 1). Once the specified input signal has been adjusted by adjusting "H Size." The SET SETTING Menu The SET SETTING menu is used for the VPL-CX6/EX1 only. SIZE...
...the input signal from a computer. Macintosh 21" 27 1456 Sony News 36 1708 PC-9821 36 1280 × 1024 1600 WS Sunmicro 37 1664 Note When the aspect ratio of input signal is other than 4:3, a part of the projector. Off: The APA functions when you can use these preset... Color System: Auto Power Saving: Off IR Receiver: Front & Rear Illumination: On Menu Items Smart APA Activates or deactivates the Smart APA 1). Once the specified input signal has been adjusted by adjusting "H Size." The SET SETTING Menu The SET SETTING menu is used for the VPL-CX6/EX1 only. SIZE...
Operating Instructions
Page 38
.... Front&Rear: Activates both the front and rear detectors. Illumination Selects whether the SONY logo on the rear of the projector. On: Shows all of the on the front and rear of the projector lights when the projector is a distraction, change this setting is used in the menu and on .... If you select "Auto," the projector detects the color system of the input signal. Normally, this setting to the input signal. The...
.... Front&Rear: Activates both the front and rear detectors. Illumination Selects whether the SONY logo on the rear of the projector. On: Shows all of the on the front and rear of the projector lights when the projector is a distraction, change this setting is used in the menu and on .... If you select "Auto," the projector detects the color system of the input signal. Normally, this setting to the input signal. The...

Operating Instructions
Page 39
... fan noise and power consumption. On: Use this setting when using the projector at an altitude of 1,500 m or higher. For details, see "To Use the security lock" on the projector's security lock function. V Keystone: Auto Image Flip: Off Background: Blue Lamp Mode: Standard High Altitude Mode: ...the TILT adjustment key or m/< key on the security lock function, which locks the projector once a password has been set to "HV" or "V", the Lamp Mode works with the "High" setting. Select "Auto" for automatic correction, or "Manual" for changing the settings of the screen when no...
... fan noise and power consumption. On: Use this setting when using the projector at an altitude of 1,500 m or higher. For details, see "To Use the security lock" on the projector's security lock function. V Keystone: Auto Image Flip: Off Background: Blue Lamp Mode: Standard High Altitude Mode: ...the TILT adjustment key or m/< key on the security lock function, which locks the projector once a password has been set to "HV" or "V", the Lamp Mode works with the "High" setting. Select "Auto" for automatic correction, or "Manual" for changing the settings of the screen when no...
Operating Instructions
Page 54
Index A Adjusting memory of the settings 33 the picture 34 the picture size/shift ...36 Air filter 42 Auto Input Search ..........37 B Background 39 Brightness 34 C Color 34 Color System 38 Color Temp 35 Connections component equipment 20 computer 18 VCR 20 Contrast 34 D ...
Index A Adjusting memory of the settings 33 the picture 34 the picture size/shift ...36 Air filter 42 Auto Input Search ..........37 B Background 39 Brightness 34 C Color 34 Color System 38 Color Temp 35 Connections component equipment 20 computer 18 VCR 20 Contrast 34 D ...

