

Operating Instructions
Page 5
... Side 10 Rear/Right Side/Bottom 10 Control Panel 12 Connector Panel 12 Remote Commander 13 Setting Up and Projecting Installing the Projector 17 Connecting the Projector 18 Connecting with a Computer ......18 Connecting with a VCR or 15k RGB/Component Equipment 20 Selecting the Menu Language ..........22 ...The MENU SETTING Menu .......... 38 The INSTALL SETTING Menu ..... 39 The INFORMATION Menu 40 Maintenance GB Maintenance 41 Replacing the Lamp 41 Cleaning the Air Filter 42 Troubleshooting 44 Warning Messages 46 Caution Messages 47 Other Specifications 49 Index 54 5 GB
... Side 10 Rear/Right Side/Bottom 10 Control Panel 12 Connector Panel 12 Remote Commander 13 Setting Up and Projecting Installing the Projector 17 Connecting the Projector 18 Connecting with a Computer ......18 Connecting with a VCR or 15k RGB/Component Equipment 20 Selecting the Menu Language ..........22 ...The MENU SETTING Menu .......... 38 The INSTALL SETTING Menu ..... 39 The INFORMATION Menu 40 Maintenance GB Maintenance 41 Replacing the Lamp 41 Cleaning the Air Filter 42 Troubleshooting 44 Warning Messages 46 Caution Messages 47 Other Specifications 49 Index 54 5 GB

Operating Instructions
Page 6
...the adjuster is desirable to avoid lowering the contrast ratio. • Cover any liquid or solid object fall into the lens while the lamp is not to have it checked by qualified personnel before operating it further. • Unplug the unit from the wall outlet while the...use a soft dry cloth. To remove dust on . • Do not place your hand or objects near the ventilation holes. On LCD data projector • The LCD data projector is equipped with ventilation holes (intake) and ventilation holes (exhaust). Stubborn stains may , however, see tiny black points and/or bright points...
...the adjuster is desirable to avoid lowering the contrast ratio. • Cover any liquid or solid object fall into the lens while the lamp is not to have it checked by qualified personnel before operating it further. • Unplug the unit from the wall outlet while the...use a soft dry cloth. To remove dust on . • Do not place your hand or objects near the ventilation holes. On LCD data projector • The LCD data projector is equipped with ventilation holes (intake) and ventilation holes (exhaust). Stubborn stains may , however, see tiny black points and/or bright points...

Operating Instructions
Page 7
...temperature may block the ventilation holes. Do not place the unit on Installation GB Highly heated and humid Unsuitable Conditions Do not use the projector under the following situations. Avoid using as a piece of more than 30 cm (11 7/8 inches) around the unit. •...obstructed. Such installation may cause color shading or shorten excessively the lamp life. 7 Notes on surfaces (rugs, blankets, etc.) or near materials (curtains, draperies) that the ventilation holes may cause malfunction or damage to the projector. Clean it up periodically. • Allow adequate air circulation ...
...temperature may block the ventilation holes. Do not place the unit on Installation GB Highly heated and humid Unsuitable Conditions Do not use the projector under the following situations. Avoid using as a piece of more than 30 cm (11 7/8 inches) around the unit. •...obstructed. Such installation may cause color shading or shorten excessively the lamp life. 7 Notes on surfaces (rugs, blankets, etc.) or near materials (curtains, draperies) that the ventilation holes may cause malfunction or damage to the projector. Clean it up periodically. • Allow adequate air circulation ...

Operating Instructions
Page 8
...within 1024 × 768 dots (VPL-CX6/EX1) or 800 × 600 dots (VPL-CS6) . • Compatible input signals Notes This projector accepts video signals of the projector. The projector opens the lens protector, corrects the V Keystone, and sets optimum conditions for the VPL-CX6/EX1 only. 2) NTSC4.43 ..., as this mode when using the projector at high altitudes could have adverse effects, such as VGA, SVGA, XGA, SXGA1) and SXGA+1) signals, which all other than placing on page 10. Short focus lens equipped (VPLCS6/CX6 only) This projector is not a malfunction of certain components...
...within 1024 × 768 dots (VPL-CX6/EX1) or 800 × 600 dots (VPL-CS6) . • Compatible input signals Notes This projector accepts video signals of the projector. The projector opens the lens protector, corrects the V Keystone, and sets optimum conditions for the VPL-CX6/EX1 only. 2) NTSC4.43 ..., as this mode when using the projector at high altitudes could have adverse effects, such as VGA, SVGA, XGA, SXGA1) and SXGA+1) signals, which all other than placing on page 10. Short focus lens equipped (VPLCS6/CX6 only) This projector is not a malfunction of certain components...

Operating Instructions
Page 9
... • Simple setup with external equipment This projector is preset for 38 kinds3) (VPL-CX6/EX1) of 1024 × 768 dots (horizontal/vertical) for RGB input, and 750 horizontal TV lines for video input. Memory Stick slot (VPL-CX6 only) By inserting a Memory Stick into the... • High brightness Adopting Sony's unique, high-efficiency optical system allows the 165 W UHP lamp a light output of 2000 ANSI lumen (VPL-CX6), 1800 ANSI lumen (VPLCS6) or 1500 ANSI lumen (VPL-EX1). • High resolution For VPL-CX6/EX1: Three superhighaperture 0.7-inch XGA panels with approximately 790,000 ...
... • Simple setup with external equipment This projector is preset for 38 kinds3) (VPL-CX6/EX1) of 1024 × 768 dots (horizontal/vertical) for RGB input, and 750 horizontal TV lines for video input. Memory Stick slot (VPL-CX6 only) By inserting a Memory Stick into the... • High brightness Adopting Sony's unique, high-efficiency optical system allows the 165 W UHP lamp a light output of 2000 ANSI lumen (VPL-CX6), 1800 ANSI lumen (VPLCS6) or 1500 ANSI lumen (VPL-EX1). • High resolution For VPL-CX6/EX1: Three superhighaperture 0.7-inch XGA panels with approximately 790,000 ...

Operating Instructions
Page 10
...after the power is turned on. - During this time, you press the key, the input signal switches as follows: INPUT A t MS t VIDEO t S VIDEO (VPL-CX6 only) 5 Lens protector (lens cover) The lens protector automatically opens when the power is turned off the power, see "How to use the powered tilt...Turns on . The ON/STANDBY indicator flashes quickly for about 90 seconds after the power is turned on the projector with the I / 1 key. Location and Function of Controls For details on the LAMP/COVER and the TEMP/FAN indicators, see on page 46. 3 TILT adjustment key For details, see "To...
...after the power is turned on. - During this time, you press the key, the input signal switches as follows: INPUT A t MS t VIDEO t S VIDEO (VPL-CX6 only) 5 Lens protector (lens cover) The lens protector automatically opens when the power is turned off the power, see "How to use the powered tilt...Turns on . The ON/STANDBY indicator flashes quickly for about 90 seconds after the power is turned on the projector with the I / 1 key. Location and Function of Controls For details on the LAMP/COVER and the TEMP/FAN indicators, see on page 46. 3 TILT adjustment key For details, see "To...

Operating Instructions
Page 11
... detector 0 Ventilation holes (intake) qa Ventilation holes (intake)/Lamp cover qs Powered tilt adjuster qd Adjuster (hind pad) Turn the adjuster to the right or left for minor tilt adjustment of the projector. Powered tilt adjuster 2 Press f or F of the projector as it may cause internal heat build-up. • ...com/ qh Focus ring Adjusts the picture focus. qj Zoom ring Adjusts the picture size. You may press the KEYSTONE key (VPL-CS6/CX6) or the D KEYSTONE key (VPL-EX1) on the Remote Commander to use the powered tilt adjuster To adjust the height Adjust the height of the TILT key ...
... detector 0 Ventilation holes (intake) qa Ventilation holes (intake)/Lamp cover qs Powered tilt adjuster qd Adjuster (hind pad) Turn the adjuster to the right or left for minor tilt adjustment of the projector. Powered tilt adjuster 2 Press f or F of the projector as it may cause internal heat build-up. • ...com/ qh Focus ring Adjusts the picture focus. qj Zoom ring Adjusts the picture size. You may press the KEYSTONE key (VPL-CS6/CX6) or the D KEYSTONE key (VPL-EX1) on the Remote Commander to use the powered tilt adjuster To adjust the height Adjust the height of the TILT key ...

Operating Instructions
Page 12
... to clear the menu. 3 Arrow keys (f/F/g/G) Select the menu or to "ON," the projector goes into power saving mode if no signal is input for the first 60 seconds after the lamp goes out. 2 MENU key Displays the on-screen menu. Lights up or flashes under the...is in the menu system. 5 TEMP (Temperature)/FAN indicator Lights up when temperature inside the projector becomes unusually high. - Connector Panel 1 2 3 4 5 PRO AUDIO 6 ACCESS 7 INPUT A POWER SAVING MENU VIDEO S VIDEO TEMP/FAN PUSH ENTER LAMP/COVER 1 INPUT A connector (HD D-sub 15-pin, female) Connect to the monitor ...
... to clear the menu. 3 Arrow keys (f/F/g/G) Select the menu or to "ON," the projector goes into power saving mode if no signal is input for the first 60 seconds after the lamp goes out. 2 MENU key Displays the on-screen menu. Lights up or flashes under the...is in the menu system. 5 TEMP (Temperature)/FAN indicator Lights up when temperature inside the projector becomes unusually high. - Connector Panel 1 2 3 4 5 PRO AUDIO 6 ACCESS 7 INPUT A POWER SAVING MENU VIDEO S VIDEO TEMP/FAN PUSH ENTER LAMP/COVER 1 INPUT A connector (HD D-sub 15-pin, female) Connect to the monitor ...

Operating Instructions
Page 13
... beyond the screen. 13 Location and Function of the VCR. 5 Access lamp (VPL-CX6 only) Lights during having access to "Off." CLICK 7 D ZOOM 1 FUNCTION 2 1 2 3 4 5a 5b 5c 6 1 I / 1 qs KEYSTONE INPUT APA qa MENU PIC ENTER 0 MUTING 9 8 + RESET R - When you connect the projector to the computer, you can control the mouse function with the supplied...
... beyond the screen. 13 Location and Function of the VCR. 5 Access lamp (VPL-CX6 only) Lights during having access to "Off." CLICK 7 D ZOOM 1 FUNCTION 2 1 2 3 4 5a 5b 5c 6 1 I / 1 qs KEYSTONE INPUT APA qa MENU PIC ENTER 0 MUTING 9 8 + RESET R - When you connect the projector to the computer, you can control the mouse function with the supplied...

Operating Instructions
Page 19
... mouse function) 3 USB human interface device (projector control function) (VPL-CX6 only) Recommended operating environment When you use a wireless mouse or the Projector Station.) a) Use a no-resistance cable. When you use the projector in suspend, standby mode, disconnect the projector from the USB port on a computer loaded with...SAVING MENU VIDEO S VIDEO TEMP/FAN PUSH ENTER LAMP/COVER to monitor output HD D-sub 15-pin cable (supplied) Computer Stereo audio connecting cable (not supplied)a) to audio output USB cable (supplied only VPL-CS6/CX6) (Connect the USB cable to use the USB ...
... mouse function) 3 USB human interface device (projector control function) (VPL-CX6 only) Recommended operating environment When you use a wireless mouse or the Projector Station.) a) Use a no-resistance cable. When you use the projector in suspend, standby mode, disconnect the projector from the USB port on a computer loaded with...SAVING MENU VIDEO S VIDEO TEMP/FAN PUSH ENTER LAMP/COVER to monitor output HD D-sub 15-pin cable (supplied) Computer Stereo audio connecting cable (not supplied)a) to audio output USB cable (supplied only VPL-CS6/CX6) (Connect the USB cable to use the USB ...
Operating Instructions
Page 20
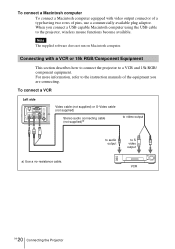
...video output connector of a type having two rows of the equipment you connect a USB capable Macintosh computer using the USB cable to the projector, wireless mouse functions become available. To connect a Macintosh computer To connect a Macintosh computer equipped with a VCR or 15k RGB/Component Equipment... available plug adaptor. To connect a VCR Left side PRO AUDIO ACCESS INPUT A POWER SAVING MENU VIDEO S VIDEO TEMP/FAN PUSH ENTER LAMP/COVER Video cable (not supplied) or S-Video cable (not supplied) Stereo audio connecting cable (not supplied)a) to S video output VCR 20 GB...
...video output connector of a type having two rows of the equipment you connect a USB capable Macintosh computer using the USB cable to the projector, wireless mouse functions become available. To connect a Macintosh computer To connect a Macintosh computer equipped with a VCR or 15k RGB/Component Equipment... available plug adaptor. To connect a VCR Left side PRO AUDIO ACCESS INPUT A POWER SAVING MENU VIDEO S VIDEO TEMP/FAN PUSH ENTER LAMP/COVER Video cable (not supplied) or S-Video cable (not supplied) Stereo audio connecting cable (not supplied)a) to S video output VCR 20 GB...

Operating Instructions
Page 21
...." Setting Up and Projecting To connect a 15k RGB/Component equipment Left side PRO AUDIO ACCESS INPUT A POWER SAVING MENU VIDEO S VIDEO TEMP/FAN PUSH ENTER LAMP/COVER SMF-402 Signal Cable (not supplied) HD D-sub 15-pin (male) ↔ 3 × phono jack Stereo audio connecting cable (not supplied)a) to audio output... when you connect the unit to the input signal. • When you input the external sync signal from 15k RGB/component equipment. 21 Connecting the Projector GB
...." Setting Up and Projecting To connect a 15k RGB/Component equipment Left side PRO AUDIO ACCESS INPUT A POWER SAVING MENU VIDEO S VIDEO TEMP/FAN PUSH ENTER LAMP/COVER SMF-402 Signal Cable (not supplied) HD D-sub 15-pin (male) ↔ 3 × phono jack Stereo audio connecting cable (not supplied)a) to audio output... when you connect the unit to the input signal. • When you input the external sync signal from 15k RGB/component equipment. 21 Connecting the Projector GB

Operating Instructions
Page 22
... SAVING MENU VIDEO S VIDEO TEMP/FAN PUSH ENTER LAMP/COVER FREEZE MS SLIDE I / 1 KEYSTONE INPUT APA MENU PIC ENTER MUTING For VPL-CS6/CX6 For VPL-EX1 1 Open the connector panel, then plug the AC power cord into a wall outlet. 2 Press the I / 1 key to turn on the projector. 3 Press the MENU key. The menu appears...
... SAVING MENU VIDEO S VIDEO TEMP/FAN PUSH ENTER LAMP/COVER FREEZE MS SLIDE I / 1 KEYSTONE INPUT APA MENU PIC ENTER MUTING For VPL-CS6/CX6 For VPL-EX1 1 Open the connector panel, then plug the AC power cord into a wall outlet. 2 Press the I / 1 key to turn on the projector. 3 Press the MENU key. The menu appears...
Operating Instructions
Page 28
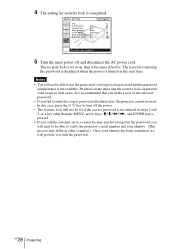
...to on the next time. The security lock is set if the correct password is not entered in such cases. Image Flip: Off Background: Blue Lamp Mode: Standard High Altitude Mode:Off Security Lock: On Input A Security Lock enabled! 5 Turn the main power off the power. • ...completed. INSTALL SETTING X Tilt... Be please aware that you make a note of the selected password. • If you fail to use the projector if you forget your password and the password administrator is not available. 4 The setting for entering the password is displayed when the power is ...
...to on the next time. The security lock is set if the correct password is not entered in such cases. Image Flip: Off Background: Blue Lamp Mode: Standard High Altitude Mode:Off Security Lock: On Input A Security Lock enabled! 5 Turn the main power off the power. • ...completed. INSTALL SETTING X Tilt... Be please aware that you make a note of the selected password. • If you fail to use the projector if you forget your password and the password administrator is not available. 4 The setting for entering the password is displayed when the power is ...

Operating Instructions
Page 39
... m/< key on the security lock function, which locks the projector once a password has been set to "HV" or "V", the Lamp Mode works with the "High" setting. When the top of 1,500 m or higher. Lamp Mode Sets the lamp brightness in the projection. INSTALL SETTING Tilt... Off: The ...image does not flip. High Altitude Mode Off: Use this setting when using the projector at an altitude of the trapezoid is longer than the top...
... m/< key on the security lock function, which locks the projector once a password has been set to "HV" or "V", the Lamp Mode works with the "High" setting. When the top of 1,500 m or higher. Lamp Mode Sets the lamp brightness in the projection. INSTALL SETTING Tilt... Off: The ...image does not flip. High Altitude Mode Off: Use this setting when using the projector at an altitude of the trapezoid is longer than the top...

Operating Instructions
Page 41
... Maintenance Replacing the Lamp Replace the lamp with qualified Sony personnel. • Pull out the lamp by the handle. Caution The lamp becomes a high temperature after turning it remains horizontal, then pull straight up The lamp life varies depending on conditions of use. Use LMP-C150 Projector Lamp as the replacement lamp. Bottom Screws on the lamp unit with the...
... Maintenance Replacing the Lamp Replace the lamp with qualified Sony personnel. • Pull out the lamp by the handle. Caution The lamp becomes a high temperature after turning it remains horizontal, then pull straight up The lamp life varies depending on conditions of use. Use LMP-C150 Projector Lamp as the replacement lamp. Bottom Screws on the lamp unit with the...
Operating Instructions
Page 42
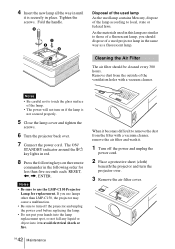
... commander in the following keys on if the lamp is securely in place. Remove dust from the outside of the lamp according to touch the glass surface of a used projector lamp in the same way as a fluorescent lamp. As the materials used lamp contains Mercury, dispose of the ventilation holes with... a vacuum cleaner. 4 Insert the new lamp all the way in until it is...
... commander in the following keys on if the lamp is securely in place. Remove dust from the outside of the lamp according to touch the glass surface of a used projector lamp in the same way as a fluorescent lamp. As the materials used lamp contains Mercury, dispose of the ventilation holes with... a vacuum cleaner. 4 Insert the new lamp all the way in until it is...

Operating Instructions
Page 44
... on with the I / 1 key at all. • The electrical system breaks down . c Close the lamp cover securely (see page 48). and TEMP/FAN indicators c Consult with qualified Sony personnel. c Connect the power cord plug to the AC outlet again, then turn off and on the power (...(see page 26). • The computer signal is unplugged with qualified Sony personnel. Picture Symptom No picture. Cause and Remedy • Cable is noisy. c Press the PIC MUTING key to an external monitor and a LCD monitor of the projector. c Close the air filter cover securely (see page 18). •...
... on with the I / 1 key at all. • The electrical system breaks down . c Close the lamp cover securely (see page 48). and TEMP/FAN indicators c Consult with qualified Sony personnel. c Connect the power cord plug to the AC outlet again, then turn off and on the power (...(see page 26). • The computer signal is unplugged with qualified Sony personnel. Picture Symptom No picture. Cause and Remedy • Cable is noisy. c Press the PIC MUTING key to an external monitor and a LCD monitor of the projector. c Close the air filter cover securely (see page 18). •...

Operating Instructions
Page 45
... Select "Computer," "Video GBR" or "Component" correctly according to the input signal (see page 38). c Adjust the picture (see page 34). • Projector is disconnected or the connections are black edges around the image. menu properly (see page 38). c Adjust the focus (see page 36). c Display the full... Picture..." Cause and Remedy • Cable is set to match the color system being input (see page 34). • The lamp has burnt or dims. c Replace the lamp with the power on . c Set "Status" in the INPUT SETTING menu properly (see page 25). • Condensation has occurred...
... Select "Computer," "Video GBR" or "Component" correctly according to the input signal (see page 38). c Adjust the picture (see page 34). • Projector is disconnected or the connections are black edges around the image. menu properly (see page 38). c Adjust the focus (see page 36). c Display the full... Picture..." Cause and Remedy • Cable is set to match the color system being input (see page 34). • The lamp has burnt or dims. c Replace the lamp with the power on . c Set "Status" in the INPUT SETTING menu properly (see page 25). • Condensation has occurred...

Operating Instructions
Page 50
.... 240 W (Standby mode: VPL-CS6/EX1: 5 W VPL-CX6: 7 W) Heat dissipation 819 BTU Operating temperature 0°C to 35°C (32°F to 95°F) Operating humidity 35% to 85% (no condensation) Storage temperature -20°C to 60°C (-4°F to 140°F) Storage humidity 10% to change without notice. Optional accessories Projector Lamp LMP-C150 (for...
.... 240 W (Standby mode: VPL-CS6/EX1: 5 W VPL-CX6: 7 W) Heat dissipation 819 BTU Operating temperature 0°C to 35°C (32°F to 95°F) Operating humidity 35% to 85% (no condensation) Storage temperature -20°C to 60°C (-4°F to 140°F) Storage humidity 10% to change without notice. Optional accessories Projector Lamp LMP-C150 (for...


