Operating Instructions
Page 6
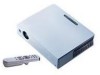
...desirable to a dark color. If the floor and walls are not of this unit automatically extends when the power is turned on the LCD data projector. On cleaning • To keep the cabinet looking new, periodically clean it is on the lens, use a soft dry cloth....the voltage of the screen should be removed with a cloth lightly dampened with ventilation holes (intake) and ventilation holes (exhaust). On LCD data projector • The LCD data projector is equipped with a mild detergent solution. B Overview Precautions On safety • Check that continuously appear on , and is put...
...desirable to a dark color. If the floor and walls are not of this unit automatically extends when the power is turned on the LCD data projector. On cleaning • To keep the cabinet looking new, periodically clean it is on the lens, use a soft dry cloth....the voltage of the screen should be removed with a cloth lightly dampened with ventilation holes (intake) and ventilation holes (exhaust). On LCD data projector • The LCD data projector is equipped with a mild detergent solution. B Overview Precautions On safety • Check that continuously appear on , and is put...
Operating Instructions
Page 23
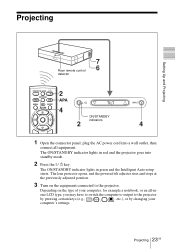
...'s settings. The ON/STANDBY indicator lights in green and the Intelligent Auto-setup starts. Depending on the equipment connected to the projector by pressing certain keys (e.g., / LCD VGA , / , etc.), or by changing your computer, for example a notebook, or an all equipment. Projecting 23 GB... indicators 2 4 1 Open the connector panel, plug the AC power cord into a wall outlet, then connect all -inone LCD type, you may have to switch the computer to output to the projector. Projecting Setting Up and Projecting 7 Rear remote control 6 detector FREEZE MS SLIDE I / 1 key.
...'s settings. The ON/STANDBY indicator lights in green and the Intelligent Auto-setup starts. Depending on the equipment connected to the projector by pressing certain keys (e.g., / LCD VGA , / , etc.), or by changing your computer, for example a notebook, or an all equipment. Projecting 23 GB... indicators 2 4 1 Open the connector panel, plug the AC power cord into a wall outlet, then connect all -inone LCD type, you may have to switch the computer to output to the projector. Projecting Setting Up and Projecting 7 Rear remote control 6 detector FREEZE MS SLIDE I / 1 key.

Operating Instructions
Page 31
... to the screen size. Off: Displays the picture while matching one pixel of the LCD. Notes • When XGA, SXGA or SXGA+ signal is input, this item will be displayed (VPLCX5). • When SVGA or XGA signal is adjusted by pressing the APA key. Adjust the picture further for H increases..., the picture moves to the right, and as the setting decreases, the picture moves to that cannot be displayed (VPL-CS5). The lower the setting, the smaller ...
... to the screen size. Off: Displays the picture while matching one pixel of the LCD. Notes • When XGA, SXGA or SXGA+ signal is input, this item will be displayed (VPLCX5). • When SVGA or XGA signal is adjusted by pressing the APA key. Adjust the picture further for H increases..., the picture moves to the right, and as the setting decreases, the picture moves to that cannot be displayed (VPL-CS5). The lower the setting, the smaller ...
Operating Instructions
Page 39
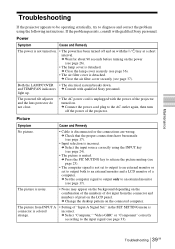
...power has been turned off the power of pixel on the LCD panel. c Wait for about 90 seconds before turning on with the power of the projector turned on the connected computer. and TEMP/FAN indicators c Consult with qualified Sony personnel. c Connect the power cord plug to the AC ... cord is incorrect. c Close the lamp cover securely (see page 37). The picture from the connector and numbers of the projector. Maintenance Troubleshooting If the projector appears to be operating erratically, try to diagnose and correct the problem using the INPUT key (see page 17). • Input...
...power has been turned off the power of pixel on the LCD panel. c Wait for about 90 seconds before turning on with the power of the projector turned on the connected computer. and TEMP/FAN indicators c Consult with qualified Sony personnel. c Connect the power cord plug to the AC ... cord is incorrect. c Close the lamp cover securely (see page 37). The picture from the connector and numbers of the projector. Maintenance Troubleshooting If the projector appears to be operating erratically, try to diagnose and correct the problem using the INPUT key (see page 17). • Input...
Operating Instructions
Page 43
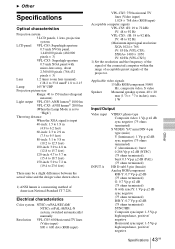
...American National Standard IT 7.228. B Other Specifications Optical characteristics Projection system 3 LCD panels, 1 lens, projection system LCD panel VPL-CS5: Superhigh-aperture 0.7-inch SVGA panel, 1,440,000 pixels (480,000 pixels × 3) VPL-CX5: Superhigh-aperture 0.7-inch XGA panel with sync/Y: 1 Vp-p ±2 dB sync negative (75 ohms ...VPL-CS5: fH: 19 to 72 kHz fV: 48 to 92 Hz VPL-CX5: fH: 19 to 92 kHz fV: 48 to 23.6 feet) There may be a slight difference between the actual value and the design value shown above. 1) ANSI lumen is a measuring method of the projector...
...American National Standard IT 7.228. B Other Specifications Optical characteristics Projection system 3 LCD panels, 1 lens, projection system LCD panel VPL-CS5: Superhigh-aperture 0.7-inch SVGA panel, 1,440,000 pixels (480,000 pixels × 3) VPL-CX5: Superhigh-aperture 0.7-inch XGA panel with sync/Y: 1 Vp-p ±2 dB sync negative (75 ohms ...VPL-CS5: fH: 19 to 72 kHz fV: 48 to 92 Hz VPL-CX5: fH: 19 to 92 kHz fV: 48 to 23.6 feet) There may be a slight difference between the actual value and the design value shown above. 1) ANSI lumen is a measuring method of the projector...


