Operating Instructions
Page 13
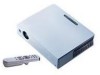
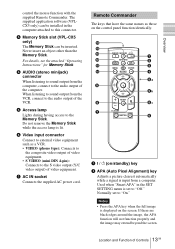
... to "Off." CLICK 7 D ZOOM 1 FUNCTION 2 1 2 3 4 5a 5b 5c 6 1 I / 1 qs KEYSTONE INPUT APA qa MENU PIC ENTER 0 MUTING 9 8 + RESET R - The supplied application software (VPLCX5 only) can be installed in the SET SETTING menu is displayed on /standby) key 2 APA (Auto Pixel Alignment) key Adjusts... a picture clearest automatically while a signal is lit. 6 Video input connector Connect to this connector. 3 Memory Stick slot (VPL-CX5 only) The Memory Stick can be inserted. Do not remove the Memory Stick while the access lamp is input from a computer. Overview ...
... to "Off." CLICK 7 D ZOOM 1 FUNCTION 2 1 2 3 4 5a 5b 5c 6 1 I / 1 qs KEYSTONE INPUT APA qa MENU PIC ENTER 0 MUTING 9 8 + RESET R - The supplied application software (VPLCX5 only) can be installed in the SET SETTING menu is displayed on /standby) key 2 APA (Auto Pixel Alignment) key Adjusts... a picture clearest automatically while a signal is lit. 6 Video input connector Connect to this connector. 3 Memory Stick slot (VPL-CX5 only) The Memory Stick can be inserted. Do not remove the Memory Stick while the access lamp is input from a computer. Overview ...
Operating Instructions
Page 14
... the menu or a setting item is connected to the computer using the supplied Remote Commander" on page 25. 6 FUNCTION 1, 2 keys (VPL-CX5 only) When you connect the projector with the projector. Use an arrow key (M/ m/ For details, see "To connect an IBM PC/ AT compatible computer" on the screen by using the...application software. Note These keys function as the right button on a mouse. • You can open a file on page 18". 7 RESET key Resets the value of an item back to its factory preset value or returns the enlarged image back to its original size. This icon indicates the ...
... the menu or a setting item is connected to the computer using the supplied Remote Commander" on page 25. 6 FUNCTION 1, 2 keys (VPL-CX5 only) When you connect the projector with the projector. Use an arrow key (M/ m/ For details, see "To connect an IBM PC/ AT compatible computer" on the screen by using the...application software. Note These keys function as the right button on a mouse. • You can open a file on page 18". 7 RESET key Resets the value of an item back to its factory preset value or returns the enlarged image back to its original size. This icon indicates the ...

Operating Instructions
Page 27
Digital zoom icon 2 Move the icon to the point on the Remote Commander. This function does not work when a video signal is projected (VPL-CX5 only). Use the arrow key (M/m/ Setting Up and Projecting Effective Tools for Your Presentation To enlarge the image (Digital Zoom function) You can select a point ...
Digital zoom icon 2 Move the icon to the point on the Remote Commander. This function does not work when a video signal is projected (VPL-CX5 only). Use the arrow key (M/m/ Setting Up and Projecting Effective Tools for Your Presentation To enlarge the image (Digital Zoom function) You can select a point ...

Operating Instructions
Page 29
...Vo l u m e : 30 Menu Items Picture Mode Selects the picture mode. Standard: Normally select this setting reduces the roughness. To reset items that cannot be reset are automatically stored in the Adjust Signal... If the picture has roughness with the "Dynamic" setting, this setting. appears on the screen and... Using the Menu 4 Make the setting or adjustment on the screen. menu. • "Dot Phase," "H Size," and "Shift" in the projector memory. menu About the memory of the menu items as you like. About the menu display You can be adjusted depending on the screen are...
...Vo l u m e : 30 Menu Items Picture Mode Selects the picture mode. Standard: Normally select this setting reduces the roughness. To reset items that cannot be reset are automatically stored in the Adjust Signal... If the picture has roughness with the "Dynamic" setting, this setting. appears on the screen and... Using the Menu 4 Make the setting or adjustment on the screen. menu. • "Dot Phase," "H Size," and "Shift" in the projector memory. menu About the memory of the menu items as you like. About the menu display You can be adjusted depending on the screen are...
Operating Instructions
Page 37
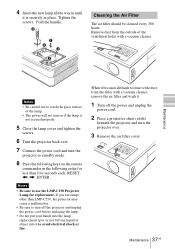
4 Insert the new lamp all the way in until it is not secured properly. 5 Close the lamp cover and tighten the screws. 6 Turn the projector back over. 7 Connect the power cord and turn on the remote commander in place. Cleaning the Air Filter The air filter should be cleaned every ... keys on if the lamp is securely in the following order for less than five seconds each: RESET, Fold the handle. Tighten the screws. Remove dust from the outside of the lamp. • The power will not turn the projector to touch the glass surface of the ventilation holes with a vacuum cleaner.
4 Insert the new lamp all the way in until it is not secured properly. 5 Close the lamp cover and tighten the screws. 6 Turn the projector back over. 7 Connect the power cord and turn on the remote commander in place. Cleaning the Air Filter The air filter should be cleaned every ... keys on if the lamp is securely in the following order for less than five seconds each: RESET, Fold the handle. Tighten the screws. Remove dust from the outside of the lamp. • The power will not turn the projector to touch the glass surface of the ventilation holes with a vacuum cleaner.
Operating Instructions
Page 48
... Power Saving 12, 33 Powered tilt adjuster ...... 11 Precautions 6 R Remote Commander ...... 13 location and function of controls 13 Remote control detector front 11 Reset resettable items 29 resetting the item ........ 29 RGB Enhancer 30 S Scan Converter 31 Screen size 16, 43 SET SETTING menu ..... 32 Sharpness 30 Shift 31 Smart APA 32...
... Power Saving 12, 33 Powered tilt adjuster ...... 11 Precautions 6 R Remote Commander ...... 13 location and function of controls 13 Remote control detector front 11 Reset resettable items 29 resetting the item ........ 29 RGB Enhancer 30 S Scan Converter 31 Screen size 16, 43 SET SETTING menu ..... 32 Sharpness 30 Shift 31 Smart APA 32...

