Operating Instructions
Page 8
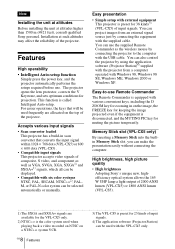
...or Windows XP. High brightness, high picture quality • High brightness Adopting Sony's unique new, highefficiency optical system allows the 165 W UHP lamp a light output of 2000 ANSI lumen (VPL-CX5) or 1800 ANSI lumen (VPL-CS5). ... 1) The SXGA and SXGA+ signals are allocated on the ...in scan converter that will be selected automatically or manually. For easier operations, the keys that converts the input signal within 1024 × 768 dots (VPL-CX5) or 800 × 600 dots (VPL-CS5) . • Compatible input signals This projector accepts video signals of composite, S video, and...
...or Windows XP. High brightness, high picture quality • High brightness Adopting Sony's unique new, highefficiency optical system allows the 165 W UHP lamp a light output of 2000 ANSI lumen (VPL-CX5) or 1800 ANSI lumen (VPL-CS5). ... 1) The SXGA and SXGA+ signals are allocated on the ...in scan converter that will be selected automatically or manually. For easier operations, the keys that converts the input signal within 1024 × 768 dots (VPL-CX5) or 800 × 600 dots (VPL-CS5) . • Compatible input signals This projector accepts video signals of composite, S video, and...
Operating Instructions
Page 14
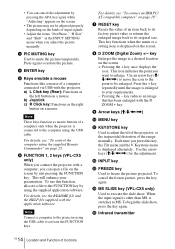
... details, see "To connect an IBM PC/ AT compatible computer" on page 18". 7 RESET key Resets the value of a computer only when the projector is displayed on a mouse. To use this function, allocate a file to mute the picture temporarily. Use an arrow key (M/ m/ • You can... location on a mouse. For details, see "To control the computer using the supplied Remote Commander" on page 25. 6 FUNCTION 1, 2 keys (VPL-CX5 only) When you connect the projector with a computer, you adjust the picture manually. 3 PIC MUTING key Used to the FUNCTION key by just pressing the FUNCTION key.
... details, see "To connect an IBM PC/ AT compatible computer" on page 18". 7 RESET key Resets the value of a computer only when the projector is displayed on a mouse. To use this function, allocate a file to mute the picture temporarily. Use an arrow key (M/ m/ • You can... location on a mouse. For details, see "To control the computer using the supplied Remote Commander" on page 25. 6 FUNCTION 1, 2 keys (VPL-CX5 only) When you connect the projector with a computer, you adjust the picture manually. 3 PIC MUTING key Used to the FUNCTION key by just pressing the FUNCTION key.
Operating Instructions
Page 17
... each connection. • Insert the cable plugs firmly; Notes • The projector accepts VGA, SVGA, XGA, SXGA (VPL-CX5 only) and SXGA+ (VPL-CX5 only) signals. Connecting with a DDC2B (Digital Data Channel 2B). Set your computer to output the signal to the computer's instruction manual. For more information, refer to only the external monitor. For details, refer...
... each connection. • Insert the cable plugs firmly; Notes • The projector accepts VGA, SVGA, XGA, SXGA (VPL-CX5 only) and SXGA+ (VPL-CX5 only) signals. Connecting with a DDC2B (Digital Data Channel 2B). Set your computer to output the signal to the computer's instruction manual. For more information, refer to only the external monitor. For details, refer...
Operating Instructions
Page 19
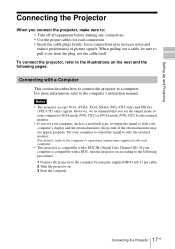
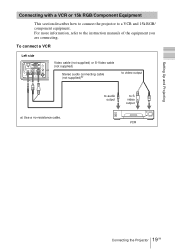
to audio output to the instruction manuals of the equipment you are connecting. For more information, refer to S video output VCR 19 Connecting the Projector GB To connect a VCR Left side ACCESS AUDIO INPUT A POWER SAVING MENU VIDEO S VIDEO TEMP/FAN PUSH ENTER LAMP/COVER Video cable (not supplied) or S-... a VCR and 15k RGB/ component equipment. Setting Up and Projecting Connecting with a VCR or 15k RGB/Component Equipment This section describes how to connect the projector to video output a) Use a no-resistance cable.
to audio output to the instruction manuals of the equipment you are connecting. For more information, refer to S video output VCR 19 Connecting the Projector GB To connect a VCR Left side ACCESS AUDIO INPUT A POWER SAVING MENU VIDEO S VIDEO TEMP/FAN PUSH ENTER LAMP/COVER Video cable (not supplied) or S-... a VCR and 15k RGB/ component equipment. Setting Up and Projecting Connecting with a VCR or 15k RGB/Component Equipment This section describes how to connect the projector to video output a) Use a no-resistance cable.
Operating Instructions
Page 24
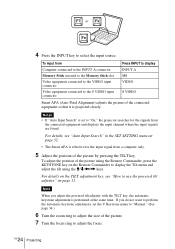
... the input signals are found. To adjust the position of the picture using the M/m/ F7 or Fx Fn 4 Press the INPUT key to "On," the projector searches for the input signal from a computer only. 5 Adjust the position of the connected equipment so that it is set to select the input source...
... the input signals are found. To adjust the position of the picture using the M/m/ F7 or Fx Fn 4 Press the INPUT key to "On," the projector searches for the input signal from a computer only. 5 Adjust the position of the connected equipment so that it is set to select the input source...
Operating Instructions
Page 25
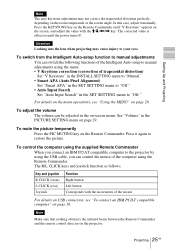
In this case, adjust it manually. Press the KEYSTONE key on the Remote Commander until "V Keystone" appears on the room temperature or the screen angle. Setting Up and Projecting Note The auto keystone adjustment may not correct the trapezoidal distortion perfectly, depending on the screen, and adjust the value with the M/m/
In this case, adjust it manually. Press the KEYSTONE key on the Remote Commander until "V Keystone" appears on the room temperature or the screen angle. Setting Up and Projecting Note The auto keystone adjustment may not correct the trapezoidal distortion perfectly, depending on the screen, and adjust the value with the M/m/
Operating Instructions
Page 34
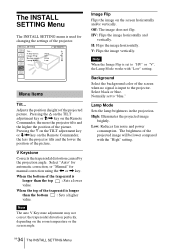
...automatic correction, or "Manual" for changing the settings of the picture. When the top of the projected image will be lower compared with "Low" setting. H: Flips the image horizontally. Adjusts the position (height) of the screen when no signal is input to the projector. Off: The ... SETTING Menu The INSTALL SETTING menu is used for manual correction using the < or , key. Pressing the f on the TILT adjustment key or M/, key on the Remote Commander, the less the projector tilts and the lower the position of the projector. V Keystone: Image Flip: Background: Lamp Mode:...
...automatic correction, or "Manual" for changing the settings of the picture. When the top of the projected image will be lower compared with "Low" setting. H: Flips the image horizontally. Adjusts the position (height) of the screen when no signal is input to the projector. Off: The ... SETTING Menu The INSTALL SETTING menu is used for manual correction using the < or , key. Pressing the f on the TILT adjustment key or M/, key on the Remote Commander, the less the projector tilts and the lower the position of the projector. V Keystone: Image Flip: Background: Lamp Mode:...
Operating Instructions
Page 43
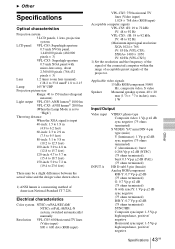
...system 3 LCD panels, 1 lens, projection system LCD panel VPL-CS5: Superhigh-aperture 0.7-inch SVGA panel, 1,440,000 pixels (480,000 pixels × 3) VPL-CX5: Superhigh-aperture 0.7-inch XGA panel with..., switched automatically/ manually Resolution VPL-CS5: 600 horizontal TV lines (Video input) 800 × 600 dots (RGB input) VPL-CX5: 750 horizontal TV...VPL-CS5: fH: 19 to 72 kHz fV: 48 to 92 Hz VPL-CX5: fH: 19 to 92 kHz fV: 48 to 23.6 feet) There may be a slight difference between the actual value and the design value shown above. 1) ANSI lumen is a measuring method of the projector...
...system 3 LCD panels, 1 lens, projection system LCD panel VPL-CS5: Superhigh-aperture 0.7-inch SVGA panel, 1,440,000 pixels (480,000 pixels × 3) VPL-CX5: Superhigh-aperture 0.7-inch XGA panel with..., switched automatically/ manually Resolution VPL-CS5: 600 horizontal TV lines (Video input) 800 × 600 dots (RGB input) VPL-CX5: 750 horizontal TV...VPL-CS5: fH: 19 to 72 kHz fV: 48 to 92 Hz VPL-CX5: fH: 19 to 92 kHz fV: 48 to 23.6 feet) There may be a slight difference between the actual value and the design value shown above. 1) ANSI lumen is a measuring method of the projector...


