Operating Instructions
Page 6
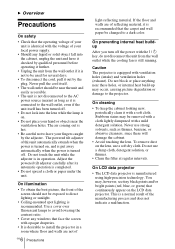
...your fingers caught by the adjuster. On LCD data projector • The LCD data projector is in a room where floor and walls are of the manufacturing process and does not indicate a malfunction. The powered tilt adjuster of this unit automatically extends when the power is turned on the lens, use a... holes. B Overview Precautions On safety • Check that the operating voltage of your unit is identical with the voltage of your local power supply. • Should any windows that face the screen with opaque draperies. • It is desirable to a dark color. Never pull ...
...your fingers caught by the adjuster. On LCD data projector • The LCD data projector is in a room where floor and walls are of the manufacturing process and does not indicate a malfunction. The powered tilt adjuster of this unit automatically extends when the power is turned on the lens, use a... holes. B Overview Precautions On safety • Check that the operating voltage of your unit is identical with the voltage of your local power supply. • Should any windows that face the screen with opaque draperies. • It is desirable to a dark color. Never pull ...
Operating Instructions
Page 8
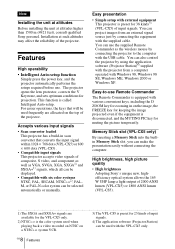
...power key, and the projector automatically performs the setups required before use the supplied Remote Commander as VGA, SVGA, XGA, SXGA1) and SXGA+1) signals, which all can make the presentation easily without connecting the computer. The projector opens the lens protector, corrects the V Keystone, and sets optimum conditions for the VPL-CX5...Adopting Sony's unique new, highefficiency optical system allows the 165 W UHP lamp a light output of 2000 ANSI lumen (VPL-CX5) or 1800 ANSI lumen (VPL-CS5). ... 1) The SXGA and SXGA+ signals are allocated on the top of the projector. This...
...power key, and the projector automatically performs the setups required before use the supplied Remote Commander as VGA, SVGA, XGA, SXGA1) and SXGA+1) signals, which all can make the presentation easily without connecting the computer. The projector opens the lens protector, corrects the V Keystone, and sets optimum conditions for the VPL-CX5...Adopting Sony's unique new, highefficiency optical system allows the 165 W UHP lamp a light output of 2000 ANSI lumen (VPL-CX5) or 1800 ANSI lumen (VPL-CS5). ... 1) The SXGA and SXGA+ signals are allocated on the top of the projector. This...
Operating Instructions
Page 12
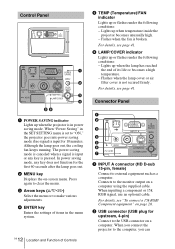
... is canceled when a signal is input or any key does not function for 10 minutes. For details, see page 41. Connects to "ON," the projector goes into power saving mode if no signal is input for the first 60 seconds after the lamp goes out. 2 MENU key Displays the on a computer. Lights... up when the lamp has reached the end of items in the SET SETTING menu is set to the monitor output on a computer using the supplied...
... is canceled when a signal is input or any key does not function for 10 minutes. For details, see page 41. Connects to "ON," the projector goes into power saving mode if no signal is input for the first 60 seconds after the lamp goes out. 2 MENU key Displays the on a computer. Lights... up when the lamp has reached the end of items in the SET SETTING menu is set to the monitor output on a computer using the supplied...
Operating Instructions
Page 13
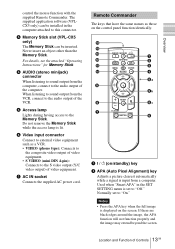
... to the audio output of the VCR. 5 Access lamp Lights during having access to the audio output of video equipment. 7 AC IN socket Connects the supplied AC power cord. CLICK 7 D ZOOM 1 FUNCTION 2 1 2 3 4 5a 5b 5c 6 1 I / 1 qs KEYSTONE INPUT APA qa MENU PIC ENTER 0 MUTING 9 8 + RESET...6 Video input connector Connect to this connector. 3 Memory Stick slot (VPL-CX5 only) The Memory Stick can be inserted. qg qf qd FREEZE MS SLIDE I / 1 (on the control panel function identically. The supplied application software (VPLCX5 only) can be installed in the SET SETTING menu...
... to the audio output of the VCR. 5 Access lamp Lights during having access to the audio output of video equipment. 7 AC IN socket Connects the supplied AC power cord. CLICK 7 D ZOOM 1 FUNCTION 2 1 2 3 4 5a 5b 5c 6 1 I / 1 qs KEYSTONE INPUT APA qa MENU PIC ENTER 0 MUTING 9 8 + RESET...6 Video input connector Connect to this connector. 3 Memory Stick slot (VPL-CX5 only) The Memory Stick can be inserted. qg qf qd FREEZE MS SLIDE I / 1 (on the control panel function identically. The supplied application software (VPLCX5 only) can be installed in the SET SETTING menu...
Operating Instructions
Page 18
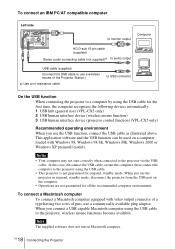
... devices automatically. 1 USB hub (general use) (VPL-CX5 only) 2 USB human interface device (wireless mouse function) 3 USB human interface device (projector control function) (VPL-CX5 only) Recommended operating environment When you use the USB... function, connect the USB cable as illustrated above. To connect an IBM PC/AT compatible computer Left side ACCESS AUDIO INPUT A POWER SAVING MENU VIDEO S VIDEO TEMP/FAN PUSH ENTER LAMP/COVER to monitor output HD D-sub 15-pin cable (supplied...
... devices automatically. 1 USB hub (general use) (VPL-CX5 only) 2 USB human interface device (wireless mouse function) 3 USB human interface device (projector control function) (VPL-CX5 only) Recommended operating environment When you use the USB... function, connect the USB cable as illustrated above. To connect an IBM PC/AT compatible computer Left side ACCESS AUDIO INPUT A POWER SAVING MENU VIDEO S VIDEO TEMP/FAN PUSH ENTER LAMP/COVER to monitor output HD D-sub 15-pin cable (supplied...
Operating Instructions
Page 19
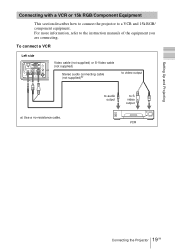
Setting Up and Projecting Connecting with a VCR or 15k RGB/Component Equipment This section describes how to connect the projector to the instruction manuals of the equipment you are connecting. For more information, refer to a VCR and 15k RGB/ component... to video output a) Use a no-resistance cable. To connect a VCR Left side ACCESS AUDIO INPUT A POWER SAVING MENU VIDEO S VIDEO TEMP/FAN PUSH ENTER LAMP/COVER Video cable (not supplied) or S-Video cable (not supplied) Stereo audio connecting cable (not supplied)a) to S video output VCR 19 Connecting the Projector GB
Setting Up and Projecting Connecting with a VCR or 15k RGB/Component Equipment This section describes how to connect the projector to the instruction manuals of the equipment you are connecting. For more information, refer to a VCR and 15k RGB/ component... to video output a) Use a no-resistance cable. To connect a VCR Left side ACCESS AUDIO INPUT A POWER SAVING MENU VIDEO S VIDEO TEMP/FAN PUSH ENTER LAMP/COVER Video cable (not supplied) or S-Video cable (not supplied) Stereo audio connecting cable (not supplied)a) to S video output VCR 19 Connecting the Projector GB

Operating Instructions
Page 20
To connect a 15k RGB/Component equipment Left side ACCESS AUDIO INPUT A POWER SAVING MENU VIDEO S VIDEO TEMP/FAN PUSH ENTER LAMP/COVER SMF-402 Signal Cable (not supplied) HD D-sub 15-pin (male) ↔ 3 × phono jack Stereo audio connecting cable (not supplied)a) to audio output to 15k RGB or component video equipment, select... SET SETTING menu. • Use the composite sync signal when you input the external sync signal from 15k RGB/component equipment. 20 GB Connecting the Projector
To connect a 15k RGB/Component equipment Left side ACCESS AUDIO INPUT A POWER SAVING MENU VIDEO S VIDEO TEMP/FAN PUSH ENTER LAMP/COVER SMF-402 Signal Cable (not supplied) HD D-sub 15-pin (male) ↔ 3 × phono jack Stereo audio connecting cable (not supplied)a) to audio output to 15k RGB or component video equipment, select... SET SETTING menu. • Use the composite sync signal when you input the external sync signal from 15k RGB/component equipment. 20 GB Connecting the Projector
Operating Instructions
Page 25
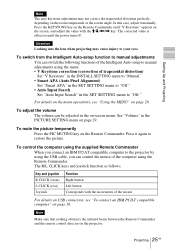
Setting Up and Projecting Note The auto keystone adjustment may not correct the trapezoidal distortion perfectly, depending on the screen, and adjust the value with the M/m/ In this case, adjust it manually. Press the KEYSTONE key on the Remote Commander until "V Keystone" appears on the room temperature or the screen angle.
Setting Up and Projecting Note The auto keystone adjustment may not correct the trapezoidal distortion perfectly, depending on the screen, and adjust the value with the M/m/ In this case, adjust it manually. Press the KEYSTONE key on the Remote Commander until "V Keystone" appears on the room temperature or the screen angle.
Operating Instructions
Page 36
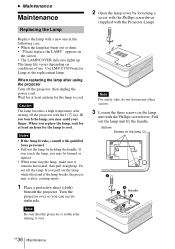
... depending on the lamp (3) Handle GB 36 Maintenance Caution The lamp becomes a high temperature after turning off the projector, then unplug the power cord. Do not tilt the lamp. If you touch the lamp, you may be burned or injured. •...projector Turn off the projector with qualified Sony personnel. • Pull out the lamp by holding the handle. B Maintenance Maintenance Replacing the Lamp Replace the lamp with the Phillips screwdriver. When you can see its underside. Pull out the lamp unit by loosening a screw with the Phillips screwdriver (supplied with the Projector...
... depending on the lamp (3) Handle GB 36 Maintenance Caution The lamp becomes a high temperature after turning off the projector, then unplug the power cord. Do not tilt the lamp. If you touch the lamp, you may be burned or injured. •...projector Turn off the projector with qualified Sony personnel. • Pull out the lamp by holding the handle. B Maintenance Maintenance Replacing the Lamp Replace the lamp with the Phillips screwdriver. When you can see its underside. Pull out the lamp unit by loosening a screw with the Phillips screwdriver (supplied with the Projector...

Operating Instructions
Page 38
GB 38 Maintenance Notes • If you neglect to attach the air filter cover firmly; the power will not be removed from the air filter, replace the air filter with a mild detergent solution and dry it fits in a shaded place. 6 Attach the ..., clogging it is not closed securely. • The air filter has a face and a reverse side. 4 Remove the air filter. 5 Wash the air filter with the supplied new one. • Be sure to clean the air filter, dust may rise inside the unit, leading to a possible malfunction or fire. • If the...
GB 38 Maintenance Notes • If you neglect to attach the air filter cover firmly; the power will not be removed from the air filter, replace the air filter with a mild detergent solution and dry it fits in a shaded place. 6 Attach the ..., clogging it is not closed securely. • The air filter has a face and a reverse side. 4 Remove the air filter. 5 Wash the air filter with the supplied new one. • Be sure to clean the air filter, dust may rise inside the unit, leading to a possible malfunction or fire. • If the...
Operating Instructions
Page 44
... your nearest Sony office. 1) VPS-50C may not be available in some areas. GB 44 Specifications Optional accessories Projector Lamp LMP-C150 (for replacement) (1) Operating Instructions (1) Quick Reference Card (1) Ferrite core (1) Memory Stick (1) (VPL-CX5 only) Design and specifications are subject to change without the projection parts) Mass Approx. 2.7 kg (5 lb 15 oz) Power requirements...
... your nearest Sony office. 1) VPS-50C may not be available in some areas. GB 44 Specifications Optional accessories Projector Lamp LMP-C150 (for replacement) (1) Operating Instructions (1) Quick Reference Card (1) Ferrite core (1) Memory Stick (1) (VPL-CX5 only) Design and specifications are subject to change without the projection parts) Mass Approx. 2.7 kg (5 lb 15 oz) Power requirements...
Operating Instructions
Page 47
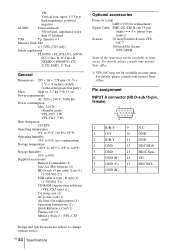
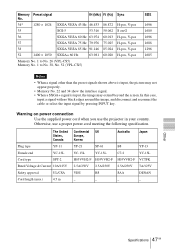
Otherwise, use the projector in your country. The United States, Canada Plug type YP-11 Female end YC-13L Cord type SPT-2 Rated Voltage & Current 10A/125V Safety approval ... 1400 × 1050 SXGA+ 60 Hz 63.981 60.020 Memory No. 1 to No. 26 (VPL-CS5) Memory No. 1 to No. 38, No. 52 (VPL-CX5) Sync H-pos, V-pos S on power connection Use the supplied power cord when you use a proper power cord meeting the following specification. Warning on G H-pos, V-pos H-pos, V-pos H-pos, V-pos H-pos, V-pos...
Otherwise, use the projector in your country. The United States, Canada Plug type YP-11 Female end YC-13L Cord type SPT-2 Rated Voltage & Current 10A/125V Safety approval ... 1400 × 1050 SXGA+ 60 Hz 63.981 60.020 Memory No. 1 to No. 26 (VPL-CS5) Memory No. 1 to No. 38, No. 52 (VPL-CX5) Sync H-pos, V-pos S on power connection Use the supplied power cord when you use a proper power cord meeting the following specification. Warning on G H-pos, V-pos H-pos, V-pos H-pos, V-pos H-pos, V-pos...
Operating Instructions
Page 48
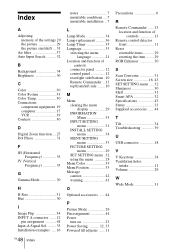
...Color 33 Menu Position 33 Message caution 42 warning 41 O Optional accessories ...... 44 P Picture Mode 29 Pin assignment 44 Power turn on 23 Power Saving 12, 33 Powered tilt adjuster ...... 11 Precautions 6 R Remote Commander ...... 13 location and function of controls 13 Remote control detector front 11... Converter 31 Screen size 16, 43 SET SETTING menu ..... 32 Sharpness 30 Shift 31 Smart APA 32 Specifications 43 Status 33 Supplied accessories ...... 44 T Tilt 34 Troubleshooting 39 U USB connector 18 V V Keystone 34 Ventilation holes intake 11 Volume 29 W Wide Mode 31...
...Color 33 Menu Position 33 Message caution 42 warning 41 O Optional accessories ...... 44 P Picture Mode 29 Pin assignment 44 Power turn on 23 Power Saving 12, 33 Powered tilt adjuster ...... 11 Precautions 6 R Remote Commander ...... 13 location and function of controls 13 Remote control detector front 11... Converter 31 Screen size 16, 43 SET SETTING menu ..... 32 Sharpness 30 Shift 31 Smart APA 32 Specifications 43 Status 33 Supplied accessories ...... 44 T Tilt 34 Troubleshooting 39 U USB connector 18 V V Keystone 34 Ventilation holes intake 11 Volume 29 W Wide Mode 31...


