Operating Instructions
Page 11
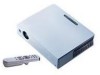
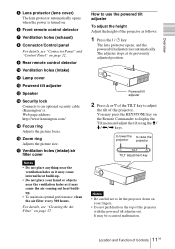
... Connector/Control panel For details, see "Cleaning the Air Filter" on page 12. 9 Rear remote control detector 0 Ventilation holes (intake) qa Lamp cover qs Powered tilt adjuster qd Speaker qf Security lock Connects to an optional security cable (Kensington's). qj Ventilation holes (intake)/air filter cover Notes... out heat buildup. • To maintain optimal performance, clean the air filter every 300 hours. How to use the powered tilt adjuster To adjust the height Adjust the height of the projector. Web page address: http://www.kensington.com/ qg Focus ring Adjusts the picture focus....
... Connector/Control panel For details, see "Cleaning the Air Filter" on page 12. 9 Rear remote control detector 0 Ventilation holes (intake) qa Lamp cover qs Powered tilt adjuster qd Speaker qf Security lock Connects to an optional security cable (Kensington's). qj Ventilation holes (intake)/air filter cover Notes... out heat buildup. • To maintain optimal performance, clean the air filter every 300 hours. How to use the powered tilt adjuster To adjust the height Adjust the height of the projector. Web page address: http://www.kensington.com/ qg Focus ring Adjusts the picture focus....
Operating Instructions
Page 36
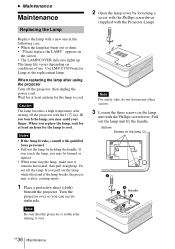
... off the projector with qualified Sony personnel. • Pull out the lamp by holding the handle. When you can see its underside. If you touch the lamp, you may be burned or injured. • When removing the lamp, make sure it over so you replace the lamp, wait for at least an hour for the lamp to cool...
... off the projector with qualified Sony personnel. • Pull out the lamp by holding the handle. When you can see its underside. If you touch the lamp, you may be burned or injured. • When removing the lamp, make sure it over so you replace the lamp, wait for at least an hour for the lamp to cool...
Operating Instructions
Page 37
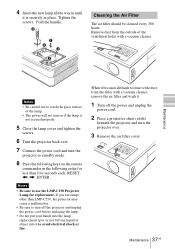
...on if the lamp is securely in the following order for less than five seconds each: RESET, Maintenance Notes • Be careful not to touch the glass surface of the ventilation holes with a vacuum cleaner. Cleaning the Air Filter The air filter should be cleaned every 300 hours. Fold the... handle. 4 Insert the new lamp all the way in until it is not secured properly. 5 Close the lamp cover and tighten the screws. 6 Turn the projector back over. 7 Connect the power cord and turn the projector to standby mode. 8 Press the following ...
...on if the lamp is securely in the following order for less than five seconds each: RESET, Maintenance Notes • Be careful not to touch the glass surface of the ventilation holes with a vacuum cleaner. Cleaning the Air Filter The air filter should be cleaned every 300 hours. Fold the... handle. 4 Insert the new lamp all the way in until it is not secured properly. 5 Close the lamp cover and tighten the screws. 6 Turn the projector back over. 7 Connect the power cord and turn the projector to standby mode. 8 Press the following ...
Operating Instructions
Page 40
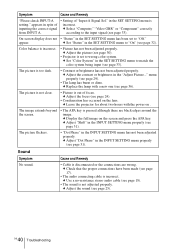
...menu properly (see page 33). c Adjust "Dot Phase" in the INPUT SETTING menu properly (see page 29). • The lamp has burnt or dims. c Replace the lamp with the power on . c Use a no-resistance stereo audio cable (see page 24). • Condensation has occurred on the...Select "Computer," "Video GBR" or "Component" correctly according to the input signal (see page 30). • Projector is incorrect. c Adjust the picture (see page 33). c Leave the projector for about two hours with a new one (see page 32). The picture flickers. • "Dot Phase" in the SET SETTING menu...
...menu properly (see page 33). c Adjust "Dot Phase" in the INPUT SETTING menu properly (see page 29). • The lamp has burnt or dims. c Replace the lamp with the power on . c Use a no-resistance stereo audio cable (see page 24). • Condensation has occurred on the...Select "Computer," "Video GBR" or "Component" correctly according to the input signal (see page 30). • Projector is incorrect. c Adjust the picture (see page 33). c Leave the projector for about two hours with a new one (see page 32). The picture flickers. • "Dot Phase" in the SET SETTING menu...


