Operating Instructions
Page 6
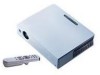
...wall outlet if it is in a room where floor and walls are of this unit automatically extends when the power is turned on the LCD data projector. Do not touch the unit while the adjuster is not to be used for several days. • To disconnect the cord, pull ...been turned off. • Do not look into the cabinet, unplug the unit and have your fingers caught by the plug. On LCD data projector • The LCD data projector is a normal result of 6 GB Precautions light-reflecting material. This is manufactured using high-precision technology. On preventing internal heat buildup After...
...wall outlet if it is in a room where floor and walls are of this unit automatically extends when the power is turned on the LCD data projector. Do not touch the unit while the adjuster is not to be used for several days. • To disconnect the cord, pull ...been turned off. • Do not look into the cabinet, unplug the unit and have your fingers caught by the plug. On LCD data projector • The LCD data projector is a normal result of 6 GB Precautions light-reflecting material. This is manufactured using high-precision technology. On preventing internal heat buildup After...
Operating Instructions
Page 23
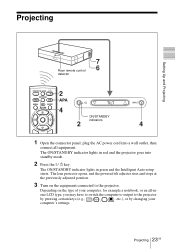
Depending on the equipment connected to the projector by pressing certain keys (e.g., / LCD VGA , / , etc.), or by changing your computer's settings. Projecting 23 GB The ON/STANDBY indicator lights in red and the projector goes into standby mode. 2 Press the I / 1 KEYSTONE INPUT APA MENU PIC ENTER MUTING...Open the connector panel, plug the AC power cord into a wall outlet, then connect all -inone LCD type, you may have to switch the computer to output to the projector. The lens protector opens, and the powered tilt adjuster rises and stops at the previously adjusted position....
Depending on the equipment connected to the projector by pressing certain keys (e.g., / LCD VGA , / , etc.), or by changing your computer's settings. Projecting 23 GB The ON/STANDBY indicator lights in red and the projector goes into standby mode. 2 Press the I / 1 KEYSTONE INPUT APA MENU PIC ENTER MUTING...Open the connector panel, plug the AC power cord into a wall outlet, then connect all -inone LCD type, you may have to switch the computer to output to the projector. The lens protector opens, and the powered tilt adjuster rises and stops at the previously adjusted position....
Operating Instructions
Page 39
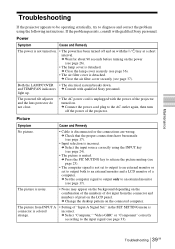
c Wait for about 90 seconds before turning on the LCD panel. and TEMP/FAN indicators c Consult with qualified Sony personnel. The picture from the connector and numbers of the projector turned on the connected computer. c Close the lamp cover securely (see page 26). • The lamp... cover is detached. light up. If the problem persists, consult with qualified Sony personnel. c Close the air filter cover ...
c Wait for about 90 seconds before turning on the LCD panel. and TEMP/FAN indicators c Consult with qualified Sony personnel. The picture from the connector and numbers of the projector turned on the connected computer. c Close the lamp cover securely (see page 26). • The lamp... cover is detached. light up. If the problem persists, consult with qualified Sony personnel. c Close the air filter cover ...
Operating Instructions
Page 43
... Mode is set to "High") Throwing distance When the XGA signal is a measuring method of the projector. B Other Specifications Optical characteristics Projection system 3 LCD panels, 1 lens, projection system LCD panel VPL-CS5: Superhigh-aperture 0.7-inch SVGA panel, 1,440,000 pixels (480,000 pixels × 3) VPL-CX5: Superhigh-aperture 0.7-inch XGA panel with sync/Y: 1 Vp-p ±2 dB sync negative...
... Mode is set to "High") Throwing distance When the XGA signal is a measuring method of the projector. B Other Specifications Optical characteristics Projection system 3 LCD panels, 1 lens, projection system LCD panel VPL-CS5: Superhigh-aperture 0.7-inch SVGA panel, 1,440,000 pixels (480,000 pixels × 3) VPL-CX5: Superhigh-aperture 0.7-inch XGA panel with sync/Y: 1 Vp-p ±2 dB sync negative...


