Operating Instructions
Page 2
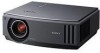
...Operation is connected. - However, there is for FCC related matters only. For customers in this manual could void your authority to operate this product, you may cause harmful interference to provide reasonable protection against harmful interference in a particular installation. Telephone Number: 858-942-2230 This device complies with the instructions, may call: Sony Customer Information Service... WARNING To reduce the risk of fire or electric shock, do not open the cabinet. Declaration of Conformity Trade Name: SONY Model No.: VPL-AW15, VPL-AW10 Responsible Party: Sony Electronics ...
...Operation is connected. - However, there is for FCC related matters only. For customers in this manual could void your authority to operate this product, you may cause harmful interference to provide reasonable protection against harmful interference in a particular installation. Telephone Number: 858-942-2230 This device complies with the instructions, may call: Sony Customer Information Service... WARNING To reduce the risk of fire or electric shock, do not open the cabinet. Declaration of Conformity Trade Name: SONY Model No.: VPL-AW15, VPL-AW10 Responsible Party: Sony Electronics ...
Operating Instructions
Page 5
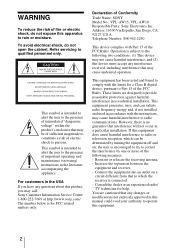
... 1: Installing the Projector .........12 Before Setting Up the Projector 12 Positioning the Projector and a screen 14 Step 2: Connecting the Projector .....17 Connecting to a VCR 17 Connecting to a Computer ..........20 Step 3: Adjusting the Picture Position 21 Step 4: Selecting the Menu Language 25 Projecting Projecting the Picture on the Screen 27 Turning Off the Power 28 Selecting the Wide Screen Mode .... 28 Selecting the Picture Viewing Mode 31 Adjusting the Picture Quality .......... 32 Adjusting the Picture Using Real Color Processing (VPL-AW15 only 33 Using...
... 1: Installing the Projector .........12 Before Setting Up the Projector 12 Positioning the Projector and a screen 14 Step 2: Connecting the Projector .....17 Connecting to a VCR 17 Connecting to a Computer ..........20 Step 3: Adjusting the Picture Position 21 Step 4: Selecting the Menu Language 25 Projecting Projecting the Picture on the Screen 27 Turning Off the Power 28 Selecting the Wide Screen Mode .... 28 Selecting the Picture Viewing Mode 31 Adjusting the Picture Quality .......... 32 Adjusting the Picture Using Real Color Processing (VPL-AW15 only 33 Using...
Operating Instructions
Page 6
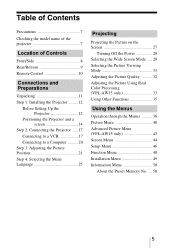
Others Troubleshooting 51 Warning Indicators 53 Message Lists 54 Replacing the Lamp and the Air Filter and cleaning the Ventilation holes (intake 55 Replacing the Air Filter 58 Fitting the lens cap 58 Specifications 59 Preset Signals 61 Input Signals and Adjustable/ Setting Items 64 Ceiling Installation 66 When Using the PSS-H10 Projector Suspension Support ......... 66 When Using the PSS-610 Projector Suspension Support ......... 70 Index 73 6
Others Troubleshooting 51 Warning Indicators 53 Message Lists 54 Replacing the Lamp and the Air Filter and cleaning the Ventilation holes (intake 55 Replacing the Air Filter 58 Fitting the lens cap 58 Specifications 59 Preset Signals 61 Input Signals and Adjustable/ Setting Items 64 Ceiling Installation 66 When Using the PSS-H10 Projector Suspension Support ......... 66 When Using the PSS-610 Projector Suspension Support ......... 70 Index 73 6
Operating Instructions
Page 7
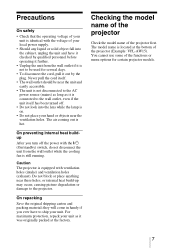
... AC power source (mains) as long as it out by the plug. Checking the model name of the projector Check the model name of the projector (Example: VPL-AW15). Precautions On safety • Check that the operating voltage of your unit is identical with the voltage of your local power supply. • Should any liquid or solid object fall into the lens while the lamp is...
... AC power source (mains) as long as it out by the plug. Checking the model name of the projector Check the model name of the projector (Example: VPL-AW15). Precautions On safety • Check that the operating voltage of your unit is identical with the voltage of your local power supply. • Should any liquid or solid object fall into the lens while the lamp is...
Operating Instructions
Page 8
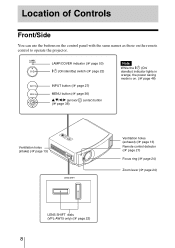
... 46) Ventilation holes (intake) (1 page 13) Ventilation holes (exhaust) (1 page 13) Remote control detector (1 page 21) Focus ring (1 page 24) Zoom lever (1 page 24) LENS SHIFT dials (VPL-AW15 only) (1 page 22) 8 LAMP/COVER indicator (1 page 53) ?/1 (On/standby) switch (1 page 22) INPUT button (1 page 27) MENU button (1 page 36) v/V/b/B (arrow)/ (enter) button (1 page 36) Note While the ?/1 (On/ standby) indicator lights in orange, the power saving mode is on the remote control to operate the projector.
... 46) Ventilation holes (intake) (1 page 13) Ventilation holes (exhaust) (1 page 13) Remote control detector (1 page 21) Focus ring (1 page 24) Zoom lever (1 page 24) LENS SHIFT dials (VPL-AW15 only) (1 page 22) 8 LAMP/COVER indicator (1 page 53) ?/1 (On/standby) switch (1 page 22) INPUT button (1 page 27) MENU button (1 page 36) v/V/b/B (arrow)/ (enter) button (1 page 36) Note While the ?/1 (On/ standby) indicator lights in orange, the power saving mode is on the remote control to operate the projector.

Operating Instructions
Page 11
... section describes how to install the projector and screen, how to connect the equipment from which you want to make sure it contains the following items: • Remote control (1) and Size AA (R6) batteries (2) • Lens cap (1) When you use the projector. • Operating Instructions (this manual) • AC power cord (1) • Air filter (for replacement) (1) Inserting the batteries into the remote control Push and slide to open. Inserting them forcibly...
... section describes how to install the projector and screen, how to connect the equipment from which you want to make sure it contains the following items: • Remote control (1) and Size AA (R6) batteries (2) • Lens cap (1) When you use the projector. • Operating Instructions (this manual) • AC power cord (1) • Air filter (for replacement) (1) Inserting the batteries into the remote control Push and slide to open. Inserting them forcibly...
Operating Instructions
Page 21
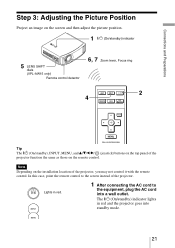
The ?/1 (On/standby) indicator lights in red. 1 After connecting the AC cord to the screen instead of the projector. Connections and Preparations Step 3: Adjusting the Picture Position Project an image on the screen and then adjust the picture position. 1 ?/1 (On/standby) indicator 5 LENS SHIFT dials (VPL-AW15 only) Remote control detector 6, 7 Zoom lever, Focus ring 2 4 Tip The ?/1 (On/standby), INPUT, MENU, and v/V/b/B/ (joystick) buttons on the remote control. Note Depending on the installation location of the projector function the same as those on the top...
The ?/1 (On/standby) indicator lights in red. 1 After connecting the AC cord to the screen instead of the projector. Connections and Preparations Step 3: Adjusting the Picture Position Project an image on the screen and then adjust the picture position. 1 ?/1 (On/standby) indicator 5 LENS SHIFT dials (VPL-AW15 only) Remote control detector 6, 7 Zoom lever, Focus ring 2 4 Tip The ?/1 (On/standby), INPUT, MENU, and v/V/b/B/ (joystick) buttons on the remote control. Note Depending on the installation location of the projector function the same as those on the top...
Operating Instructions
Page 22
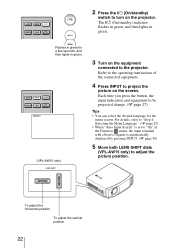
.../standby) indicator flashes in green, and then lights in the Function menu, the input terminal with effective signals is set to "On" in green. Each time you press the button, the input indication and equipment to turn on the projector. Flashes in green for the menu screen. For details, refer to "Step 4: Selecting the Menu Language". (1 page 25) • When "Auto Input Search" is automatically displayed by pressing INPUT. (1 page 48) 5 Move both LENS SHIFT dials (VPL-AW15...
.../standby) indicator flashes in green, and then lights in the Function menu, the input terminal with effective signals is set to "On" in green. Each time you press the button, the input indication and equipment to turn on the projector. Flashes in green for the menu screen. For details, refer to "Step 4: Selecting the Menu Language". (1 page 25) • When "Auto Input Search" is automatically displayed by pressing INPUT. (1 page 48) 5 Move both LENS SHIFT dials (VPL-AW15...
Operating Instructions
Page 28
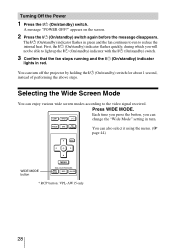
.../standby) indicator lights in turn off the projector by holding the ?/1 (On/standby) switch for about 1 second, instead of performing the above steps. Press WIDE MODE. The ?/1 (On/standby) indicator flashes in green and the fan continues to run to the video signal received. You can also select it using the menu. (1 page 44) WIDE MODE button * RCP button: VPL-AW15 only 28 Selecting the Wide Screen Mode You can change the "Wide Mode" setting in red. A message "POWER OFF?" Turning...
.../standby) indicator lights in turn off the projector by holding the ?/1 (On/standby) switch for about 1 second, instead of performing the above steps. Press WIDE MODE. The ?/1 (On/standby) indicator flashes in green and the fan continues to run to the video signal received. You can also select it using the menu. (1 page 44) WIDE MODE button * RCP button: VPL-AW15 only 28 Selecting the Wide Screen Mode You can change the "Wide Mode" setting in red. A message "POWER OFF?" Turning...
Operating Instructions
Page 46
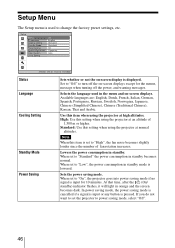
... Setting Standby Mode Power Saving Sets whether or not the on-screen display is pressed. Sets the power saving mode. Setup Menu The Setup menu is used in orange and the screen becomes dark. When set to change the factory preset settings, etc. When set to "Low", the power consumption in standby. When set to "On", the projector goes into power saving mode if no signal is input for the menus, message when turning off the power, and warning messages. At that time, after the ?/1 (On/ standby) indicator flashes...
... Setting Standby Mode Power Saving Sets whether or not the on-screen display is pressed. Sets the power saving mode. Setup Menu The Setup menu is used in orange and the screen becomes dark. When set to change the factory preset settings, etc. When set to "Low", the power consumption in standby. When set to "On", the projector goes into power saving mode if no signal is input for the menus, message when turning off the power, and warning messages. At that time, after the ?/1 (On/ standby) indicator flashes...
Operating Instructions
Page 50
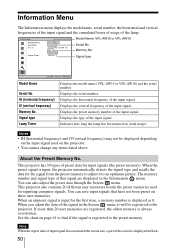
... been turned on the projector. • You cannot change any items listed above. About the Preset Memory No. When an unpreset signal is input for input signals (the preset memory). Signal type Lamp Timer Displays the model name (VPL-AW15 or VPL-AW10) and the serial number. Information Menu The Information menu displays the model name, serial number, the horizontal and vertical frequencies of the input signal and the cumulated hours of usage of the screen is displayed...
... been turned on the projector. • You cannot change any items listed above. About the Preset Memory No. When an unpreset signal is input for input signals (the preset memory). Signal type Lamp Timer Displays the model name (VPL-AW15 or VPL-AW10) and the serial number. Information Menu The Information menu displays the model name, serial number, the horizontal and vertical frequencies of the input signal and the cumulated hours of usage of the screen is displayed...
Operating Instructions
Page 51
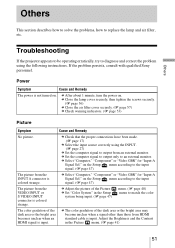
... the Picture c Set "Color System" in the Picture menu. (1 page 41) 51 Others Others This section describes how to solve the problems, how to diagnose and correct the problem using the INPUT. (1 page 27) c Set the computer signal to the input signal. (1 page 47) The picture from the VIDEO INPUT or S VIDEO INPUT connector is colored strange. Troubleshooting If the projector appears to be operating erratically, try to replace the lamp and air filter, etc. c Adjust the picture...
... the Picture c Set "Color System" in the Picture menu. (1 page 41) 51 Others Others This section describes how to solve the problems, how to diagnose and correct the problem using the INPUT. (1 page 27) c Set the computer signal to the input signal. (1 page 47) The picture from the VIDEO INPUT or S VIDEO INPUT connector is colored strange. Troubleshooting If the projector appears to be operating erratically, try to replace the lamp and air filter, etc. c Adjust the picture...
Operating Instructions
Page 52
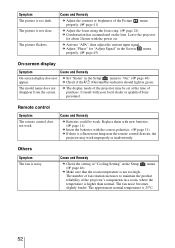
... Sony personnel. The model name does not disappear from the screen. The fan noise becomes slightly louder. c Check if the ?/1 (On/standby) indicator should light in the Setup menu. (1 page 46) c Make sure that the room temperature is a fluorescent lamp near the remote control detector, the projector may be weak. Cause and Remedy c Batteries could be set at the time of the Picture properly. (1 page 41) menu c Adjust the focus using the focus...
... Sony personnel. The model name does not disappear from the screen. The fan noise becomes slightly louder. c Check if the ?/1 (On/standby) indicator should light in the Setup menu. (1 page 46) c Make sure that the room temperature is a fluorescent lamp near the remote control detector, the projector may be weak. Cause and Remedy c Batteries could be set at the time of the Picture properly. (1 page 41) menu c Adjust the focus using the focus...
Operating Instructions
Page 53
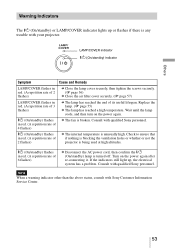
... the projector is being used at high altitudes. ?/1 (On/standby) flashes in red. (A repetition rate of 4 flashes) c The fan is turned off. LAMP/COVER indicator ?/1 (On/standby) indicator Symptom Cause and Remedy LAMP/COVER flashes in red. (A repetition rate of 2 flashes) c Close the lamp cover securely, then tighten the screws securely. (1 page 56) c Close the air filter cover securely. (1 page 57) LAMP/COVER flashes in red. (A repetition rate of 3 flashes) c The lamp has reached the end of 2 flashes) c The internal temperature is any trouble...
... the projector is being used at high altitudes. ?/1 (On/standby) flashes in red. (A repetition rate of 4 flashes) c The fan is turned off. LAMP/COVER indicator ?/1 (On/standby) indicator Symptom Cause and Remedy LAMP/COVER flashes in red. (A repetition rate of 2 flashes) c Close the lamp cover securely, then tighten the screws securely. (1 page 56) c Close the air filter cover securely. (1 page 57) LAMP/COVER flashes in red. (A repetition rate of 3 flashes) c The lamp has reached the end of 2 flashes) c The internal temperature is any trouble...
Operating Instructions
Page 54
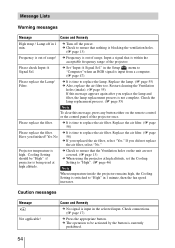
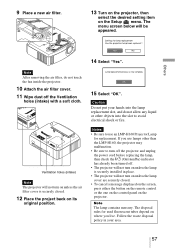
... air filter, select "Yes." c Turn off in the Setup menu to replace the air filter. Yes No c It is currently prohibited. 54 c The operation to be "High" if projector is not complete. Message Lists Warning messages Message Cause and Remedy High temp.! Lamp off the power. c Frequency is input from a computer. (1 page 47) Please replace the Lamp/ Filter. in 1 min. Replace the air filter. (1 page 58) Please replace the filter. Please check Input-A Signal Sel. c It is input in 1 minute, then the fan...
... air filter, select "Yes." c Turn off in the Setup menu to replace the air filter. Yes No c It is currently prohibited. 54 c The operation to be "High" if projector is not complete. Message Lists Warning messages Message Cause and Remedy High temp.! Lamp off the power. c Frequency is input from a computer. (1 page 47) Please replace the Lamp/ Filter. in 1 min. Replace the air filter. (1 page 58) Please replace the filter. Please check Input-A Signal Sel. c It is input in 1 minute, then the fan...
Operating Instructions
Page 55
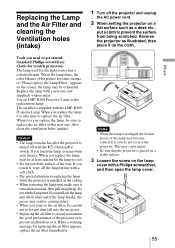
... the cloth. Also clean the ventilation holes (intake). Notes • When the lamp is also time to let any dust fall into the projector. • Replacing the air filter is supplied with a new one . Others Tools you replace the lamp, it on the lamp cover with the ?/1 (On/standby) switch. Replace the lamp with the LMP-H160 Projector Lamp. Whenever you remove the air filter, be careful not to replace the air filter. When you...
... the cloth. Also clean the ventilation holes (intake). Notes • When the lamp is also time to let any dust fall into the projector. • Replacing the air filter is supplied with a new one . Others Tools you replace the lamp, it on the lamp cover with the ?/1 (On/standby) switch. Replace the lamp with the LMP-H160 Projector Lamp. Whenever you remove the air filter, be careful not to replace the air filter. When you...
Operating Instructions
Page 57
... shock or fire. Ventilation holes (intake) Note The projector will not turn on unless the air filter cover is securely closed . • To cancel a message displayed on the screen, press either the button on the remote control or the one on the control panel on where you use an LMP-H160 Projector Lamp for used fluorescent tubes depend on the projector. If you live. The disposal rules for...
... shock or fire. Ventilation holes (intake) Note The projector will not turn on unless the air filter cover is securely closed . • To cancel a message displayed on the screen, press either the button on the remote control or the one on the control panel on where you use an LMP-H160 Projector Lamp for used fluorescent tubes depend on the projector. If you live. The disposal rules for...
Operating Instructions
Page 58
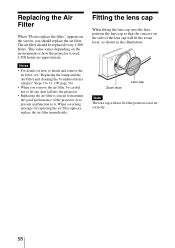
... projector is not set correctly. 58 When a warning message for replacing the air filter appears, replace the air filter immediately. Zoom lever Lens cap Note The lens cap will fit the zoom lever, as shown in the illustration. This value varies depending on how to attach and remove the air filter, see "Replacing the Lamp and the Air Filter and cleaning the Ventilation holes (intake)" Steps 7 to it. Replacing the Air Filter When "Please replace the filter...
... projector is not set correctly. 58 When a warning message for replacing the air filter appears, replace the air filter immediately. Zoom lever Lens cap Note The lens cap will fit the zoom lever, as shown in the illustration. This value varies depending on how to attach and remove the air filter, see "Replacing the Lamp and the Air Filter and cleaning the Ventilation holes (intake)" Steps 7 to it. Replacing the Air Filter When "Please replace the filter...
Operating Instructions
Page 60
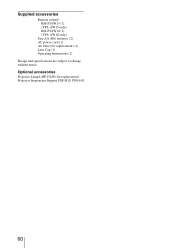
Optional accessories Projector Lamp LMP-H160 (for replacement) (1) Lens Cap (1) Operating Instructions (1) Design and specifications are subject to change without notice. Supplied accessories Remote control RM-PJAW15 (1) (VPL-AW15 only) RM-PJAW10 (1) (VPL-AW10 only) Size AA (R6) batteries (2) AC power cord (1) Air filter (for replacement) Projector Suspension Support PSS-H10, PSS-610 60
Optional accessories Projector Lamp LMP-H160 (for replacement) (1) Lens Cap (1) Operating Instructions (1) Design and specifications are subject to change without notice. Supplied accessories Remote control RM-PJAW15 (1) (VPL-AW15 only) RM-PJAW10 (1) (VPL-AW10 only) Size AA (R6) batteries (2) AC power cord (1) Air filter (for replacement) Projector Suspension Support PSS-H10, PSS-610 60
Operating Instructions
Page 70
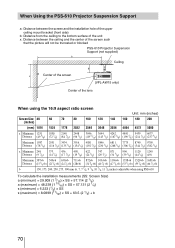
...-610 Projector Suspension Support a: Distance between the screen and the installation hole of the upper ceiling mount bracket (front side) b: Distance from the ceiling to the bottom surface of the unit x: Distance between the ceiling and the center of the screen such that the picture will not be truncated or blocked PSS-610 Projector Suspension Support (not supplied) Ceiling Center of the screen (VPL-AW15 only) Center of the lens When using...
...-610 Projector Suspension Support a: Distance between the screen and the installation hole of the upper ceiling mount bracket (front side) b: Distance from the ceiling to the bottom surface of the unit x: Distance between the ceiling and the center of the screen such that the picture will not be truncated or blocked PSS-610 Projector Suspension Support (not supplied) Ceiling Center of the screen (VPL-AW15 only) Center of the lens When using...


