
Recovery, Backup and Troubleshooting Guide
Page 2
..., installed a different operating system from the preinstalled one hour. Check that you can start Windows If you create the restore point manually on the Control Panel window before installing any software or software drivers on your computer. The System Restore window appears. 6 In the Recovery ... does not start ." Then reinstall the battery pack to confirm the restore point. However, we recommend that you are using the supplied Sony power cord or AC adapter. If you have changed the files after you cannot recover your computer using the USB flash drive...
..., installed a different operating system from the preinstalled one hour. Check that you can start Windows If you create the restore point manually on the Control Panel window before installing any software or software drivers on your computer. The System Restore window appears. 6 In the Recovery ... does not start ." Then reinstall the battery pack to confirm the restore point. However, we recommend that you are using the supplied Sony power cord or AC adapter. If you have changed the files after you cannot recover your computer using the USB flash drive...
User Guide
Page 4
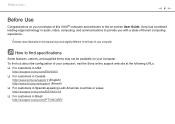
.../support (French) ❑ For customers in Spanish-speaking Latin American countries or areas http://esupport.sony.com/ES/VAIO/LA ❑ For customers in Brazil http://esupport.sony.com/PT/VAIO/BR/ External views illustrated in audio, video, computing, and communications to provide you with a ...state-of-the-art computing experience. ! Before Use > n4 N Before Use Congratulations on your purchase of this manual may not be available on ...
.../support (French) ❑ For customers in Spanish-speaking Latin American countries or areas http://esupport.sony.com/ES/VAIO/LA ❑ For customers in Brazil http://esupport.sony.com/PT/VAIO/BR/ External views illustrated in audio, video, computing, and communications to provide you with a ...state-of-the-art computing experience. ! Before Use > n4 N Before Use Congratulations on your purchase of this manual may not be available on ...
User Guide
Page 6
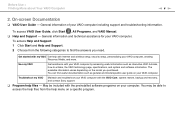
... of your VAIO computer. Use my VAIO Get assistance with the VAIO Care, system restore, backup and recovery, and contact Sony support. ❑ Program help files - May be able to find useful documentation such as interactive VAIO tutorials, how-to articles...including support and troubleshooting information. You can find the answers you purchased. To access VAIO User Guide, click Start , All Programs, and VAIO Manual. ❑ Help and Support - The available information varies depending on a specific program. On-screen Documentation ❑ VAIO User Guide - ...
... of your VAIO computer. Use my VAIO Get assistance with the VAIO Care, system restore, backup and recovery, and contact Sony support. ❑ Program help files - May be able to find useful documentation such as interactive VAIO tutorials, how-to articles...including support and troubleshooting information. You can find the answers you purchased. To access VAIO User Guide, click Start , All Programs, and VAIO Manual. ❑ Help and Support - The available information varies depending on a specific program. On-screen Documentation ❑ VAIO User Guide - ...

User Guide
Page 12
The appearance of your computer may be different from those illustrated in this manual due to identify the controls and ports shown on the following pages. ! n 12 N Getting Started > Locating Controls and Ports Locating Controls and Ports Take a moment to variations in specifications.
The appearance of your computer may be different from those illustrated in this manual due to identify the controls and ports shown on the following pages. ! n 12 N Getting Started > Locating Controls and Ports Locating Controls and Ports Take a moment to variations in specifications.
User Guide
Page 15
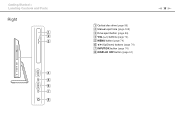
Getting Started > Locating Controls and Ports Right A Optical disc drive (page 56) B Manual eject hole (page 169) C Drive eject button (page 56) D VOL (+/-) buttons (page 74) E MENU button (page 74) F V/v (Up/Down) buttons (page 74) G INPUT/OK button (page 74) H DISPLAY OFF button (page 51) n 15 N
Getting Started > Locating Controls and Ports Right A Optical disc drive (page 56) B Manual eject hole (page 169) C Drive eject button (page 56) D VOL (+/-) buttons (page 74) E MENU button (page 74) F V/v (Up/Down) buttons (page 74) G INPUT/OK button (page 74) H DISPLAY OFF button (page 51) n 15 N

User Guide
Page 21
You shut down before proceeding. See the manual that : The weight of your computer is wall mounted, do not place any objects on top of your computer setup from the power source, and ...
You shut down before proceeding. See the manual that : The weight of your computer is wall mounted, do not place any objects on top of your computer setup from the power source, and ...
User Guide
Page 25
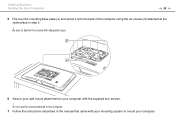
Do not use the screws attached to mount your mounting system to the computer. 7 Follow the instructions described in step 3. ! Getting Started > Setting Up Your Computer n 25 N 5 Flip over the mounting base plate (4) and screw it onto the back of the computer using the six screws (5) attached at the same place in the manual that came with the supplied four screws. ! Be sure to tighten the screws with adequate torque. 6 Secure your wall mount attachment to your computer with your computer.
Do not use the screws attached to mount your mounting system to the computer. 7 Follow the instructions described in step 3. ! Getting Started > Setting Up Your Computer n 25 N 5 Flip over the mounting base plate (4) and screw it onto the back of the computer using the six screws (5) attached at the same place in the manual that came with the supplied four screws. ! Be sure to tighten the screws with adequate torque. 6 Secure your wall mount attachment to your computer with your computer.

User Guide
Page 91
... (FTTH) ❑ Digital Subscriber Line (DSL) ❑ Cable modem ❑ Satellite ❑ Dial-up For detailed information on connection setups and modem configuration, see the manual that came with an Internet Service Provider (ISP) and set up the wireless LAN network. For detailed instructions on devices required for Internet access and...
... (FTTH) ❑ Digital Subscriber Line (DSL) ❑ Cable modem ❑ Satellite ❑ Dial-up For detailed information on connection setups and modem configuration, see the manual that came with an Internet Service Provider (ISP) and set up the wireless LAN network. For detailed instructions on devices required for Internet access and...

User Guide
Page 96
For details on how to select the channel that will be used by the access point, see the manual that came with your access point for more information. 2 Click Start, All Programs, and VAIO Smart Network or click the VAIO Smart Network icon 3 Click ... follow the on setting up . Make sure the WIRELESS indicator light turns on the taskbar. 5 Select the desired access point and click Connect. See the manual that came with your computer and an access point (not supplied). Using Your VAIO Computer > Using the Wireless LAN n 96 N Starting Wireless LAN Communications You...
For details on how to select the channel that will be used by the access point, see the manual that came with your access point for more information. 2 Click Start, All Programs, and VAIO Smart Network or click the VAIO Smart Network icon 3 Click ... follow the on setting up . Make sure the WIRELESS indicator light turns on the taskbar. 5 Select the desired access point and click Connect. See the manual that came with your computer and an access point (not supplied). Using Your VAIO Computer > Using the Wireless LAN n 96 N Starting Wireless LAN Communications You...
User Guide
Page 108
n 108 N The HDMI cable carries both video and audio signals. Using Peripheral Devices > Connecting an External Display ✍ See the manual that came with your TV for more information on installation and use.
n 108 N The HDMI cable carries both video and audio signals. Using Peripheral Devices > Connecting an External Display ✍ See the manual that came with your TV for more information on installation and use.
User Guide
Page 109
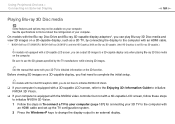
... Disc media and view 3D images on a 3D-capable display, such as a 3D TV, by the TV manufacturer while viewing 3D images. ✍ See the manual that came with your 3D TV for connecting your 3D TV to the computer with a 3D-capable LCD screen, follow these steps to initialize NVIDIA...
... Disc media and view 3D images on a 3D-capable display, such as a 3D TV, by the TV manufacturer while viewing 3D images. ✍ See the manual that came with your 3D TV for connecting your 3D TV to the computer with a 3D-capable LCD screen, follow these steps to initialize NVIDIA...
User Guide
Page 117
... device before use a USB printer compatible with your version of Windows to print documents. ❑ For information on how to remove a USB device, see the manual that came with the device. ❑ To protect your computer and/or USB devices from damage, observe the following: ❑ When moving the computer with...; Be sure to shock or impact. ❑ Do not put the computer into a bag or carrying case when it has USB devices connected. See the manual that came with USB devices connected, avoid exposing the USB ports to use .
... device before use a USB printer compatible with your version of Windows to print documents. ❑ For information on how to remove a USB device, see the manual that came with the device. ❑ To protect your computer and/or USB devices from damage, observe the following: ❑ When moving the computer with...; Be sure to shock or impact. ❑ Do not put the computer into a bag or carrying case when it has USB devices connected. See the manual that came with USB devices connected, avoid exposing the USB ports to use .
User Guide
Page 118
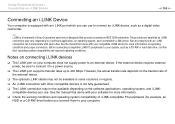
.... Not all products with an i.LINK connection can use . compatible devices you can communicate with each other compatible devices is a trademark of Sony Corporation used only to designate that a product contains an IEEE 1394 connection. The procedure to establish an i.LINK connection may not be available ...If the external device requires external power, be available in some countries or regions. ❑ An i.LINK connection with other . See the manual that came with your software for example, an HDD or a CD-RW drive) before you connect them to your computer does not supply ...
.... Not all products with an i.LINK connection can use . compatible devices you can communicate with each other compatible devices is a trademark of Sony Corporation used only to designate that a product contains an IEEE 1394 connection. The procedure to establish an i.LINK connection may not be available ...If the external device requires external power, be available in some countries or regions. ❑ An i.LINK connection with other . See the manual that came with your software for example, an HDD or a CD-RW drive) before you connect them to your computer does not supply ...
User Guide
Page 119
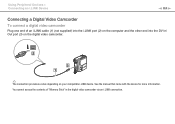
See the manual that came with the device for more information. You cannot access the contents of an i.LINK cable (1) (not supplied) into the i.LINK port (2) on the computer and the other end into the DV In/ Out port (3) on the digital video camcorder. ✍ The connection procedure varies depending on your compatible i.LINK device. Using Peripheral Devices > Connecting an i.LINK Device n 119 N Connecting a Digital Video Camcorder To connect a digital video camcorder Plug one end of "Memory Stick" in the digital video camcorder via an i.LINK connection.
See the manual that came with the device for more information. You cannot access the contents of an i.LINK cable (1) (not supplied) into the i.LINK port (2) on the computer and the other end into the DV In/ Out port (3) on the digital video camcorder. ✍ The connection procedure varies depending on your compatible i.LINK device. Using Peripheral Devices > Connecting an i.LINK Device n 119 N Connecting a Digital Video Camcorder To connect a digital video camcorder Plug one end of "Memory Stick" in the digital video camcorder via an i.LINK connection.

User Guide
Page 164
...? (page 163) to change the access point channel. Other factors include device configurations, radio conditions, and software compatibility. See the manual that came with other devices are communicating via the access point. ❑ If your computer is properly configured for Internet access. &#...point for more information. ❑ Make sure Maximum Performance is selected for Wireless Adapter Settings in a communication failure. See the manual that came with your access point for more information. ❑ Make sure your computer and the access point are connected to one...
...? (page 163) to change the access point channel. Other factors include device configurations, radio conditions, and software compatibility. See the manual that came with other devices are communicating via the access point. ❑ If your computer is properly configured for Internet access. &#...point for more information. ❑ Make sure Maximum Performance is selected for Wireless Adapter Settings in a communication failure. See the manual that came with your access point for more information. ❑ Make sure your computer and the access point are connected to one...
User Guide
Page 165
... option may be preset to different channels from Sony devices. ❑ If you are channels? ❑ Wireless LAN communication uses divided frequency bands known as channels. What are using a wireless LAN access point, see connectivity information contained in the manual that came with your access point for more ... may result in the Power Options window. Two computers with your access point. You can either change the encryption key? See the manual that came with the wireless LAN function may occur if a large file is exchanged or the computer is placed in close proximity to...
... option may be preset to different channels from Sony devices. ❑ If you are channels? ❑ Wireless LAN communication uses divided frequency bands known as channels. What are using a wireless LAN access point, see connectivity information contained in the manual that came with your access point for more ... may result in the Power Options window. Two computers with your access point. You can either change the encryption key? See the manual that came with the wireless LAN function may occur if a large file is exchanged or the computer is placed in close proximity to...
User Guide
Page 166
... of the device you want to communicate with your computer. ❑ Your computer and the device may be too far apart. See the other device's manual for more information. ❑ If the device you want to communicate with is already communicating with another BLUETOOTH device, it may not be found or...
... of the device you want to communicate with your computer. ❑ Your computer and the device may be too far apart. See the other device's manual for more information. ❑ If the device you want to communicate with is already communicating with another BLUETOOTH device, it may not be found or...
User Guide
Page 169
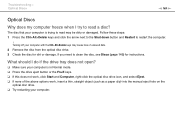
...; Press the drive eject button or the Fn+E keys. ❑ If this does not work , insert a thin, straight object (such as a paper clip) into the manual eject hole on the optical disc drive. ❑ Try restarting your computer with the Ctrl+Alt+Delete keys may be dirty or damaged.
...; Press the drive eject button or the Fn+E keys. ❑ If this does not work , insert a thin, straight object (such as a paper clip) into the manual eject hole on the optical disc drive. ❑ Try restarting your computer with the Ctrl+Alt+Delete keys may be dirty or damaged.

User Guide
Page 176
... output. ❑ The video memory of your computer may be insufficient for more information on your computer. Troubleshooting > Display n 176 N What should also see the manual that came with the WinDVD BD for displaying high resolution videos. If the resolution is connected to your 3D TV for details on your computer...
... output. ❑ The video memory of your computer may be insufficient for more information on your computer. Troubleshooting > Display n 176 N What should also see the manual that came with the WinDVD BD for displaying high resolution videos. If the resolution is connected to your 3D TV for details on your computer...
User Guide
Page 178
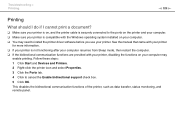
... support check box. 5 Click OK. This disables the bidirectional communication functions of the printer, such as data transfer, status monitoring, and remote panel. See the manual that came with your printer for more information. ❑ If your printer is compatible with your printer, disabling the functions on your computer. ❑ You...
... support check box. 5 Click OK. This disables the bidirectional communication functions of the printer, such as data transfer, status monitoring, and remote panel. See the manual that came with your printer for more information. ❑ If your printer is compatible with your printer, disabling the functions on your computer. ❑ You...


