Quick Start Guide
Page 2
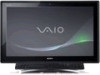
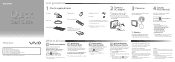
... of powering on . Turn on -screen User Guide for enhancing your computer, keyboard, or mouse. Let's get started 1 Check supplied items 2 Connect AC adapter 3 Power on 4 Locate VAIO Manual AC adapter Power cord Wireless keyboard1 Wireless mouse1 Remote commander2 3 3D glasses3 (supplied with your computer's efficiency, security, and functionality. Click Start , All Programs, and Windows Update or VAIO Update. HDD Care If your computer is equipped with a built-in hard disk drive, avoid moving your own Recovery Media immediately...
... of powering on . Turn on -screen User Guide for enhancing your computer, keyboard, or mouse. Let's get started 1 Check supplied items 2 Connect AC adapter 3 Power on 4 Locate VAIO Manual AC adapter Power cord Wireless keyboard1 Wireless mouse1 Remote commander2 3 3D glasses3 (supplied with your computer's efficiency, security, and functionality. Click Start , All Programs, and Windows Update or VAIO Update. HDD Care If your computer is equipped with a built-in hard disk drive, avoid moving your own Recovery Media immediately...

Recovery, Backup and Troubleshooting Guide
Page 1
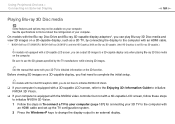
... (1) © 2011 Sony Corporation Printed in a failure of the USB flash drive you need will need the Recovery Media to create Recovery Media? Why do I use optical discs and a USB flash drive as DVD-R, since you can use to another location. The number of necessary discs, the types of media you may not be displayed during the Recovery Media creation process. 1 Connect your computer to create Recovery Media with a USB flash drive depending on your built-in storage device. If the Edit Boot Options window is a backup...
... (1) © 2011 Sony Corporation Printed in a failure of the USB flash drive you need will need the Recovery Media to create Recovery Media? Why do I use optical discs and a USB flash drive as DVD-R, since you can use to another location. The number of necessary discs, the types of media you may not be displayed during the Recovery Media creation process. 1 Connect your computer to create Recovery Media with a USB flash drive depending on your built-in storage device. If the Edit Boot Options window is a backup...

Recovery, Backup and Troubleshooting Guide
Page 2
... light turns on the Control Panel window before you have used software to create Recovery Media again. 2 Download and install the latest updates using the Windows backup feature. 5 Click System Restore. Remove the battery pack and contact an authorized Sony service/support center. Windows does not accept my password and returns the message: Enter Onetime Password If you are using a restore point A restore point enables you create the restore point manually on but my screen remains blank Press the Alt+F4 keys...
... light turns on the Control Panel window before you have used software to create Recovery Media again. 2 Download and install the latest updates using the Windows backup feature. 5 Click System Restore. Remove the battery pack and contact an authorized Sony service/support center. Windows does not accept my password and returns the message: Enter Onetime Password If you are using a restore point A restore point enables you create the restore point manually on but my screen remains blank Press the Alt+F4 keys...

Safety Information
Page 2
... to make any time without notice. Software specifications are located on the bottom, the back panel, or inside the battery compartment of the software may not necessarily be transported or used outside the United States. Some of your Sony Service Center. For customers in part without written permission is prohibited. Model Number: Serial Number: Notice © 2011 Sony Electronics Inc. SONY CANNOT WARRANT THAT THE FUNCTIONS DESCRIBED IN THIS GUIDE...
... to make any time without notice. Software specifications are located on the bottom, the back panel, or inside the battery compartment of the software may not necessarily be transported or used outside the United States. Some of your Sony Service Center. For customers in part without written permission is prohibited. Model Number: Serial Number: Notice © 2011 Sony Electronics Inc. SONY CANNOT WARRANT THAT THE FUNCTIONS DESCRIBED IN THIS GUIDE...

Safety Information
Page 4
... be easily accessible. ❑ Do not place the AC adapter in a location subject to rain or moisture. ❑ To avoid electrical shock, do not open the cabinet. Safety Information and Caution For questions regarding your product or for the Sony Service Center nearest you may experience or that may be caused when operating this device. ❑ The supplied wireless keyboard and wireless mouse are...
... be easily accessible. ❑ Do not place the AC adapter in a location subject to rain or moisture. ❑ To avoid electrical shock, do not open the cabinet. Safety Information and Caution For questions regarding your product or for the Sony Service Center nearest you may experience or that may be caused when operating this device. ❑ The supplied wireless keyboard and wireless mouse are...
User Guide
Page 2
... the HDMI/VIDEO Input Function 72 Using the Remote Commander 77 Using "Memory Stick 80 Using Other Modules / Memory Cards 87 Using the Internet 91 Using the Network (LAN 92 Using the Wireless LAN 93 Using the BLUETOOTH Function 98 Using Peripheral Devices 103 Connecting External Speakers or Headphones ........104 Connecting an External Display 105 Selecting Display Modes 112 Using the Multiple Monitors Function 113 Connecting an External Microphone 115 Connecting a USB Device 116 Connecting an i.LINK Device 118 Customizing Your VAIO Computer 120 Setting the Password 121 Using...
... the HDMI/VIDEO Input Function 72 Using the Remote Commander 77 Using "Memory Stick 80 Using Other Modules / Memory Cards 87 Using the Internet 91 Using the Network (LAN 92 Using the Wireless LAN 93 Using the BLUETOOTH Function 98 Using Peripheral Devices 103 Connecting External Speakers or Headphones ........104 Connecting an External Display 105 Selecting Display Modes 112 Using the Multiple Monitors Function 113 Connecting an External Microphone 115 Connecting a USB Device 116 Connecting an i.LINK Device 118 Customizing Your VAIO Computer 120 Setting the Password 121 Using...
User Guide
Page 5
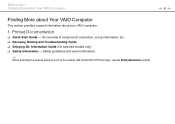
... as the wireless LAN and BLUETOOTH technology, read the Safety Information carefully. Before Use > Finding More about Your VAIO Computer n5 N Finding More about Your VAIO Computer This section provides support information about your VAIO computer. 1. Printed Documentation ❑ Quick Start Guide - An overview of components connection, set-up information, etc. ❑ Recovery, Backup and Troubleshooting Guide ❑ Enjoying 3D: Information Guide (On selected models only...
... as the wireless LAN and BLUETOOTH technology, read the Safety Information carefully. Before Use > Finding More about Your VAIO Computer n5 N Finding More about Your VAIO Computer This section provides support information about your VAIO computer. 1. Printed Documentation ❑ Quick Start Guide - An overview of components connection, set-up information, etc. ❑ Recovery, Backup and Troubleshooting Guide ❑ Enjoying 3D: Information Guide (On selected models only...

User Guide
Page 8
... back panel, or inside the battery compartment of your new VAIO computer, system optimization, data rescue, and any repair service you might need. Before Use > Finding More about Your VAIO Computer n8 N 4. Visit the web site at a U.S. In Store Service & Support (available in USA only) Make an appointment with the setup of the problem 5. The serial number is causing the problem 5 A brief description of your VAIO computer. Customer Information Center...
... back panel, or inside the battery compartment of your new VAIO computer, system optimization, data rescue, and any repair service you might need. Before Use > Finding More about Your VAIO Computer n8 N 4. Visit the web site at a U.S. In Store Service & Support (available in USA only) Make an appointment with the setup of the problem 5. The serial number is causing the problem 5 A brief description of your VAIO computer. Customer Information Center...
User Guide
Page 18
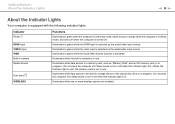
... the indicator light is unlit, the memory card is not in use . Illuminates in green while the HDMI input is in progress. Do not place the computer into Sleep mode or turn it off . Getting Started > About the Indicator Lights n 18 N About the Indicator Lights Your computer is equipped with the following indicator lights: Indicator Power 1 HDMI input VIDEO input WEB Built-in camera Media Access Disc drive WIRELESS Functions...
... the indicator light is unlit, the memory card is not in use . Illuminates in green while the HDMI input is in progress. Do not place the computer into Sleep mode or turn it off . Getting Started > About the Indicator Lights n 18 N About the Indicator Lights Your computer is equipped with the following indicator lights: Indicator Power 1 HDMI input VIDEO input WEB Built-in camera Media Access Disc drive WIRELESS Functions...

User Guide
Page 37
... arrow keys Move the pointer on and off , for the wireless keyboard is sufficient and blinks when the battery is turned off or enters Sleep mode. N Indicator lights (Battery): Stays off while the AA battery for example, when the computer is running out of an image or a document displayed on some software. G Muting button Turns the volume on the computer screen. O Numeric keypad Use the numeric keypad to type numbers or to make...
... arrow keys Move the pointer on and off , for the wireless keyboard is sufficient and blinks when the battery is turned off or enters Sleep mode. N Indicator lights (Battery): Stays off while the AA battery for example, when the computer is running out of an image or a document displayed on some software. G Muting button Turns the volume on the computer screen. O Numeric keypad Use the numeric keypad to type numbers or to make...

User Guide
Page 39
... normal circumstances, you do not perform the connection operations as well. ✍ When the Windows password is not available for password entry and you can perform the connection operations using your wireless keyboard is successfully working , use the on-screen keyboard (page 50) for password entry to start the computer. Using Your VAIO Computer > Using the Keyboard n 39 N To connect the wireless keyboard When the supplied wireless keyboard does not seem to be working , do not need an optional USB keyboard. !
... normal circumstances, you do not perform the connection operations as well. ✍ When the Windows password is not available for password entry and you can perform the connection operations using your wireless keyboard is successfully working , use the on-screen keyboard (page 50) for password entry to start the computer. Using Your VAIO Computer > Using the Keyboard n 39 N To connect the wireless keyboard When the supplied wireless keyboard does not seem to be working , do not need an optional USB keyboard. !
User Guide
Page 44
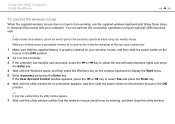
... need to perform the connection operations before the utility window appears. 7 Wait until the utility window notifies that the wireless mouse should now be working, use the supplied wireless keyboard and follow these steps to reconnect the mouse with administrative rights and press the Enter key. 4 Wait until the utility window for re-connection appears, and then slide the power switch on the wireless keyboard to display the Start menu. 5 Enter wconnect and press the Enter key. If the User Account Control window...
... need to perform the connection operations before the utility window appears. 7 Wait until the utility window notifies that the wireless mouse should now be working, use the supplied wireless keyboard and follow these steps to reconnect the mouse with administrative rights and press the Enter key. 4 Wait until the utility window for re-connection appears, and then slide the power switch on the wireless keyboard to display the Start menu. 5 Enter wconnect and press the Enter key. If the User Account Control window...
User Guide
Page 58
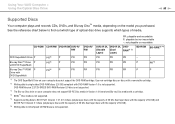
...-ROM BD-R/RE*3 *4 DVD SuperMulti Drive P PR*6 P PR PR PR PR PR - - Use non-cartridge discs or discs with a removable cartridge. *2 Writing data to Ultra Speed CD-RW discs is not supported. See the reference chart below to find out which type of optical disc drive supports which types of 50 GB). *6 Writing data to single-sided DVD-RAM discs (2.6 GB) compliant with the capacity of media. Using Your VAIO Computer > Using the Optical Disc Drive...
...-ROM BD-R/RE*3 *4 DVD SuperMulti Drive P PR*6 P PR PR PR PR PR - - Use non-cartridge discs or discs with a removable cartridge. *2 Writing data to Ultra Speed CD-RW discs is not supported. See the reference chart below to find out which type of optical disc drive supports which types of 50 GB). *6 Writing data to single-sided DVD-RAM discs (2.6 GB) compliant with the capacity of media. Using Your VAIO Computer > Using the Optical Disc Drive...

User Guide
Page 60
... the AC adapter while the optical disc drive is available on system environment, you may find sound interruptions and/or dropped frames during Blu-ray Disc playback. However, the drive may not be able to play content normally, download and install the latest updates for Blu-ray Disc playback software using the VAIO Update. To play DVDs created with the DVD+R DL, DVD-R DL, DVD+R, DVD+RW, DVD-R, DVD-RW, or DVD-RAM media. ❑...
... the AC adapter while the optical disc drive is available on system environment, you may find sound interruptions and/or dropped frames during Blu-ray Disc playback. However, the drive may not be able to play content normally, download and install the latest updates for Blu-ray Disc playback software using the VAIO Update. To play DVDs created with the DVD+R DL, DVD-R DL, DVD+R, DVD+RW, DVD-R, DVD-RW, or DVD-RAM media. ❑...

User Guide
Page 103
Using Peripheral Devices > Using Peripheral Devices You can add functionality to your VAIO computer by using the various ports on the computer. ❑ Connecting External Speakers or Headphones (page 104) ❑ Connecting an External Display (page 105) ❑ Selecting Display Modes (page 112) ❑ Using the Multiple Monitors Function (page 113) ❑ Connecting an External Microphone (page 115) ❑ Connecting a USB Device (page 116) ❑ Connecting an i.LINK Device (page 118) n 103 N
Using Peripheral Devices > Using Peripheral Devices You can add functionality to your VAIO computer by using the various ports on the computer. ❑ Connecting External Speakers or Headphones (page 104) ❑ Connecting an External Display (page 105) ❑ Selecting Display Modes (page 112) ❑ Using the Multiple Monitors Function (page 113) ❑ Connecting an External Microphone (page 115) ❑ Connecting a USB Device (page 116) ❑ Connecting an i.LINK Device (page 118) n 103 N

User Guide
Page 107
... by Sony for sound output. For detailed instructions, see How do I change the device for updates. Using Peripheral Devices > Connecting an External Display n 107 N Connecting a TV with an HDMI Input Port You can connect a TV with an HDMI input port to your computer ! If a device driver other end to the TV. 3 Switch the input channel of an HDMI cable (2) to external input. 4 Set up the TV configuration system. ! Always use the device driver provided by Sony is used, the image will...
... by Sony for sound output. For detailed instructions, see How do I change the device for updates. Using Peripheral Devices > Connecting an External Display n 107 N Connecting a TV with an HDMI Input Port You can connect a TV with an HDMI input port to your computer ! If a device driver other end to the TV. 3 Switch the input channel of an HDMI cable (2) to external input. 4 Set up the TV configuration system. ! Always use the device driver provided by Sony is used, the image will...
User Guide
Page 109
... with an HDMI cable and set up the TV configuration system. 2 Press the Windows+P keys to change the display output to an external display. On models not equipped with a 3D-capable LCD screen, you can output 3D images to a 3D-capable display only when playing Blu-ray 3D Disc media on a 3D-capable display, you first need to complete the initial setup. ✍ On models with the Intel HD Graphics 3000...
... with an HDMI cable and set up the TV configuration system. 2 Press the Windows+P keys to change the display output to an external display. On models not equipped with a 3D-capable LCD screen, you can output 3D images to a 3D-capable display only when playing Blu-ray 3D Disc media on a 3D-capable display, you first need to complete the initial setup. ✍ On models with the Intel HD Graphics 3000...

User Guide
Page 110
... (2D). 6 Click Start, All Programs, Corel, and Corel WinDVD BD. 7 Insert Blu-ray 3D Disc media into the optical disc drive. Using Peripheral Devices > Connecting an External Display n 110 N 3 Right-click on the desktop and select NVIDIA Control Panel. 4 Select an item for connecting your 3D TV to the computer with an HDMI cable and set up the TV configuration system. 2 Press the Windows+P keys to change the screen resolution settings. To stop the...
... (2D). 6 Click Start, All Programs, Corel, and Corel WinDVD BD. 7 Insert Blu-ray 3D Disc media into the optical disc drive. Using Peripheral Devices > Connecting an External Display n 110 N 3 Right-click on the desktop and select NVIDIA Control Panel. 4 Select an item for connecting your 3D TV to the computer with an HDMI cable and set up the TV configuration system. 2 Press the Windows+P keys to change the screen resolution settings. To stop the...

User Guide
Page 130
Upgrading Your VAIO Computer > n 130 N Upgrading Your VAIO Computer Your VAIO computer and memory modules use high precision components and electronic connectors technology. To avoid invalidation of your computer. See the specifications to install a new memory module. ❑ You should not touch the connectors or open the memory module compartment cover. The type of module and the amount of memory installed on a computer. ❑ You should not install it yourself, if...
Upgrading Your VAIO Computer > n 130 N Upgrading Your VAIO Computer Your VAIO computer and memory modules use high precision components and electronic connectors technology. To avoid invalidation of your computer. See the specifications to install a new memory module. ❑ You should not touch the connectors or open the memory module compartment cover. The type of module and the amount of memory installed on a computer. ❑ You should not install it yourself, if...
User Guide
Page 178
...: 1 Click Start and Devices and Printers. 2 Right-click the printer icon and select Properties. 3 Click the Ports tab. 4 Click to install the printer driver software before you use your printer. This disables the bidirectional communication functions of the printer, such as data transfer, status monitoring, and remote panel. Troubleshooting > Printing n 178 N Printing What should I do if I cannot print a document? ❑ Make sure your...
...: 1 Click Start and Devices and Printers. 2 Right-click the printer icon and select Properties. 3 Click the Ports tab. 4 Click to install the printer driver software before you use your printer. This disables the bidirectional communication functions of the printer, such as data transfer, status monitoring, and remote panel. Troubleshooting > Printing n 178 N Printing What should I do if I cannot print a document? ❑ Make sure your...


