
Safety Information
Page 2
... Canada Owner's Record The model number and serial number are subject to change without notice and may not be transported or used outside the United States. SONY ELECTRONICS INC. This product contains software owned by Sony and licensed by the terms of your Sony Service Center. Software specifications are located on the bottom, the back panel, or inside the battery compartment of a separate user license agreement. Model Number: Serial Number: Notice © 2011 Sony Electronics...
... Canada Owner's Record The model number and serial number are subject to change without notice and may not be transported or used outside the United States. SONY ELECTRONICS INC. This product contains software owned by Sony and licensed by the terms of your Sony Service Center. Software specifications are located on the bottom, the back panel, or inside the battery compartment of a separate user license agreement. Model Number: Serial Number: Notice © 2011 Sony Electronics...
Safety Information
Page 4
... may be caused when operating this device. ❑ The supplied wireless keyboard and wireless mouse are not magnetically shielded; Remove the AC adapter away from the pacemaker. ❑ Sony is unlit before putting the computer into a bag or a carrying case. ❑ When holding the computer, be sure to wait until it completely, unplug the AC adapter or the power cable from mains voltage. moisture...
... may be caused when operating this device. ❑ The supplied wireless keyboard and wireless mouse are not magnetically shielded; Remove the AC adapter away from the pacemaker. ❑ Sony is unlit before putting the computer into a bag or a carrying case. ❑ When holding the computer, be sure to wait until it completely, unplug the AC adapter or the power cable from mains voltage. moisture...
User Guide
Page 2
... the HDMI/VIDEO Input Function 69 Using the Remote Commander 74 Using "Memory Stick 77 Using Other Modules / Memory Cards 84 Using the Internet 88 Using the Network (LAN 89 Using the Wireless LAN 90 Using the BLUETOOTH Function 95 Using Peripheral Devices 100 Connecting External Speakers or Headphones ........101 Connecting an External Display 102 Selecting Display Modes 106 Using the Multiple Monitors Function 107 Connecting an External Microphone 109 Connecting a USB Device 110 Connecting an i.LINK Device 112 Customizing Your VAIO Computer 114 Setting the Password 115 Using...
... the HDMI/VIDEO Input Function 69 Using the Remote Commander 74 Using "Memory Stick 77 Using Other Modules / Memory Cards 84 Using the Internet 88 Using the Network (LAN 89 Using the Wireless LAN 90 Using the BLUETOOTH Function 95 Using Peripheral Devices 100 Connecting External Speakers or Headphones ........101 Connecting an External Display 102 Selecting Display Modes 106 Using the Multiple Monitors Function 107 Connecting an External Microphone 109 Connecting a USB Device 110 Connecting an i.LINK Device 112 Customizing Your VAIO Computer 114 Setting the Password 115 Using...

User Guide
Page 5
Printed Documentation ❑ Quick Start Guide - Before Use > Finding More about Your VAIO Computer n5 N Finding More about Your VAIO Computer This section provides support information about your VAIO computer. 1. An overview of components connection, set-up information, etc. ❑ Recovery, Backup and Troubleshooting Guide ❑ Safety Information - Safety guidelines and owner information. ✍ Before activating the wireless functions such as the wireless LAN and BLUETOOTH technology, read the Safety Information carefully.
Printed Documentation ❑ Quick Start Guide - Before Use > Finding More about Your VAIO Computer n5 N Finding More about Your VAIO Computer This section provides support information about your VAIO computer. 1. An overview of components connection, set-up information, etc. ❑ Recovery, Backup and Troubleshooting Guide ❑ Safety Information - Safety guidelines and owner information. ✍ Before activating the wireless functions such as the wireless LAN and BLUETOOTH technology, read the Safety Information carefully.

User Guide
Page 8
... panel, or inside the battery compartment of the number below the barcode. 3 The operating system on the Sony online support web site. In order to find the information you might need. Customer Information Center If you do not find the nearest location. Sony Style store and get personalized service and support for at a U.S. In Store Service & Support (available in USA only) Make an appointment with the setup...
... panel, or inside the battery compartment of the number below the barcode. 3 The operating system on the Sony online support web site. In order to find the information you might need. Customer Information Center If you do not find the nearest location. Sony Style store and get personalized service and support for at a U.S. In Store Service & Support (available in USA only) Make an appointment with the setup...

User Guide
Page 37
... Mode (page 27). K E key* Ejects the optical disc drive tray when used in ). N Indicator lights (Battery): Stays off . Press to make the view look smaller and further away (zoom out). See the help file included with the VAIO Control Center for the wireless keyboard is sufficient and blinks when the battery is running out of power. (Caps lock): Turns on the computer screen. J Windows key Displays the Start menu. Press to perform basic math calculations. * Disabled...
... Mode (page 27). K E key* Ejects the optical disc drive tray when used in ). N Indicator lights (Battery): Stays off . Press to make the view look smaller and further away (zoom out). See the help file included with the VAIO Control Center for the wireless keyboard is sufficient and blinks when the battery is running out of power. (Caps lock): Turns on the computer screen. J Windows key Displays the Start menu. Press to perform basic math calculations. * Disabled...

User Guide
Page 39
... the on -screen keyboard (page 50) for password entry and you can perform the connection operations using an optional USB keyboard as this may cause a malfunction. 1 Make sure that the supplied battery is properly installed on your wireless keyboard, and then slide the power switch on the keyboard to the OFF position. 2 Turn on -screen keyboard is set on your computer, you need to perform the connection operations before using your computer. If the Windows password is not...
... the on -screen keyboard (page 50) for password entry and you can perform the connection operations using an optional USB keyboard as this may cause a malfunction. 1 Make sure that the supplied battery is properly installed on your wireless keyboard, and then slide the power switch on the keyboard to the OFF position. 2 Turn on -screen keyboard is set on your computer, you need to perform the connection operations before using your computer. If the Windows password is not...

User Guide
Page 44
... the Enter key. 4 Wait until the utility window notifies that the supplied battery is successfully working, do not need to perform the connection operations before using an optional USB mouse as this may take a while before the utility window appears. 7 Wait until the Windows starts, and then press the Windows key on the wireless keyboard to display the Start menu. 5 Enter wconnect and press the Enter key. You can perform the connection operations using your wireless mouse, and then slide the power switch on the mouse...
... the Enter key. 4 Wait until the utility window notifies that the supplied battery is successfully working, do not need to perform the connection operations before using an optional USB mouse as this may take a while before the utility window appears. 7 Wait until the Windows starts, and then press the Windows key on the wireless keyboard to display the Start menu. 5 Enter wconnect and press the Enter key. You can perform the connection operations using your wireless mouse, and then slide the power switch on the mouse...

User Guide
Page 57
... not supported. Using Your VAIO Computer > Using the Optical Disc Drive n 57 N Supported Discs Your computer plays and records CDs, DVDs, and Blu-ray Disc™ media, depending on your computer does not support BD-RE Disc media in Version 1.0 format and Blu-ray Disc media with a cartridge. *4 Supports writing data to find out which type of optical disc drive supports which types of 25 GB, dual-layer discs with DVD-RAM Version 1.0 is not supported. DVD-RAM Version 2.2/12X-SPEED DVD-RAM Revision 5.0 disc...
... not supported. Using Your VAIO Computer > Using the Optical Disc Drive n 57 N Supported Discs Your computer plays and records CDs, DVDs, and Blu-ray Disc™ media, depending on your computer does not support BD-RE Disc media in Version 1.0 format and Blu-ray Disc media with a cartridge. *4 Supports writing data to find out which type of optical disc drive supports which types of 25 GB, dual-layer discs with DVD-RAM Version 1.0 is not supported. DVD-RAM Version 2.2/12X-SPEED DVD-RAM Revision 5.0 disc...

User Guide
Page 59
Do not use circular discs. Using Your VAIO Computer > Using the Optical Disc Drive n 59 N Notes on Using the Optical Disc Drive Notes on your computer. To play audio CDs created with the CD-R or CD-RW media. ❑ Some DVD players and computer optical disc drives may become unstable during AVC HD playback. ❑ Do not place your computer into the power saving mode while your computer while the optical disc drive is...
Do not use circular discs. Using Your VAIO Computer > Using the Optical Disc Drive n 59 N Notes on Using the Optical Disc Drive Notes on your computer. To play audio CDs created with the CD-R or CD-RW media. ❑ Some DVD players and computer optical disc drives may become unstable during AVC HD playback. ❑ Do not place your computer into the power saving mode while your computer while the optical disc drive is...
User Guide
Page 100
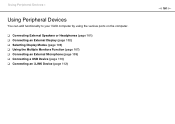
Using Peripheral Devices > Using Peripheral Devices You can add functionality to your VAIO computer by using the various ports on the computer. ❑ Connecting External Speakers or Headphones (page 101) ❑ Connecting an External Display (page 102) ❑ Selecting Display Modes (page 106) ❑ Using the Multiple Monitors Function (page 107) ❑ Connecting an External Microphone (page 109) ❑ Connecting a USB Device (page 110) ❑ Connecting an i.LINK Device (page 112) n 100 N
Using Peripheral Devices > Using Peripheral Devices You can add functionality to your VAIO computer by using the various ports on the computer. ❑ Connecting External Speakers or Headphones (page 101) ❑ Connecting an External Display (page 102) ❑ Selecting Display Modes (page 106) ❑ Using the Multiple Monitors Function (page 107) ❑ Connecting an External Microphone (page 109) ❑ Connecting a USB Device (page 110) ❑ Connecting an i.LINK Device (page 112) n 100 N

User Guide
Page 101
Turn down the volume of the speakers before you turn them on. Connect external speakers (1) to your speakers are designed for computer use. ! Using Peripheral Devices > Connecting External Speakers or Headphones n 101 N Connecting External Speakers or Headphones You can connect external sound output devices (not supplied), such as speakers or headphones, to the headphones jack (2) i with a speaker cable (3) (not supplied). To connect external speakers ✍ Make sure your computer.
Turn down the volume of the speakers before you turn them on. Connect external speakers (1) to your speakers are designed for computer use. ! Using Peripheral Devices > Connecting External Speakers or Headphones n 101 N Connecting External Speakers or Headphones You can connect external sound output devices (not supplied), such as speakers or headphones, to the headphones jack (2) i with a speaker cable (3) (not supplied). To connect external speakers ✍ Make sure your computer.
User Guide
Page 104
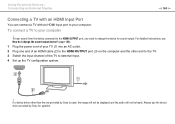
... AC outlet. 2 Plug one end of the TV to the HDMI OUTPUT port (3) on the computer and the other than the one provided by Sony for sound output. For detailed instructions, see How do I change the device for updates. If a device driver other end to the TV. 3 Switch the input channel of an HDMI cable (2) to external input. 4 Set up the TV configuration system. ! To connect a TV to...
... AC outlet. 2 Plug one end of the TV to the HDMI OUTPUT port (3) on the computer and the other than the one provided by Sony for sound output. For detailed instructions, see How do I change the device for updates. If a device driver other end to the TV. 3 Switch the input channel of an HDMI cable (2) to external input. 4 Set up the TV configuration system. ! To connect a TV to...
User Guide
Page 117
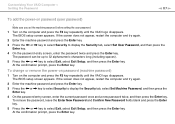
... current password once and a new password twice, and then press the Enter key. To remove the password, leave the Enter New Password and Confirm New Password fields blank and press the Enter key. 5 Press the < or , key to select Exit, select Exit Setup, and then press the Enter key. The BIOS setup screen appears. To change or remove the power-on password (machine password) 1 Turn on the computer and press the F2 key repeatedly until the VAIO logo disappears. The BIOS setup screen...
... current password once and a new password twice, and then press the Enter key. To remove the password, leave the Enter New Password and Confirm New Password fields blank and press the Enter key. 5 Press the < or , key to select Exit, select Exit Setup, and then press the Enter key. The BIOS setup screen appears. To change or remove the power-on password (machine password) 1 Turn on the computer and press the F2 key repeatedly until the VAIO logo disappears. The BIOS setup screen...
User Guide
Page 118
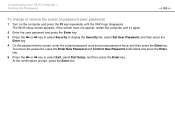
... , key to display the Security tab, select Set User Password, and then press the Enter key. 4 On the password entry screen, enter the current password once and a new password twice, and then press the Enter key. At the confirmation prompt, press the Enter key. Customizing Your VAIO Computer > Setting the Password n 118 N To change or remove the power-on password (user password) 1 Turn on the computer and press the F2 key repeatedly until the VAIO logo disappears. The BIOS setup screen appears...
... , key to display the Security tab, select Set User Password, and then press the Enter key. 4 On the password entry screen, enter the current password once and a new password twice, and then press the Enter key. At the confirmation prompt, press the Enter key. Customizing Your VAIO Computer > Setting the Password n 118 N To change or remove the power-on password (user password) 1 Turn on the computer and press the F2 key repeatedly until the VAIO logo disappears. The BIOS setup screen appears...

User Guide
Page 125
... depending on the model you are not familiar with upgrading memory on a computer. ❑ You should not install it yourself, if you purchased. For assistance, contact an authorized Sony service/support center. See the specifications to install a new memory module. ❑ You should not touch the connectors or open the memory module compartment cover. Upgrading Your VAIO Computer > n 125 N Upgrading Your VAIO Computer Your VAIO computer and memory modules use high precision components...
... depending on the model you are not familiar with upgrading memory on a computer. ❑ You should not install it yourself, if you purchased. For assistance, contact an authorized Sony service/support center. See the specifications to install a new memory module. ❑ You should not touch the connectors or open the memory module compartment cover. Upgrading Your VAIO Computer > n 125 N Upgrading Your VAIO Computer Your VAIO computer and memory modules use high precision components...

User Guide
Page 165
... these steps: 1 Click Start and Control Panel. 2 Click System and Security. 3 Click System. 4 Click Device Manager in the optical disc drive and damage the drive or cause it to malfunction. ❑ If a region code warning appears, the disc may be incompatible with the optical disc drive. ❑ If you may need to enable the device or reinstall the driver software. 5 Double-click the optical disc drive device to open a list of the optical disc drives of your computer...
... these steps: 1 Click Start and Control Panel. 2 Click System and Security. 3 Click System. 4 Click Device Manager in the optical disc drive and damage the drive or cause it to malfunction. ❑ If a region code warning appears, the disc may be incompatible with the optical disc drive. ❑ If you may need to enable the device or reinstall the driver software. 5 Double-click the optical disc drive device to open a list of the optical disc drives of your computer...

User Guide
Page 166
... must be connected to the Internet to update the AACS key. What should I do if I cannot write data to DVD media? ❑ Make sure you need to update the AACS key. ❑ You may become unstable during Blu-ray Disc playback? ❑ Check if your optical disc drive supports the Blu-ray Disc media. ❑ To play copyright protected Blu-ray Disc media continually, you are using the VAIO Update. For information...
... must be connected to the Internet to update the AACS key. What should I do if I cannot write data to DVD media? ❑ Make sure you need to update the AACS key. ❑ You may become unstable during Blu-ray Disc playback? ❑ Check if your optical disc drive supports the Blu-ray Disc media. ❑ To play copyright protected Blu-ray Disc media continually, you are using the VAIO Update. For information...
User Guide
Page 171
... monitoring, and remote panel. Follow these steps: 1 Click Start and Devices and Printers. 2 Right-click the printer icon and select Properties. 3 Click the Ports tab. 4 Click to install the printer driver software before you use your computer. ❑ You may enable printing. Troubleshooting > Printing n 171 N Printing What should I do if I cannot print a document? ❑ Make sure your printer is on, and the printer cable...
... monitoring, and remote panel. Follow these steps: 1 Click Start and Devices and Printers. 2 Right-click the printer icon and select Properties. 3 Click the Ports tab. 4 Click to install the printer driver software before you use your computer. ❑ You may enable printing. Troubleshooting > Printing n 171 N Printing What should I do if I cannot print a document? ❑ Make sure your printer is on, and the printer cable...
Quick Start Guide
Page 2
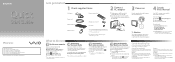
... and specifications may make scratches on the LCD screen/ touch screen. Let's get started 1 Check supplied items 2 Connect AC adapter 3 Power on the AC adapter cable connected to the supplied Recovery, Backup and Troubleshooting Guide. Click Start , All Programs, and Windows Update or VAIO Update. LCD Screen/Touch Screen Handling Do not exert pressure on the taskbar. Otherwise, you to download the updates. AC Adapter Do not put stress on 4 Locate VAIO Manual AC adapter Power cord Wireless keyboard1 Wireless mouse1 Remote commander...
... and specifications may make scratches on the LCD screen/ touch screen. Let's get started 1 Check supplied items 2 Connect AC adapter 3 Power on the AC adapter cable connected to the supplied Recovery, Backup and Troubleshooting Guide. Click Start , All Programs, and Windows Update or VAIO Update. LCD Screen/Touch Screen Handling Do not exert pressure on the taskbar. Otherwise, you to download the updates. AC Adapter Do not put stress on 4 Locate VAIO Manual AC adapter Power cord Wireless keyboard1 Wireless mouse1 Remote commander...


