Care and Handling of Your VAIO® Computer
Page 5
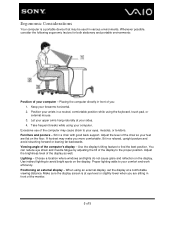
.... You can reduce eye strain and muscle fatigue by adjusting the tilt of the computer may cause strain to the proper position. Choose a location where windows and lights do not cause glare and reflection on the display. Let your sides. 4. A footrest may be used in front of the computer's display - Make...
.... You can reduce eye strain and muscle fatigue by adjusting the tilt of the computer may cause strain to the proper position. Choose a location where windows and lights do not cause glare and reflection on the display. Let your sides. 4. A footrest may be used in front of the computer's display - Make...

Quick Start Guide
Page 1
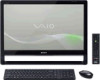
... to access, and provides important documents and helpful support resources such as a desk or table. Click Start , All Programs, Windows Update or VAIO Update. Recovery Media are subject to factory-installed settings in hard disk drive, avoid moving your computer. The ... http://www.sony.ca/support/ (Canada) http://esupport.sony.com/ES/VAIO/LA/ (Latin American area) http://esupport.sony.com/PT/VAIO/BR/ (Brazil) Features and specifications may vary and are not provided with the following documentation. Press the power button until the setup window appears. ...
... to access, and provides important documents and helpful support resources such as a desk or table. Click Start , All Programs, Windows Update or VAIO Update. Recovery Media are subject to factory-installed settings in hard disk drive, avoid moving your computer. The ... http://www.sony.ca/support/ (Canada) http://esupport.sony.com/ES/VAIO/LA/ (Latin American area) http://esupport.sony.com/PT/VAIO/BR/ (Brazil) Features and specifications may vary and are not provided with the following documentation. Press the power button until the setup window appears. ...

User Guide
Page 8
....microsoft.com/directory/. Before Use > Finding More about Your VAIO Computer n8 N 3. Support Web Sites ❑ Sony online support web site The Sony online support web site provides instant access to information on commonly encountered problems. Type a description of the problem and ...sony.ca/support/ ❑ For customers in Spanish-speaking Latin American countries or areas http://esupport.sony.com/ES/VAIO/LA ❑ For customers in Brazil http://esupport.sony.com/PT/VAIO/BR/ ❑ Operating system online support web site Your computer comes preinstalled with a Microsoft Windows...
....microsoft.com/directory/. Before Use > Finding More about Your VAIO Computer n8 N 3. Support Web Sites ❑ Sony online support web site The Sony online support web site provides instant access to information on commonly encountered problems. Type a description of the problem and ...sony.ca/support/ ❑ For customers in Spanish-speaking Latin American countries or areas http://esupport.sony.com/ES/VAIO/LA ❑ For customers in Brazil http://esupport.sony.com/PT/VAIO/BR/ ❑ Operating system online support web site Your computer comes preinstalled with a Microsoft Windows...

User Guide
Page 11
... display - Before Use > Ergonomic Considerations n 11 N ❑ Viewing angle of the display to your computer to avoid bright spots on the display. Choose a location where windows and lights do not exert excessive pressure on your comfort and work efficiency. ❑ Ventilation - Use the display tilting feature to find the best position.
... display - Before Use > Ergonomic Considerations n 11 N ❑ Viewing angle of the display to your computer to avoid bright spots on the display. Choose a location where windows and lights do not exert excessive pressure on your comfort and work efficiency. ❑ Ventilation - Use the display tilting feature to find the best position.
User Guide
Page 29
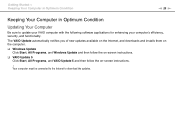
.... The VAIO Update automatically notifies you of new updates available on the Internet, and downloads and installs them on the computer. ❑ Windows Update Click Start, All Programs, and Windows Update and then follow the on-screen instructions. ❑ VAIO Update 5 Click Start, All Programs, and VAIO Update 5 and then follow the...
.... The VAIO Update automatically notifies you of new updates available on the Internet, and downloads and installs them on the computer. ❑ Windows Update Click Start, All Programs, and Windows Update and then follow the on-screen instructions. ❑ VAIO Update 5 Click Start, All Programs, and VAIO Update 5 and then follow the...

User Guide
Page 30
... ASSIST button Click Start, All Programs, VAIO Care, and VAIO Care. ✍ See the help file included with the VAIO Care for example, when the Windows does not start. The VAIO Care will provide appropriate measures to keep it running at an optimum level. On models with the ASSIST button Press...
... ASSIST button Click Start, All Programs, VAIO Care, and VAIO Care. ✍ See the help file included with the VAIO Care for example, when the Windows does not start. The VAIO Care will provide appropriate measures to keep it running at an optimum level. On models with the ASSIST button Press...

User Guide
Page 35
... when used in ). See the help file included with the VAIO Control Center for example, when the computer is properly connected with the Fn key. J Windows key Displays the Start menu. and blinks for about 10 minutes when the connection is cut off, for more information. H Volume control buttons* Increase (+) or...
... when used in ). See the help file included with the VAIO Control Center for example, when the computer is properly connected with the Fn key. J Windows key Displays the Start menu. and blinks for about 10 minutes when the connection is cut off, for more information. H Volume control buttons* Increase (+) or...

User Guide
Page 40
The Mouse Properties window appears. 3 Change the settings. n 40 N Using Your VAIO Computer > Using the Mouse Adjusting the Mouse Functions 1 Click Start and Control Panel. 2 Click Mouse under Hardware and Sound.
The Mouse Properties window appears. 3 Change the settings. n 40 N Using Your VAIO Computer > Using the Mouse Adjusting the Mouse Functions 1 Click Start and Control Panel. 2 Click Mouse under Hardware and Sound.

User Guide
Page 45
..., see the help file included with the software. ✍ When capturing an image or a movie in a dark place, click the Capture icon in the main window, and then click the WebCam Settings icon and select the low light or low light compensation option in the main... window. Launching or exiting your desired icon in the properties window. Video conferences are using the built-in camera. Using Your VAIO Computer > Using the Built-in Camera n 45 N Using the Built-in...
..., see the help file included with the software. ✍ When capturing an image or a movie in a dark place, click the Capture icon in the main window, and then click the WebCam Settings icon and select the low light or low light compensation option in the main... window. Launching or exiting your desired icon in the properties window. Video conferences are using the built-in camera. Using Your VAIO Computer > Using the Built-in Camera n 45 N Using the Built-in...

User Guide
Page 53
See the specifications to switch the receiving signal type. The hybrid TV tuner board supports both NTSC and ATSC signals but you must change your TV connection setup to find out about the configuration of your computer. ! The Windows Media Center included in this section may have a TV tuner board installed. Some features and options in your operating system enables TV program viewing, recording and playback. Using Your VAIO Computer > Using the TV Function n 53 N Using the TV Function Your computer may not be available on your computer.
See the specifications to switch the receiving signal type. The hybrid TV tuner board supports both NTSC and ATSC signals but you must change your TV connection setup to find out about the configuration of your computer. ! The Windows Media Center included in this section may have a TV tuner board installed. Some features and options in your operating system enables TV program viewing, recording and playback. Using Your VAIO Computer > Using the TV Function n 53 N Using the TV Function Your computer may not be available on your computer.

User Guide
Page 60
...-definition audio and video signals from the connected device and play the audio/video content on your computer without turning on the computer and starting Windows. Some features and options in this section may be available on your computer. See the specifications to connect an external audio/video device, such as...
...-definition audio and video signals from the connected device and play the audio/video content on your computer without turning on the computer and starting Windows. Some features and options in this section may be available on your computer. See the specifications to connect an external audio/video device, such as...

User Guide
Page 61
... the HDMI input or the video input. ✍ You do not need an HDMI cable or an audio/video cable with your computer and start Windows to switch the audio/video input source. Using Your VAIO Computer > Using the HDMI/VIDEO Input Function n 61 N Connecting an External Audio/Video Device To...
... the HDMI input or the video input. ✍ You do not need an HDMI cable or an audio/video cable with your computer and start Windows to switch the audio/video input source. Using Your VAIO Computer > Using the HDMI/VIDEO Input Function n 61 N Connecting an External Audio/Video Device To...

User Guide
Page 64
... the remote commander (if supplied) for the above operations. Switching the audio/video input source for more information. the main and sub windows 2 Press the OK button. ✍ Alternatively, you can use the Swap function to interchange the input signals between 1 Select PinP and SWAP....Swap functions The PinP function is enabled, you can additionally use the PinP A and Swap S buttons on the main window and switching the audio/video input source for the sub window among three sources: the computer input, the HDMI input, and the video input. Enabling the PinP function 1 Select...
... the remote commander (if supplied) for the above operations. Switching the audio/video input source for more information. the main and sub windows 2 Press the OK button. ✍ Alternatively, you can use the Swap function to interchange the input signals between 1 Select PinP and SWAP....Swap functions The PinP function is enabled, you can additionally use the PinP A and Swap S buttons on the main window and switching the audio/video input source for the sub window among three sources: the computer input, the HDMI input, and the video input. Enabling the PinP function 1 Select...

User Guide
Page 65
See the specifications to find out about the configuration of audio/video related software applications, including the Windows Media Center. Before attempting to use the remote commander, remove the battery compartment cover (1) from battery leakage. ! When the remote commander is supplied with the ...
See the specifications to find out about the configuration of audio/video related software applications, including the Windows Media Center. Before attempting to use the remote commander, remove the battery compartment cover (1) from battery leakage. ! When the remote commander is supplied with the ...

User Guide
Page 66
..., one audio track, one DVD chapter, and 7 seconds of recorded TV or video. While the sub window is in view, press to swap the input signals between the main and sub windows. Skip B? button Press to begin media playback. B Pause X button Press to move media backward at ...Some button functions may not be available. Forward M button Press to move media backward, for the sub window or hide the sub window. Play N button Press to show a small sub window on the main window. Illustrated above is in view, this button works as an example. PinP A button Press to begin...
..., one audio track, one DVD chapter, and 7 seconds of recorded TV or video. While the sub window is in view, press to swap the input signals between the main and sub windows. Skip B? button Press to begin media playback. B Pause X button Press to move media backward at ...Some button functions may not be available. Forward M button Press to move media backward, for the sub window or hide the sub window. Play N button Press to show a small sub window on the main window. Illustrated above is in view, this button works as an example. PinP A button Press to begin...

User Guide
Page 67
... to backspace and delete entered text. L More button / OPTIONS button Press to view additional options that are available for your desired action or window option. P Live TV button Press to view TV programs. Q DVD menu button / MENU button Press to the yellow shortcut link in teletext...button Press to the green shortcut link in teletext TV program mode. M Directional arrow buttons Press the V, v, B, and b buttons to the previous window. Using Your VAIO Computer > Using the Remote Commander n 67 N C Back button Press to return to move the pointer on the playback media, such...
... to backspace and delete entered text. L More button / OPTIONS button Press to view additional options that are available for your desired action or window option. P Live TV button Press to view TV programs. Q DVD menu button / MENU button Press to the yellow shortcut link in teletext...button Press to the green shortcut link in teletext TV program mode. M Directional arrow buttons Press the V, v, B, and b buttons to the previous window. Using Your VAIO Computer > Using the Remote Commander n 67 N C Back button Press to return to move the pointer on the playback media, such...

User Guide
Page 68
This button works the same as well. U APPLICATION CLOSE button Press to close the active application window. *1 Pressing these buttons displays a message if your computer does not support the HDMI/VIDEO input function. *2 Available with the HDMI/VIDEO input function (page 60) ...
This button works the same as well. U APPLICATION CLOSE button Press to close the active application window. *1 Pressing these buttons displays a message if your computer does not support the HDMI/VIDEO input function. *2 Available with the HDMI/VIDEO input function (page 60) ...

User Guide
Page 70
... appear in the proper direction. "Memory Stick" is automatically detected by your system and the contents of "Memory Stick" are inserting it in the Computer window after you insert "Memory Stick" into the slot for the first time, you may be prompted to install the software. If nothing appears on -screen...
... appear in the proper direction. "Memory Stick" is automatically detected by your system and the contents of "Memory Stick" are inserting it in the Computer window after you insert "Memory Stick" into the slot for the first time, you may be prompted to install the software. If nothing appears on -screen...

User Guide
Page 77
.... 3 Carefully slide the SD memory card into the slot until it clicks into the slot. The SD memory card icon will appear in the Computer window after you may be prompted to install the software.
.... 3 Carefully slide the SD memory card into the slot until it clicks into the slot. The SD memory card icon will appear in the Computer window after you may be prompted to install the software.

User Guide
Page 88
For setting up the Bluetooth function. To communicate with another Bluetooth device To communicate with Another Bluetooth Device You can connect your computer to a Bluetooth device such as another Bluetooth device, you first need to set up and using the Bluetooth function, search Windows Help and Support for Bluetooth information. Using Your VAIO Computer > Using the Bluetooth Function n 88 N Communicating with another computer, a mobile phone, a PDA, a headset, a mouse, or a digital camera without the use of any cables.
For setting up the Bluetooth function. To communicate with another Bluetooth device To communicate with Another Bluetooth Device You can connect your computer to a Bluetooth device such as another Bluetooth device, you first need to set up and using the Bluetooth function, search Windows Help and Support for Bluetooth information. Using Your VAIO Computer > Using the Bluetooth Function n 88 N Communicating with another computer, a mobile phone, a PDA, a headset, a mouse, or a digital camera without the use of any cables.


