
User Guide
Page 2
... Your Computer Safely 25 Using the Power Saving Mode 26 Updating Your Computer 28 Using Your VAIO Computer 29 Using the Keyboard 30 Using the Mouse 36 Using the Touch Screen 42 Using the Built-in Camera 46 Using the Optical Disc Drive 47 Using the TV ...Device 95 Customizing Your VAIO Computer 97 Setting the Password 98 Using the VAIO Control Center 103 Upgrading Your VAIO Computer 104 Adding and Removing Memory 105 Precautions 111 Safety Information 112 Care and Maintenance Information 114 Handling Your Computer 115 Handling the LCD Screen/Touch Screen 117 Using the Power ...
... Your Computer Safely 25 Using the Power Saving Mode 26 Updating Your Computer 28 Using Your VAIO Computer 29 Using the Keyboard 30 Using the Mouse 36 Using the Touch Screen 42 Using the Built-in Camera 46 Using the Optical Disc Drive 47 Using the TV ...Device 95 Customizing Your VAIO Computer 97 Setting the Password 98 Using the VAIO Control Center 103 Upgrading Your VAIO Computer 104 Adding and Removing Memory 105 Precautions 111 Safety Information 112 Care and Maintenance Information 114 Handling Your Computer 115 Handling the LCD Screen/Touch Screen 117 Using the Power ...

User Guide
Page 3
Troubleshooting 123 Computer 125 System Security 131 Built-in Camera 132 Networking 134 Bluetooth Technology 137 Optical Discs 140 Display 144 Printing 146 Microphone 147 Mouse 148 Speakers 150 Touch Screen 151 Keyboard 152 Floppy Disks 153 Audio/Video 154 HDMI/VIDEO Input Function 157 "Memory Stick 159 Peripherals 160 Trademarks 161 Notice 163 n3 N
Troubleshooting 123 Computer 125 System Security 131 Built-in Camera 132 Networking 134 Bluetooth Technology 137 Optical Discs 140 Display 144 Printing 146 Microphone 147 Mouse 148 Speakers 150 Touch Screen 151 Keyboard 152 Floppy Disks 153 Audio/Video 154 HDMI/VIDEO Input Function 157 "Memory Stick 159 Peripherals 160 Trademarks 161 Notice 163 n3 N

User Guide
Page 4
... look slightly different from those of your computer, visit the Sony online support web site at the following URLs: ❑ For customers in USA http://esupport.sony.com/EN/VAIO/ ❑ For customers in Canada http://sony.ca/support/ ❑ For customers in Spanish-speaking Latin ...American countries or areas http://esupport.sony.com/ES/VAIO/LA ❑ For customers in this Sony VAIO® computer, and welcome to find out about the configuration of your computer. How to the on-screen User Guide. Before Use > n4 N Before Use Congratulations...
... look slightly different from those of your computer, visit the Sony online support web site at the following URLs: ❑ For customers in USA http://esupport.sony.com/EN/VAIO/ ❑ For customers in Canada http://sony.ca/support/ ❑ For customers in Spanish-speaking Latin ...American countries or areas http://esupport.sony.com/ES/VAIO/LA ❑ For customers in this Sony VAIO® computer, and welcome to find out about the configuration of your computer. How to the on-screen User Guide. Before Use > n4 N Before Use Congratulations...

User Guide
Page 5
... to find useful documentation such as below: - On-screen Documentation ❑ Help and Support - Information about your VAIO computer, and creating recovery discs and more. Software Information Troubleshoot my VAIO Maintain and troubleshoot your VAIO computer with my VAIO Get help in storage device to articles, the VAIO technology page, specifications, and system and software information...
... to find useful documentation such as below: - On-screen Documentation ❑ Help and Support - Information about your VAIO computer, and creating recovery discs and more. Software Information Troubleshoot my VAIO Maintain and troubleshoot your VAIO computer with my VAIO Get help in storage device to articles, the VAIO technology page, specifications, and system and software information...
User Guide
Page 6
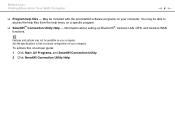
Information about Your VAIO Computer n6 N ❑ Program help menu on your computer. Features and options may be able to find out about configuration of your computer. Before Use > ... your computer. May be available on a specific program. ❑ SmartWi™ Connection Utility Help - You may not be included with the preinstalled software programs on -screen guide: 1 Click Start, All Programs, and SmartWi Connection Utility. 2 Click SmartWi Connection Utility Help. See the specifications to access the help files from the help...
Information about Your VAIO Computer n6 N ❑ Program help menu on your computer. Features and options may be able to find out about configuration of your computer. Before Use > ... your computer. May be available on a specific program. ❑ SmartWi™ Connection Utility Help - You may not be included with the preinstalled software programs on -screen guide: 1 Click Start, All Programs, and SmartWi Connection Utility. 2 Click SmartWi Connection Utility Help. See the specifications to access the help files from the help...

User Guide
Page 7
... problem and the Knowledge Database searches for the corresponding solutions online. ❑ For customers in USA http://esupport.sony.com/EN/VAIO/ ❑ For customers in Canada http://sony.ca/support/ ❑ For customers in Spanish-speaking Latin American countries or areas http://esupport....sony.com/ES/VAIO/LA ❑ For customers in Brazil http://esupport.sony.com/BR/ ❑ Operating system online support web site Your computer comes ...
... problem and the Knowledge Database searches for the corresponding solutions online. ❑ For customers in USA http://esupport.sony.com/EN/VAIO/ ❑ For customers in Canada http://sony.ca/support/ ❑ For customers in Spanish-speaking Latin American countries or areas http://esupport....sony.com/ES/VAIO/LA ❑ For customers in Brazil http://esupport.sony.com/BR/ ❑ Operating system online support web site Your computer comes ...

User Guide
Page 8
... an appointment with the setup of your new VAIO PC, system optimization, data rescue, and any repair service you may call Sony directly. Before Use > Finding More about Your VAIO Computer n8 N 4. Sony Style Backstage Technicians can assist with a Sony certified technician at www.sonystyle.com/backstage to ... efficient services, have the following information readily available: 1 Your VAIO computer model You can find it on the Sony online support web site. In order to find it at our site, you might need. Sony Style store and get personalized service and support for at the...
... an appointment with the setup of your new VAIO PC, system optimization, data rescue, and any repair service you may call Sony directly. Before Use > Finding More about Your VAIO Computer n8 N 4. Sony Style Backstage Technicians can assist with a Sony certified technician at www.sonystyle.com/backstage to ... efficient services, have the following information readily available: 1 Your VAIO computer model You can find it on the Sony online support web site. In order to find it at our site, you might need. Sony Style store and get personalized service and support for at the...
User Guide
Page 9
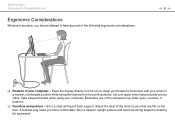
Before Use > Ergonomic Considerations Ergonomic Considerations Whenever possible, you should attempt to take account of the following ergonomic considerations: n9 N ❑ Position of the computer may make you . Sit in a neutral, comfortable position while using your sides. Take frequent breaks while using the keyboard or the pointing device. Keep your wrists in a chair with your forearms horizontal, with good back support. Sit in front of the chair so your computer - Excessive use of your feet are flat on the floor. Adjust the level of you more comfortable....
Before Use > Ergonomic Considerations Ergonomic Considerations Whenever possible, you should attempt to take account of the following ergonomic considerations: n9 N ❑ Position of the computer may make you . Sit in a neutral, comfortable position while using your sides. Take frequent breaks while using the keyboard or the pointing device. Keep your wrists in a chair with your forearms horizontal, with good back support. Sit in front of the chair so your computer - Excessive use of your feet are flat on the floor. Adjust the level of you more comfortable....

User Guide
Page 10
Choose a location where windows and lights do not exert excessive pressure on the display. Proper lighting adds to find the best position. While adjusting the viewing angle, do not cause glare and reflection on your comfort and work efficiency. ❑ Ventilation - You can reduce eye strain and muscle fatigue by adjusting the tilt of the display - Before Use > Ergonomic Considerations n 10 N ❑ Viewing angle of the display to the proper position. Use the display's tilting feature to your computer to eliminate a risk of mechanical damage. ❑ Lighting - Use ...
Choose a location where windows and lights do not exert excessive pressure on the display. Proper lighting adds to find the best position. While adjusting the viewing angle, do not cause glare and reflection on your comfort and work efficiency. ❑ Ventilation - You can reduce eye strain and muscle fatigue by adjusting the tilt of the display - Before Use > Ergonomic Considerations n 10 N ❑ Viewing angle of the display to the proper position. Use the display's tilting feature to your computer to eliminate a risk of mechanical damage. ❑ Lighting - Use ...
User Guide
Page 11
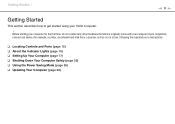
Upon completion, connect one device (for the first time, do not connect any other hardware that did not originally come with your VAIO computer. ! Getting Started > n 11 N Getting Started This section describes how to get started using your computer. Before starting your computer for example, a printer, an external ...
Upon completion, connect one device (for the first time, do not connect any other hardware that did not originally come with your VAIO computer. ! Getting Started > n 11 N Getting Started This section describes how to get started using your computer. Before starting your computer for example, a printer, an external ...
User Guide
Page 12
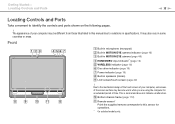
... manual due to variations in specifications. Getting Started > Locating Controls and Ports n 12 N Locating Controls and Ports Take a moment to the mechanical design of the touch screen of your computer, some countries or areas. It may be different from those illustrated in this sensor for an extended period of the...
... manual due to variations in specifications. Getting Started > Locating Controls and Ports n 12 N Locating Controls and Ports Take a moment to the mechanical design of the touch screen of your computer, some countries or areas. It may be different from those illustrated in this sensor for an extended period of the...
User Guide
Page 13
... as the audio/video input source by the INPUT SELECT button (page 14), pressing this button to wait until the computer cools down before you touch it.
... as the audio/video input source by the INPUT SELECT button (page 14), pressing this button to wait until the computer cools down before you touch it.

User Guide
Page 14
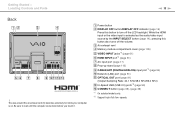
Getting Started > Locating Controls and Ports Right A Optical disc drive (page 47) B Manual eject hole (page 140) C Drive eject button (page 47) D INPUT SELECT button* (page 63)/ INPUT SELECT indicator* (page 16) E MENU button* (page 63) F V/v (Up/Down) buttons* (page 63) G OK button* (page 63) * On selected models only. n 14 N
Getting Started > Locating Controls and Ports Right A Optical disc drive (page 47) B Manual eject hole (page 140) C Drive eject button (page 47) D INPUT SELECT button* (page 63)/ INPUT SELECT indicator* (page 16) E MENU button* (page 63) F V/v (Up/Down) buttons* (page 63) G OK button* (page 63) * On selected models only. n 14 N

User Guide
Page 15
Getting Started > Locating Controls and Ports Left n 15 N A "Memory Stick Duo" slot*1 (page 70) B Media Access indicator (page 16) C SD memory card slot (page 76) D i.LINK 4-pin (S400) port (page 95) E Hi-Speed USB (USB 2.0) ports*2 (page 93) F Headphones jack (page 91) G Microphone jack (page 92) H Line In jack Connect an external audio device to receive audio signals. *1 Your computer supports only Duo-size "Memory Stick". *2 Support high-/full-/low- speeds.
Getting Started > Locating Controls and Ports Left n 15 N A "Memory Stick Duo" slot*1 (page 70) B Media Access indicator (page 16) C SD memory card slot (page 76) D i.LINK 4-pin (S400) port (page 95) E Hi-Speed USB (USB 2.0) ports*2 (page 93) F Headphones jack (page 91) G Microphone jack (page 92) H Line In jack Connect an external audio device to receive audio signals. *1 Your computer supports only Duo-size "Memory Stick". *2 Support high-/full-/low- speeds.
User Guide
Page 16
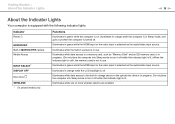
... input is not in progress. Illuminates while data access to the built-in storage device or the optical disc drive is in use . Illuminates while one or more wireless options are enabled. Illuminates in progress. (Do not place the computer into Sleep mode or turn it off while this indicator light...
... input is not in progress. Illuminates while data access to the built-in storage device or the optical disc drive is in use . Illuminates while one or more wireless options are enabled. Illuminates in progress. (Do not place the computer into Sleep mode or turn it off while this indicator light...
User Guide
Page 17
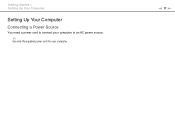
Getting Started > Setting Up Your Computer Setting Up Your Computer Connecting a Power Source You need a power cord to connect your computer to an AC power source. ✍ Use only the supplied power cord for your computer. n 17 N
Getting Started > Setting Up Your Computer Setting Up Your Computer Connecting a Power Source You need a power cord to connect your computer to an AC power source. ✍ Use only the supplied power cord for your computer. n 17 N
User Guide
Page 18
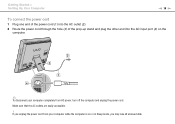
If you may lose all unsaved data. Make sure that the AC outlets are easily accessible. ! Getting Started > Setting Up Your Computer n 18 N To connect the power cord 1 Plug one end of the power cord (1) into the AC outlet (2). 2 Route the power cord through the hole (3) of the prop-up stand and plug the other end into the AC input port (4) on or in Sleep mode, you unplug the power cord from your computer while the computer is on the computer. ✍ To disconnect your computer completely from AC power, turn off the computer and unplug the power cord.
If you may lose all unsaved data. Make sure that the AC outlets are easily accessible. ! Getting Started > Setting Up Your Computer n 18 N To connect the power cord 1 Plug one end of the power cord (1) into the AC outlet (2). 2 Route the power cord through the hole (3) of the prop-up stand and plug the other end into the AC input port (4) on or in Sleep mode, you unplug the power cord from your computer while the computer is on the computer. ✍ To disconnect your computer completely from AC power, turn off the computer and unplug the power cord.

User Guide
Page 19
A wireless connection is within the range of supported weight of your mounting system. See the manual that : The weight of your mounting system. ! If not, follow the instructions described in damage to the computer or personal injuries. You shut down the computer, turn off all peripheral devices, disconnect the power cord and the peripheral devices from the power source, and then wait about an hour until the computer cools down before proceeding. Before connecting your computer to your mounting system or changing your computer setup from the desktop type to the wall-mount type, make ...
A wireless connection is within the range of supported weight of your mounting system. See the manual that : The weight of your mounting system. ! If not, follow the instructions described in damage to the computer or personal injuries. You shut down the computer, turn off all peripheral devices, disconnect the power cord and the peripheral devices from the power source, and then wait about an hour until the computer cools down before proceeding. Before connecting your computer to your mounting system or changing your computer setup from the desktop type to the wall-mount type, make ...

User Guide
Page 20
When facing down your computer, be sure to the screen frame. 2 Remove the four screws (1) and take the prop-up stand (2) off the computer. Getting Started > Setting Up Your Computer To reveal the mounting holes 1 Gently face down your computer on a soft cloth to avoid damage to place it on a flat surface. ! n 20 N
When facing down your computer, be sure to the screen frame. 2 Remove the four screws (1) and take the prop-up stand (2) off the computer. Getting Started > Setting Up Your Computer To reveal the mounting holes 1 Gently face down your computer on a soft cloth to avoid damage to place it on a flat surface. ! n 20 N
User Guide
Page 21
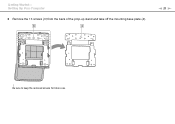
Be sure to keep the removed screws for future use. n 21 N ! Getting Started > Setting Up Your Computer 3 Remove the 13 screws (3) from the back of the prop-up stand and take off the mounting base plate (4).
Be sure to keep the removed screws for future use. n 21 N ! Getting Started > Setting Up Your Computer 3 Remove the 13 screws (3) from the back of the prop-up stand and take off the mounting base plate (4).