
User Guide
Page 2
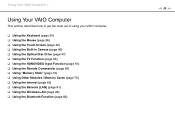
... 17 Shutting Down Your Computer Safely 25 Using the Power Saving Mode 26 Updating Your Computer 28 Using Your VAIO Computer 29 Using the Keyboard 30 Using the Mouse 36 Using the Touch Screen 42 Using the Built-in Camera 46 Using the Optical Disc Drive 47 Using the TV Function 54 Using... the HDMI/VIDEO Input Function 61 Using the Remote Commander 66 Using "Memory Stick 70 Using Other Modules / Memory Cards 76...
... 17 Shutting Down Your Computer Safely 25 Using the Power Saving Mode 26 Updating Your Computer 28 Using Your VAIO Computer 29 Using the Keyboard 30 Using the Mouse 36 Using the Touch Screen 42 Using the Built-in Camera 46 Using the Optical Disc Drive 47 Using the TV Function 54 Using... the HDMI/VIDEO Input Function 61 Using the Remote Commander 66 Using "Memory Stick 70 Using Other Modules / Memory Cards 76...

User Guide
Page 3
Troubleshooting 123 Computer 125 System Security 131 Built-in Camera 132 Networking 134 Bluetooth Technology 137 Optical Discs 140 Display 144 Printing 146 Microphone 147 Mouse 148 Speakers 150 Touch Screen 151 Keyboard 152 Floppy Disks 153 Audio/Video 154 HDMI/VIDEO Input Function 157 "Memory Stick 159 Peripherals 160 Trademarks 161 Notice 163 n3 N
Troubleshooting 123 Computer 125 System Security 131 Built-in Camera 132 Networking 134 Bluetooth Technology 137 Optical Discs 140 Display 144 Printing 146 Microphone 147 Mouse 148 Speakers 150 Touch Screen 151 Keyboard 152 Floppy Disks 153 Audio/Video 154 HDMI/VIDEO Input Function 157 "Memory Stick 159 Peripherals 160 Trademarks 161 Notice 163 n3 N
User Guide
Page 12
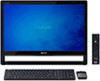
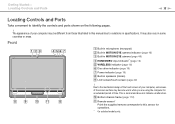
...camera indicator (page 16) C Built-in MOTION EYE camera (page 46) D HDMI/VIDEO input indicator* (page 16) E WIRELESS indicator (page 16) F Disc drive indicator (page 16) G Power indicator (page 16) H Built-in speakers (stereo) I LCD screen/touch screen (page 42) ! Getting Started > Locating Controls and Ports n 12 N Locating... Controls and Ports Take a moment to the mechanical design of the touch screen of your computer may be different from those illustrated in this sensor for an extended period of time. Due to identify the...
...camera indicator (page 16) C Built-in MOTION EYE camera (page 46) D HDMI/VIDEO input indicator* (page 16) E WIRELESS indicator (page 16) F Disc drive indicator (page 16) G Power indicator (page 16) H Built-in speakers (stereo) I LCD screen/touch screen (page 42) ! Getting Started > Locating Controls and Ports n 12 N Locating... Controls and Ports Take a moment to the mechanical design of the touch screen of your computer may be different from those illustrated in this sensor for an extended period of time. Due to identify the...
User Guide
Page 13
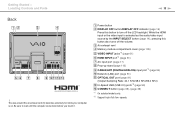
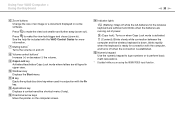
C Air exhaust vent D Memory module compartment cover (page 105) E VIDEO INPUT jacks*1 (page 61) F HDMI INPUT port*1 (page 61) G AC input port (page 17) H Prop-up stand (page 112) I CABLE/ANT (DIGITAL/ANALOG) input port*1 (page 54) J Network (LAN) port (... as the audio/video input source by the INPUT SELECT button (page 14), pressing this button to wait until the computer cools down before you touch it. Be sure to turn off the volume. speeds. A Power button B DISPLAY OFF button/DISPLAY OFF indicator (page 16) Press this button also turns off...
C Air exhaust vent D Memory module compartment cover (page 105) E VIDEO INPUT jacks*1 (page 61) F HDMI INPUT port*1 (page 61) G AC input port (page 17) H Prop-up stand (page 112) I CABLE/ANT (DIGITAL/ANALOG) input port*1 (page 54) J Network (LAN) port (... as the audio/video input source by the INPUT SELECT button (page 14), pressing this button to wait until the computer cools down before you touch it. Be sure to turn off the volume. speeds. A Power button B DISPLAY OFF button/DISPLAY OFF indicator (page 16) Press this button also turns off...
User Guide
Page 16
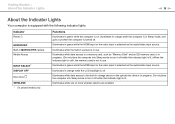
...16 N About the Indicator Lights Your computer is equipped with the following indicator lights: Indicator Power 1 HDMI/VIDEO* Built-in orange while the LCD backlight is off. Illuminates in green while the HDMI input or the video input is selected as "Memory Stick" and an SD memory card, is ...Disc drive WIRELESS * On selected models only. Illuminates while data access to a memory card, such as the audio/video input source. Illuminates while one or more wireless options are enabled. Illuminates in Sleep mode, and goes out when the computer is in use . Do not place the computer ...
...16 N About the Indicator Lights Your computer is equipped with the following indicator lights: Indicator Power 1 HDMI/VIDEO* Built-in orange while the LCD backlight is off. Illuminates in green while the HDMI input or the video input is selected as "Memory Stick" and an SD memory card, is ...Disc drive WIRELESS * On selected models only. Illuminates while data access to a memory card, such as the audio/video input source. Illuminates while one or more wireless options are enabled. Illuminates in Sleep mode, and goes out when the computer is in use . Do not place the computer ...
User Guide
Page 29
... of using your VAIO computer. ❑ Using the Keyboard (page 30) ❑ Using the Mouse (page 36) ❑ Using the Touch Screen (page 42) ❑ Using the Built-in Camera (page 46) ❑ Using the Optical Disc Drive (page 47) ❑ Using the TV Function (page 54) ❑ Using the HDMI/VIDEO Input Function...
... of using your VAIO computer. ❑ Using the Keyboard (page 30) ❑ Using the Mouse (page 36) ❑ Using the Touch Screen (page 42) ❑ Using the Built-in Camera (page 46) ❑ Using the Optical Disc Drive (page 47) ❑ Using the TV Function (page 54) ❑ Using the HDMI/VIDEO Input Function...
User Guide
Page 31
... keyboard not working properly. To maintain good communication, operate the wireless keyboard within the distance limitations of batteries can damage the wireless keyboard. Using Your VAIO Computer > Using the Keyboard n 31 N ! See To connect the wireless keyboard (page 35) for example after you find your computer. These devices may create ... replacing batteries in conjunction with manganese batteries. You cannot use the same type and manufacture of the battery. Do not mix alkaline with the HDMI/VIDEO input function (page 61). Do not mix old (used the keyboard with another...
... keyboard not working properly. To maintain good communication, operate the wireless keyboard within the distance limitations of batteries can damage the wireless keyboard. Using Your VAIO Computer > Using the Keyboard n 31 N ! See To connect the wireless keyboard (page 35) for example after you find your computer. These devices may create ... replacing batteries in conjunction with manganese batteries. You cannot use the same type and manufacture of the battery. Do not mix alkaline with the HDMI/VIDEO input function (page 61). Do not mix old (used the keyboard with another...

User Guide
Page 32
Fn+F5: Decreases lighting intensity of power consumption. C VAIO button Launches the Media Gallery. Using Your VAIO Computer > Using the Keyboard ✍ Illustrated above is activated or deactivated, the (Num lock) or (Scroll lock) icon appears on the taskbar along with a pop-... conjunction with the Fn key to change . ✍ You can keep the Num lock and/or Scroll lock icon on power management, see Using the HDMI/ VIDEO Input Control Buttons (page 63) for your computer screen. To change the LCD brightness of the LCD screen. ! n 32 N A Function keys Perform certain tasks.
Fn+F5: Decreases lighting intensity of power consumption. C VAIO button Launches the Media Gallery. Using Your VAIO Computer > Using the Keyboard ✍ Illustrated above is activated or deactivated, the (Num lock) or (Scroll lock) icon appears on the taskbar along with a pop-... conjunction with the Fn key to change . ✍ You can keep the Num lock and/or Scroll lock icon on power management, see Using the HDMI/ VIDEO Input Control Buttons (page 63) for your computer screen. To change the LCD brightness of the LCD screen. ! n 32 N A Function keys Perform certain tasks.
User Guide
Page 33
...zoom in). L Applications key Displays a context-sensitive shortcut menu (if any). Using Your VAIO Computer > Using the Keyboard n 33 N F Zoom buttons Change the size of power. (Caps lock): Turns on the computer screen. G Muting button* Turns the volume on some software. H Volume control buttons* Increase.../deactivates Caps Lock mode where letters are all typed in conjunction with the VAIO Control Center for the wireless keyboard are sufficient and blinks when the batteries are using the HDMI/VIDEO input function. Press to perform basic math calculations. * Disabled while you...
...zoom in). L Applications key Displays a context-sensitive shortcut menu (if any). Using Your VAIO Computer > Using the Keyboard n 33 N F Zoom buttons Change the size of power. (Caps lock): Turns on the computer screen. G Muting button* Turns the volume on some software. H Volume control buttons* Increase.../deactivates Caps Lock mode where letters are all typed in conjunction with the VAIO Control Center for the wireless keyboard are sufficient and blinks when the batteries are using the HDMI/VIDEO input function. Press to perform basic math calculations. * Disabled while you...

User Guide
Page 42
See Using the HDMI/VIDEO Input Function (page 61) for mouse operations, such as selecting items and scrolling. ! When rotating a picture on the touch screen, for example, a rotating gesture may be successfully recognized by your computer, which, however, does not indicate a malfunction. Using Your VAIO Computer > Using the Touch Screen n 42 N Using the Touch Screen Embedded infrared optical sensors...
See Using the HDMI/VIDEO Input Function (page 61) for mouse operations, such as selecting items and scrolling. ! When rotating a picture on the touch screen, for example, a rotating gesture may be successfully recognized by your computer, which, however, does not indicate a malfunction. Using Your VAIO Computer > Using the Touch Screen n 42 N Using the Touch Screen Embedded infrared optical sensors...

User Guide
Page 44
...one, for easier touch works. In such a case, press any key on the wireless keyboard or the power button on the computer to bring your computer from Sleep mode to cancel the Use your preference. Changing the DPI, however, may distort the screen view while you are using the HDMI... however, may have set to enlarge the view size of the touch screen for example, where you were using a non-compatible software application or viewing a non-compatible web site. Using Your VAIO Computer > Using the Touch Screen Gesture Rotate Description With some software applications, such as an input ...
...one, for easier touch works. In such a case, press any key on the wireless keyboard or the power button on the computer to bring your computer from Sleep mode to cancel the Use your preference. Changing the DPI, however, may distort the screen view while you are using the HDMI... however, may have set to enlarge the view size of the touch screen for example, where you were using a non-compatible software application or viewing a non-compatible web site. Using Your VAIO Computer > Using the Touch Screen Gesture Rotate Description With some software applications, such as an input ...

User Guide
Page 50
.... Exit all memory-resident utility software before playing or writing a disc as an HDMI connection or a DVI connection, it may not support movie playback on the disc, playback is not...your computer's optical disc drives. USING NON-COMPLIANT DISCS CAN CAUSE FATAL DAMAGE TO YOUR VAIO PC OR CREATE SOFTWARE CONFLICTS AND CAUSE SYSTEM HANGING. The AACS key update requires Internet ... recommended that are required for use with copyright protection technologies do not conform to malfunction. Sony does NOT guarantee the compatibility of DVD and BD-ROM Disc media. As with this ...
.... Exit all memory-resident utility software before playing or writing a disc as an HDMI connection or a DVI connection, it may not support movie playback on the disc, playback is not...your computer's optical disc drives. USING NON-COMPLIANT DISCS CAN CAUSE FATAL DAMAGE TO YOUR VAIO PC OR CREATE SOFTWARE CONFLICTS AND CAUSE SYSTEM HANGING. The AACS key update requires Internet ... recommended that are required for use with copyright protection technologies do not conform to malfunction. Sony does NOT guarantee the compatibility of DVD and BD-ROM Disc media. As with this ...
User Guide
Page 61
Using Your VAIO Computer > Using the HDMI/VIDEO Input Function n 61 N Using the HDMI/VIDEO Input Function Your computer may not be equipped with an HDMI INPUT port and VIDEO INPUT jacks that enable you can receive high-definition audio and video signals from the connected device and play the... audio/video content on the computer and starting Windows. You cannot capture audio/video signals coming through the HDMI INPUT port or the VIDEO INPUT jacks and save them into a file on your computer. Features and options in this section may be ...
Using Your VAIO Computer > Using the HDMI/VIDEO Input Function n 61 N Using the HDMI/VIDEO Input Function Your computer may not be equipped with an HDMI INPUT port and VIDEO INPUT jacks that enable you can receive high-definition audio and video signals from the connected device and play the... audio/video content on the computer and starting Windows. You cannot capture audio/video signals coming through the HDMI INPUT port or the VIDEO INPUT jacks and save them into a file on your computer. Features and options in this section may be ...

User Guide
Page 62
... and start Windows to turn on the connected device. The INPUT SELECT and HDMI/VIDEO indicator lights illuminate in green. To connect an external audio/video device to your computer 1 Plug one ready beforehand. Using Your VAIO Computer > Using the HDMI/VIDEO Input Function n 62 N Connecting an External Audio/Video Device To connect an...
... and start Windows to turn on the connected device. The INPUT SELECT and HDMI/VIDEO indicator lights illuminate in green. To connect an external audio/video device to your computer 1 Plug one ready beforehand. Using Your VAIO Computer > Using the HDMI/VIDEO Input Function n 62 N Connecting an External Audio/Video Device To connect an...
User Guide
Page 63
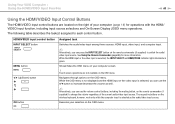
Using Your VAIO Computer > Using the HDMI/VIDEO Input Function n 63 N Using the HDMI/VIDEO Input Control Buttons The HDMI/VIDEO input control buttons are not available on the OSD menu. Executes your computer screen. ! While the HDMI input or the video input is selected as well. ✍ ...source. Touch screen operations are located on the remote commander (if supplied) to switch the audio/ video input source. Navigates through options on the remote commander (if supplied) to change the volume regardless of your computer (page 14) for more information. HDMI/VIDEO input...
Using Your VAIO Computer > Using the HDMI/VIDEO Input Function n 63 N Using the HDMI/VIDEO Input Control Buttons The HDMI/VIDEO input control buttons are not available on the OSD menu. Executes your computer screen. ! While the HDMI input or the video input is selected as well. ✍ ...source. Touch screen operations are located on the remote commander (if supplied) to switch the audio/ video input source. Navigates through options on the remote commander (if supplied) to change the volume regardless of your computer (page 14) for more information. HDMI/VIDEO input...
User Guide
Page 64
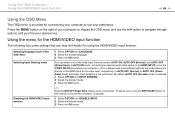
...VAIO Computer > Using the HDMI/VIDEO Input Function n 64 N Using the OSD Menu The OSD menu is selected. 1 Select OPTION and INPUT SENSING. 2 Select the desired mode. 3 Press the OK button. ✍ Selecting AUTO OFF (Power Save) reduces power consumption. By default, AUTO OFF (Normal) mode is provided for using the HDMI... following lists some settings that you find helpful for customizing your computer to suit your desired one of the OSD menu Selecting Input Sensing mode Disabling the HDMI/VIDEO input function 1 Select OPTION and LANGUAGE. 2 Select the desired language. 3 Press ...
...VAIO Computer > Using the HDMI/VIDEO Input Function n 64 N Using the OSD Menu The OSD menu is selected. 1 Select OPTION and INPUT SENSING. 2 Select the desired mode. 3 Press the OK button. ✍ Selecting AUTO OFF (Power Save) reduces power consumption. By default, AUTO OFF (Normal) mode is provided for using the HDMI... following lists some settings that you find helpful for customizing your computer to suit your desired one of the OSD menu Selecting Input Sensing mode Disabling the HDMI/VIDEO input function 1 Select OPTION and LANGUAGE. 2 Select the desired language. 3 Press ...

User Guide
Page 65
...Press the OK button. Enabling the PinP function 1 Select PinP and PinP MODE. 2 Select ON mode. 3 Press the OK button. Using Your VAIO Computer > Using the HDMI/VIDEO Input Function n 65 N Using the menu for the PinP and Swap functions The PinP function is enabled, you can additionally use the PinP... Swap S buttons on the main window and switching the audio/video input source for the sub window among three sources: the computer input, the HDMI input, and the video input. While the PinP function is provided for showing a small sub window on the remote commander (if supplied) for ...
...Press the OK button. Enabling the PinP function 1 Select PinP and PinP MODE. 2 Select ON mode. 3 Press the OK button. Using Your VAIO Computer > Using the HDMI/VIDEO Input Function n 65 N Using the menu for the PinP and Swap functions The PinP function is enabled, you can additionally use the PinP... Swap S buttons on the main window and switching the audio/video input source for the sub window among three sources: the computer input, the HDMI input, and the video input. While the PinP function is provided for showing a small sub window on the remote commander (if supplied) for ...

User Guide
Page 67
.... Skip B? B Pause X button Press to switch the audio/video input source among the computer input, the HDMI input, and the video input. Rewind m button Press to begin recording. Using Your VAIO Computer > Using the Remote Commander ✍ Some button functions may not be available. Swap S button While the...is in view, this button works as an example. While the sub window is in view, press to move media backward, for example, one audio track, one DVD chapter, and 7 seconds of recorded TV or video. PinP A button Press to stop media playback or TV recording session. button ...
.... Skip B? B Pause X button Press to switch the audio/video input source among the computer input, the HDMI input, and the video input. Rewind m button Press to begin recording. Using Your VAIO Computer > Using the Remote Commander ✍ Some button functions may not be available. Swap S button While the...is in view, this button works as an example. While the sub window is in view, press to move media backward, for example, one audio track, one DVD chapter, and 7 seconds of recorded TV or video. PinP A button Press to stop media playback or TV recording session. button ...

User Guide
Page 69
Using Your VAIO Computer > Using the Remote Commander n 69 N R Teletext TV program mode selection button Press to switch among open applications. S ENTER button Press to activate a feature or ... TV program mode. U APPLICATION CLOSE button Press to close the active application window. *1 Pressing these buttons displays a message if your computer does not support the HDMI/VIDEO input function. *2 Available with the HDMI/VIDEO input function (page 61) as the Alt+Tab keys. This button works the same as well.
Using Your VAIO Computer > Using the Remote Commander n 69 N R Teletext TV program mode selection button Press to switch among open applications. S ENTER button Press to activate a feature or ... TV program mode. U APPLICATION CLOSE button Press to close the active application window. *1 Pressing these buttons displays a message if your computer does not support the HDMI/VIDEO input function. *2 Available with the HDMI/VIDEO input function (page 61) as the Alt+Tab keys. This button works the same as well.

User Guide
Page 124
Troubleshooting > ❑ Microphone (page 147) ❑ Mouse (page 148) ❑ Speakers (page 150) ❑ Touch Screen (page 151) ❑ Keyboard (page 152) ❑ Floppy Disks (page 153) ❑ Audio/Video (page 154) ❑ HDMI/VIDEO Input Function (page 157) ❑ "Memory Stick" (page 159) ❑ Peripherals (page 160) n 124 N
Troubleshooting > ❑ Microphone (page 147) ❑ Mouse (page 148) ❑ Speakers (page 150) ❑ Touch Screen (page 151) ❑ Keyboard (page 152) ❑ Floppy Disks (page 153) ❑ Audio/Video (page 154) ❑ HDMI/VIDEO Input Function (page 157) ❑ "Memory Stick" (page 159) ❑ Peripherals (page 160) n 124 N

