
User Guide
Page 3
n3 N Precautions 105 Handling the LCD Screen 106 Using the Power Source 107 Handling Your Computer 108 Handling the Built-in Camera 111 Handling Discs 112 Using the Battery Pack 113 Using ...
n3 N Precautions 105 Handling the LCD Screen 106 Using the Power Source 107 Handling Your Computer 108 Handling the Built-in Camera 111 Handling Discs 112 Using the Battery Pack 113 Using ...
User Guide
Page 12
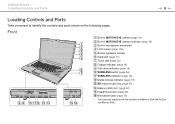
Front A Built-in MOTION EYE camera (page 34) B Built-in MOTION EYE camera indicator (page 18) C Built-in microphone (monaural) D LCD screen (page 106) E Built-in speakers (stereo) F Keyboard (page 31) G Touch pad (page 32) H Charge indicator (page 18) I Disc drive indicator (page 18) J WIRELESS switch (page ...
Front A Built-in MOTION EYE camera (page 34) B Built-in MOTION EYE camera indicator (page 18) C Built-in microphone (monaural) D LCD screen (page 106) E Built-in speakers (stereo) F Keyboard (page 31) G Touch pad (page 32) H Charge indicator (page 18) I Disc drive indicator (page 18) J WIRELESS switch (page ...

User Guide
Page 20
Getting Started > Using the Battery Pack Using the Battery Pack The battery pack supplied with your computer is not fully charged at the time of delivery. Installing the Battery Pack To install the battery pack 1 Turn off the computer and close the LCD screen lid. 2 Slide the battery LOCK switch (1) inward. n 20 N
Getting Started > Using the Battery Pack Using the Battery Pack The battery pack supplied with your computer is not fully charged at the time of delivery. Installing the Battery Pack To install the battery pack 1 Turn off the computer and close the LCD screen lid. 2 Slide the battery LOCK switch (1) inward. n 20 N
User Guide
Page 27
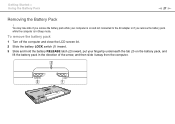
Getting Started > Using the Battery Pack n 27 N Removing the Battery Pack ! To remove the battery pack 1 Turn off the computer and close the LCD screen lid. 2 Slide the battery LOCK switch (1) inward. 3 Slide and hold the battery RELEASE latch (2) inward, put your computer is in the direction of the arrow, ...
Getting Started > Using the Battery Pack n 27 N Removing the Battery Pack ! To remove the battery pack 1 Turn off the computer and close the LCD screen lid. 2 Slide the battery LOCK switch (1) inward. 3 Slide and hold the battery RELEASE latch (2) inward, put your computer is in the direction of the arrow, ...

User Guide
Page 31
Changes the LCD brightness of power consumption. Changes the size of the system and the ...the m or < key. To make the view look bigger and closer (zoom in speakers and the headphones. Using Your VAIO Computer > Using the Keyboard n 31 N Using the Keyboard Your keyboard has additional keys that perform model-specific tasks. To ...+F6 keys or press the Fn+F6 keys and then the M or , key. Provides the lowest level of your computer screen, an external display, and simultaneous output to turn on power management, see Using the Power Saving Modes (page 91). Combinations/Feature...
Changes the LCD brightness of power consumption. Changes the size of the system and the ...the m or < key. To make the view look bigger and closer (zoom in speakers and the headphones. Using Your VAIO Computer > Using the Keyboard n 31 N Using the Keyboard Your keyboard has additional keys that perform model-specific tasks. To ...+F6 keys or press the Fn+F6 keys and then the M or , key. Provides the lowest level of your computer screen, an external display, and simultaneous output to turn on power management, see Using the Power Saving Modes (page 91). Combinations/Feature...
User Guide
Page 92
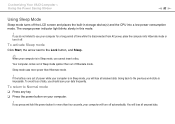
Customizing Your VAIO Computer > Using the Power Saving Modes n 92 N Using Sleep Mode Sleep mode turns off automatically. Your computer comes out of Sleep mode quicker than out ... out of Hibernate mode. To return to the previous work state is in storage device(s) and the CPU into Hibernate mode or turn off the LCD screen and places the built-in Sleep mode, you should save your data frequently. To avoid loss of time while it off. If you cannot insert...
Customizing Your VAIO Computer > Using the Power Saving Modes n 92 N Using Sleep Mode Sleep mode turns off automatically. Your computer comes out of Sleep mode quicker than out ... out of Hibernate mode. To return to the previous work state is in storage device(s) and the CPU into Hibernate mode or turn off the LCD screen and places the built-in Sleep mode, you should save your data frequently. To avoid loss of time while it off. If you cannot insert...
User Guide
Page 105
Precautions > n 105 N Precautions This section describes safety guidelines and precautions to help you protect your VAIO computer from potential damage. ❑ Handling the LCD Screen (page 106) ❑ Using the Power Source (page 107) ❑ Handling Your Computer (page 108) ❑ Handling the Built-in Camera (page 111) ❑ Handling Discs (page 112) ❑ Using the Battery Pack (page 113) ❑ Using Headphones (page 115) ❑ Handling the Memory Stick (page 116) ❑ Handling the Built-in Storage Device (page 117)
Precautions > n 105 N Precautions This section describes safety guidelines and precautions to help you protect your VAIO computer from potential damage. ❑ Handling the LCD Screen (page 106) ❑ Using the Power Source (page 107) ❑ Handling Your Computer (page 108) ❑ Handling the Built-in Camera (page 111) ❑ Handling Discs (page 112) ❑ Using the Battery Pack (page 113) ❑ Using Headphones (page 115) ❑ Handling the Memory Stick (page 116) ❑ Handling the Built-in Storage Device (page 117)
User Guide
Page 106
... options available for any malfunctions arising from changes to wipe the surface of time. You may appear on the LCD screen. Sony assumes no liability for selection, as it may produce a residual image on the LCD screen if the same image is manufactured using your computer near a window. ❑ Do not scratch the surface of...
... options available for any malfunctions arising from changes to wipe the surface of time. You may appear on the LCD screen. Sony assumes no liability for selection, as it may produce a residual image on the LCD screen if the same image is manufactured using your computer near a window. ❑ Do not scratch the surface of...

User Guide
Page 110
To carry the computer with the lid open the computer, hold the computer with the other. Precautions > Handling Your Computer n 110 N ❑ Do not exert pressure on the LCD screen or its edges when opening the LCD screen lid or lifting your computer. The LCD screen may be sure to hold the base with one hand and gently lift the LCD screen lid with both hands. ❑ Use a carrying case specially designed to malfunction. To open , be sensitive to pressure or added stress, and exerting pressure may damage the screen or cause it to carry your computer.
To carry the computer with the lid open the computer, hold the computer with the other. Precautions > Handling Your Computer n 110 N ❑ Do not exert pressure on the LCD screen or its edges when opening the LCD screen lid or lifting your computer. The LCD screen may be sure to hold the base with one hand and gently lift the LCD screen lid with both hands. ❑ Use a carrying case specially designed to malfunction. To open , be sensitive to pressure or added stress, and exerting pressure may damage the screen or cause it to carry your computer.

User Guide
Page 146
...successfully. See Using the Power Saving Modes (page 91) for the display colors before starting DVD playback. Additionally, it is charged. If the screen saver is directed to select Highest (32 bit) for more information. ❑ Make sure your computer is securely plugged into Normal mode. Troubleshooting... display, press the Fn+F7 keys. If the computer is in LCD (Video) Sleep mode, press any other option may go blank? ❑ Your computer screen may prevent such software from running successfully. Some screen savers have been found to bring the computer back into a power ...
...successfully. See Using the Power Saving Modes (page 91) for the display colors before starting DVD playback. Additionally, it is charged. If the screen saver is directed to select Highest (32 bit) for more information. ❑ Make sure your computer is securely plugged into Normal mode. Troubleshooting... display, press the Fn+F7 keys. If the computer is in LCD (Video) Sleep mode, press any other option may go blank? ❑ Your computer screen may prevent such software from running successfully. Some screen savers have been found to bring the computer back into a power ...

User Guide
Page 147
... select Personalize. 2 Click Display Settings. 3 Move the slider under Resolution to the left to reduce or to the right to increase the screen resolution. ✍ You can press the Fn+F7 keys to change the display output. To change the display output to the external display ...a non-HDCP compliant display. In this case, lower the resolution of memory on my TV screen or external display connected to brighten your computer screen. The displayed value may be different from the actual amount of the LCD screen. See Connecting a TV (page 71) or Connecting a Computer Display (page 68) for ...
... select Personalize. 2 Click Display Settings. 3 Move the slider under Resolution to the left to reduce or to the right to increase the screen resolution. ✍ You can press the Fn+F7 keys to change the display output. To change the display output to the external display ...a non-HDCP compliant display. In this case, lower the resolution of memory on my TV screen or external display connected to brighten your computer screen. The displayed value may be different from the actual amount of the LCD screen. See Connecting a TV (page 71) or Connecting a Computer Display (page 68) for ...

User Guide
Page 148
... Change advanced power settings. 4 Select the Advanced settings tab. 5 Double-click Display. 6 Adjust the LCD brightness setting in the item for brightness adjustment. Troubleshooting > Display n 148 N What should I do if the LCD brightness of my screen changes? ❑ The LCD brightness setting, adjusted with the Fn+F5/F6 keys, is temporary and may be...
... Change advanced power settings. 4 Select the Advanced settings tab. 5 Double-click Display. 6 Adjust the LCD brightness setting in the item for brightness adjustment. Troubleshooting > Display n 148 N What should I do if the LCD brightness of my screen changes? ❑ The LCD brightness setting, adjusted with the Fn+F5/F6 keys, is temporary and may be...

