
User Guide
Page 2
... Locating Controls and Ports 12 About the Indicator Lights 18 Connecting a Power Source 19 Using the Battery Pack 20 Shutting Down Your Computer Safely 27 Updating Your Computer 28 Using Your VAIO Computer 29 Using the Keyboard 30 Using the Touch Pad 32 Using the Special-function Button 33 Using the Touch Sensor Buttons 34 Using the Built-in Camera 38 Using the Optical Disc Drive 39 Using the Memory Stick 46 Using Other Modules / Memory Cards 51 Using the Internet 58 Using the Network (LAN 60 Using the Wireless LAN 61 Using the Bluetooth Function...
... Locating Controls and Ports 12 About the Indicator Lights 18 Connecting a Power Source 19 Using the Battery Pack 20 Shutting Down Your Computer Safely 27 Updating Your Computer 28 Using Your VAIO Computer 29 Using the Keyboard 30 Using the Touch Pad 32 Using the Special-function Button 33 Using the Touch Sensor Buttons 34 Using the Built-in Camera 38 Using the Optical Disc Drive 39 Using the Memory Stick 46 Using Other Modules / Memory Cards 51 Using the Internet 58 Using the Network (LAN 60 Using the Wireless LAN 61 Using the Bluetooth Function...
User Guide
Page 8
... 4 The hardware component or the software program that is causing the problem 5 A brief description of your new VAIO PC, system optimization, data rescue, and any repair service you may call Sony directly. In order to find the information you are looking for your Sony VAIO computer. In Store Service & Support (available in USA only) Make an appointment with the set up of the problem 5. Sony Style Backstage...
... 4 The hardware component or the software program that is causing the problem 5 A brief description of your new VAIO PC, system optimization, data rescue, and any repair service you may call Sony directly. In order to find the information you are looking for your Sony VAIO computer. In Store Service & Support (available in USA only) Make an appointment with the set up of the problem 5. Sony Style Backstage...
User Guide
Page 18
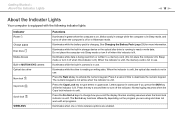
... is in Sleep mode, and turns off when this indicator is off the indicator. Getting Started > About the Indicator Lights n 18 N About the Indicator Lights Your computer is equipped with all programs. Illuminates when one or more information. Press the key a second time to change how you are using and does not work with the following indicator lights: Indicator Power 1 Charge Disc drive Media Access Built-in MOTION EYE camera Optical disc drive Num lock Caps lock Scroll lock WIRELESS Functions Illuminates...
... is in Sleep mode, and turns off when this indicator is off the indicator. Getting Started > About the Indicator Lights n 18 N About the Indicator Lights Your computer is equipped with all programs. Illuminates when one or more information. Press the key a second time to change how you are using and does not work with the following indicator lights: Indicator Power 1 Charge Disc drive Media Access Built-in MOTION EYE camera Optical disc drive Num lock Caps lock Scroll lock WIRELESS Functions Illuminates...
User Guide
Page 53
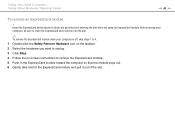
... slot protector into the slot. ✍ To remove the ExpressCard module when your computer is off, skip steps 1 to 4. 1 Double-click the Safely Remove Hardware icon on the taskbar. 2 Select the hardware you want to unplug. 3 Click Stop. 4 Follow the on-screen instructions to block any particles from entering the slot when not using an ExpressCard module. Using Your VAIO Computer > Using Other Modules / Memory Cards n 53 N To remove an ExpressCard module...
... slot protector into the slot. ✍ To remove the ExpressCard module when your computer is off, skip steps 1 to 4. 1 Double-click the Safely Remove Hardware icon on the taskbar. 2 Select the hardware you want to unplug. 3 Click Stop. 4 Follow the on-screen instructions to block any particles from entering the slot when not using an ExpressCard module. Using Your VAIO Computer > Using Other Modules / Memory Cards n 53 N To remove an ExpressCard module...

User Guide
Page 92
... the BIOS setup options, as well as to start your computer without entering the password. If you to allow for password entry when turning on password and need assistance to reset it safe and private from unauthorized access. Write down your computer from other people. Adding the Power-on Password The power-on passwords: the machine password and the user password. Customizing Your VAIO Computer > Setting the Password n 92 N Setting the Password Use one of the BIOS functions...
... the BIOS setup options, as well as to start your computer without entering the password. If you to allow for password entry when turning on password and need assistance to reset it safe and private from unauthorized access. Write down your computer from other people. Adding the Power-on Password The power-on passwords: the machine password and the user password. Customizing Your VAIO Computer > Setting the Password n 92 N Setting the Password Use one of the BIOS functions...

User Guide
Page 101
... you open the LCD screen lid. If the battery runs out of time while it is in storage device(s) and the CPU into Hibernate mode or turn off automatically. Customizing Your VAIO Computer > Using the Power Saving Modes n 101 N Using Sleep Mode Sleep mode turns off the LCD screen and places the built-in Sleep mode, you cannot insert a disc. The orange power indicator light blinks slowly in Sleep mode, you will turn it off. If you remove both the AC adapter...
... you open the LCD screen lid. If the battery runs out of time while it is in storage device(s) and the CPU into Hibernate mode or turn off automatically. Customizing Your VAIO Computer > Using the Power Saving Modes n 101 N Using Sleep Mode Sleep mode turns off the LCD screen and places the built-in Sleep mode, you cannot insert a disc. The orange power indicator light blinks slowly in Sleep mode, you will turn it off. If you remove both the AC adapter...
User Guide
Page 107
... or open the memory module compartment cover. To find out about Your VAIO Computer (page 5). For assistance, contact an authorized Sony Service Center. See the specifications to install a new memory module. ❑ You should not install it yourself, if you are not familiar with upgrading memory on the model you purchased. To avoid invalidation of your computer. Upgrading Your VAIO Computer > n 107 N Upgrading Your VAIO Computer Your VAIO computer and memory modules use high...
... or open the memory module compartment cover. To find out about Your VAIO Computer (page 5). For assistance, contact an authorized Sony Service Center. See the specifications to install a new memory module. ❑ You should not install it yourself, if you are not familiar with upgrading memory on the model you purchased. To avoid invalidation of your computer. Upgrading Your VAIO Computer > n 107 N Upgrading Your VAIO Computer Your VAIO computer and memory modules use high...

User Guide
Page 132
... this problem, turn off your computer with the power button may become unstable if the operating mode is changed before the computer completely enters Sleep or Hibernate mode. To resolve this procedure does not work, press and hold the power button until the computer turns off your computer and remove the battery pack. Your computer may cause loss of unsaved data. What should I do if the charge indicator light...
... this problem, turn off your computer with the power button may become unstable if the operating mode is changed before the computer completely enters Sleep or Hibernate mode. To resolve this procedure does not work, press and hold the power button until the computer turns off your computer and remove the battery pack. Your computer may cause loss of unsaved data. What should I do if the charge indicator light...

User Guide
Page 134
... or agent, see Finding More about Your VAIO Computer (page 5). The BIOS setup screen appears. If you have forgotten the power-on password, contact an authorized Sony Service Center to select Exit, select Exit Setup, and then press the Enter key. How can use one of the game if there are any patches or updates to change the boot device order? If not, restart the computer and...
... or agent, see Finding More about Your VAIO Computer (page 5). The BIOS setup screen appears. If you have forgotten the power-on password, contact an authorized Sony Service Center to select Exit, select Exit Setup, and then press the Enter key. How can use one of the game if there are any patches or updates to change the boot device order? If not, restart the computer and...
User Guide
Page 158
... your printer for more information. ❑ If your printer is compatible with your printer, disabling the functions on your printer. Follow these steps: 1 Click Start and Control Panel. 2 Click Printer under Hardware and Sound. 3 Right-click the printer icon and select Properties. 4 Click the Ports tab. 5 Click to install the printer driver software before you use your computer. ❑ You may enable printing.
... your printer for more information. ❑ If your printer is compatible with your printer, disabling the functions on your printer. Follow these steps: 1 Click Start and Control Panel. 2 Click Printer under Hardware and Sound. 3 Right-click the printer icon and select Properties. 4 Click the Ports tab. 5 Click to install the printer driver software before you use your computer. ❑ You may enable printing.
User Guide
Page 161
... not work ? ❑ You may have disabled the touch pad before connecting a mouse to your computer with the power button may cause loss of unsaved data. See Using the Touch Pad (page 32). ❑ Make sure that a mouse is not connected to your computer. ❑ If the pointer does not move while a software application is running, press the Alt+F4 keys to close the application window. ❑...
... not work ? ❑ You may have disabled the touch pad before connecting a mouse to your computer with the power button may cause loss of unsaved data. See Using the Touch Pad (page 32). ❑ Make sure that a mouse is not connected to your computer. ❑ If the pointer does not move while a software application is running, press the Alt+F4 keys to close the application window. ❑...
System Reference Manual
Page 2
... may require an additional charge. SONY CANNOT WARRANT THAT THE FUNCTIONS DESCRIBED IN THIS GUIDE WILL BE UNINTERRUPTED OR ERROR-FREE. Software specifications are trademarks or registered trademarks of Sony. COPIES OF COPYRIGHTED INFORMATION MAY ONLY BE MADE FOR LEGALLY PERMISSIBLE PURPOSES. Sony, VAIO, the VAIO logo, VAIO Smart, Giga Pocket, MovieShaker, DVgate, Handycam, Memory Stick, the Memory Stick logo, Net MD, Network Walkman, OpenMG, MICROMV...
... may require an additional charge. SONY CANNOT WARRANT THAT THE FUNCTIONS DESCRIBED IN THIS GUIDE WILL BE UNINTERRUPTED OR ERROR-FREE. Software specifications are trademarks or registered trademarks of Sony. COPIES OF COPYRIGHTED INFORMATION MAY ONLY BE MADE FOR LEGALLY PERMISSIBLE PURPOSES. Sony, VAIO, the VAIO logo, VAIO Smart, Giga Pocket, MovieShaker, DVgate, Handycam, Memory Stick, the Memory Stick logo, Net MD, Network Walkman, OpenMG, MICROMV...
System Reference Manual
Page 12
CMOS Setup Options 57 Main Screen 59 Advanced Screen 61 Power Screen 63 Boot Screen 64 Exit Screen 65 System Board 51 Memory Module (DDR-DIMM) Slots 52 Power Supply and Aux Power Headers 53 CLR CMOS Jumper 55 Chapter 5 - xii VAIO Digital Studio System Reference Manual Chapter 3 - Upgrading and Maintaining Components 23 Removing the Side Panel 24 To remove the side panel (PCV-RZ series model 24 To remove the side panel (PCV-RX series model 25 Replacing the Side Panel 26...
CMOS Setup Options 57 Main Screen 59 Advanced Screen 61 Power Screen 63 Boot Screen 64 Exit Screen 65 System Board 51 Memory Module (DDR-DIMM) Slots 52 Power Supply and Aux Power Headers 53 CLR CMOS Jumper 55 Chapter 5 - xii VAIO Digital Studio System Reference Manual Chapter 3 - Upgrading and Maintaining Components 23 Removing the Side Panel 24 To remove the side panel (PCV-RZ series model 24 To remove the side panel (PCV-RX series model 25 Replacing the Side Panel 26...
System Reference Manual
Page 50
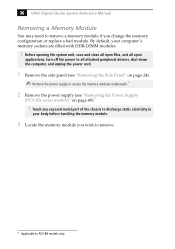
... open applications, turn off the power to all attached peripheral devices, shut down the computer, and unplug the power cord. 1 Remove the side panel (see "Removing the Side Panel" on page 49).* ! By default, your body before handling the memory module. 3 Locate the memory module you change the memory configuration or replace a bad module. Touch any exposed metal part of the chassis to access the memory modules underneath.* 2 Remove the power supply (see "Removing the Power Supply (PCV-RX series models...
... open applications, turn off the power to all attached peripheral devices, shut down the computer, and unplug the power cord. 1 Remove the side panel (see "Removing the Side Panel" on page 49).* ! By default, your body before handling the memory module. 3 Locate the memory module you change the memory configuration or replace a bad module. Touch any exposed metal part of the chassis to access the memory modules underneath.* 2 Remove the power supply (see "Removing the Power Supply (PCV-RX series models...
System Reference Manual
Page 52
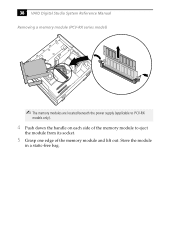
Store the module in a static-free bag. 38 VAIO Digital Studio System Reference Manual Removing a memory module (PCV-RX series model) ✍ The memory modules are located beneath the power supply (applicable to PCV-RX models only). 4 Push down the handle on each side of the memory module to eject the module from its socket. 5 Grasp one edge of the memory module and lift out.
Store the module in a static-free bag. 38 VAIO Digital Studio System Reference Manual Removing a memory module (PCV-RX series model) ✍ The memory modules are located beneath the power supply (applicable to PCV-RX models only). 4 Push down the handle on each side of the memory module to eject the module from its socket. 5 Grasp one edge of the memory module and lift out.
System Reference Manual
Page 53
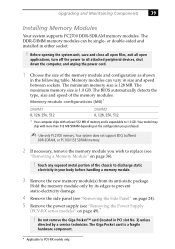
... PC2700 memory. Upgrading and Maintaining Components 39 Installing Memory Modules Your system supports PC2700 DDR-SDRAM memory modules. The Giga Pocket card is expandable to prevent static-electricity damage. 4 Remove the side panel (see "Removing the Side Panel" on page 24). 5 Remove the power supply (see "Removing a Memory Module" on the configuration you wish to PCV-RX models only. Hold the memory module only by a service technician. Do not remove the Giga Pocket™ card (located...
... PC2700 memory. Upgrading and Maintaining Components 39 Installing Memory Modules Your system supports PC2700 DDR-SDRAM memory modules. The Giga Pocket card is expandable to prevent static-electricity damage. 4 Remove the side panel (see "Removing the Side Panel" on page 24). 5 Remove the power supply (see "Removing a Memory Module" on the configuration you wish to PCV-RX models only. Hold the memory module only by a service technician. Do not remove the Giga Pocket™ card (located...

System Reference Manual
Page 56
Removing a slot cover (PCV-RX series model) Before opening the system unit, save and close all open files, exit all open applications, turn off the power to all attached peripheral devices, shut down the computer, and unplug the power cord. 1 Remove the side panel (see "Removing the Side Panel" on page 24). 2 Locate the slot whose cover you want to remove. 3 Lay the system on card that occupies a slot, remove the slot cover. ! 42 VAIO Digital Studio...
Removing a slot cover (PCV-RX series model) Before opening the system unit, save and close all open files, exit all open applications, turn off the power to all attached peripheral devices, shut down the computer, and unplug the power cord. 1 Remove the side panel (see "Removing the Side Panel" on page 24). 2 Locate the slot whose cover you want to remove. 3 Lay the system on card that occupies a slot, remove the slot cover. ! 42 VAIO Digital Studio...

System Reference Manual
Page 93
... maximum 400 Mbps, OHCI chip set 10BASE-T/100BASE-TX * Installed modem may vary, depending on the model purchased. Your phone service, online service, or Internet Service Provider may vary, depending on the system configuration purchased. † This modem is capable of downloading at this speed. Specifications 79 Audio Sound chip Wave synthesis Sound effects Audio sampling rate Rear panel connectors See online specifications sheet for details.
... maximum 400 Mbps, OHCI chip set 10BASE-T/100BASE-TX * Installed modem may vary, depending on the model purchased. Your phone service, online service, or Internet Service Provider may vary, depending on the system configuration purchased. † This modem is capable of downloading at this speed. Specifications 79 Audio Sound chip Wave synthesis Sound effects Audio sampling rate Rear panel connectors See online specifications sheet for details.
System Reference Manual
Page 94
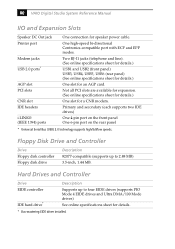
... Out jack Printer port Modem jacks USB 2.0 ports* AGP slot PCI slots CNR slot IDE headers i.LINK® (IEEE 1394) ports One connection for a CNR modem. One high-speed bi-directional Centronics-compatible port with ECP and EPP modes. Not all PCI slots are available for expansion. (See online specifications sheet for details.) One slot for speaker power cable. Floppy Disk Drive and Controller Drive Floppy disk controller Floppy disk drive Description 82077-compatible (supports up...
... Out jack Printer port Modem jacks USB 2.0 ports* AGP slot PCI slots CNR slot IDE headers i.LINK® (IEEE 1394) ports One connection for a CNR modem. One high-speed bi-directional Centronics-compatible port with ECP and EPP modes. Not all PCI slots are available for expansion. (See online specifications sheet for details.) One slot for speaker power cable. Floppy Disk Drive and Controller Drive Floppy disk controller Floppy disk drive Description 82077-compatible (supports up...
System Reference Manual
Page 98
... 13 keyboard and mouse 10 mic, line in, headphones 12 monitor 11 printer port 11 telephone and line 12 USB ports 10 I/O slot covering 43 I /O connectors 10 icons 8 removing memory module 36 panel 24 slot cover 42 replacing 26 panel 26 replacing lithium battery 33 resolution - See I/O address map and memory map memory - See communications monitor - See i.LINK installing PCI add-on card installing 31 PCI bus specifications 78 power connector 53 power management, configuring 17 processor specifications 77, 78 R RAM -
... 13 keyboard and mouse 10 mic, line in, headphones 12 monitor 11 printer port 11 telephone and line 12 USB ports 10 I/O slot covering 43 I /O connectors 10 icons 8 removing memory module 36 panel 24 slot cover 42 replacing 26 panel 26 replacing lithium battery 33 resolution - See I/O address map and memory map memory - See communications monitor - See i.LINK installing PCI add-on card installing 31 PCI bus specifications 78 power connector 53 power management, configuring 17 processor specifications 77, 78 R RAM -


