User Guide
Page 2
... and Ports...14 About the Indicator Lights ...20 Connecting a Power Source ...21 Using the Battery Pack ...22 Shutting Down Your Computer Safely ...30 Using Your VAIO Computer ...31 Using the Keyboard ...32 Using the Touch Pad ...34 Using the Special-function Button ...35 Using the Touch Sensor Buttons ...36 Using the...
... and Ports...14 About the Indicator Lights ...20 Connecting a Power Source ...21 Using the Battery Pack ...22 Shutting Down Your Computer Safely ...30 Using Your VAIO Computer ...31 Using the Keyboard ...32 Using the Touch Pad ...34 Using the Special-function Button ...35 Using the Touch Sensor Buttons ...36 Using the...
User Guide
Page 3
... Monitors Function ...81 Connecting an External Microphone ...83 Connecting a Universal Serial Bus (USB) Device...84 Connecting a Printer ...87 Connecting an i.LINK Device ...88 Customizing Your VAIO Computer ...90 Setting the Password ...91 Using Fingerprint Authentication ...98 Setting Up Your Computer with the...
... Monitors Function ...81 Connecting an External Microphone ...83 Connecting a Universal Serial Bus (USB) Device...84 Connecting a Printer ...87 Connecting an i.LINK Device ...88 Customizing Your VAIO Computer ...90 Setting the Password ...91 Using Fingerprint Authentication ...98 Setting Up Your Computer with the...
User Guide
Page 4
n4 N Precautions ...121 Handling the LCD Screen ...122 Using the Power Source ...123 Handling Your Computer ...124 Handling the Built-in MOTION EYE Camera...126 Handling Floppy Disks ...127 Handling Discs ...128 Using the Battery Pack ...129 Using Headphones ...131 Handling the Memory Stick ...132 Handling the Hard Disk ...133 Updating Your Computer ...134 Troubleshooting ...135 Computer ...137 System Security ...143 Battery...144 Built-in MOTION EYE Camera...146 Internet ...148 Networking ...150 Bluetooth Technology ...153 Optical Discs ...157 Display ...162 Printing ...166 Microphone ...167
n4 N Precautions ...121 Handling the LCD Screen ...122 Using the Power Source ...123 Handling Your Computer ...124 Handling the Built-in MOTION EYE Camera...126 Handling Floppy Disks ...127 Handling Discs ...128 Using the Battery Pack ...129 Using Headphones ...131 Handling the Memory Stick ...132 Handling the Hard Disk ...133 Updating Your Computer ...134 Troubleshooting ...135 Computer ...137 System Security ...143 Battery...144 Built-in MOTION EYE Camera...146 Internet ...148 Networking ...150 Bluetooth Technology ...153 Optical Discs ...157 Display ...162 Printing ...166 Microphone ...167

User Guide
Page 5
n5 N Mouse ...168 Speakers ...169 Touch Pad...171 Keyboard...172 Floppy Disks ...173 Audio/Video...174 Memory Stick ...176 Peripherals ...177 Support Options ...178 Sony Support Information ...178 Trademarks ...182
n5 N Mouse ...168 Speakers ...169 Touch Pad...171 Keyboard...172 Floppy Disks ...173 Audio/Video...174 Memory Stick ...176 Peripherals ...177 Support Options ...178 Sony Support Information ...178 Trademarks ...182
User Guide
Page 6
Information in this Sony VAIO® computer, and welcome to provide state-of your computer. n6 N Before Use Before Use Congratulations on your purchase of the VAIO computers with the 64-bit operating system. You may look slightly different from those of -the-art personal computing experience. ...intended for users of this manual may find differences in audio, video, computing, and communications to the on-screen User Guide. Sony has combined leading-edge technology in the information when your computer comes preinstalled with the Microsoft® Windows Vista® 32-bit operating...
Information in this Sony VAIO® computer, and welcome to provide state-of your computer. n6 N Before Use Before Use Congratulations on your purchase of the VAIO computers with the 64-bit operating system. You may look slightly different from those of -the-art personal computing experience. ...intended for users of this manual may find differences in audio, video, computing, and communications to the on-screen User Guide. Sony has combined leading-edge technology in the information when your computer comes preinstalled with the Microsoft® Windows Vista® 32-bit operating...
User Guide
Page 7
... implied warranties or merchantability or fitness for any particular purpose with this manual or the information contained herein at any circumstances. Sony Corporation will not compensate for any incidental, consequential, or special damages, whether based on tort, contract, or otherwise, arising... are lost recordings made to your computer, external recording media, or recording devices or any machine-readable form without notice. Sony Corporation reserves the right to make any modification to any relevant losses, including when recordings are not specified. All rights reserved...
... implied warranties or merchantability or fitness for any particular purpose with this manual or the information contained herein at any circumstances. Sony Corporation will not compensate for any incidental, consequential, or special damages, whether based on tort, contract, or otherwise, arising... are lost recordings made to your computer, external recording media, or recording devices or any machine-readable form without notice. Sony Corporation reserves the right to make any modification to any relevant losses, including when recordings are not specified. All rights reserved...
User Guide
Page 8
...specifications: 1 Connect to the Internet. 2 Go to the Sony online support web site at the following URLs: http://esupport.sony.com/EN/VAIO/ for customers in USA http://www.sony.ca/support/ for customers in Canada http://esupport.sony.com/LA/ for customers in Spanish-speaking Latin American countries or... areas http://esupport.sony.com/BR/ for customers in this manual)...
...specifications: 1 Connect to the Internet. 2 Go to the Sony online support web site at the following URLs: http://esupport.sony.com/EN/VAIO/ for customers in USA http://www.sony.ca/support/ for customers in Canada http://esupport.sony.com/LA/ for customers in Spanish-speaking Latin American countries or... areas http://esupport.sony.com/BR/ for customers in this manual)...

User Guide
Page 9
n9 N Before Use ❑ VAIO Recovery Center User Guide - To access this on-screen guide: 1 Click Start and Help and Support. 2 Click Use my VAIO. 3 Click VAIO Recovery Center User Guide. Provides information about restoring individual software programs, hardware drivers, and drive partition(s) or your entire hard disk drive to the original factory settings.
n9 N Before Use ❑ VAIO Recovery Center User Guide - To access this on-screen guide: 1 Click Start and Help and Support. 2 Click Use my VAIO. 3 Click VAIO Recovery Center User Guide. Provides information about restoring individual software programs, hardware drivers, and drive partition(s) or your entire hard disk drive to the original factory settings.
User Guide
Page 10
... and Support. ❑ Get started with my VAIO Get help with VAIO Care, system restore, backup and recovery, and contact Sony support. Choose from the following categories to articles, the VAIO technology page, specifications, and system and software information. ❑ Troubleshoot my VAIO Maintain and troubleshoot your VAIO computer with Internet and wireless setup, security setup...
... and Support. ❑ Get started with my VAIO Get help with VAIO Care, system restore, backup and recovery, and contact Sony support. Choose from the following categories to articles, the VAIO technology page, specifications, and system and software information. ❑ Troubleshoot my VAIO Maintain and troubleshoot your VAIO computer with Internet and wireless setup, security setup...

User Guide
Page 11
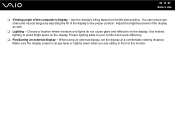
n 11 N Before Use Ergonomic Considerations You will be using your computer as a portable device in a variety of you (1). Place the computer directly in front of environments. Sit in a chair with your wrists in a relaxed, upright posture and avoid slouching forward or leaning far backwards. Keep your forearms horizontal (2), with good back support. Let your upper arms hang naturally at your feet are flat on the floor. Sit in a neutral, comfortable position (3) while using your computer - Adjust the level of your computer. Whenever possible, you more comfortable. Take ...
n 11 N Before Use Ergonomic Considerations You will be using your computer as a portable device in a variety of you (1). Place the computer directly in front of environments. Sit in a chair with your wrists in a relaxed, upright posture and avoid slouching forward or leaning far backwards. Keep your forearms horizontal (2), with good back support. Let your upper arms hang naturally at your feet are flat on the floor. Sit in a neutral, comfortable position (3) while using your computer - Adjust the level of your computer. Whenever possible, you more comfortable. Take ...
User Guide
Page 12
Use the display's tilting feature to your comfort and work efficiency. ❑ Positioning an external display - Proper lighting adds to find the best position. Make sure the display screen is at a comfortable viewing distance. Choose a location where windows and lights do not cause glare and reflection on the display. When using an external display, set the display at eye level or slightly lower when you are sitting in front of the display as well. ❑ Lighting - You can reduce eye strain and muscle fatigue by adjusting the tilt of the computer's display - Use ...
Use the display's tilting feature to your comfort and work efficiency. ❑ Positioning an external display - Proper lighting adds to find the best position. Make sure the display screen is at a comfortable viewing distance. Choose a location where windows and lights do not cause glare and reflection on the display. When using an external display, set the display at eye level or slightly lower when you are sitting in front of the display as well. ❑ Lighting - You can reduce eye strain and muscle fatigue by adjusting the tilt of the computer's display - Use ...
User Guide
Page 13
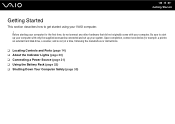
... Battery Pack (page 22) ❑ Shutting Down Your Computer Safely (page 30) n 13 N Getting Started Getting Started This section describes how to start up your VAIO computer. ! Before starting your computer.
... Battery Pack (page 22) ❑ Shutting Down Your Computer Safely (page 30) n 13 N Getting Started Getting Started This section describes how to start up your VAIO computer. ! Before starting your computer.
User Guide
Page 14
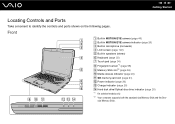
Front A Built-in MOTION EYE camera (page 40) B Built-in MOTION EYE camera indicator (page 20) C Built-in microphone (monaural) D LCD screen (page 122) E Built-in speakers (stereo) F Keyboard (page 32) G Touch pad (page 34) H Fingerprint sensor*1 (page 98) I Memory Stick slot*2 (page 56) J Media Access indicator (page 20) K SD memory card slot (page 61) L Power indicator (page 20) M Charge indicator (page 20) N Hard disk drive/Optical disc drive indicator (page 20) *1 On selected models only. *2 Your computer supports both the standard-size Memory Stick and the Duosize Memory Stick. n 14 N ...
Front A Built-in MOTION EYE camera (page 40) B Built-in MOTION EYE camera indicator (page 20) C Built-in microphone (monaural) D LCD screen (page 122) E Built-in speakers (stereo) F Keyboard (page 32) G Touch pad (page 34) H Fingerprint sensor*1 (page 98) I Memory Stick slot*2 (page 56) J Media Access indicator (page 20) K SD memory card slot (page 61) L Power indicator (page 20) M Charge indicator (page 20) N Hard disk drive/Optical disc drive indicator (page 20) *1 On selected models only. *2 Your computer supports both the standard-size Memory Stick and the Duosize Memory Stick. n 14 N ...

User Guide
Page 15
E Power button F Num lock indicator (page 20) G Caps lock indicator (page 20) H Scroll lock indicator (page 20) I WIRELESS switch (page 67) J WIRELESS indicator (page 20) * On selected models only. n 15 N Getting Started A CAPTURE button* (page 35) B Playback control area* : Fast-rewind : Play/Pause : Fast-forward For information on how to use the touch sensor buttons above , see Controlling Music and Video Playback (page 37). C AV MODE button* (page 36) D Volume control area* / : Volume : Muting For information on how to use the touch sensor buttons above , see Controlling Music and...
E Power button F Num lock indicator (page 20) G Caps lock indicator (page 20) H Scroll lock indicator (page 20) I WIRELESS switch (page 67) J WIRELESS indicator (page 20) * On selected models only. n 15 N Getting Started A CAPTURE button* (page 35) B Playback control area* : Fast-rewind : Play/Pause : Fast-forward For information on how to use the touch sensor buttons above , see Controlling Music and Video Playback (page 37). C AV MODE button* (page 36) D Volume control area* / : Volume : Muting For information on how to use the touch sensor buttons above , see Controlling Music and...
User Guide
Page 16
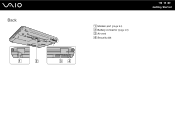
Back A Modem port (page 64) B Battery connector (page 22) C Air vent D Security slot n 16 N Getting Started
Back A Modem port (page 64) B Battery connector (page 22) C Air vent D Security slot n 16 N Getting Started

User Guide
Page 17
speeds. Right n 17 N Getting Started A Optical disc drive (page 43) B Optical disc drive indicator (page 20) C Drive eject button (page 43) D Manual eject hole (page 157) E ExpressCard/34 slot (page 53) F Hi-Speed USB (USB 2.0) port* (page 84) G Network (Ethernet) port (page 66) * Supports high-/full-/low-
speeds. Right n 17 N Getting Started A Optical disc drive (page 43) B Optical disc drive indicator (page 20) C Drive eject button (page 43) D Manual eject hole (page 157) E ExpressCard/34 slot (page 53) F Hi-Speed USB (USB 2.0) port* (page 84) G Network (Ethernet) port (page 66) * Supports high-/full-/low-

User Guide
Page 18
speeds. Left n 18 N Getting Started A DC IN port (page 21) B Air vent C Monitor port (page 77) D Hi-Speed USB (USB 2.0) ports* (page 84) E i.LINK 4-pin (S400) port (page 88) F Microphone jack (page 83) G Headphones jack (page 76) * Support high-/full-/low-
speeds. Left n 18 N Getting Started A DC IN port (page 21) B Air vent C Monitor port (page 77) D Hi-Speed USB (USB 2.0) ports* (page 84) E i.LINK 4-pin (S400) port (page 88) F Microphone jack (page 83) G Headphones jack (page 76) * Support high-/full-/low-

User Guide
Page 19
Bottom n 19 N Getting Started A Air vents B Illumination lamp (page 106) C Memory module compartment cover (page 115)
Bottom n 19 N Getting Started A Air vents B Illumination lamp (page 106) C Memory module compartment cover (page 115)
User Guide
Page 20
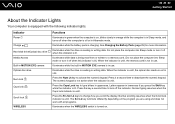
Press the Num Lk key to type letters in use. When the indicator is unlit, the optical disc media is unlit. Press the Caps Lock key to activate the numeric keypad. Normal typing resumes when the Caps lock indicator is not in uppercase. Press the Fn+Scr Lk keys to change how you are using and does not work with the following indicator lights: Indicator Power 1 Charge Hard disk drive/Optical disc drive Media Access Built-in MOTION EYE camera Optical disc drive Num lock Caps lock Scroll lock WIRELESS Functions Illuminates in green when the computer is on, blinks ...
Press the Num Lk key to type letters in use. When the indicator is unlit, the optical disc media is unlit. Press the Caps Lock key to activate the numeric keypad. Normal typing resumes when the Caps lock indicator is not in uppercase. Press the Fn+Scr Lk keys to change how you are using and does not work with the following indicator lights: Indicator Power 1 Charge Hard disk drive/Optical disc drive Media Access Built-in MOTION EYE camera Optical disc drive Num lock Caps lock Scroll lock WIRELESS Functions Illuminates in green when the computer is on, blinks ...
User Guide
Page 21
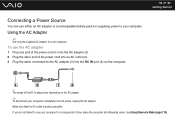
Using the AC Adapter ✍ Use only the supplied AC adapter for your computer completely from AC power, unplug the AC adapter. Make sure that the AC outlet is easily accessible. n 21 N Getting Started Connecting a Power Source You can use either an AC adapter or a rechargeable battery pack for supplying power to use the AC adapter 1 Plug one end of the power cord (1) into the AC adapter (3). 2 Plug the other end of the power cord into an AC outlet (2). 3 Plug the cable connected to the AC adapter (3) into Hibernate mode. If you do not intend to your computer. To use your ...
Using the AC Adapter ✍ Use only the supplied AC adapter for your computer completely from AC power, unplug the AC adapter. Make sure that the AC outlet is easily accessible. n 21 N Getting Started Connecting a Power Source You can use either an AC adapter or a rechargeable battery pack for supplying power to use the AC adapter 1 Plug one end of the power cord (1) into the AC adapter (3). 2 Plug the other end of the power cord into an AC outlet (2). 3 Plug the cable connected to the AC adapter (3) into Hibernate mode. If you do not intend to your computer. To use your ...