
User Guide
Page 20
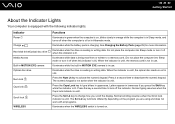
... the indicator. When the indicator is unlit, the optical disc media is in use . Press the key a second time to turn it a second time to change how you are using and does not work with the following indicator lights: Indicator Power 1 Charge Hard disk drive/Optical disc drive Media Access Built...
... the indicator. When the indicator is unlit, the optical disc media is in use . Press the key a second time to turn it a second time to change how you are using and does not work with the following indicator lights: Indicator Power 1 Charge Hard disk drive/Optical disc drive Media Access Built...
User Guide
Page 31
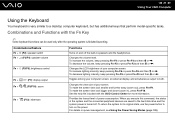
... on and off the built-in speakers and the headphones. To decrease the volume, keep pressing Fn+F4 or press Fn+F4 and then M or ,. Changes the volume level. To increase the volume, keep pressing Fn+F3 or press Fn+F3 and then m or Combinations and Functions with the Fn Key... used only after the operating system is very similar to a desktop computer keyboard, but has additional keys that perform model-specific tasks. n 31 N Using Your VAIO Computer Using the Keyboard Your keyboard is finished launching.
... on and off the built-in speakers and the headphones. To decrease the volume, keep pressing Fn+F4 or press Fn+F4 and then M or ,. Changes the volume level. To increase the volume, keep pressing Fn+F3 or press Fn+F3 and then m or Combinations and Functions with the Fn Key... used only after the operating system is very similar to a desktop computer keyboard, but has additional keys that perform model-specific tasks. n 31 N Using Your VAIO Computer Using the Keyboard Your keyboard is finished launching.
User Guide
Page 32
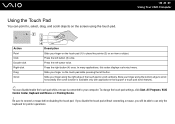
... scroll function is connected to place the pointer (2) on an item or object. Press the left button (3) once. To change the touch pad settings, click Start, All Programs, VAIO Control Center, Keyboard and Mouse and Pointing Device. ! Be sure to , select, drag, and scroll objects on the ... pad scroll feature). ✍ You can point to connect a mouse before disabling the touch pad. Slide your computer. n 32 N Using Your VAIO Computer Action Point Click Double-click Right-click Drag Scroll Description Slide your finger on the touch pad (1) to your finger along the right edge...
... scroll function is connected to place the pointer (2) on an item or object. Press the left button (3) once. To change the touch pad settings, click Start, All Programs, VAIO Control Center, Keyboard and Mouse and Pointing Device. ! Be sure to , select, drag, and scroll objects on the ... pad scroll feature). ✍ You can point to connect a mouse before disabling the touch pad. Slide your computer. n 32 N Using Your VAIO Computer Action Point Click Double-click Right-click Drag Scroll Description Slide your finger on the touch pad (1) to your finger along the right edge...
User Guide
Page 34
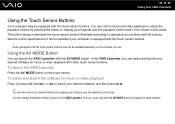
...; You can also select your desired software by pressing the button or swiping your computer is equipped with the touch sensor buttons. ! To launch the VAIO Launcher Press the AV MODE button on the software you perform with the buttons. To select and launch the software for music or video playback... with the AV MODE button. Using the AV MODE Button You can change the default software options in lamps underneath the touch sensor buttons illuminate according to display the setup window. You can launch the...
...; You can also select your desired software by pressing the button or swiping your computer is equipped with the touch sensor buttons. ! To launch the VAIO Launcher Press the AV MODE button on the software you perform with the buttons. To select and launch the software for music or video playback... with the AV MODE button. Using the AV MODE Button You can change the default software options in lamps underneath the touch sensor buttons illuminate according to display the setup window. You can launch the...
User Guide
Page 57
... is ready for use the device that it clicks into the slot until it does not contain your computer, follow these steps. ! n 57 N Using Your VAIO Computer To format a Memory Stick The Memory Stick has been formatted in Format options. 5 Click Start. 6 Follow the on-screen instructions. ! Do not remove the... Stick from the File system drop-down list as it may take time to use . The size of the allocation unit and file system may change. Formatting the Memory Stick erases the entire data on the media type. Be sure to format the Memory Stick depending on the media.
... is ready for use the device that it clicks into the slot until it does not contain your computer, follow these steps. ! n 57 N Using Your VAIO Computer To format a Memory Stick The Memory Stick has been formatted in Format options. 5 Click Start. 6 Follow the on-screen instructions. ! Do not remove the... Stick from the File system drop-down list as it may take time to use . The size of the allocation unit and file system may change. Formatting the Memory Stick erases the entire data on the media type. Be sure to format the Memory Stick depending on the media.

User Guide
Page 65
...speed is not as fast as the one displayed on your computer. In addition, communications may be as fast as expected, changing the wireless channel on the access point may reduce the communication speed due to ensure communications with IEEE 802.11b products. The ... this into consideration, the IEEE 802.11g products are designed to reduce the communication speed to radio interference. n 65 N Using Your VAIO Computer The communication speed varies depending on the distance between communication devices, existence of obstacles between such devices, the radio conditions, the ambient...
...speed is not as fast as the one displayed on your computer. In addition, communications may be as fast as expected, changing the wireless channel on the access point may reduce the communication speed due to ensure communications with IEEE 802.11b products. The ... this into consideration, the IEEE 802.11g products are designed to reduce the communication speed to radio interference. n 65 N Using Your VAIO Computer The communication speed varies depending on the distance between communication devices, existence of obstacles between such devices, the radio conditions, the ambient...
User Guide
Page 77
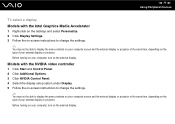
.... 2 Click Additional Options. 3 Click NVIDIA Control Panel. 4 Select the display setup option under Display. 5 Follow the on-screen instructions to change the settings. ✍ You may not be able to display the same contents on your computer screen and the external display or projector at the...Intel Graphics Media Accelerator 1 Right-click on the desktop and select Personalize. 2 Click Display Settings. 3 Follow the on-screen instructions to change the settings. ✍ You may not be able to display the same contents on your computer screen and the external display or projector at...
.... 2 Click Additional Options. 3 Click NVIDIA Control Panel. 4 Select the display setup option under Display. 5 Follow the on-screen instructions to change the settings. ✍ You may not be able to display the same contents on your computer screen and the external display or projector at the...Intel Graphics Media Accelerator 1 Right-click on the desktop and select Personalize. 2 Click Display Settings. 3 Follow the on-screen instructions to change the settings. ✍ You may not be able to display the same contents on your computer screen and the external display or projector at...
User Guide
Page 79
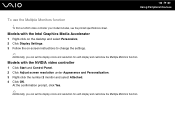
... function. Models with the Intel Graphics Media Accelerator 1 Right-click on the desktop and select Personalize. 2 Click Display Settings. 3 Follow the on-screen instructions to change the settings. ✍ Additionally, you can set the display colors and resolution for each display and customize the Multiple Monitors function. Models with the NVIDIA...
... function. Models with the Intel Graphics Media Accelerator 1 Right-click on the desktop and select Personalize. 2 Click Display Settings. 3 Follow the on-screen instructions to change the settings. ✍ Additionally, you can set the display colors and resolution for each display and customize the Multiple Monitors function. Models with the NVIDIA...
User Guide
Page 88
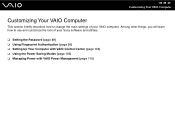
n 88 N Customizing Your VAIO Computer Customizing Your VAIO Computer This section briefly describes how to use and customize the look of your Sony software and utilities. ❑ Setting the Password (page 89) ❑ Using Fingerprint Authentication (page 96) ❑ Setting Up Your Computer with VAIO Control Center (page 104) ❑ Using the Power Saving Modes (page 105) ❑ Managing Power with VAIO Power Management (page 110) Among other things, you will learn how to change the main settings of your VAIO computer.
n 88 N Customizing Your VAIO Computer Customizing Your VAIO Computer This section briefly describes how to use and customize the look of your Sony software and utilities. ❑ Setting the Password (page 89) ❑ Using Fingerprint Authentication (page 96) ❑ Setting Up Your Computer with VAIO Control Center (page 104) ❑ Using the Power Saving Modes (page 105) ❑ Managing Power with VAIO Power Management (page 110) Among other things, you will learn how to change the main settings of your VAIO computer.
User Guide
Page 89
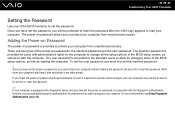
...provided for users with the fingerprint authentication function, you have set the power-on password in conjunction with administrative rights on the computer to change all the setup options in for service to reset the password. ✍ If your computer is provided to protect your computer without ...the power-on password, you must first set the user password, you cannot start your computer from other people. n 89 N Customizing Your VAIO Computer Setting the Password Use one of the BIOS functions to set the password, you to protect your computer from unauthorized access. If you ...
...provided for users with the fingerprint authentication function, you have set the power-on password in conjunction with administrative rights on the computer to change all the setup options in for service to reset the password. ✍ If your computer is provided to protect your computer without ...the power-on password, you must first set the user password, you cannot start your computer from other people. n 89 N Customizing Your VAIO Computer Setting the Password Use one of the BIOS functions to set the password, you to protect your computer from unauthorized access. If you ...

User Guide
Page 90
At the confirmation prompt, press the Enter key. If not, restart the computer and press the F2 key several times when the VAIO logo appears. 3 Press the < or , key to select Security to select Exit, select Exit Setup, and then press the Enter key. The password can be ...up to 32 alphanumeric characters (including spaces) long. 5 Select Password when Power On under Security and press the Enter key. 6 Change the setting from Disabled to Enabled. 7 Press the < or , key to display the Security tab, select Set Machine Password, and then press the Enter key...
At the confirmation prompt, press the Enter key. If not, restart the computer and press the F2 key several times when the VAIO logo appears. 3 Press the < or , key to select Security to select Exit, select Exit Setup, and then press the Enter key. The password can be ...up to 32 alphanumeric characters (including spaces) long. 5 Select Password when Power On under Security and press the Enter key. 6 Change the setting from Disabled to Enabled. 7 Press the < or , key to display the Security tab, select Set Machine Password, and then press the Enter key...

User Guide
Page 92
If not, restart the computer and press the F2 key several times when the VAIO logo appears. 3 Enter the machine password and press the Enter key. 4 Press the < or , key to select Security to select Exit, select Exit Setup, and ... Enter key. 5 On the password entry screen, enter the current password once and a new password twice, and then press the Enter key. n 92 N Customizing Your VAIO Computer Changing/Removing the Power-on Password To change or remove the power-on password (machine password) 1 Turn on the computer. 2 Press the F2 key when the...
If not, restart the computer and press the F2 key several times when the VAIO logo appears. 3 Enter the machine password and press the Enter key. 4 Press the < or , key to select Security to select Exit, select Exit Setup, and ... Enter key. 5 On the password entry screen, enter the current password once and a new password twice, and then press the Enter key. n 92 N Customizing Your VAIO Computer Changing/Removing the Power-on Password To change or remove the power-on password (machine password) 1 Turn on the computer. 2 Press the F2 key when the...

User Guide
Page 93
The BIOS setup screen appears. If not, restart the computer and press the F2 key several times when the VAIO logo appears. 3 Enter the user password and press the Enter key. 4 Press the < or , key to select Security to select Exit, select Exit Setup, and ... Enter key. 5 On the password entry screen, enter the current password once and a new password twice, and then press the Enter key. n 93 N Customizing Your VAIO Computer To change or remove the power-on password (user password) 1 Turn on the computer. 2 Press the F2 key when the...
The BIOS setup screen appears. If not, restart the computer and press the F2 key several times when the VAIO logo appears. 3 Enter the user password and press the Enter key. 4 Press the < or , key to select Security to select Exit, select Exit Setup, and ... Enter key. 5 On the password entry screen, enter the current password once and a new password twice, and then press the Enter key. n 93 N Customizing Your VAIO Computer To change or remove the power-on password (user password) 1 Turn on the computer. 2 Press the F2 key when the...
User Guide
Page 94
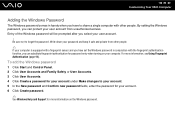
.... 2 Click User Accounts and Family Safety or User Accounts. 3 Click User Accounts. 4 Click Create a password for your account under Make changes to your account. 5 In the New password and Confirm new password fields, enter the password for your account. 6 Click Create password. &#... function, you can substitute fingerprint authentication for more information, see Using Fingerprint Authentication (page 96). n 94 N Customizing Your VAIO Computer Adding the Windows Password The Windows password comes in handy when you have set the Windows password in conjunction with other people...
.... 2 Click User Accounts and Family Safety or User Accounts. 3 Click User Accounts. 4 Click Create a password for your account under Make changes to your account. 5 In the New password and Confirm new password fields, enter the password for your account. 6 Click Create password. &#... function, you can substitute fingerprint authentication for more information, see Using Fingerprint Authentication (page 96). n 94 N Customizing Your VAIO Computer Adding the Windows Password The Windows password comes in handy when you have set the Windows password in conjunction with other people...
User Guide
Page 95
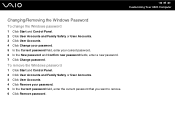
... password. 6 In the New password and Confirm new password fields, enter a new password. 7 Click Change password. n 95 N Customizing Your VAIO Computer Changing/Removing the Windows Password To change the Windows password 1 Click Start and Control Panel. 2 Click User Accounts and Family Safety or User ...Accounts. 3 Click User Accounts. 4 Click Change your password. 5 In the Current password field, enter your...
... password. 6 In the New password and Confirm new password fields, enter a new password. 7 Click Change password. n 95 N Customizing Your VAIO Computer Changing/Removing the Windows Password To change the Windows password 1 Click Start and Control Panel. 2 Click User Accounts and Family Safety or User ...Accounts. 3 Click User Accounts. 4 Click Change your password. 5 In the Current password field, enter your...

User Guide
Page 104
... the Illumination LED check box. 4 Click OK. You can change the settings. 3 Once finished, click OK. Some of the lamp to make it stay unlit by following these steps: 1 Click Start, All Programs, and VAIO Control Center. 2 Click Display and Illumination LED Setting. 3 ...to specify preferences for system behavior. n 104 N Customizing Your VAIO Computer Setting Up Your Computer with the VAIO Control Center. The setting of your computer illuminates depending on your actions or the computer's status. Changing the default illumination lamp activity The illumination lamp on the bottom of...
... the Illumination LED check box. 4 Click OK. You can change the settings. 3 Once finished, click OK. Some of the lamp to make it stay unlit by following these steps: 1 Click Start, All Programs, and VAIO Control Center. 2 Click Display and Illumination LED Setting. 3 ...to specify preferences for system behavior. n 104 N Customizing Your VAIO Computer Setting Up Your Computer with the VAIO Control Center. The setting of your computer illuminates depending on your actions or the computer's status. Changing the default illumination lamp activity The illumination lamp on the bottom of...
User Guide
Page 107
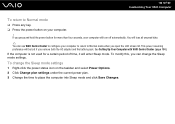
... lid. To modify this, you remove both the AC adapter and the battery pack. n 107 N Customizing Your VAIO Computer To return to place the computer into Sleep mode and click Save Changes. You will enter Sleep mode. If the computer is not used for more than four seconds, your computer will... be lost if you can use VAIO Control Center to configure your computer. ! See Setting Up Your Computer with VAIO Control Center (page 104).
... lid. To modify this, you remove both the AC adapter and the battery pack. n 107 N Customizing Your VAIO Computer To return to place the computer into Sleep mode and click Save Changes. You will enter Sleep mode. If the computer is not used for more than four seconds, your computer will... be lost if you can use VAIO Control Center to configure your computer. ! See Setting Up Your Computer with VAIO Control Center (page 104).
User Guide
Page 110
.... 4 Click OK. n 110 N Customizing Your VAIO Computer Managing Power with the software for more information. Selecting a Power Plan When you need to change the power plan settings 1 Click Change plan settings under your power status. The VAIO Power Management is added to display the window that time... select Power Options. 2 Select your computer and longer battery life. This icon indicates what kind of your desired power plan. Change the settings for VAIO computers. To select a power plan 1 Right-click the power status icon on the taskbar. With this icon to the Windows...
.... 4 Click OK. n 110 N Customizing Your VAIO Computer Managing Power with the software for more information. Selecting a Power Plan When you need to change the power plan settings 1 Click Change plan settings under your power status. The VAIO Power Management is added to display the window that time... select Power Options. 2 Select your computer and longer battery life. This icon indicates what kind of your desired power plan. Change the settings for VAIO computers. To select a power plan 1 Right-click the power status icon on the taskbar. With this icon to the Windows...
User Guide
Page 113
...pack and AC adapter) and from any telecommunication links, networks, or modems before adding or removing memory modules. ❑ Be careful when changing memory. Before touching a memory module, ensure the following pages. If such a station is not detected by the computer or the Windows operating... ❑ Be sure to place your computer. Before you upgrade your computer, you can damage electronic components. n 113 N Upgrading Your VAIO Computer Adding and Removing Memory If you want to expand the functionality of your computer's memory, read the notes and procedures in the following...
...pack and AC adapter) and from any telecommunication links, networks, or modems before adding or removing memory modules. ❑ Be careful when changing memory. Before touching a memory module, ensure the following pages. If such a station is not detected by the computer or the Windows operating... ❑ Be sure to place your computer. Before you upgrade your computer, you can damage electronic components. n 113 N Upgrading Your VAIO Computer Adding and Removing Memory If you want to expand the functionality of your computer's memory, read the notes and procedures in the following...
User Guide
Page 114
... computer and any repair costs will not be covered by the warranty. ❑ Do not place the memory module in aluminum foil to change the module. n 114 N Upgrading Your VAIO Computer ❑ Do not open the memory module package before you are not magnetically shielded ❑ Ambient temperature of more than 95...
... computer and any repair costs will not be covered by the warranty. ❑ Do not place the memory module in aluminum foil to change the module. n 114 N Upgrading Your VAIO Computer ❑ Do not open the memory module package before you are not magnetically shielded ❑ Ambient temperature of more than 95...


