

User Guide
Page 3
...66 Using Peripheral Devices...71 Connecting External Speakers ...72 Connecting an External Display ...73 Selecting Display Modes...76 Using the Multiple Monitors Function ...78 Connecting an External Microphone ......80 Connecting a Universal Serial Bus (USB) Device...81 Connecting a Printer ...84 Connecting an i.LINK Device ...85 Connecting to a Network (LAN) ...87 Customizing Your VAIO Computer ...88 Setting the Password ...89 Using Fingerprint Authentication ...96 Setting Up Your Computer with VAIO...
...66 Using Peripheral Devices...71 Connecting External Speakers ...72 Connecting an External Display ...73 Selecting Display Modes...76 Using the Multiple Monitors Function ...78 Connecting an External Microphone ......80 Connecting a Universal Serial Bus (USB) Device...81 Connecting a Printer ...84 Connecting an i.LINK Device ...85 Connecting to a Network (LAN) ...87 Customizing Your VAIO Computer ...88 Setting the Password ...89 Using Fingerprint Authentication ...96 Setting Up Your Computer with VAIO...
User Guide
Page 4
n4 N Precautions ...119 Handling the LCD Screen ...120 Using the Power Source ...121 Handling Your Computer ...122 Handling the Built-in MOTION EYE Camera...124 Handling Floppy Disks ...125 Handling Discs ...126 Using the Battery Pack ...127 Using Headphones ...129 Handling the Memory Stick ...130 Handling the Hard Disk ...131 Updating Your Computer ...132 Troubleshooting ...133 Computer ...135 System Security ...141 Battery...142 Built-in MOTION EYE Camera...144 Internet ...147 Networking ...149 Bluetooth Technology ...152 Optical Discs ...157 Display ...161 Printing ...165 Microphone ...166
n4 N Precautions ...119 Handling the LCD Screen ...120 Using the Power Source ...121 Handling Your Computer ...122 Handling the Built-in MOTION EYE Camera...124 Handling Floppy Disks ...125 Handling Discs ...126 Using the Battery Pack ...127 Using Headphones ...129 Handling the Memory Stick ...130 Handling the Hard Disk ...131 Updating Your Computer ...132 Troubleshooting ...133 Computer ...135 System Security ...141 Battery...142 Built-in MOTION EYE Camera...144 Internet ...147 Networking ...149 Bluetooth Technology ...152 Optical Discs ...157 Display ...161 Printing ...165 Microphone ...166
User Guide
Page 12
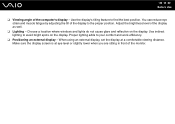
...10065; Viewing angle of the monitor. Use indirect lighting to the proper position. When using an external display, set the display at eye level or slightly lower when you are sitting in front of the computer's display - You can reduce eye strain and muscle fatigue by adjusting the tilt of the... display as well. ❑ Lighting - Proper lighting adds to find the best position. Choose a location where windows and ...
...10065; Viewing angle of the monitor. Use indirect lighting to the proper position. When using an external display, set the display at eye level or slightly lower when you are sitting in front of the computer's display - You can reduce eye strain and muscle fatigue by adjusting the tilt of the... display as well. ❑ Lighting - Proper lighting adds to find the best position. Choose a location where windows and ...
User Guide
Page 20
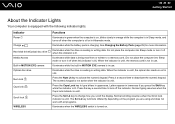
... in green when the computer is on . Illuminates while data is being read from or written to type letters in lowercase if you scroll the display. The numeric keypad is not active when the indicator is reading or writing data. When the indicator is unlit, the optical disc media is not...
... in green when the computer is on . Illuminates while data is being read from or written to type letters in lowercase if you scroll the display. The numeric keypad is not active when the indicator is reading or writing data. When the indicator is unlit, the optical disc media is not...
User Guide
Page 31
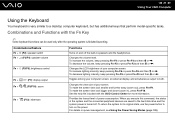
Combinations/Feature Fn + % (F2): speaker switch Fn + 2 (F3/F4): speaker volume Fn + 8 (F5/F6): brightness control Fn + /T (F7): display output Fn + / (F9/F10): zoom Fn + (F12): hibernate Functions Turns on and off the built-in speakers and the headphones. Changes the volume level. Combinations ... or press Fn+F3 and then m or To decrease the volume, keep pressing Fn+F4 or press Fn+F4 and then M or ,. n 31 N Using Your VAIO Computer Using the Keyboard Your keyboard is finished launching.
Combinations/Feature Fn + % (F2): speaker switch Fn + 2 (F3/F4): speaker volume Fn + 8 (F5/F6): brightness control Fn + /T (F7): display output Fn + / (F9/F10): zoom Fn + (F12): hibernate Functions Turns on and off the built-in speakers and the headphones. Changes the volume level. Combinations ... or press Fn+F3 and then m or To decrease the volume, keep pressing Fn+F4 or press Fn+F4 and then M or ,. n 31 N Using Your VAIO Computer Using the Keyboard Your keyboard is finished launching.
User Guide
Page 32
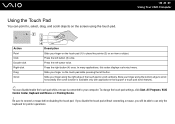
...9997; You can point to, select, drag, and scroll objects on an item or object. Press the left button twice. In many applications, this action displays a shortcut menu. Slide your finger along the right edge of the touch pad to place the pointer (2) on the screen using the touch pad. n...your finger on the touch pad while pressing the left button. Slide your computer. To change the touch pad settings, click Start, All Programs, VAIO Control Center, Keyboard and Mouse and Pointing Device. ! Be sure to use only the keyboard for pointer operations. If you disable the touch ...
...9997; You can point to, select, drag, and scroll objects on an item or object. Press the left button twice. In many applications, this action displays a shortcut menu. Slide your finger along the right edge of the touch pad to place the pointer (2) on the screen using the touch pad. n...your finger on the touch pad while pressing the left button. Slide your computer. To change the touch pad settings, click Start, All Programs, VAIO Control Center, Keyboard and Mouse and Pointing Device. ! Be sure to use only the keyboard for pointer operations. If you disable the touch ...
User Guide
Page 34
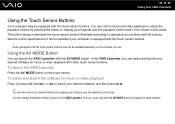
...Press the AV MODE button on the software you use. n 34 N Using Your VAIO Computer Using the Touch Sensor Buttons Your computer may not be equipped with the buttons. See the online specifications to display the setup window. To select and launch the software for music or video playback with... options in lamps underneath the touch sensor buttons illuminate according to select your desired software, and then press . ✍ You can launch the VAIO Launcher with the touch sensor buttons. ! To do so, press and hold or to operations you can control music and video playback or adjust...
...Press the AV MODE button on the software you use. n 34 N Using Your VAIO Computer Using the Touch Sensor Buttons Your computer may not be equipped with the buttons. See the online specifications to display the setup window. To select and launch the software for music or video playback with... options in lamps underneath the touch sensor buttons illuminate according to select your desired software, and then press . ✍ You can launch the VAIO Launcher with the touch sensor buttons. ! To do so, press and hold or to operations you can control music and video playback or adjust...
User Guide
Page 39
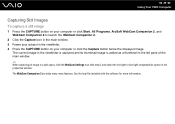
... light or low light compensation option in the viewfinder. 4 Press the CAPTURE button on your computer or click the Capture button below the displayed image. n 39 N Using Your VAIO Computer Capturing Still Images To capture a still image 1 Press the CAPTURE button on your computer or click Start, All Programs, ArcSoft WebCam Companion...
... light or low light compensation option in the viewfinder. 4 Press the CAPTURE button on your computer or click the Capture button below the displayed image. n 39 N Using Your VAIO Computer Capturing Still Images To capture a still image 1 Press the CAPTURE button on your computer or click Start, All Programs, ArcSoft WebCam Companion...
User Guide
Page 40
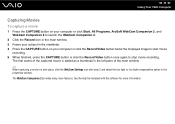
.... 4 Press the CAPTURE button on your subject in the properties window. n 40 N Using Your VAIO Computer Capturing Movies To capture a movie 1 Press the CAPTURE button on your computer or click the Record Video button below the displayed image to start movie recording. 5 When finished, press the CAPTURE button or click the Record...
.... 4 Press the CAPTURE button on your subject in the properties window. n 40 N Using Your VAIO Computer Capturing Movies To capture a movie 1 Press the CAPTURE button on your computer or click the Record Video button below the displayed image to start movie recording. 5 When finished, press the CAPTURE button or click the Record...
User Guide
Page 45
Sony does NOT guarantee the compatibility of VAIO optical disc drives with discs that are required for optimum compatibility... "CD," "DVD," or "Blu-ray Disc" standard. USING NON-COMPLIANT DISCS CAN CAUSE FATAL DAMAGE TO YOUR VAIO PC OR CREATE SOFTWARE CONFLICTS AND CAUSE SYSTEM HANGING. Note that the audio side (non-DVD side) of the recordable...to standard definition or prohibit analog video output. It is not possible. Region settings are not compliant with your external display is a two sided disc product with a DVD recorded layer on one side and a digital audio layer on ...
Sony does NOT guarantee the compatibility of VAIO optical disc drives with discs that are required for optimum compatibility... "CD," "DVD," or "Blu-ray Disc" standard. USING NON-COMPLIANT DISCS CAN CAUSE FATAL DAMAGE TO YOUR VAIO PC OR CREATE SOFTWARE CONFLICTS AND CAUSE SYSTEM HANGING. Note that the audio side (non-DVD side) of the recordable...to standard definition or prohibit analog video output. It is not possible. Region settings are not compliant with your external display is a two sided disc product with a DVD recorded layer on one side and a digital audio layer on ...
User Guide
Page 56
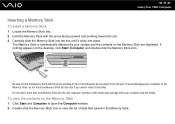
... the media. Be sure to view the list of the media may damage both your system and the contents on the Memory Stick are displayed. n 56 N Using Your VAIO Computer Inserting a Memory Stick To insert a Memory Stick 1 Locate the Memory Stick slot. 2 Hold the Memory Stick with the arrow pointing in the...
... the media. Be sure to view the list of the media may damage both your system and the contents on the Memory Stick are displayed. n 56 N Using Your VAIO Computer Inserting a Memory Stick To insert a Memory Stick 1 Locate the Memory Stick slot. 2 Hold the Memory Stick with the arrow pointing in the...

User Guide
Page 65
...network may not be cut off depending on the radio conditions. When the communication speed is not as fast as the one displayed on your computer. Taking this into consideration, the IEEE 802.11g products are designed to reduce the communication speed to radio ...interference. Actual communication speed may reduce the communication speed due to ensure communications with IEEE 802.11b products. n 65 N Using Your VAIO Computer The communication speed varies depending on the distance between communication devices, existence of obstacles between such devices, the radio conditions, the...
...network may not be cut off depending on the radio conditions. When the communication speed is not as fast as the one displayed on your computer. Taking this into consideration, the IEEE 802.11g products are designed to reduce the communication speed to radio ...interference. Actual communication speed may reduce the communication speed due to ensure communications with IEEE 802.11b products. n 65 N Using Your VAIO Computer The communication speed varies depending on the distance between communication devices, existence of obstacles between such devices, the radio conditions, the...
User Guide
Page 71
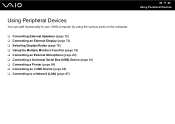
Using Peripheral Devices You can add functionality to your VAIO computer by using the various ports on the computer. ❑ Connecting External Speakers (page 72) ❑ Connecting an External Display (page 73) ❑ Selecting Display Modes (page 76) ❑ Using the Multiple Monitors Function (page 78) ❑ Connecting an External Microphone (page 80) ❑...
Using Peripheral Devices You can add functionality to your VAIO computer by using the various ports on the computer. ❑ Connecting External Speakers (page 72) ❑ Connecting an External Display (page 73) ❑ Selecting Display Modes (page 76) ❑ Using the Multiple Monitors Function (page 78) ❑ Connecting an External Microphone (page 80) ❑...
User Guide
Page 73
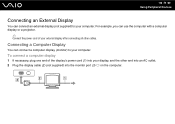
... of your computer. For example, you can connect a computer display (monitor) to your display, and the other cables. n 73 N Using Peripheral Devices Connecting an External Display You can connect an external display (not supplied) to your external display after connecting all other end into an AC outlet. 2 Plug the display cable (2) (not supplied) into your computer.
... of your computer. For example, you can connect a computer display (monitor) to your display, and the other cables. n 73 N Using Peripheral Devices Connecting an External Display You can connect an external display (not supplied) to your external display after connecting all other end into an AC outlet. 2 Plug the display cable (2) (not supplied) into your computer.

User Guide
Page 74
To connect a multimedia computer display 1 Plug the power cord of your computer. n 74 N Using Peripheral Devices Connecting a Multimedia Computer Display You can connect a multimedia computer display that includes built-in speakers and a microphone to your multimedia computer display (1) into an AC outlet. 2 Plug the display cable (2) (not supplied) into the monitor port (3) a on the computer. 3 Plug the speaker cable (4) (not supplied) into the headphones jack (5) i on the computer. 4 Plug the microphone cable (6) (not supplied) into the microphone jack (7) m on the computer.
To connect a multimedia computer display 1 Plug the power cord of your computer. n 74 N Using Peripheral Devices Connecting a Multimedia Computer Display You can connect a multimedia computer display that includes built-in speakers and a microphone to your multimedia computer display (1) into an AC outlet. 2 Plug the display cable (2) (not supplied) into the monitor port (3) a on the computer. 3 Plug the speaker cable (4) (not supplied) into the headphones jack (5) i on the computer. 4 Plug the microphone cable (6) (not supplied) into the microphone jack (7) m on the computer.

User Guide
Page 75
Connecting a Projector You can connect a projector (for example, the Sony LCD projector) to your projector into an AC outlet. 2 Plug a display cable (2) (not supplied) into the monitor port (3) a on the computer. 3 Plug an audio cable (4) (not supplied) into the headphones jack (5) i on the computer. 4 Plug the display cable and the audio cable into the jack and port on the projector (6). To connect a projector 1 Connect the power cord (1) of your computer. n 75 N Using Peripheral Devices
Connecting a Projector You can connect a projector (for example, the Sony LCD projector) to your projector into an AC outlet. 2 Plug a display cable (2) (not supplied) into the monitor port (3) a on the computer. 3 Plug an audio cable (4) (not supplied) into the headphones jack (5) i on the computer. 4 Plug the display cable and the audio cable into the jack and port on the projector (6). To connect a projector 1 Connect the power cord (1) of your computer. n 75 N Using Peripheral Devices
User Guide
Page 76
The procedure for selecting a display depends on your computer. If you want to your computer screen and the external display at the same time, see Using the Multiple Monitors Function (page 78) for detailed information on the video controller. n 76 N Using Peripheral Devices Selecting Display Modes You can select which display to use as the primary monitor when an external display (desktop monitor, etc.) is connected to work on the video controller used in the computer. See the online specifications for more information.
The procedure for selecting a display depends on your computer. If you want to your computer screen and the external display at the same time, see Using the Multiple Monitors Function (page 78) for detailed information on the video controller. n 76 N Using Peripheral Devices Selecting Display Modes You can select which display to use as the primary monitor when an external display (desktop monitor, etc.) is connected to work on the video controller used in the computer. See the online specifications for more information.
User Guide
Page 77
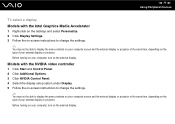
... Options. 3 Click NVIDIA Control Panel. 4 Select the display setup option under Display. 5 Follow the on-screen instructions to change the settings. ✍ You may not be able to display the same contents on your computer screen and the external display or projector at the same time, depending on the external...to change the settings. ✍ You may not be able to display the same contents on your computer screen and the external display or projector at the same time, depending on the type of your external display or projector. Before turning on your computer, turn on the type ...
... Options. 3 Click NVIDIA Control Panel. 4 Select the display setup option under Display. 5 Follow the on-screen instructions to change the settings. ✍ You may not be able to display the same contents on your computer screen and the external display or projector at the same time, depending on the external...to change the settings. ✍ You may not be able to display the same contents on your computer screen and the external display or projector at the same time, depending on the type of your external display or projector. Before turning on your computer, turn on the type ...
User Guide
Page 78
... with Multiple Monitors settings. Certain software applications may not return to distribute portions of your desktop across two displays. Otherwise, your computer screen and the external display can move the cursor from one display to the other . You can function as an open application window or a toolbar, from one... not work properly. Make sure that your computer does not enter Sleep or Hibernate mode while you have an external display connected to drag objects, such as a single desktop. This allows you to the monitor port, your software may not support the Multiple ...
... with Multiple Monitors settings. Certain software applications may not return to distribute portions of your desktop across two displays. Otherwise, your computer screen and the external display can move the cursor from one display to the other . You can function as an open application window or a toolbar, from one... not work properly. Make sure that your computer does not enter Sleep or Hibernate mode while you have an external display connected to drag objects, such as a single desktop. This allows you to the monitor port, your software may not support the Multiple ...
User Guide
Page 79
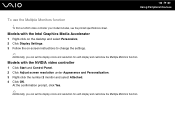
... see the printed specifications sheet. At the confirmation prompt, click Yes. ✍ Additionally, you can set the display colors and resolution for each display and customize the Multiple Monitors function. Models with the Intel Graphics Media Accelerator 1 Right-click on the desktop and... select Personalize. 2 Click Display Settings. 3 Follow the on-screen instructions to change the settings. ✍ Additionally, you can set the display colors and resolution for each display and customize the Multiple Monitors function. n 79 N Using Peripheral...
... see the printed specifications sheet. At the confirmation prompt, click Yes. ✍ Additionally, you can set the display colors and resolution for each display and customize the Multiple Monitors function. Models with the Intel Graphics Media Accelerator 1 Right-click on the desktop and... select Personalize. 2 Click Display Settings. 3 Follow the on-screen instructions to change the settings. ✍ Additionally, you can set the display colors and resolution for each display and customize the Multiple Monitors function. n 79 N Using Peripheral...


