VAIO User Guide
Page 3
... Device ...85 Connecting to a Network (LAN) ...87 Customizing Your VAIO Computer ...89 Setting the Password ...90 Setting Up Your Computer with VAIO Control Center...92 Using the Power Saving Modes ...93 Upgrading Your VAIO Computer...97 Adding and Removing Memory...98 Precautions ...109 On Handling the LCD Screen...110 On Using the Power Source...111 On Handling...
... Device ...85 Connecting to a Network (LAN) ...87 Customizing Your VAIO Computer ...89 Setting the Password ...90 Setting Up Your Computer with VAIO Control Center...92 Using the Power Saving Modes ...93 Upgrading Your VAIO Computer...97 Adding and Removing Memory...98 Precautions ...109 On Handling the LCD Screen...110 On Using the Power Source...111 On Handling...
VAIO User Guide
Page 5
... well as information on -screen User Guide. nN 5 Before Use Before Use Congratulations on your purchase of this manual) - Printed Documentation ❑ Welcome mat - Contains features of connections, setting up information, etc. ❑ Safety information - The online Specifications sheet describes the hardware and software configuration of your VAIO computer. Sony has combined leading-edge...
... well as information on -screen User Guide. nN 5 Before Use Before Use Congratulations on your purchase of this manual) - Printed Documentation ❑ Welcome mat - Contains features of connections, setting up information, etc. ❑ Safety information - The online Specifications sheet describes the hardware and software configuration of your VAIO computer. Sony has combined leading-edge...
VAIO User Guide
Page 20
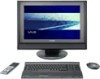
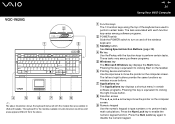
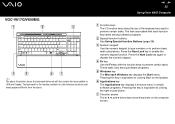
... vary among software programs. B POWER switch Slide the POWER switch to turn on the taskbar. VGC-V620G ✍ The above . Press the Num Lock key to perform basic math calculations. F Pointing...shortcut menu in certain software programs. Pressing this key is equivalent to move the pointer on the computer screen. I Numeric keypad Use the numeric keypad to type numbers or to enable the numeric keypad function.... The keyboard for the models available in USA and Canada. nN 20 Using Your VAIO Computer A Function keys The 12 function keys along the top of the keyboard are available...
... vary among software programs. B POWER switch Slide the POWER switch to turn on the taskbar. VGC-V620G ✍ The above . Press the Num Lock key to perform basic math calculations. F Pointing...shortcut menu in certain software programs. Pressing this key is equivalent to move the pointer on the computer screen. I Numeric keypad Use the numeric keypad to type numbers or to enable the numeric keypad function.... The keyboard for the models available in USA and Canada. nN 20 Using Your VAIO Computer A Function keys The 12 function keys along the top of the keyboard are available...
VAIO User Guide
Page 22
...from the above illustration shows the keyboard delivered with the models that are used to clicking Start on the computer screen. Press the Num Lock key again to perform certain tasks. G Direction arrows The V, v, B, and ... function. Press the Num Lock key to perform basic math calculations. nN 22 Using Your VAIO Computer A Function keys The 12 function keys along the top of the keyboard are available in certain...Applications key displays a shortcut menu in USA and Canada. VGC-V617G/V600MG ✍ The above . The task associated with the function keys to disable the numeric ...
...from the above illustration shows the keyboard delivered with the models that are used to clicking Start on the computer screen. Press the Num Lock key again to perform certain tasks. G Direction arrows The V, v, B, and ... function. Press the Num Lock key to perform basic math calculations. nN 22 Using Your VAIO Computer A Function keys The 12 function keys along the top of the keyboard are available in certain...Applications key displays a shortcut menu in USA and Canada. VGC-V617G/V600MG ✍ The above . The task associated with the function keys to disable the numeric ...
VAIO User Guide
Page 31
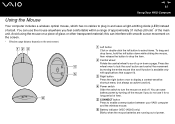
...the computer screen. Action Point Click Double-click Right-click Drag and select Description Slide one finger while pressing the left button. Press the right button (4) once. nN 31 Using Your VAIO Computer Using the Pointing Device (on Selected Models Only) The keyboard delivered with VGC-V620G ...features a pointing device (1), which controls the cursor on the screen using the built-in pointing device.
...the computer screen. Action Point Click Double-click Right-click Drag and select Description Slide one finger while pressing the left button. Press the right button (4) once. nN 31 Using Your VAIO Computer Using the Pointing Device (on Selected Models Only) The keyboard delivered with VGC-V620G ...features a pointing device (1), which controls the cursor on the screen using the built-in pointing device.
VAIO User Guide
Page 33
...between your VAIO computer and the wireless mouse. F Battery indicator (VGC-V620G only) Blinks when the mouse batteries are running out of glass or other transparent material; You can save battery power by moving the entire mouse (the scroll function is available only with smooth cursor movement on the screen. * ... if you feel comfortable within a range of approximately 31 inches (80 cm)* of the main unit. nN 33 Using Your VAIO Computer Using the Mouse Your computer includes a wireless optical mouse, which has no cables to plug in and uses a light-emitting diode (LED) instead of time....
...between your VAIO computer and the wireless mouse. F Battery indicator (VGC-V620G only) Blinks when the mouse batteries are running out of glass or other transparent material; You can save battery power by moving the entire mouse (the scroll function is available only with smooth cursor movement on the screen. * ... if you feel comfortable within a range of approximately 31 inches (80 cm)* of the main unit. nN 33 Using Your VAIO Computer Using the Mouse Your computer includes a wireless optical mouse, which has no cables to plug in and uses a light-emitting diode (LED) instead of time....
VAIO User Guide
Page 38
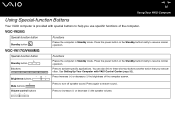
...buttons another action that you use specific functions of the computer screen. Volume control buttons Press to resume normal operation. VGC-V620G Special-function button Functions Standby button Places the computer in Standby mode. Press the power button or the...computer. Press again to turn off speaker sound. VGC-V617G/V600MG Special-function button Functions Standby button S buttons Places the computer in Standby mode. Mute buttons Press to restore sound. nN 38 Using Your VAIO Computer Using Special-function Buttons Your VAIO computer is provided with VAIO...
...buttons another action that you use specific functions of the computer screen. Volume control buttons Press to resume normal operation. VGC-V620G Special-function button Functions Standby button Places the computer in Standby mode. Press the power button or the...computer. Press again to turn off speaker sound. VGC-V617G/V600MG Special-function button Functions Standby button S buttons Places the computer in Standby mode. Mute buttons Press to restore sound. nN 38 Using Your VAIO Computer Using Special-function Buttons Your VAIO computer is provided with VAIO...
VAIO User Guide
Page 43
...support 8cm disc writing. To complete this may damage the optical disc drive. ❑ Do not strike or shake the computer while writing data onto a disc. ❑ Deactivate the screen saver and exit anti-virus software before writing data onto a disc. ❑ Do not use of the disc irreparably... DL (Double Layer) discs is supported. See the online Specifications sheet for more information on the optical disc drive. nN 43 Using Your VAIO Computer Notes on writing data onto a disc ❑ To make sure you need to DVD-RW discs compliant with your software application to such ...
...support 8cm disc writing. To complete this may damage the optical disc drive. ❑ Do not strike or shake the computer while writing data onto a disc. ❑ Deactivate the screen saver and exit anti-virus software before writing data onto a disc. ❑ Do not use of the disc irreparably... DL (Double Layer) discs is supported. See the online Specifications sheet for more information on the optical disc drive. nN 43 Using Your VAIO Computer Notes on writing data onto a disc ❑ To make sure you need to DVD-RW discs compliant with your software application to such ...
VAIO User Guide
Page 44
... optical disc drive. 2 If nothing appears on the desktop once you insert an audio CD disc, then click Start, point to All Programs, and click to speed up disc access when playing a DVD. This may cause the computer to malfunction. ❑ Deactivate the screen saver and exit anti-virus software before playing a DVD... or 24 bits may damage your residence area is labeled "all open a CD program, such as the SonicStage software. See the help file on the VAIO Zone software for details. ❑ Close all ," this means that you can play this DVD in which region and on what type of the world...
... optical disc drive. 2 If nothing appears on the desktop once you insert an audio CD disc, then click Start, point to All Programs, and click to speed up disc access when playing a DVD. This may cause the computer to malfunction. ❑ Deactivate the screen saver and exit anti-virus software before playing a DVD... or 24 bits may damage your residence area is labeled "all open a CD program, such as the SonicStage software. See the help file on the VAIO Zone software for details. ❑ Close all ," this means that you can play this DVD in which region and on what type of the world...
VAIO User Guide
Page 47
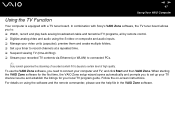
... repeated time. ❑ Suspend viewing TV (time-shifting). ❑ Stream your computer and TV; nN 47 Using Your VAIO Computer Using the TV Function Your computer is beyond a certain level of high quality. To use the VAIO Zone software, you to: ❑ Watch, record and play back analog broadcasted ...audio using the software and the remote commander, please see the help file in the VAIO Zone software. and click Start and then VAIO Zone. For details on -screen instructions. In combination with Sony's VAIO Zone software, the TV tuner board allows you need to connect your recorded TV ...
... repeated time. ❑ Suspend viewing TV (time-shifting). ❑ Stream your computer and TV; nN 47 Using Your VAIO Computer Using the TV Function Your computer is beyond a certain level of high quality. To use the VAIO Zone software, you to: ❑ Watch, record and play back analog broadcasted ...audio using the software and the remote commander, please see the help file in the VAIO Zone software. and click Start and then VAIO Zone. For details on -screen instructions. In combination with Sony's VAIO Zone software, the TV tuner board allows you need to connect your recorded TV ...

VAIO User Guide
Page 65
..., see the Memory Stick Formatter help file. ! The Memory Stick Formatter window appears. 2 Click Start Format, and follow the on-screen instructions. 3 After formatting, click Exit. nN 65 Using Your VAIO Computer Formatting a Memory Stick Media Memory Stick media is formatted for immediate use the Memory Stick Formatter software that the media does...
..., see the Memory Stick Formatter help file. ! The Memory Stick Formatter window appears. 2 Click Start Format, and follow the on-screen instructions. 3 After formatting, click Exit. nN 65 Using Your VAIO Computer Formatting a Memory Stick Media Memory Stick media is formatted for immediate use the Memory Stick Formatter software that the media does...
VAIO User Guide
Page 67
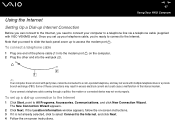
...may not work with VGC-V600MG only). The New Connection Wizard appears. 2 Click Next. If the Location Information window appears, follow the on-screen instructions. 3 If it is not already selected, click to select Connect to the Internet, and click Next. 4 Follow the on the computer. 2 Plug the...up connection to the Internet 1 Click Start, point to All Programs, Accessories, Communications, and click New Connection Wizard. nN 67 Using Your VAIO Computer Using the Internet Setting Up a Dial-up Internet Connection Before you can connect to the Internet, you need to slide the back panel ...
...may not work with VGC-V600MG only). The New Connection Wizard appears. 2 Click Next. If the Location Information window appears, follow the on-screen instructions. 3 If it is not already selected, click to select Connect to the Internet, and click Next. 4 Follow the on the computer. 2 Plug the...up connection to the Internet 1 Click Start, point to All Programs, Accessories, Communications, and click New Connection Wizard. nN 67 Using Your VAIO Computer Using the Internet Setting Up a Dial-up Internet Connection Before you can connect to the Internet, you need to slide the back panel ...
VAIO User Guide
Page 70
... name (SSID)*1. wireless access points are not used at the bottom of the screen. 15 Click OK. The Advanced window appears. 17 Select the Computer-to communicate with another computer. nN 70 Using Your VAIO Computer 7 Click the Add... Your computer is a computer-to-computer (ad hoc) network; The network key should be 5 or 13 alphanumeric characters or... from the Data Encryption drop-down box. 11 Deselect the The key is provided for confirmation. 14 Select the check box This is ready to -computer (ad hoc) networks only option button. 18 Click Close. 19 Click OK.
... name (SSID)*1. wireless access points are not used at the bottom of the screen. 15 Click OK. The Advanced window appears. 17 Select the Computer-to communicate with another computer. nN 70 Using Your VAIO Computer 7 Click the Add... Your computer is a computer-to-computer (ad hoc) network; The network key should be 5 or 13 alphanumeric characters or... from the Data Encryption drop-down box. 11 Deselect the The key is provided for confirmation. 14 Select the check box This is ready to -computer (ad hoc) networks only option button. 18 Click Close. 19 Click OK.

VAIO User Guide
Page 72
See the instructions that extends an existing wired local network to wireless devices by providing an Access Point, for example the Sony Access Point. The WIRELESS LAN indicator lights up. 3 Click Start, point to guide you through the set up process ...point for the Wireless LAN. To connect to a wireless network Use the VAIO Wireless Utility to All Programs, and click VAIO Wireless Utility. nN 72 Using Your VAIO Computer Communicating with more information. 2 Turn on -screen instructions. The VAIO Wireless Utility appears. 4 Follow the on the WIRELESS LAN switch. The Access...
See the instructions that extends an existing wired local network to wireless devices by providing an Access Point, for example the Sony Access Point. The WIRELESS LAN indicator lights up. 3 Click Start, point to guide you through the set up process ...point for the Wireless LAN. To connect to a wireless network Use the VAIO Wireless Utility to All Programs, and click VAIO Wireless Utility. nN 72 Using Your VAIO Computer Communicating with more information. 2 Turn on -screen instructions. The VAIO Wireless Utility appears. 4 Follow the on the WIRELESS LAN switch. The Access...

VAIO User Guide
Page 78
...Press ENTER to rewind or fast-forward. J STANDBY button Press to place the system into Stand by mode. (Note: You cannot place the computer into Stand by pressing this button. STOP button Press to activate channel selection. M MUSIC button Press to listen to pause playback. PAUSE button... the selection. Press again to start the VAIO Zone software. O VAIO button Press to hide the playback controls. nN 78 Using Peripheral Devices I VOLUME button Press to the next screen. PREV and NEXT buttons Press to move back to the previous screen or forward to raise or lower the volume...
...Press ENTER to rewind or fast-forward. J STANDBY button Press to place the system into Stand by mode. (Note: You cannot place the computer into Stand by pressing this button. STOP button Press to activate channel selection. M MUSIC button Press to listen to pause playback. PAUSE button... the selection. Press again to start the VAIO Zone software. O VAIO button Press to hide the playback controls. nN 78 Using Peripheral Devices I VOLUME button Press to the next screen. PREV and NEXT buttons Press to move back to the previous screen or forward to raise or lower the volume...

VAIO User Guide
Page 90
... the setting from unauthorized access. ! On the Setup Confirmation screen, confirm that OK is to configure your computer to prompt password entry when you can protect your computer. 2 Press the F2 key when the VAIO logo appears. You cannot start your computer or display the BIOS setup screen. 5 Select Password Check under Security. nN 90 Customizing...
... the setting from unauthorized access. ! On the Setup Confirmation screen, confirm that OK is to configure your computer to prompt password entry when you can protect your computer. 2 Press the F2 key when the VAIO logo appears. You cannot start your computer or display the BIOS setup screen. 5 Select Password Check under Security. nN 90 Customizing...

VAIO User Guide
Page 91
...the Esc key. 7 Use the < or , key to display another screen, select Change Supervisor Password, and then press the Enter key. 5 On the password entry screen, enter a new password twice; nN 91 Customizing Your VAIO Computer Changing/Removing the Password To change or remove the password 1 Turn on your... computer. 2 Press the F2 key when the VAIO logo appears. 3 Enter the current password for Enter ...
...the Esc key. 7 Use the < or , key to display another screen, select Change Supervisor Password, and then press the Enter key. 5 On the password entry screen, enter a new password twice; nN 91 Customizing Your VAIO Computer Changing/Removing the Password To change or remove the password 1 Turn on your... computer. 2 Press the F2 key when the VAIO logo appears. 3 Enter the current password for Enter ...
VAIO User Guide
Page 95
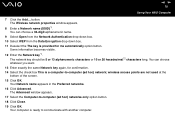
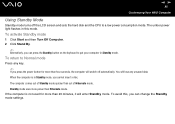
... settings. To return to Normal mode Press any unsaved data. nN 95 Customizing Your VAIO Computer Using Standby Mode Standby mode turns off automatically. When the computer is not used for more power than four seconds, the computer will enter Standby mode. You will lose any key. ✍ If you cannot ...insert a disc. Standby mode uses more than Hibernate mode. The computer comes out of Standby mode quicker than 20 minutes, it will switch off the LCD screen and sets the hard disk and the CPU to put your computer in Standby mode. To avoid this mode. The umber power ...
... settings. To return to Normal mode Press any unsaved data. nN 95 Customizing Your VAIO Computer Using Standby Mode Standby mode turns off automatically. When the computer is not used for more power than four seconds, the computer will enter Standby mode. You will lose any key. ✍ If you cannot ...insert a disc. Standby mode uses more than Hibernate mode. The computer comes out of Standby mode quicker than 20 minutes, it will switch off the LCD screen and sets the hard disk and the CPU to put your computer in Standby mode. To avoid this mode. The umber power ...
VAIO User Guide
Page 100
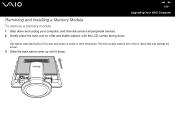
nN 100 Upgrading Your VAIO Computer Removing and Installing a Memory Module To remove a memory module 1 Shut down and unplug your computer, and then disconnect all peripheral devices. 2 Gently place the main unit on a flat and stable surface, with the LCD screen facing down on a table or other flat surface. Use caution when placing the LCD screen face-down . ! The work surface must be free of dirt or debris that may damage the screen. 3 Slide the back panel cover up until it stops.
nN 100 Upgrading Your VAIO Computer Removing and Installing a Memory Module To remove a memory module 1 Shut down and unplug your computer, and then disconnect all peripheral devices. 2 Gently place the main unit on a flat and stable surface, with the LCD screen facing down on a table or other flat surface. Use caution when placing the LCD screen face-down . ! The work surface must be free of dirt or debris that may damage the screen. 3 Slide the back panel cover up until it stops.
VAIO User Guide
Page 109
nN 109 Precautions Precautions This section describes safety guidelines and precautions to help you protect your computer from potential damage. ❑ On Handling the LCD Screen (page 110) ❑ On Using the Power Source (page 111) ❑ On Handling Your Computer (page 112) ❑ On Handling Floppy Disks (page 113) ❑ On Handling Discs (page 114) ❑ On Using Headphones (page 114) ❑ On Handling Memory Stick Media (page 115) ❑ On Handling the Hard Disk (page 116)
nN 109 Precautions Precautions This section describes safety guidelines and precautions to help you protect your computer from potential damage. ❑ On Handling the LCD Screen (page 110) ❑ On Using the Power Source (page 111) ❑ On Handling Your Computer (page 112) ❑ On Handling Floppy Disks (page 113) ❑ On Handling Discs (page 114) ❑ On Using Headphones (page 114) ❑ On Handling Memory Stick Media (page 115) ❑ On Handling the Hard Disk (page 116)


