

User Guide
Page 3
n3 N Using Peripheral Devices...104 Connecting External Speakers ...105 Connecting a Universal Serial Bus (USB) Device...107 Connecting a Printer ...109 Connecting an i.LINK Device ...110 Connecting to a Network (LAN) ...112 Customizing Your VAIO Computer ...114 Setting the Password ...115 Setting Up Your Computer with VAIO Control Center 120 Using the Power Saving Mode...121 Upgrading Your VAIO Computer...124 Adding and Removing Memory...125 Adding the Hard Disk Drive...132 Precautions ...138 Handling the LCD Screen ...139 Using the Power Source ...140 Handling Your Computer ...141 Handling ...
n3 N Using Peripheral Devices...104 Connecting External Speakers ...105 Connecting a Universal Serial Bus (USB) Device...107 Connecting a Printer ...109 Connecting an i.LINK Device ...110 Connecting to a Network (LAN) ...112 Customizing Your VAIO Computer ...114 Setting the Password ...115 Setting Up Your Computer with VAIO Control Center 120 Using the Power Saving Mode...121 Upgrading Your VAIO Computer...124 Adding and Removing Memory...125 Adding the Hard Disk Drive...132 Precautions ...138 Handling the LCD Screen ...139 Using the Power Source ...140 Handling Your Computer ...141 Handling ...

User Guide
Page 7
...wireless WAN functions are available on selected models only. To access this on -screen guide: 1 Click Start and Help and Support. 2 Click Use My VAIO. 3 Click VAIO Recovery Center User Guide. ❑ SmartWi™ Connection Utility Help - See the online specifications to find out whether your entire hard disk drive to the original factory settings. To access this on -screen guide: 1 Click Start and Help and Support. 2 Click Use My VAIO. 3 Click Media Center User Guide. Provides information about using Windows Media Center. n7 N Before Use ❑ VAIO Recovery Center User Guide...
...wireless WAN functions are available on selected models only. To access this on -screen guide: 1 Click Start and Help and Support. 2 Click Use My VAIO. 3 Click VAIO Recovery Center User Guide. ❑ SmartWi™ Connection Utility Help - See the online specifications to find out whether your entire hard disk drive to the original factory settings. To access this on -screen guide: 1 Click Start and Help and Support. 2 Click Use My VAIO. 3 Click Media Center User Guide. Provides information about using Windows Media Center. n7 N Before Use ❑ VAIO Recovery Center User Guide...

User Guide
Page 37
.... H Volume control buttons Increase (+) or decrease (-) the volume. M Applications key Displays a shortcut menu in place to batteries wear out. In such a case, you can change the assignment with VAIO Control Center (page 120) and find out more information. N Windows key Displays the Start menu. n 37 N Using Your VAIO Computer G Indicators (Battery): turns on while connection between the computer and the wireless keyboard is ready for use (page 26). See Setting Up Your Computer with the VAIO Control Center.
.... H Volume control buttons Increase (+) or decrease (-) the volume. M Applications key Displays a shortcut menu in place to batteries wear out. In such a case, you can change the assignment with VAIO Control Center (page 120) and find out more information. N Windows key Displays the Start menu. n 37 N Using Your VAIO Computer G Indicators (Battery): turns on while connection between the computer and the wireless keyboard is ready for use (page 26). See Setting Up Your Computer with the VAIO Control Center.

User Guide
Page 49
Use the table below to see which types of optical disc drive installed on the model you purchased. n 49 N Using Your VAIO Computer Reading and Writing Optical Discs Your computer plays and records CDs, DVDs, and Blu-ray Disc™ media, depending on your optical disc drive supports. Check your specifications for the type of media your model.
Use the table below to see which types of optical disc drive installed on the model you purchased. n 49 N Using Your VAIO Computer Reading and Writing Optical Discs Your computer plays and records CDs, DVDs, and Blu-ray Disc™ media, depending on your optical disc drive supports. Check your specifications for the type of media your model.

User Guide
Page 51
... Compact Disc Digital Audio standard specifications (CD Standard). As with the supplied 8 cm disc adapter. It is strongly recommended that a digital HDCPcompliant environment be sure to read the notices on the other optical media devices, circumstances may not support movie playback on selected models only, is capable of reading 8 cm DVD-R, DVD-RW, DVD+RW, and DVD+R DL discs, but not 8 cm CD-ROM, DVD-RAM discs, and Blu-ray Disc media...
... Compact Disc Digital Audio standard specifications (CD Standard). As with the supplied 8 cm disc adapter. It is strongly recommended that a digital HDCPcompliant environment be sure to read the notices on the other optical media devices, circumstances may not support movie playback on selected models only, is capable of reading 8 cm DVD-R, DVD-RW, DVD+RW, and DVD+R DL discs, but not 8 cm CD-ROM, DVD-RAM discs, and Blu-ray Disc media...

User Guide
Page 55
... Optical Discs (page 49) to find out about the supported disc media. For instructions on the desktop, click Start, All Programs, and the desired Blu-ray Disc software to play a Blu-ray Disc media 1 Close all running software applications. 2 Insert a Blu-ray Disc media into the optical disc drive. 3 If nothing appears on how to find out about the supported disc media. For instructions on selected models only. n 55 N Using Your VAIO Computer Playing Blu-ray Disc Media...
... Optical Discs (page 49) to find out about the supported disc media. For instructions on the desktop, click Start, All Programs, and the desired Blu-ray Disc software to play a Blu-ray Disc media 1 Close all running software applications. 2 Insert a Blu-ray Disc media into the optical disc drive. 3 If nothing appears on how to find out about the supported disc media. For instructions on selected models only. n 55 N Using Your VAIO Computer Playing Blu-ray Disc Media...

User Guide
Page 64
... you can use your TV remote control to set the TV to the VHF/UHF input port (5) on your TV monitor or display. 3 Connect one end of a stereo A/V cable with the L-shaped plug. 1 Connect one end of the set -top box (STB) (3). When using the STB setup: ❑ A standard TV remote control cannot be able to use a universal remote control or commander to the Composite Audio output (L/R) jacks (7) and the Video output jack...
... you can use your TV remote control to set the TV to the VHF/UHF input port (5) on your TV monitor or display. 3 Connect one end of a stereo A/V cable with the L-shaped plug. 1 Connect one end of the set -top box (STB) (3). When using the STB setup: ❑ A standard TV remote control cannot be able to use a universal remote control or commander to the Composite Audio output (L/R) jacks (7) and the Video output jack...

User Guide
Page 96
... Connection Utility. 2 Click SmartWi Connection Utility Help. ! You can communicate with the SmartWi Connection Utility. To use the wireless LAN function You need to turn on ad-hoc networks. You cannot select the 5 GHz bandwidth, which is not available on the WIRELESS switch before starting the SmartWi Connection Utility. Be sure to pull cables or wires through a network. n 96 N Using Your VAIO Computer Using Wireless LAN (WLAN) Using the Sony Wireless LAN (WLAN), all your digital devices with built-in which a user...
... Connection Utility. 2 Click SmartWi Connection Utility Help. ! You can communicate with the SmartWi Connection Utility. To use the wireless LAN function You need to turn on ad-hoc networks. You cannot select the 5 GHz bandwidth, which is not available on the WIRELESS switch before starting the SmartWi Connection Utility. Be sure to pull cables or wires through a network. n 96 N Using Your VAIO Computer Using Wireless LAN (WLAN) Using the Sony Wireless LAN (WLAN), all your digital devices with built-in which a user...
User Guide
Page 99
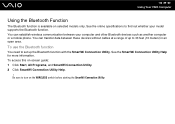
... phone. n 99 N Using Your VAIO Computer Using the Bluetooth Function The Bluetooth function is available on the WIRELESS switch before starting the SmartWi Connection Utility. You can establish wireless communication between these devices without cables at a range of up the Bluetooth function with the SmartWi Connection Utility. To access this on-screen guide: 1 Click Start, All Programs, and SmartWi Connection Utility. 2 Click SmartWi Connection Utility Help. ! See the SmartWi Connection Utility Help for...
... phone. n 99 N Using Your VAIO Computer Using the Bluetooth Function The Bluetooth function is available on the WIRELESS switch before starting the SmartWi Connection Utility. You can establish wireless communication between these devices without cables at a range of up the Bluetooth function with the SmartWi Connection Utility. To access this on-screen guide: 1 Click Start, All Programs, and SmartWi Connection Utility. 2 Click SmartWi Connection Utility Help. ! See the SmartWi Connection Utility Help for...

User Guide
Page 105
... device connected to the OPTICAL OUT port, you can connect external sound output devices (not supplied), such as speakers or headphones, to change the sound output device? (page 186). n 105 N Using Peripheral Devices Connecting External Speakers You can connect an S/PDIF device such as digital headphones or an AV amplifier to the port and enhance the sound quality of outputting digital signals through the OPTICAL OUT port, you need to your computer. For the detailed instructions...
... device connected to the OPTICAL OUT port, you can connect external sound output devices (not supplied), such as speakers or headphones, to change the sound output device? (page 186). n 105 N Using Peripheral Devices Connecting External Speakers You can connect an S/PDIF device such as digital headphones or an AV amplifier to the port and enhance the sound quality of outputting digital signals through the OPTICAL OUT port, you need to your computer. For the detailed instructions...

User Guide
Page 109
n 109 N Using Peripheral Devices Connecting a Printer You can connect a USB printer compatible with your version of a USB printer cable (2) (not supplied) into an AC outlet. 2 Choose the USB port (3) you prefer to use. 3 Plug one end of Windows to the computer. To connect a printer using the USB port 1 Plug the power cord (1) of your printer into the USB port and the other end to your computer to your printer. Connecting a Printer Using the USB Port You can connect a Windows-compatible printer to print documents.
n 109 N Using Peripheral Devices Connecting a Printer You can connect a USB printer compatible with your version of a USB printer cable (2) (not supplied) into an AC outlet. 2 Choose the USB port (3) you prefer to use. 3 Plug one end of Windows to the computer. To connect a printer using the USB port 1 Plug the power cord (1) of your printer into the USB port and the other end to your computer to your printer. Connecting a Printer Using the USB Port You can connect a Windows-compatible printer to print documents.
User Guide
Page 112
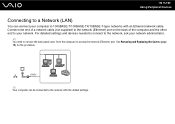
For detailed settings and devices needed to connect to the network, ask your network. Connect one end of a network cable (not supplied) to the network (Ethernet) port on the back of the computer and the other end to your network administrator. ✍ You need to remove the back panel cover from the computer to access the network (Ethernet) port. n 112 N Using Peripheral Devices Connecting to a Network (LAN) You can be connected to the network with an Ethernet network cable. See Removing and Replacing the Covers (page 18...
For detailed settings and devices needed to connect to the network, ask your network. Connect one end of a network cable (not supplied) to the network (Ethernet) port on the back of the computer and the other end to your network administrator. ✍ You need to remove the back panel cover from the computer to access the network (Ethernet) port. n 112 N Using Peripheral Devices Connecting to a Network (LAN) You can be connected to the network with an Ethernet network cable. See Removing and Replacing the Covers (page 18...
User Guide
Page 119
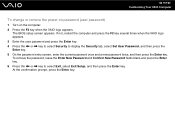
To remove the password, leave the Enter New Password and Confirm New Password fields blank and press the Enter key. 6 Press the < or , key to display the Security tab, select Set User Password, and then press the Enter key. 5 On the password entry screen, enter the current password once and a new password twice, and then press the Enter key. At the confirmation prompt, press the Enter key. n 119 N Customizing Your VAIO Computer To change or remove the power-on password (user password) 1 Turn on the...
To remove the password, leave the Enter New Password and Confirm New Password fields blank and press the Enter key. 6 Press the < or , key to display the Security tab, select Set User Password, and then press the Enter key. 5 On the password entry screen, enter the current password once and a new password twice, and then press the Enter key. At the confirmation prompt, press the Enter key. n 119 N Customizing Your VAIO Computer To change or remove the power-on password (user password) 1 Turn on the...

User Guide
Page 158
... the Enter key. 6 Press the < or , key to download. ❑ Make sure you have installed the latest video driver. ❑ On some VAIO models, the graphics memory is not guaranteed. What should I do if I cannot remember the power-on password? The BIOS setup screen appears. You can I change the boot device order. The optimal graphic performance in this case is shared with the system. To find the nearest center or agent, see Sony Support Information...
... the Enter key. 6 Press the < or , key to download. ❑ Make sure you have installed the latest video driver. ❑ On some VAIO models, the graphics memory is not guaranteed. What should I do if I cannot remember the power-on password? The BIOS setup screen appears. You can I change the boot device order. The optimal graphic performance in this case is shared with the system. To find the nearest center or agent, see Sony Support Information...
User Guide
Page 160
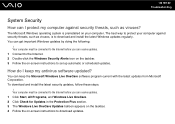
... can receive updates. 1 Connect to the Internet. 2 Double-click the Windows Security Alerts icon on the taskbar. 3 Follow the on -screen instructions to set up automatic or scheduled updates. You can receive updates. 1 Click Start, All Programs, and Windows Live OneCare. 2 Click Check for Updates in the Protection Plus section. 3 The Windows Live OneCare Updates balloon appears on the taskbar. 4 Follow the on -screen instructions to download updates.
... can receive updates. 1 Connect to the Internet. 2 Double-click the Windows Security Alerts icon on the taskbar. 3 Follow the on -screen instructions to set up automatic or scheduled updates. You can receive updates. 1 Click Start, All Programs, and Windows Live OneCare. 2 Click Check for Updates in the Protection Plus section. 3 The Windows Live OneCare Updates balloon appears on the taskbar. 4 Follow the on -screen instructions to download updates.
User Guide
Page 162
... between lighting output frequency and shutter speed. Why can set an appropriate value to one software application. Why is using the camera, exit the application before using the built-in MOTION EYE camera cannot be suspended for the camera. Follow these steps: 1 Click Start, Control Panel, Hardware and Sound, and Device Manager. 2 Double-click Imaging devices. 3 Right-click the device name for a few seconds if: ❑ a shortcut key...
... between lighting output frequency and shutter speed. Why can set an appropriate value to one software application. Why is using the camera, exit the application before using the built-in MOTION EYE camera cannot be suspended for the camera. Follow these steps: 1 Click Start, Control Panel, Hardware and Sound, and Device Manager. 2 Double-click Imaging devices. 3 Right-click the device name for a few seconds if: ❑ a shortcut key...

User Guide
Page 172
... the computer. 2 Remove the disc from the optical disc drive. 3 Check the disc for instructions. ❑ If you are using external speakers, check the volume settings on the speakers and the connections between the speakers and your computer. ❑ Make sure the correct driver software is dirty or damaged, your computer will stop responding. Follow these steps: 1 Click Start and Control Panel. 2 Click System and Maintenance. 3 Click System. n 172 N Troubleshooting What should...
... the computer. 2 Remove the disc from the optical disc drive. 3 Check the disc for instructions. ❑ If you are using external speakers, check the volume settings on the speakers and the connections between the speakers and your computer. ❑ Make sure the correct driver software is dirty or damaged, your computer will stop responding. Follow these steps: 1 Click Start and Control Panel. 2 Click System and Maintenance. 3 Click System. n 172 N Troubleshooting What should...

User Guide
Page 174
... Disc media? ! To download and install the updates on how to connect the computer to the Internet. n 174 N Troubleshooting What should I do if I cannot write data to CD media? ❑ Make sure you neither launch any software application nor allow any to launch automatically, not even a screen saver. ❑ Stop using the keyboard. ❑ If you are using a CD-R/RW disc with an adhesive label affixed, replace...
... Disc media? ! To download and install the updates on how to connect the computer to the Internet. n 174 N Troubleshooting What should I do if I cannot write data to CD media? ❑ Make sure you neither launch any software application nor allow any to launch automatically, not even a screen saver. ❑ Stop using the keyboard. ❑ If you are using a CD-R/RW disc with an adhesive label affixed, replace...

User Guide
Page 175
The DVD±RW/±R DL/RAM drive does not support it. ❑ BD-R Disc media are not rewritable. You cannot add or erase data to find out the type of your optical disc drive supports the Blu-ray Disc writing function. See the online specifications to find out about the supported disc media. ❑ Make sure your optical disc drive, and then Reading and Writing Optical Discs (page 49) to or from the BD-R Disc media. This Q & A entry applies to Blu-ray Disc media? ! n 175 N Troubleshooting Why can't I write data to selected models only.
The DVD±RW/±R DL/RAM drive does not support it. ❑ BD-R Disc media are not rewritable. You cannot add or erase data to find out the type of your optical disc drive supports the Blu-ray Disc writing function. See the online specifications to find out about the supported disc media. ❑ Make sure your optical disc drive, and then Reading and Writing Optical Discs (page 49) to or from the BD-R Disc media. This Q & A entry applies to Blu-ray Disc media? ! n 175 N Troubleshooting Why can't I write data to selected models only.

User Guide
Page 177
...; You may need to install the printer driver software before you use your computer may enable printing. This disables the bidirectional communication functions of the printer, such as data transfer, status monitoring, and remote panel. n 177 N Troubleshooting Printing What should I do if I cannot print a document? ❑ Make sure your printer is on, and the printer cable is securely connected to the ports on the printer...
...; You may need to install the printer driver software before you use your computer may enable printing. This disables the bidirectional communication functions of the printer, such as data transfer, status monitoring, and remote panel. n 177 N Troubleshooting Printing What should I do if I cannot print a document? ❑ Make sure your printer is on, and the printer cable is securely connected to the ports on the printer...


