User Guide
Page 24
... S1 button assignment may be different from the above is the English keyboard as an example. D Zoom buttons Change the view size of the LCD screen. See Setting Up Your Computer with the VAIO Control Center for the lower level of the LCD screen. Press to make the screen view look smaller and...
... S1 button assignment may be different from the above is the English keyboard as an example. D Zoom buttons Change the view size of the LCD screen. See Setting Up Your Computer with the VAIO Control Center for the lower level of the LCD screen. Press to make the screen view look smaller and...
User Guide
Page 41
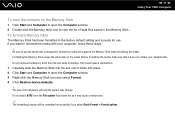
... system drop-down list as it may change. The size of data files saved in the Memory Stick. Do not select NTFS from the slot while formatting. This could cause a malfunction. 1 Carefully slide the Memory Stick into the slot until it does not contain your computer, follow these steps. ! Be sure to... when formatting the media. Before formatting the media, make sure that is ready for use the device that it clicks into place. 2 Click Start and Computer to use . n 41 N Using Your VAIO Computer To view the contents on the media.
... system drop-down list as it may change. The size of data files saved in the Memory Stick. Do not select NTFS from the slot while formatting. This could cause a malfunction. 1 Carefully slide the Memory Stick into the slot until it does not contain your computer, follow these steps. ! Be sure to... when formatting the media. Before formatting the media, make sure that is ready for use the device that it clicks into place. 2 Click Start and Computer to use . n 41 N Using Your VAIO Computer To view the contents on the media.
User Guide
Page 50
...products are designed to reduce the communication speed to radio interference. When the communication speed is not as fast as the one displayed on the actual distance between communication devices, existence of obstacles between such devices, the radio conditions, the ambient environment ... such walls, and the software in use . n 50 N Using Your VAIO Computer The communication speed varies depending on the radio conditions. In addition, communications may be as fast as expected, changing the wireless channel on the same wireless network may increase the communication speed.
...products are designed to reduce the communication speed to radio interference. When the communication speed is not as fast as the one displayed on the actual distance between communication devices, existence of obstacles between such devices, the radio conditions, the ambient environment ... such walls, and the software in use . n 50 N Using Your VAIO Computer The communication speed varies depending on the radio conditions. In addition, communications may be as fast as expected, changing the wireless channel on the same wireless network may increase the communication speed.
User Guide
Page 57
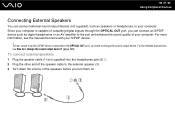
To hear sound from the S/PDIF device connected to the OPTICAL OUT port, you need to change the sound output device? (page 125). Since your computer is capable of outputting digital signals through the OPTICAL OUT port, you can connect external sound output devices (not supplied), such as ... port and enhance the sound quality of the speakers before you turn them on. For the detailed instructions, see the manual that came with your computer. To connect external speakers 1 Plug the speaker cable (1) (not supplied) into the headphones jack (2) i. 2 Plug the other end of the speaker cable...
To hear sound from the S/PDIF device connected to the OPTICAL OUT port, you need to change the sound output device? (page 125). Since your computer is capable of outputting digital signals through the OPTICAL OUT port, you can connect external sound output devices (not supplied), such as ... port and enhance the sound quality of the speakers before you turn them on. For the detailed instructions, see the manual that came with your computer. To connect external speakers 1 Plug the speaker cable (1) (not supplied) into the headphones jack (2) i. 2 Plug the other end of the speaker cable...
User Guide
Page 65
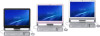
Among other things, you will learn how to change the main settings of your VAIO computer. n 65 N Customizing Your VAIO Computer Customizing Your VAIO Computer This section briefly describes how to use and customize the look of your Sony software and utilities. ❑ Setting the Password (page 66) ❑ Setting Up Your Computer with VAIO Control Center (page 71) ❑ Using the Power Saving Mode (page 72)
Among other things, you will learn how to change the main settings of your VAIO computer. n 65 N Customizing Your VAIO Computer Customizing Your VAIO Computer This section briefly describes how to use and customize the look of your Sony software and utilities. ❑ Setting the Password (page 66) ❑ Setting Up Your Computer with VAIO Control Center (page 71) ❑ Using the Power Saving Mode (page 72)
User Guide
Page 66
... other people. The machine password is provided for the standard users to allow for service to start the computer. n 66 N Customizing Your VAIO Computer Setting the Password Use one of the BIOS functions to forget the password. Adding the Power-on Password The power-on passwords: the ...machine password and the user password. Be sure not to set the machine password. ! If you cannot start your computer may need assistance to change...
... other people. The machine password is provided for the standard users to allow for service to start the computer. n 66 N Customizing Your VAIO Computer Setting the Password Use one of the BIOS functions to forget the password. Adding the Power-on Password The power-on passwords: the ...machine password and the user password. Be sure not to set the machine password. ! If you cannot start your computer may need assistance to change...

User Guide
Page 67
... appears. The password can be up to 32 alphanumeric characters (including spaces) long. 5 Select Password when Power On under Security and press the Enter key. 6 Change the setting from Disabled to Enabled. 7 Press the < or , key to display the Security tab, select Set Machine Password, and then press the Enter key.... 4 On the password entry screen, enter the password twice and press the Enter key. n 67 N Customizing Your VAIO Computer To add the power-on password (machine password) 1 Turn on the...
... appears. The password can be up to 32 alphanumeric characters (including spaces) long. 5 Select Password when Power On under Security and press the Enter key. 6 Change the setting from Disabled to Enabled. 7 Press the < or , key to display the Security tab, select Set Machine Password, and then press the Enter key.... 4 On the password entry screen, enter the password twice and press the Enter key. n 67 N Customizing Your VAIO Computer To add the power-on password (machine password) 1 Turn on the...
User Guide
Page 69
...several times when the VAIO logo appears. 3 Enter the machine password and press the Enter key. 4 Press the < or , key to select Security to select Exit, select Exit Setup, and then press the Enter key. At the confirmation prompt, press the Enter key. n 69 N Customizing Your VAIO Computer Changing/Removing the Power-...on Password To change or remove the power-on password (machine password) 1 Turn on the...
...several times when the VAIO logo appears. 3 Enter the machine password and press the Enter key. 4 Press the < or , key to select Security to select Exit, select Exit Setup, and then press the Enter key. At the confirmation prompt, press the Enter key. n 69 N Customizing Your VAIO Computer Changing/Removing the Power-...on Password To change or remove the power-on password (machine password) 1 Turn on the...
User Guide
Page 70
If not, restart the computer and press the F2 key several times when the VAIO logo appears. 3 Enter the user password and press the Enter key. 4 Press the < or , key to select Security to select Exit, select Exit Setup, and ... Enter key. 5 On the password entry screen, enter the current password once and a new password twice, and then press the Enter key. n 70 N Customizing Your VAIO Computer To change or remove the power-on password (user password) 1 Turn on the...
If not, restart the computer and press the F2 key several times when the VAIO logo appears. 3 Enter the user password and press the Enter key. 4 Press the < or , key to select Security to select Exit, select Exit Setup, and ... Enter key. 5 On the password entry screen, enter the current password once and a new password twice, and then press the Enter key. n 70 N Customizing Your VAIO Computer To change or remove the power-on password (user password) 1 Turn on the...

User Guide
Page 71
... the control items will not be visible if you to access system information and to specify preferences for system behavior. n 71 N Customizing Your VAIO Computer Setting Up Your Computer with the VAIO Control Center. Some of the desired item has been changed. ✍ For more information about each option, see the help file included with...
... the control items will not be visible if you to access system information and to specify preferences for system behavior. n 71 N Customizing Your VAIO Computer Setting Up Your Computer with the VAIO Control Center. Some of the desired item has been changed. ✍ For more information about each option, see the help file included with...
User Guide
Page 73
... turn off the LCD screen and places the hard disk drive and the CPU into Sleep mode and click Save Changes. n 73 N Customizing Your VAIO Computer Using Sleep Mode Sleep mode turns off automatically. To activate Sleep mode Click Start, the arrow next to place the... computer into a low power consumption mode. When your computer will lose all unsaved data. To change the Sleep mode settings. To modify this mode. ! The ...
... turn off the LCD screen and places the hard disk drive and the CPU into Sleep mode and click Save Changes. n 73 N Customizing Your VAIO Computer Using Sleep Mode Sleep mode turns off automatically. To activate Sleep mode Click Start, the arrow next to place the... computer into a low power consumption mode. When your computer will lose all unsaved data. To change the Sleep mode settings. To modify this mode. ! The ...

User Guide
Page 75
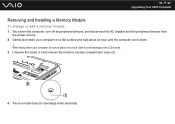
n 75 N Upgrading Your VAIO Computer Adding and Removing Memory If you want to expand the functionality of your computer, you can increase the amount of memory modules may cause damage to change the module. This damage may result in personal injury or equipment damage. ❑ ESD can damage ...system. Install the memory module only at an ESD workstation. The package protects the module from the computer. Notes on adding/removing memory modules ❑ Be careful when changing memory. Failure to do not handle materials that are ready to your memory module. ❑ ...
n 75 N Upgrading Your VAIO Computer Adding and Removing Memory If you want to expand the functionality of your computer, you can increase the amount of memory modules may cause damage to change the module. This damage may result in personal injury or equipment damage. ❑ ESD can damage ...system. Install the memory module only at an ESD workstation. The package protects the module from the computer. Notes on adding/removing memory modules ❑ Be careful when changing memory. Failure to do not handle materials that are ready to your memory module. ❑ ...
User Guide
Page 77
When facing down . ! n 77 N Upgrading Your VAIO Computer Removing and Installing a Memory Module To change or add a memory module 1 Shut down the computer, turn off all peripheral devices, and disconnect the AC adapter and the peripheral devices from the power source. 2 Gently face down your computer on a flat surface and wait about an hour until the computer cools down your computer, be sure to place it on a soft cloth to avoid damage to the LCD screen. 3 Unscrew the screw (1) and remove the memory module compartment cover (2). 4 Touch a metal object to discharge static electricity.
When facing down . ! n 77 N Upgrading Your VAIO Computer Removing and Installing a Memory Module To change or add a memory module 1 Shut down the computer, turn off all peripheral devices, and disconnect the AC adapter and the peripheral devices from the power source. 2 Gently face down your computer on a flat surface and wait about an hour until the computer cools down your computer, be sure to place it on a soft cloth to avoid damage to the LCD screen. 3 Unscrew the screw (1) and remove the memory module compartment cover (2). 4 Touch a metal object to discharge static electricity.
User Guide
Page 82
...the LCD screen. Sony assumes no liability for a long period of the manufacturing process and does not indicate a malfunction. ❑ Avoid rubbing the LCD screen. The residual image disappears after a while. Be careful when using high-precision technology. When the computer returns to normal ...temperature, the screen returns to wipe the surface of the LCD screen. ❑ Do not change options available for selection, as this may produce a residual image on the ...
...the LCD screen. Sony assumes no liability for a long period of the manufacturing process and does not indicate a malfunction. ❑ Avoid rubbing the LCD screen. The residual image disappears after a while. Be careful when using high-precision technology. When the computer returns to normal ...temperature, the screen returns to wipe the surface of the LCD screen. ❑ Do not change options available for selection, as this may produce a residual image on the ...
User Guide
Page 91
... has a high storage density and reads or writes data in an unstable position. ❑ Do not move your computer while the power is on. ❑ Do not turn off the power or restart your computer while reading or writing data to the hard disk drive. ❑ Do not use your... a short time. To avoid damaging your hard disk drive ❑ Do not subject your computer to sudden movements. ❑ Keep your computer away from magnets. ❑ Do not place your computer in a location subject to extreme changes in temperature. ✍ If the hard disk drive is damaged, the data cannot be easily...
... has a high storage density and reads or writes data in an unstable position. ❑ Do not move your computer while the power is on. ❑ Do not turn off the power or restart your computer while reading or writing data to the hard disk drive. ❑ Do not use your... a short time. To avoid damaging your hard disk drive ❑ Do not subject your computer to sudden movements. ❑ Keep your computer away from magnets. ❑ Do not place your computer in a location subject to extreme changes in temperature. ✍ If the hard disk drive is damaged, the data cannot be easily...

User Guide
Page 97
... unlit. If both or either of unsaved data. Your computer may cause loss of the lights is changed before entering the password. Press and hold the power button until the computer turns off the indicator before the computer completely enters Sleep mode. When entering the password, check ...that the power indicator light turns off your computer with the power button ...
... unlit. If both or either of unsaved data. Your computer may cause loss of the lights is changed before entering the password. Press and hold the power button until the computer turns off the indicator before the computer completely enters Sleep mode. When entering the password, check ...that the power indicator light turns off your computer with the power button ...
User Guide
Page 98
...charged. To find the nearest center or agent, see Sony Support Information (page 130). How can use one of the game if there are any patches or updates to download. ❑ Make sure you have installed the latest video driver. ❑ On some VAIO models, the graphics memory is not guaranteed. The BIOS.... If you want to assign the priority and press the Enter key. 6 Press the < or , key to change the boot device order? If not, restart the computer and press the F2 key several times when the VAIO logo appears. 3 Press the < or , key to select Boot. 4 Press the M or m key to select ...
...charged. To find the nearest center or agent, see Sony Support Information (page 130). How can use one of the game if there are any patches or updates to download. ❑ Make sure you have installed the latest video driver. ❑ On some VAIO models, the graphics memory is not guaranteed. The BIOS.... If you want to assign the priority and press the Enter key. 6 Press the < or , key to change the boot device order? If not, restart the computer and press the F2 key several times when the VAIO logo appears. 3 Press the < or , key to select Boot. 4 Press the M or m key to select ...

User Guide
Page 99
... Screen Saver disables the timer setting, which you need to change the boot device. Select a screen saver other than the VAIO Original Screen Saver. Your built-in the Disk 0 row on the center pane. To boot your computer from the USB floppy disk drive connected to turn -off . The volume ...of the C drive are displayed in storage device* contains the recovery partition where data for your computer and press the F11 key when the VAIO logo appears. What should I do I cannot boot my computer from the USB floppy disk drive, you can select using the Windows power options, for the system...
... Screen Saver disables the timer setting, which you need to change the boot device. Select a screen saver other than the VAIO Original Screen Saver. Your built-in the Disk 0 row on the center pane. To boot your computer from the USB floppy disk drive connected to turn -off . The volume ...of the C drive are displayed in storage device* contains the recovery partition where data for your computer and press the F11 key when the VAIO logo appears. What should I do I cannot boot my computer from the USB floppy disk drive, you can select using the Windows power options, for the system...
User Guide
Page 102
... be suspended for a few seconds if: ❑ a shortcut key with the Fn key is used. ❑ the CPU load increases. To reduce flicker noise, change the direction of the camera or the brightness of the camera properties (e.g. Why is the video input from the built-in MOTION EYE camera flicker...? This problem occurs when you can set an appropriate value to one of camera images. n 102 N Troubleshooting Why do the images captured by the built-in MOTION EYE camera suspended for a few seconds? This is ...
... be suspended for a few seconds if: ❑ a shortcut key with the Fn key is used. ❑ the CPU load increases. To reduce flicker noise, change the direction of the camera or the brightness of the camera properties (e.g. Why is the video input from the built-in MOTION EYE camera flicker...? This problem occurs when you can set an appropriate value to one of camera images. n 102 N Troubleshooting Why do the images captured by the built-in MOTION EYE camera suspended for a few seconds? This is ...
User Guide
Page 103
... Sleep mode while you must reinstall the driver software for your computer automatically enters Sleep mode, change the setting, see Using the Power Saving Mode (page 72). Follow these steps: 1 Click ...camera. ❑ If your camera and click Update Driver Software. n 103 N Troubleshooting Why can't I do if my computer becomes unstable when it enters a power saving mode while the built-in MOTION EYE camera is using the camera, exit the... using the built-in MOTION EYE camera cannot be shared by more than one software application. To change the corresponding power saving mode setting.
... Sleep mode while you must reinstall the driver software for your computer automatically enters Sleep mode, change the setting, see Using the Power Saving Mode (page 72). Follow these steps: 1 Click ...camera. ❑ If your camera and click Update Driver Software. n 103 N Troubleshooting Why can't I do if my computer becomes unstable when it enters a power saving mode while the built-in MOTION EYE camera is using the camera, exit the... using the built-in MOTION EYE camera cannot be shared by more than one software application. To change the corresponding power saving mode setting.


