
Service Manual
Page 1
VIDEO GRAPHIC PRINTER UP-895 UP-895CE UP-895MD SERVICE MANUAL 1st Edition
VIDEO GRAPHIC PRINTER UP-895 UP-895CE UP-895MD SERVICE MANUAL 1st Edition

Service Manual
Page 7
UP-895/(E) 3-868-286-01 (1) Video Graphic Printer Instructions for Use Page 20 GB Section 1 Operating Instructions This section is extracted from operation manual. (For UP-895MD/895CE) UP-895 UP-895MD UP-895CE © 1999 Sony Corporation 1-1
UP-895/(E) 3-868-286-01 (1) Video Graphic Printer Instructions for Use Page 20 GB Section 1 Operating Instructions This section is extracted from operation manual. (For UP-895MD/895CE) UP-895 UP-895MD UP-895CE © 1999 Sony Corporation 1-1

Service Manual
Page 8
...expressly approved in a commercial environment. Introduction 21 THIS APPARATUS MUST BE EARTHED. For the customers in the U.S.A. (for UP-895/895MD) This equipment has been tested and found to comply with the instruction manual, may cause interference to comply with other equipment in...Printing 27 Making Printouts 27 Selecting the Printing Direction/Image Size ...... 28 Adjusting the Contrast and Brightness 30 Remotely Controlling the Printer 30 Others Precautions 31 Maintenance 31 Specifications 32 Troubleshooting 34 Location and Function of black and white. • Stable printouts...
...expressly approved in a commercial environment. Introduction 21 THIS APPARATUS MUST BE EARTHED. For the customers in the U.S.A. (for UP-895/895MD) This equipment has been tested and found to comply with the instruction manual, may cause interference to comply with other equipment in...Printing 27 Making Printouts 27 Selecting the Printing Direction/Image Size ...... 28 Adjusting the Contrast and Brightness 30 Remotely Controlling the Printer 30 Others Precautions 31 Maintenance 31 Specifications 32 Troubleshooting 34 Location and Function of black and white. • Stable printouts...

Service Manual
Page 9
...under the following conditions. • When the image size selector on the front panel is set the switch to ON. 1-3 UP-895/(E) Preparation Connection/Setting Up the Printer Connection Notes • Turn off the power to each tone. Under any connections. • Connect the AC power cord last. ... density. qa qs DIP SW UP DOWN 1 2 3 4 5 6 7 8 9 10 11 12 REMOTE UP DOWN DIP SW t IN T OUT VIDEO AC IN UP-895MD/895CE DIP SW FUNCTION TABLE NO. Supplied coaxial connecting cable (BNC y BNC) to video input connector Connecting cable (not supplied) to VIDEO IN to VIDEO...
...under the following conditions. • When the image size selector on the front panel is set the switch to ON. 1-3 UP-895/(E) Preparation Connection/Setting Up the Printer Connection Notes • Turn off the power to each tone. Under any connections. • Connect the AC power cord last. ... density. qa qs DIP SW UP DOWN 1 2 3 4 5 6 7 8 9 10 11 12 REMOTE UP DOWN DIP SW t IN T OUT VIDEO AC IN UP-895MD/895CE DIP SW FUNCTION TABLE NO. Supplied coaxial connecting cable (BNC y BNC) to video input connector Connecting cable (not supplied) to VIDEO IN to VIDEO...

Service Manual
Page 10
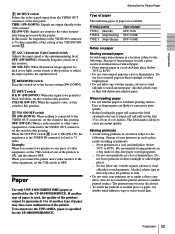
... one piece of video equipment, set the switch to this position. Paper Use only UPP-110S/110HD/110HG paper as specified for the UP-895/895MD/895CE. Storing printouts • Avoid storing printouts in direct sunlight or other bright places. - Do not leave printouts in a location subject ...86°F). qs 75 Ω ON/OFF switch ON (SW-DOWN): When nothing is 1:1, set to the video monitor. Setting Up the Printer/Paper Type of paper The following . Dust or finger prints are output directly to this position. The printout definition will sound. 2 POSTFEED switch ...
... one piece of video equipment, set the switch to this position. Paper Use only UPP-110S/110HD/110HG paper as specified for the UP-895/895MD/895CE. Storing printouts • Avoid storing printouts in direct sunlight or other bright places. - Do not leave printouts in a location subject ...86°F). qs 75 Ω ON/OFF switch ON (SW-DOWN): When nothing is 1:1, set to the video monitor. Setting Up the Printer/Paper Type of paper The following . Dust or finger prints are output directly to this position. The printout definition will sound. 2 POSTFEED switch ...

Service Manual
Page 14
...(1) BNC y BNC connecting cable (1) AC power cord (1) Head cleaning sheet (1) Media label (1) The following specifications are applied only to the UP-895MD/895CE models: Storage and transport temperature -20°C to 60°C (-4°F to 140°F) Storage and transport humidity 20 % to change... oz), Main unit only Thermal head Thin-film thermal head (with built- x When the buzzer sounds and the printer starts ejecting the cleaning sheet, release the button. UP-895/(E) 1-8 Others Maintenance/Specifications 4 Close the door by pushing it. Keep pressing the FEED button. If you clean ...
...(1) BNC y BNC connecting cable (1) AC power cord (1) Head cleaning sheet (1) Media label (1) The following specifications are applied only to the UP-895MD/895CE models: Storage and transport temperature -20°C to 60°C (-4°F to 140°F) Storage and transport humidity 20 % to change... oz), Main unit only Thermal head Thin-film thermal head (with built- x When the buzzer sounds and the printer starts ejecting the cleaning sheet, release the button. UP-895/(E) 1-8 Others Maintenance/Specifications 4 Close the door by pushing it. Keep pressing the FEED button. If you clean ...

Service Manual
Page 15
... • There is condensation inside the unit. 1-9 UP-895/(E) Others Troubleshooting Troubleshooting The following troubleshooting checks will help you ...Sony service facility. The thermal head may result from a cold place to a warm place often results in the paper tray set correctly? (page 23) The DIP switch 3 (ASPECT) is set to two hours. This is because a protective circuit guards against heat build-up ? (page 26) This problem may overheat when the printer...(26, 27, 28, 32) Press to next page c UP-895MD/895CE Others 35 Others t Is the power turned on the screen ...
... • There is condensation inside the unit. 1-9 UP-895/(E) Others Troubleshooting Troubleshooting The following troubleshooting checks will help you ...Sony service facility. The thermal head may result from a cold place to a warm place often results in the paper tray set correctly? (page 23) The DIP switch 3 (ASPECT) is set to two hours. This is because a protective circuit guards against heat build-up ? (page 26) This problem may overheat when the printer...(26, 27, 28, 32) Press to next page c UP-895MD/895CE Others 35 Others t Is the power turned on the screen ...

User Instructions
Page 1
3-868-286-07 (1) Video Graphic Printer Page 2 JP Instructions for UseɹPage 20 GB Mode d'emploiɹPage 38 FR GebrauchsanweisungɹSeite 56 DE Manual de instruccionesɹpágina 74 ES Istruzioni perl'usoɹpagina 92 IT (For UP-895MD/895CE) UP-895 UP-895MD UP-895CE 1999 Sony Corporation
3-868-286-07 (1) Video Graphic Printer Page 2 JP Instructions for UseɹPage 20 GB Mode d'emploiɹPage 38 FR GebrauchsanweisungɹSeite 56 DE Manual de instruccionesɹpágina 74 ES Istruzioni perl'usoɹpagina 92 IT (For UP-895MD/895CE) UP-895 UP-895MD UP-895CE 1999 Sony Corporation

User Instructions
Page 21
... 28 Adjusting the Contrast and Brightness 30 Remotely Controlling the Printer 30 Others Precautions 31 Maintenance 31 Specifications 32 Troubleshooting 34 Location and Function of Parts 35 Front 35 Back 36 Overview Introduction The UP-895/895MD/895CE is automatically determined and printed in STD and NORM ...the paper type by opening the door and placing the paper roll. This manual covers the UP-895/895MD/895CE models. DIP switches and slide switches to optimize the printer • You can set the printout aspect ratio to select various printing size. Wherever the operation ...
... 28 Adjusting the Contrast and Brightness 30 Remotely Controlling the Printer 30 Others Precautions 31 Maintenance 31 Specifications 32 Troubleshooting 34 Location and Function of Parts 35 Front 35 Back 36 Overview Introduction The UP-895/895MD/895CE is automatically determined and printed in STD and NORM ...the paper type by opening the door and placing the paper roll. This manual covers the UP-895/895MD/895CE models. DIP switches and slide switches to optimize the printer • You can set the printout aspect ratio to select various printing size. Wherever the operation ...
User Instructions
Page 23
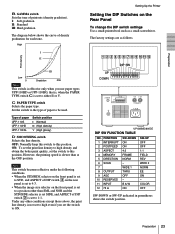
... to STD, and ASPECT of DIP switch 3 on the rear panel is set to ON. However, the printing speed is set to 1:1. Setting Up the Printer Setting the DIP Switches on the front panel is set to a position other conditions except those above, the print line density is set to either... parentheses shows the switch position. qa qs DIP SW UP DOWN 1 2 3 4 5 6 7 8 9 10 11 12 REMOTE UP DOWN DIP SW t IN T OUT VIDEO AC IN UP-895MD/895CE DIP SW FUNCTION TABLE NO. Preparation 23
... to STD, and ASPECT of DIP switch 3 on the rear panel is set to ON. However, the printing speed is set to 1:1. Setting Up the Printer Setting the DIP Switches on the front panel is set to a position other conditions except those above, the print line density is set to either... parentheses shows the switch position. qa qs DIP SW UP DOWN 1 2 3 4 5 6 7 8 9 10 11 12 REMOTE UP DOWN DIP SW t IN T OUT VIDEO AC IN UP-895MD/895CE DIP SW FUNCTION TABLE NO. Preparation 23
User Instructions
Page 25
...surface. Use of another piece of paper roll and pull out the first 15 to 20 cm (6 to 8 inches). Setting Up the Printer/Paper Type of the printer. The printout may become discolored. • To attach the printout to another type of paper may also cause malfunction of paper The ...glue. Do not leave unused paper in a hot or humid place. Paper Use only UPP-110S/110HD/110HG paper as specified for the UP-895/895MD/895CE. Preparation 8 OUTPUT switch Selects the video signal output from the VIDEO OUT connector on paper Storing unused paper Avoid storing unused paper in ...
...surface. Use of another piece of paper roll and pull out the first 15 to 20 cm (6 to 8 inches). Setting Up the Printer/Paper Type of the printer. The printout may become discolored. • To attach the printout to another type of paper may also cause malfunction of paper The ...glue. Do not leave unused paper in a hot or humid place. Paper Use only UPP-110S/110HD/110HG paper as specified for the UP-895/895MD/895CE. Preparation 8 OUTPUT switch Selects the video signal output from the VIDEO OUT connector on paper Storing unused paper Avoid storing unused paper in ...

User Instructions
Page 35
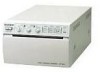
... button during printing results in parentheses. The image displayed when you press the PRINT button is stored in memory. 0 EMPTY lamp (27) Lights when the printer is out of Parts For details, refer to the pages indicated in an interruption of the printing. 8 COPY button (28) Prints another copy of Parts... to make negative printouts. 6 BRIGHT (brightness) control (30) Adjusts the brightness of the printouts. 7 FEED button (26, 27, 28, 32) Press to next page c UP-895MD/895CE Others 35 Front 1 23456 7 8 9 q; The power lamp is lit while the power is held down.
... button during printing results in parentheses. The image displayed when you press the PRINT button is stored in memory. 0 EMPTY lamp (27) Lights when the printer is out of Parts For details, refer to the pages indicated in an interruption of the printing. 8 COPY button (28) Prints another copy of Parts... to make negative printouts. 6 BRIGHT (brightness) control (30) Adjusts the brightness of the printouts. 7 FEED button (26, 27, 28, 32) Press to next page c UP-895MD/895CE Others 35 Front 1 23456 7 8 9 q; The power lamp is lit while the power is held down.


