
Operating Instructions / Mode d’emploi
Page 3
... Macintosh OS 13 GB English Preparing to Print 14 Preparing a Print Pack 14 Loading the Ink Ribbon Cartridge and Printing Paper ......... 16 Removing the Ink Ribbon Cartridge and the Printing Paper 19 Making Printer Setting from your Computer 20 With Windows 20 With the Macintosh 25 Miscellaneous 31 Maintaining the Performance of...
... Macintosh OS 13 GB English Preparing to Print 14 Preparing a Print Pack 14 Loading the Ink Ribbon Cartridge and Printing Paper ......... 16 Removing the Ink Ribbon Cartridge and the Printing Paper 19 Making Printer Setting from your Computer 20 With Windows 20 With the Macintosh 25 Miscellaneous 31 Maintaining the Performance of...

Operating Instructions / Mode d’emploi
Page 4
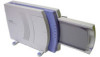
... a glossy print. • Texture: Produces a textured print. • Matte: Produces a matte print. The printer can select from the printer. Paper supply/eject tray (1) Prints with fine photographic quality. The printer weighs only 2.7kg, making it can be easily cleared simply by this manual) (1)... What the Digital Photo Printer Can Do High-quality Photo Printing The sublimation printing process used for printing 10 sheets) (1) Print paper (5 sheets each edge. Checking the Packing List Check the contents of an A4 sheet. Stands (2) Laminate Patterns Because laminate processing...
... a glossy print. • Texture: Produces a textured print. • Matte: Produces a matte print. The printer can select from the printer. Paper supply/eject tray (1) Prints with fine photographic quality. The printer weighs only 2.7kg, making it can be easily cleared simply by this manual) (1)... What the Digital Photo Printer Can Do High-quality Photo Printing The sublimation printing process used for printing 10 sheets) (1) Print paper (5 sheets each edge. Checking the Packing List Check the contents of an A4 sheet. Stands (2) Laminate Patterns Because laminate processing...
Operating Instructions / Mode d’emploi
Page 6
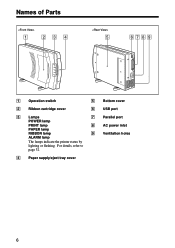
For details, refer to page 32. 4 Paper supply/eject tray cover 6 Names of Parts 1 234 5 6789 1 Operation switch 5 Bottom cover 2 Ribbon cartridge cover 6 USB port 3 Lamps 7 Parallel port POWER lamp PRINT lamp 8 AC power inlet PAPER lamp RIBBON lamp 9 Ventilation holes ALARM lamp The lamps indicate the printer status by lighting or flashing.
For details, refer to page 32. 4 Paper supply/eject tray cover 6 Names of Parts 1 234 5 6789 1 Operation switch 5 Bottom cover 2 Ribbon cartridge cover 6 USB port 3 Lamps 7 Parallel port POWER lamp PRINT lamp 8 AC power inlet PAPER lamp RIBBON lamp 9 Ventilation holes ALARM lamp The lamps indicate the printer status by lighting or flashing.

Operating Instructions / Mode d’emploi
Page 14
... then cut off along the perforations. Notes on Using Print Packs • The ink ribbon cartridge is designed to allow you to prepare a Sony Print Pack (printing paper and an ink ribbon cartridge, sold as a set). Type Size/number of sheets Features UPC10P23 Photocards 100 × 180 mm (100 ×...) 25 sheets These sheets produce prints that have no white border when photos taken with an adhesive. The following table lists the types of Sony Print Packs available. Preparing to Print Preparing a Print Pack In order to print, it is necessary to print an image on each of ...
... then cut off along the perforations. Notes on Using Print Packs • The ink ribbon cartridge is designed to allow you to prepare a Sony Print Pack (printing paper and an ink ribbon cartridge, sold as a set). Type Size/number of sheets Features UPC10P23 Photocards 100 × 180 mm (100 ×...) 25 sheets These sheets produce prints that have no white border when photos taken with an adhesive. The following table lists the types of Sony Print Packs available. Preparing to Print Preparing a Print Pack In order to print, it is necessary to print an image on each of ...

Operating Instructions / Mode d’emploi
Page 15
... share the same product number together. Doing so could leave fingerprints, which will be lost. • Ink ribbon cartridges cannot be re-used. • If a paper jam occurs, do not turn off the printer. • If photos taken with a digital camera that has a 2:3 aspect ratio (V:H) are printed on the... paper in a UPC-10P34 Print Pack, the printed image may extend beyond the left and right perforations, or white border may result in poor image quality, ...
... share the same product number together. Doing so could leave fingerprints, which will be lost. • Ink ribbon cartridges cannot be re-used. • If a paper jam occurs, do not turn off the printer. • If photos taken with a digital camera that has a 2:3 aspect ratio (V:H) are printed on the... paper in a UPC-10P34 Print Pack, the printed image may extend beyond the left and right perforations, or white border may result in poor image quality, ...
Operating Instructions / Mode d’emploi
Page 16
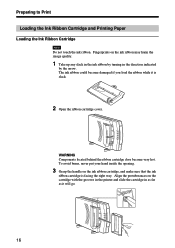
... grooves in the printer and slide the cartridge in the direction indicated by the arrow. Preparing to Print Loading the Ink Ribbon Cartridge and Printing Paper Loading the Ink Ribbon Cartridge Note Do not touch the ink ribbon.
... grooves in the printer and slide the cartridge in the direction indicated by the arrow. Preparing to Print Loading the Ink Ribbon Cartridge and Printing Paper Loading the Ink Ribbon Cartridge Note Do not touch the ink ribbon.

Operating Instructions / Mode d’emploi
Page 17
Stopper Printing surface Tabs 17 If the paper is curled, uncurl it. 2 With the printing surface (glossy side) facing up, place the paper in the paper supply/eject tray, making sure that the RIBBON lamp has turned off. Loading the Printing Paper Note Never touch the printing side (the blank, glossy side) of the tray. Doing so could leave fingerprints, which will harm image quality. 1 Fan the paper thoroughly. 4 Close the ribbon cartridge cover, and then make sure that the paper is under the tabs at the end of the paper.
Stopper Printing surface Tabs 17 If the paper is curled, uncurl it. 2 With the printing surface (glossy side) facing up, place the paper in the paper supply/eject tray, making sure that the RIBBON lamp has turned off. Loading the Printing Paper Note Never touch the printing side (the blank, glossy side) of the tray. Doing so could leave fingerprints, which will harm image quality. 1 Fan the paper thoroughly. 4 Close the ribbon cartridge cover, and then make sure that the paper is under the tabs at the end of the paper.

Operating Instructions / Mode d’emploi
Page 18
... has turned off. Preparing to Print Notes • Do not place more than 25 sheets in the tray at one time. • When loading printing paper in any typical application software to print. 18 Once printer setup is complete, use the Print function in the tray, make sure that is significantly... tray with the grooves in the printer, slide the tray in as far as it will go, and then make sure that all of the paper is now ready to Print" (page 14). To print, first read "Preparing to print. Stopper Notes • Do not allow more than 10 sheets of...
... has turned off. Preparing to Print Notes • Do not place more than 25 sheets in the tray at one time. • When loading printing paper in any typical application software to print. 18 Once printer setup is complete, use the Print function in the tray, make sure that is significantly... tray with the grooves in the printer, slide the tray in as far as it will go, and then make sure that all of the paper is now ready to Print" (page 14). To print, first read "Preparing to print. Stopper Notes • Do not allow more than 10 sheets of...

Operating Instructions / Mode d’emploi
Page 19
Removing the Ink Ribbon Cartridge and the Printing Paper Removing the ink ribbon cartridge 1 Open the ribbon cartridge cover. 2 Grasp the handle and pull the cartridge out. Removing the printing paper 1 Pull the paper supply/eject tray out of the printer. 2 Lift the metal plate at the bottom of the paper supply/eject tray, and then pull out the printing paper. 19
Removing the Ink Ribbon Cartridge and the Printing Paper Removing the ink ribbon cartridge 1 Open the ribbon cartridge cover. 2 Grasp the handle and pull the cartridge out. Removing the printing paper 1 Pull the paper supply/eject tray out of the printer. 2 Lift the metal plate at the bottom of the paper supply/eject tray, and then pull out the printing paper. 19
Operating Instructions / Mode d’emploi
Page 20
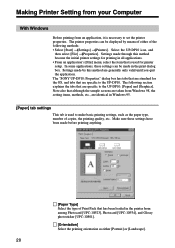
... some applications, these settings have been made in the printer from an application, it is necessary to the UP-DP10: [Paper] and [Graphics]. Select the UP-DP10 icon, and then select [File] t[Properties]. The "SONY UP-DP10: Properties" dialog box has tabs that are specific to set the printer properties. Making Printer Setting from your...
... some applications, these settings have been made in the printer from an application, it is necessary to the UP-DP10: [Paper] and [Graphics]. Select the UP-DP10 icon, and then select [File] t[Properties]. The "SONY UP-DP10: Properties" dialog box has tabs that are specific to set the printer properties. Making Printer Setting from your...

Operating Instructions / Mode d’emploi
Page 21
... Clicking this button displays the version information for the printer driver. < [Restore Defaults] Clicking this item to select one of the settings under the [Paper] tab to "25." < [Scaling] Specify the enlargement/reduction ratio. Any integer value ranging from "1" to their initial values. 21 If this option ...identical thumbnail images are printed on each sheet. < [Laminate Pattern] Use this button restores all of the following three laminate processing options for the paper type. • If [1 up] is selected, then only one image is printed on each sheet. • If [16 up] is ...
... Clicking this button displays the version information for the printer driver. < [Restore Defaults] Clicking this item to select one of the settings under the [Paper] tab to "25." < [Scaling] Specify the enlargement/reduction ratio. Any integer value ranging from "1" to their initial values. 21 If this option ...identical thumbnail images are printed on each sheet. < [Laminate Pattern] Use this button restores all of the following three laminate processing options for the paper type. • If [1 up] is selected, then only one image is printed on each sheet. • If [16 up] is ...

Operating Instructions / Mode d’emploi
Page 26
...can be set for this ratio. < "Orientation" Select the printing orientation. < "Image Layout" This item becomes valid if "UPC-10S01" is selected for the paper type. • If "1 up" is selected, then only one image is printed on each sheet. • If "16 up" is selected, then 16 ...identical thumbnail images are printed on each sheet. < "Laminate Pattern" Use this item to make basic printing settings, such as the paper type, the printing quality, etc. All of the following three laminate processing options for the print surface: • If "Glossy" is selected, prints ...
...can be set for this ratio. < "Orientation" Select the printing orientation. < "Image Layout" This item becomes valid if "UPC-10S01" is selected for the paper type. • If "1 up" is selected, then only one image is printed on each sheet. • If "16 up" is selected, then 16 ...identical thumbnail images are printed on each sheet. < "Laminate Pattern" Use this item to make basic printing settings, such as the paper type, the printing quality, etc. All of the following three laminate processing options for the print surface: • If "Glossy" is selected, prints ...
Operating Instructions / Mode d’emploi
Page 31
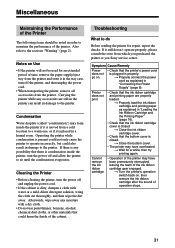
... in order to sit until the condensation evaporates. Troubleshooting What to the sections "Warning" (page 2). t Properly load the ink ribbon cartridge and printing paper as explained in damage to the printer. t Turn the printer's operation switch back on . • Check that the bottom cover is dirty, dampen...please consult the store from a cold location to a warm one, or if it is moved from which you purchased the printer or you Sony service center. Printer does not print • Check that there is condensation inside the printer if it is present could not only cause ...
... in order to sit until the condensation evaporates. Troubleshooting What to the sections "Warning" (page 2). t Properly load the ink ribbon cartridge and printing paper as explained in damage to the printer. t Turn the printer's operation switch back on . • Check that the bottom cover is dirty, dampen...please consult the store from a cold location to a warm one, or if it is moved from which you purchased the printer or you Sony service center. Printer does not print • Check that there is condensation inside the printer if it is present could not only cause ...
Operating Instructions / Mode d’emploi
Page 32
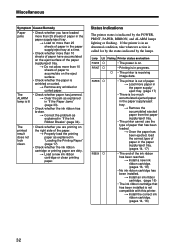
...cartridge. (pages 16, 19) • No ink ribbon cartridge has been installed. Miscellaneous Symptom Cause/Remedy Paper jams The ALARM lamp is out of paper. t Clear the jam as explained in "If the Paper Jams" (page 33). • Check whether the ink ribbon has broken. t Load a new ink...; Check whether you are dirty. t Load more than 25 sheets of paper in the paper supply/eject tray at a time. • Check whether more paper in the paper supply/eject tray. t Remove the accumulated ejected paper from the paper supply/eject tray. • The printer cannot use the type of the...
...cartridge. (pages 16, 19) • No ink ribbon cartridge has been installed. Miscellaneous Symptom Cause/Remedy Paper jams The ALARM lamp is out of paper. t Clear the jam as explained in "If the Paper Jams" (page 33). • Check whether the ink ribbon has broken. t Load a new ink...; Check whether you are dirty. t Load more than 25 sheets of paper in the paper supply/eject tray at a time. • Check whether more paper in the paper supply/eject tray. t Remove the accumulated ejected paper from the paper supply/eject tray. • The printer cannot use the type of the...
Operating Instructions / Mode d’emploi
Page 33
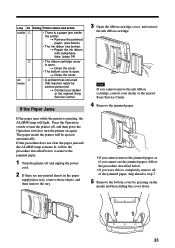
...contact your dealer or the nearest Sony Service Center. All a lamps • A problem has occurred that requires repair by pressing on again. The paper inside the printer. t Remove the jammed paper. (see the jammed paper, follow the procedure described below to remove the jammed paper. 1 Turn the printer off...page 34) a • The ribbon cartridge cover is open . t Contact your dealer or the nearest Sony Service Center. 4 Remove the jammed paper. • If you cannot remove the jammed paper, or if you cannot see below . • If you were able to completely remove all of ...
...contact your dealer or the nearest Sony Service Center. All a lamps • A problem has occurred that requires repair by pressing on again. The paper inside the printer. t Remove the jammed paper. (see the jammed paper, follow the procedure described below to remove the jammed paper. 1 Turn the printer off...page 34) a • The ribbon cartridge cover is open . t Contact your dealer or the nearest Sony Service Center. 4 Remove the jammed paper. • If you cannot remove the jammed paper, or if you cannot see below . • If you were able to completely remove all of ...
Operating Instructions / Mode d’emploi
Page 34
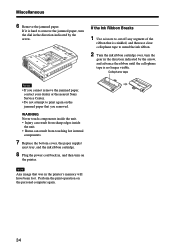
...ribbon until the cellophane tape is no longer visible. Miscellaneous 6 Remove the jammed paper. Note Any image that you removed. Cellophane tape Notes • If you cannot remove the jammed paper, contact your dealer or the nearest Sony Service Center. • Do not attempt to mend the ink ribbon. 2 ...Turn the ink ribbon cartridge over, turn the gear in the printer's memory will have been lost. Perform the print operation on the jammed paper that was ...
...ribbon until the cellophane tape is no longer visible. Miscellaneous 6 Remove the jammed paper. Note Any image that you removed. Cellophane tape Notes • If you cannot remove the jammed paper, contact your dealer or the nearest Sony Service Center. • Do not attempt to mend the ink ribbon. 2 ...Turn the ink ribbon cartridge over, turn the gear in the printer's memory will have been lost. Perform the print operation on the jammed paper that was ...

Operating Instructions / Mode d’emploi
Page 35
...Amax. Main Specifications Power supply 100 to 25 sheets Paper supply method Autofeed from paper supply tray Maximum capacity of paper supply tray 25 sheets Paper eject method Front ejection Sheets are ejected in order on top of paper supply tray Ribbon cartridge Can print 25 sheets Inputs AC... IN (power inlet) Thermal head 11.6 dots/mm Accessories Paper supply/eject tray (1) Power cord (1) Stands (2) Tray case (1) Ink ribbon cartridge (sufficient for printing 10 sheets) (1) Print paper (5 sheets each of printing pixels (maximum) Print Pack Effective Image transfer Type...
...Amax. Main Specifications Power supply 100 to 25 sheets Paper supply method Autofeed from paper supply tray Maximum capacity of paper supply tray 25 sheets Paper eject method Front ejection Sheets are ejected in order on top of paper supply tray Ribbon cartridge Can print 25 sheets Inputs AC... IN (power inlet) Thermal head 11.6 dots/mm Accessories Paper supply/eject tray (1) Power cord (1) Stands (2) Tray case (1) Ink ribbon cartridge (sufficient for printing 10 sheets) (1) Print paper (5 sheets each of printing pixels (maximum) Print Pack Effective Image transfer Type...


