Operating Instructions / Mode d’emploi
Page 2
... energy and, if not installed and used in the USA This equipment has been tested and found to correct the interference by turning the equipment off and on a circuit different from that interference will not occur in a residential installation. You are designed to Part 15 of Conformity Trade Name: SONY Model No: UP-DP10 Responsible Party: Sony Electronics Inc. WARNING To...
... energy and, if not installed and used in the USA This equipment has been tested and found to correct the interference by turning the equipment off and on a circuit different from that interference will not occur in a residential installation. You are designed to Part 15 of Conformity Trade Name: SONY Model No: UP-DP10 Responsible Party: Sony Electronics Inc. WARNING To...

Operating Instructions / Mode d’emploi
Page 3
... the Digital Photo Printer Can Do 4 Checking the Packing List 4 Requirements 5 Names of Parts 6 Setup and Connection 7 Attaching the Stands to the Printer 7 Connecting the Printer to a Computer 7 Connecting the Power Supply 8 Turning the Power On/Off 8 Installing the Printer Driver 9 With Windows 98 9 With Windows 95 12 With the Macintosh OS 13 GB English Preparing to Print 14 Preparing a Print Pack 14 Loading the Ink Ribbon Cartridge and Printing Paper ......... 16 Removing the Ink Ribbon Cartridge and the Printing Paper 19 Making Printer Setting from your...
... the Digital Photo Printer Can Do 4 Checking the Packing List 4 Requirements 5 Names of Parts 6 Setup and Connection 7 Attaching the Stands to the Printer 7 Connecting the Printer to a Computer 7 Connecting the Power Supply 8 Turning the Power On/Off 8 Installing the Printer Driver 9 With Windows 98 9 With Windows 95 12 With the Macintosh OS 13 GB English Preparing to Print 14 Preparing a Print Pack 14 Loading the Ink Ribbon Cartridge and Printing Paper ......... 16 Removing the Ink Ribbon Cartridge and the Printing Paper 19 Making Printer Setting from your...

Operating Instructions / Mode d’emploi
Page 4
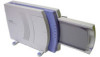
... blank strips of paper on each of UPC-10P23 and UPC10P34) (1) CD-ROM (driver, application) (1) Operating Manual (this printer makes it is used by removing the cover. 4 Compact, Thin, and Light Design The printer itself is performed while photos are printed, the photos will not become discolored over time. Paper Jams Can Be Cleared Easily If the paper jams, it light and easy to transport or ship the printer. • When shipping the printer, remove the ink cartridge and the paper supply/eject tray...
... blank strips of paper on each of UPC-10P23 and UPC10P34) (1) CD-ROM (driver, application) (1) Operating Manual (this printer makes it is used by removing the cover. 4 Compact, Thin, and Light Design The printer itself is performed while photos are printed, the photos will not become discolored over time. Paper Jams Can Be Cleared Easily If the paper jams, it light and easy to transport or ship the printer. • When shipping the printer, remove the ink cartridge and the paper supply/eject tray...

Operating Instructions / Mode d’emploi
Page 5
...* *Please see the user's manual provided with a male type A connector and a male type B connector. (Refer to use the UP-DP10. When using device driver (Windows\system\lpt.vxd) version 4.00.953 in order to the illustration below.) Male type A connector Male type B connector 5 In this page.) < Requirements in order to connect to a printer port: • A personal computer on which is more memory and hard disk...
...* *Please see the user's manual provided with a male type A connector and a male type B connector. (Refer to use the UP-DP10. When using device driver (Windows\system\lpt.vxd) version 4.00.953 in order to the illustration below.) Male type A connector Male type B connector 5 In this page.) < Requirements in order to connect to a printer port: • A personal computer on which is more memory and hard disk...

Operating Instructions / Mode d’emploi
Page 7
... made through a network. • Proper operation can be connected using both a USB cable and a parallel cable. Connect it using one type of cable or the other. Setup and Connection Attaching the Stands to a printer port, we recommend using a shielded printer cable not more than 2m long and with a double-ended ferrite core. • Make sure that you insert the cable connectors all of the way when making the connections. • The driver provided with...
... made through a network. • Proper operation can be connected using both a USB cable and a parallel cable. Connect it using one type of cable or the other. Setup and Connection Attaching the Stands to a printer port, we recommend using a shielded printer cable not more than 2m long and with a double-ended ferrite core. • Make sure that you insert the cable connectors all of the way when making the connections. • The driver provided with...
Operating Instructions / Mode d’emploi
Page 8
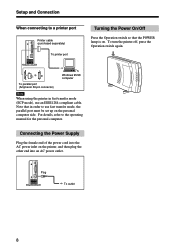
...-pin connector) Windows 95/98 computer Note When using the printer in order to use an IEEE1284-compliant cable. Connecting the Power Supply Plug the female end of the power cord into an AC power outlet. Plug To outlet 8 For details, refer to a printer port Printer cable (purchased separately) To printer port Turning the Power On/Off Press the Operation switch so that in fast transfer mode (ECP mode), use fast transfer mode, the...
...-pin connector) Windows 95/98 computer Note When using the printer in order to use an IEEE1284-compliant cable. Connecting the Power Supply Plug the female end of the power cord into an AC power outlet. Plug To outlet 8 For details, refer to a printer port Printer cable (purchased separately) To printer port Turning the Power On/Off Press the Operation switch so that in fast transfer mode (ECP mode), use fast transfer mode, the...

Operating Instructions / Mode d’emploi
Page 9
When the Printer Is Connected by selecting [Start] t [Settings] t[Printers] t[Add Printer]. 2 Click [Next]. The window changes as shown below . Before installing the printer driver, turn the computer on the UP-DP10, using the Print function of typical application software. The window changes as shown below . 6 Click [Next]. After the file is copied, the window changes as shown below . 9 If the "Add New Hardware Wizard" dialog box does not appear when Windows 98 starts up...
When the Printer Is Connected by selecting [Start] t [Settings] t[Printers] t[Add Printer]. 2 Click [Next]. The window changes as shown below . Before installing the printer driver, turn the computer on the UP-DP10, using the Print function of typical application software. The window changes as shown below . 6 Click [Next]. After the file is copied, the window changes as shown below . 9 If the "Add New Hardware Wizard" dialog box does not appear when Windows 98 starts up...

Operating Instructions / Mode d’emploi
Page 12
... turn the computer and the printer off, and then connect the printer to your Windows 95 operating manual for the printer in the [Printer name] field. With Windows 95 Install the printer driver that is contained in the CD-ROM drive. 12 The window changes as shown below . After the file is provided with a USB cable under Windows 95. Once Windows 95 starts up , install the printer by selecting [Start] t [Settings] t[Printers] t[Add Printer]. 2 Click [Next]. If the "Update...
... turn the computer and the printer off, and then connect the printer to your Windows 95 operating manual for the printer in the [Printer name] field. With Windows 95 Install the printer driver that is contained in the CD-ROM drive. 12 The window changes as shown below . After the file is provided with a USB cable under Windows 95. Once Windows 95 starts up , install the printer by selecting [Start] t [Settings] t[Printers] t[Add Printer]. 2 Click [Next]. If the "Update...

Operating Instructions / Mode d’emploi
Page 13
... using the printer driver, please take a moment to be copied, click [Browse], specify the [Win95\English] folder on the screen in the "Chooser" folder. 13 The window changes as shown below . The "PRINTER SOFTWARE" icon appears on the desktop. 2 Double-click the "Driver" icon to open the folder. 3 Double-click the "Chooser" icon to open the folder. 4 Double-click the "UP-DP10 Install-E" icon to start installation. 5 Follow the instructions displayed...
... using the printer driver, please take a moment to be copied, click [Browse], specify the [Win95\English] folder on the screen in the "Chooser" folder. 13 The window changes as shown below . The "PRINTER SOFTWARE" icon appears on the desktop. 2 Double-click the "Driver" icon to open the folder. 3 Double-click the "Chooser" icon to open the folder. 4 Double-click the "UP-DP10 Install-E" icon to start installation. 5 Follow the instructions displayed...

Operating Instructions / Mode d’emploi
Page 14
... to allow you to prepare a Sony Print Pack (printing paper and an ink ribbon cartridge, sold as a set). Product No. Note If "Border" is selected in the printer driver, each of the sheets in the Print Pack. • If photos taken with a digital camera that has a 3:4 aspect ratio (V:H) are printed on these sheets and the border is then cut off along the perforations. A Sony Print Pack must be reduced somewhat. UPC10P34 Photocards...
... to allow you to prepare a Sony Print Pack (printing paper and an ink ribbon cartridge, sold as a set). Product No. Note If "Border" is selected in the printer driver, each of the sheets in the Print Pack. • If photos taken with a digital camera that has a 3:4 aspect ratio (V:H) are printed on these sheets and the border is then cut off along the perforations. A Sony Print Pack must be reduced somewhat. UPC10P34 Photocards...

Operating Instructions / Mode d’emploi
Page 15
... a 2:3 aspect ratio (V:H) are printed on the paper in a UPC-10P34 Print Pack, the printed image may extend beyond the left and right perforations, or white border may result in "If the Paper Jams" (page 33). • If the ink ribbon breaks, you can tape it is necessary to change BOTH the ink ribbon cartridge and the paper, as a set. • Never touch the printing side (the blank, glossy side) of time, place them back...
... a 2:3 aspect ratio (V:H) are printed on the paper in a UPC-10P34 Print Pack, the printed image may extend beyond the left and right perforations, or white border may result in "If the Paper Jams" (page 33). • If the ink ribbon breaks, you can tape it is necessary to change BOTH the ink ribbon cartridge and the paper, as a set. • Never touch the printing side (the blank, glossy side) of time, place them back...
Operating Instructions / Mode d’emploi
Page 16
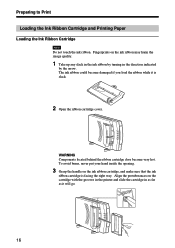
... opening. 3 Grasp the handle on the ink ribbon may harm the image quality. 1 Take up any slack in the ink ribbon by turning in as far as it is facing the right way. The ink ribbon could become very hot. Preparing to Print Loading the Ink Ribbon Cartridge and Printing Paper Loading the Ink Ribbon Cartridge Note Do not touch the ink ribbon. Fingerprints on the ink ribbon cartridge, and make sure that the ink ribbon cartridge is slack. 2 Open the ribbon cartridge...
... opening. 3 Grasp the handle on the ink ribbon may harm the image quality. 1 Take up any slack in the ink ribbon by turning in as far as it is facing the right way. The ink ribbon could become very hot. Preparing to Print Loading the Ink Ribbon Cartridge and Printing Paper Loading the Ink Ribbon Cartridge Note Do not touch the ink ribbon. Fingerprints on the ink ribbon cartridge, and make sure that the ink ribbon cartridge is slack. 2 Open the ribbon cartridge...

Operating Instructions / Mode d’emploi
Page 18
... paper supply/eject tray when you take the tray out of the tray. • Do not use the Print function in the tray, make sure that the PAPER lamp has turned off. Once printer setup is complete, use paper that is completely inside of the printer. To print, first read "Preparing to Print" (page 14). Preparing to Print Notes • Do not place more than 25 sheets in the tray at one time. • When loading printing paper...
... paper supply/eject tray when you take the tray out of the tray. • Do not use the Print function in the tray, make sure that the PAPER lamp has turned off. Once printer setup is complete, use paper that is completely inside of the printer. To print, first read "Preparing to Print" (page 14). Preparing to Print Notes • Do not place more than 25 sheets in the tray at one time. • When loading printing paper...
Operating Instructions / Mode d’emploi
Page 20
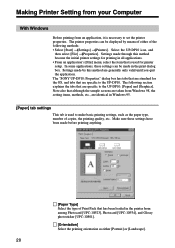
...] Select the printing orientation as the paper type, number of copies, the printing quality, etc. In some applications, these settings have been made through this method are specific to the UP-DP10: [Paper] and [Graphics]. The printer properties can be displayed by this method become the initial printer settings for the OS, and tabs that has been loaded in Windows 95. [Paper] tab settings This tab is used for printer setup. Settings made...
...] Select the printing orientation as the paper type, number of copies, the printing quality, etc. In some applications, these settings have been made through this method are specific to the UP-DP10: [Paper] and [Graphics]. The printer properties can be displayed by this method become the initial printer settings for the OS, and tabs that has been loaded in Windows 95. [Paper] tab settings This tab is used for printer setup. Settings made...

Operating Instructions / Mode d’emploi
Page 26
... selected, prints are produced with a matte finish. < "Border" If this option is selected, the image size that has been loaded in the "Page Setup" dialog box are described below. < "Paper Type" Select the type of the following three laminate processing options for the paper type. • If "1 up" is selected, then only one image is printed on each sheet. < "Laminate Pattern" Use this item to make basic printing settings, such as the paper type, the printing quality...
... selected, prints are produced with a matte finish. < "Border" If this option is selected, the image size that has been loaded in the "Page Setup" dialog box are described below. < "Paper Type" Select the type of the following three laminate processing options for the paper type. • If "1 up" is selected, then only one image is printed on each sheet. < "Laminate Pattern" Use this item to make basic printing settings, such as the paper type, the printing quality...
Operating Instructions / Mode d’emploi
Page 31
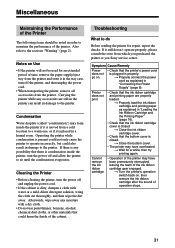
... printer, and then unplug the power cord. • When transporting the printer, remove all accessories from which you purchased the printer or you Sony service center. Miscellaneous Maintaining the Performance of the Printer The following items should be used for an extended period of time, remove the paper supply/eject tray from the printer and store it in properly. Operating the printer while condensation is placed in damage to operate incorrectly...
... printer, and then unplug the power cord. • When transporting the printer, remove all accessories from which you purchased the printer or you Sony service center. Miscellaneous Maintaining the Performance of the Printer The following items should be used for an extended period of time, remove the paper supply/eject tray from the printer and store it in properly. Operating the printer while condensation is placed in damage to operate incorrectly...
Operating Instructions / Mode d’emploi
Page 32
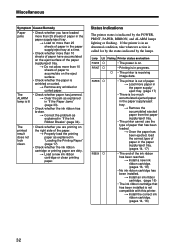
...25 sheets of paper in progress. t Load a new ink ribbon cartridge or clean printing paper. PRINT a • Printing is in the paper supply/eject tray at a time. • Check whether more than 10 sheets of paper have loaded more than 25 sheets of paper in the paper supply/eject tray. (pages 14, 17) RIBBON a • The end of the ink ribbon has been reached. t Remove the accumulated ejected paper from the paper supply/eject tray. • The printer cannot use the type of paper that has been installed is not compatible with this printer. t Install a new ink ribbon cartridge. (pages...
...25 sheets of paper in progress. t Load a new ink ribbon cartridge or clean printing paper. PRINT a • Printing is in the paper supply/eject tray at a time. • Check whether more than 10 sheets of paper have loaded more than 25 sheets of paper in the paper supply/eject tray. (pages 14, 17) RIBBON a • The end of the ink ribbon has been reached. t Remove the accumulated ejected paper from the paper supply/eject tray. • The printer cannot use the type of paper that has been installed is not compatible with this printer. t Install a new ink ribbon cartridge. (pages...
Operating Instructions / Mode d’emploi
Page 33
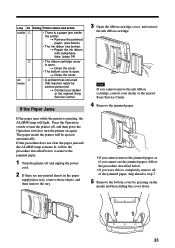
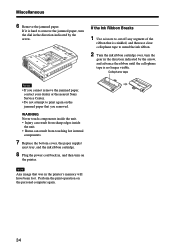
... below to turn the printer off, and then press the Operation switch to remove the jammed paper. 1 Turn the printer off and unplug the power cord. 2 If there are any printed sheets in the paper supply/eject tray, remove those sheets, and then remove the tray. 3 Open the ribbon cartridge cover, and remove the ink ribbon cartridge. t Remove the jammed paper. (see the jammed paper, follow the procedure described below . • If you cannot remove the ink ribbon cartridge, contact your dealer or the nearest Sony Service Center.
... below to turn the printer off, and then press the Operation switch to remove the jammed paper. 1 Turn the printer off and unplug the power cord. 2 If there are any printed sheets in the paper supply/eject tray, remove those sheets, and then remove the tray. 3 Open the ribbon cartridge cover, and remove the ink ribbon cartridge. t Remove the jammed paper. (see the jammed paper, follow the procedure described below . • If you cannot remove the ink ribbon cartridge, contact your dealer or the nearest Sony Service Center.
Operating Instructions / Mode d’emploi
Page 34
... components. 7 Replace the bottom cover, the paper supply/ eject tray, and the ink ribbon cartridge. 8 Plug the power cord back in, and then turn the gear in the direction indicated by the arrow. If the Ink Ribbon Breaks 1 Use scissors to cut off any segment of the ribbon that is hard to remove the jammed paper, turn the dial in the printer's memory will have been lost. Perform the print operation on the jammed paper that...
... components. 7 Replace the bottom cover, the paper supply/ eject tray, and the ink ribbon cartridge. 8 Plug the power cord back in, and then turn the gear in the direction indicated by the arrow. If the Ink Ribbon Breaks 1 Use scissors to cut off any segment of the ribbon that is hard to remove the jammed paper, turn the dial in the printer's memory will have been lost. Perform the print operation on the jammed paper that...

Operating Instructions / Mode d’emploi
Page 35
Main Specifications Power supply 100 to 25 sheets Paper supply method Autofeed from paper supply tray Maximum capacity of paper supply tray 25 sheets Paper eject method Front ejection Sheets are ejected in order on top of paper supply tray Ribbon cartridge Can print 25 sheets Inputs AC IN (power inlet) Thermal head 11.6 dots/mm Accessories Paper supply/eject tray (1) Power cord (1) Stands (2) Tray case (1) Ink ribbon cartridge (sufficient for printing 10 sheets) (1) Print paper (5 sheets each of UPC- 10P23 and UPC-10P34) (1) CD-ROM (1) Operating Manual (1) Software license agreement (1) ...
Main Specifications Power supply 100 to 25 sheets Paper supply method Autofeed from paper supply tray Maximum capacity of paper supply tray 25 sheets Paper eject method Front ejection Sheets are ejected in order on top of paper supply tray Ribbon cartridge Can print 25 sheets Inputs AC IN (power inlet) Thermal head 11.6 dots/mm Accessories Paper supply/eject tray (1) Power cord (1) Stands (2) Tray case (1) Ink ribbon cartridge (sufficient for printing 10 sheets) (1) Print paper (5 sheets each of UPC- 10P23 and UPC-10P34) (1) CD-ROM (1) Operating Manual (1) Software license agreement (1) ...

