
Operating Instructions
Page 2
...your purchase of uninsulated "dangerous voltage" within the product's enclosure that you . Congratulations on your used rechargeable batteries to come. RECYCLING LITHIUM-ION BATTERIES Lithium-Ion batteries are recyclable. WARNING To prevent fire or shock hazard, do not expose the unit to the presence of ...rechargeable batteries, call toll free 1-800-8228837, or visit http://www.rbrc.org/. Never expose the battery pack to the presence of this Sony Handycam. THIS CLASS B DIGITAL APPARATUS COMPLIES WITH CANADIAN ICES-003. 2...
...your purchase of uninsulated "dangerous voltage" within the product's enclosure that you . Congratulations on your used rechargeable batteries to come. RECYCLING LITHIUM-ION BATTERIES Lithium-Ion batteries are recyclable. WARNING To prevent fire or shock hazard, do not expose the unit to the presence of ...rechargeable batteries, call toll free 1-800-8228837, or visit http://www.rbrc.org/. Never expose the battery pack to the presence of this Sony Handycam. THIS CLASS B DIGITAL APPARATUS COMPLIES WITH CANADIAN ICES-003. 2...
Operating Instructions
Page 5
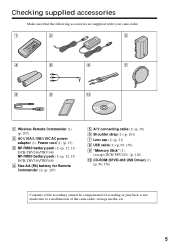
... sure that the following accessories are supplied with your camcorder. 1 2 3 4 5 6 7 8 9 0 1 Wireless Remote Commander (1) (p. 207) 2 AC-L10A/L10B/L10C AC power adaptor (1), Power cord (1) (p. 13) 3 NP-FM30 battery pack (1) (p. 12, 13) DCR-TRV240/TRV340 NP-FM50 battery pack (1) (p. 12, 13) DCR-TRV740/TRV840 4 Size AA (R6) battery for Remote Commander (2) (p. 207) 5 A/V connecting cable (1) (p. 38) 6 Shoulder strap...
... sure that the following accessories are supplied with your camcorder. 1 2 3 4 5 6 7 8 9 0 1 Wireless Remote Commander (1) (p. 207) 2 AC-L10A/L10B/L10C AC power adaptor (1), Power cord (1) (p. 13) 3 NP-FM30 battery pack (1) (p. 12, 13) DCR-TRV240/TRV340 NP-FM50 battery pack (1) (p. 12, 13) DCR-TRV740/TRV840 4 Size AA (R6) battery for Remote Commander (2) (p. 207) 5 A/V connecting cable (1) (p. 38) 6 Shoulder strap...

Operating Instructions
Page 6
...function 35 Viewing recordings on TV 38 Advanced Recording Operations Recording still images on your computer (Windows users only 94 Customizing Your Camcorder Changing the menu settings 105 6 Digital effect 48 Using the PROGRAM AE function .... 51 Adjusting the exposure manually ...... 53 ... supplied accessories 5 Quick Start Guide 8 Getting Started Using this manual 10 Step 1 Preparing the power supply ... 12 Installing the battery pack 12 Charging the battery pack 13 Connecting to a wall outlet 17 Step 2 Setting the date and time ........ 18 Step 3 Inserting a cassette 20 ...
...function 35 Viewing recordings on TV 38 Advanced Recording Operations Recording still images on your computer (Windows users only 94 Customizing Your Camcorder Changing the menu settings 105 6 Digital effect 48 Using the PROGRAM AE function .... 51 Adjusting the exposure manually ...... 53 ... supplied accessories 5 Quick Start Guide 8 Getting Started Using this manual 10 Step 1 Preparing the power supply ... 12 Installing the battery pack 12 Charging the battery pack 13 Connecting to a wall outlet 17 Step 2 Setting the date and time ........ 18 Step 3 Inserting a cassette 20 ...
Operating Instructions
Page 7
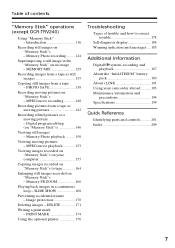
... "Memory Stick"s to correct trouble 178 Self-diagnosis display 184 Warning indicators and messages .... 185 Additional Information Digital8 system, recording and playback 187 About the "InfoLITHIUM" battery pack 189 About i.LINK 191 Using your camcorder abroad .......... 193 Maintenance information and precautions 194 Specifications 199 Quick Reference Identifying parts and controls 201 Index 209...
... "Memory Stick"s to correct trouble 178 Self-diagnosis display 184 Warning indicators and messages .... 185 Additional Information Digital8 system, recording and playback 187 About the "InfoLITHIUM" battery pack 189 About i.LINK 191 Using your camcorder abroad .......... 193 Maintenance information and precautions 194 Specifications 199 Quick Reference Identifying parts and controls 201 Index 209...

Operating Instructions
Page 8
.... 3 Close the cassette compartment by pressing on the cassette compartment. Quick Start Guide 8 Push the center of your camcorder outdoors (p. 12). Connecting the power cord (p. 17) Use the battery pack when using your camcorder. Open the DC IN jack cover. See the page in straight as far as possible into the cassette compartment...
.... 3 Close the cassette compartment by pressing on the cassette compartment. Quick Start Guide 8 Push the center of your camcorder outdoors (p. 12). Connecting the power cord (p. 17) Use the battery pack when using your camcorder. Open the DC IN jack cover. See the page in straight as far as possible into the cassette compartment...

Operating Instructions
Page 9
... playback. The picture appears on the LCD screen (p. 34) 2 Press m to CAMERA while pressing the small green button. REW 3 Press N to VCR while pressing the small green button. V POWER CAM M Note Do not pick up your camcorder, the clock setting is set to ...LCD panel while pressing OPEN. Viewfinder When the LCD panel is black and white. To stop recording, press START/STOP button again. Monitoring the playback picture on the LCD screen. 4 Press START/STOP. When you want to off. If you purchase your camcorder by holding the viewfinder, the LCD panel, or the battery...
... playback. The picture appears on the LCD screen (p. 34) 2 Press m to CAMERA while pressing the small green button. REW 3 Press N to VCR while pressing the small green button. V POWER CAM M Note Do not pick up your camcorder, the clock setting is set to ...LCD panel while pressing OPEN. Viewfinder When the LCD panel is black and white. To stop recording, press START/STOP button again. Monitoring the playback picture on the LCD screen. 4 Press START/STOP. When you want to off. If you purchase your camcorder by holding the viewfinder, the LCD panel, or the battery...

Operating Instructions
Page 12
BATT (battery) release lever If you install the large-capacity battery pack If you install the NP-FM70/QM71/FM90/QM91/FM91 battery pack on your camcorder, extend its viewfinder. 12 Step 1 Preparing the power supply Installing the battery pack (1) Lift up the viewfinder. (2) Slide the battery pack down until it clicks. 1 2 To remove the battery pack (1) Lift up the viewfinder. (2) Slide the battery pack out in the direction of the arrow while pressing BATT (battery) release lever down.
BATT (battery) release lever If you install the large-capacity battery pack If you install the NP-FM70/QM71/FM90/QM91/FM91 battery pack on your camcorder, extend its viewfinder. 12 Step 1 Preparing the power supply Installing the battery pack (1) Lift up the viewfinder. (2) Slide the battery pack down until it clicks. 1 2 To remove the battery pack (1) Lift up the viewfinder. (2) Slide the battery pack out in the direction of the arrow while pressing BATT (battery) release lever down.
Operating Instructions
Page 13
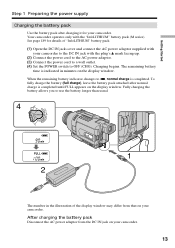
... AC power adaptor from that on your camcorder to u, normal charge is completed. When the remaining battery indicator changes to the DC IN jack with the "InfoLITHIUM" battery pack (M series). Fully charging the battery allows you to OFF (CHG). Your camcorder operates only with the plug's v mark... the power cord to a wall outlet. (4) Set the POWER switch to use the battery longer than usual. 4 V POWER 1 2 The number in minutes on the display window. See page 189 for your camcorder. Charging begins. Getting Started OFCFR(CHG) E ERMAORY CAM M Step 1 Preparing the ...
... AC power adaptor from that on your camcorder to u, normal charge is completed. When the remaining battery indicator changes to the DC IN jack with the "InfoLITHIUM" battery pack (M series). Fully charging the battery allows you to OFF (CHG). Your camcorder operates only with the plug's v mark... the power cord to a wall outlet. (4) Set the POWER switch to use the battery longer than usual. 4 V POWER 1 2 The number in minutes on the display window. See page 189 for your camcorder. Charging begins. Getting Started OFCFR(CHG) E ERMAORY CAM M Step 1 Preparing the ...

Operating Instructions
Page 14
...objects from the wall outlet as soon as battery consumption with the metal parts on the remaining battery time indicator is correct. "InfoLITHIUM" M series battery packs have the mark. When the battery pack is charged fully The LCD backlight of the AC power adaptor. Something ... using the viewfinder. Your camcorder operates only with this unit, disconnect the plug from coming into contact with compatible electronic equipment. This may go off . Remaining battery time indicator The remaining battery time indicator in an ambient temperature of Sony Corporation. 14 If any ...
...objects from the wall outlet as soon as battery consumption with the metal parts on the remaining battery time indicator is correct. "InfoLITHIUM" M series battery packs have the mark. When the battery pack is charged fully The LCD backlight of the AC power adaptor. Something ... using the viewfinder. Your camcorder operates only with this unit, disconnect the plug from coming into contact with compatible electronic equipment. This may go off . Remaining battery time indicator The remaining battery time indicator in an ambient temperature of Sony Corporation. 14 If any ...

Operating Instructions
Page 15
... Continuous* Typical** 100 55 165 95 345 200 400 230 520 300 605 350 Recording with the LCD screen Continuous* Typical** 80 45 130 75 270 155 315 180 410 235 475 275 DCR-TRV740 Battery pack NP-FM30 NP-FM50 (supplied) NP-FM70 NP-QM71 NP-FM90 NP-QM91/FM91 Recording with... the viewfinder Continuous* Typical** 85 45 140 80 295 170 340 195 450 260 520 300 Recording with the LCD screen Continuous* Typical** 70 40 110 60...
... Continuous* Typical** 100 55 165 95 345 200 400 230 520 300 605 350 Recording with the LCD screen Continuous* Typical** 80 45 130 75 270 155 315 180 410 235 475 275 DCR-TRV740 Battery pack NP-FM30 NP-FM50 (supplied) NP-FM70 NP-QM71 NP-FM90 NP-QM91/FM91 Recording with... the viewfinder Continuous* Typical** 85 45 140 80 295 170 340 195 450 260 520 300 Recording with the LCD screen Continuous* Typical** 70 40 110 60...
Operating Instructions
Page 16
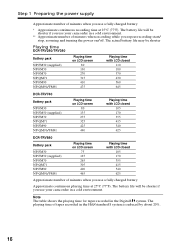
...) NP-FM50 NP-FM70 NP-QM71 NP-FM90 NP-QM91/FM91 Playing time on LCD screen 80 130 270 315 410 475 Playing time with LCD closed 110 180 370 430 560 645 DCR-TRV740 Battery pack NP-FM30 NP-FM50 (supplied) NP-FM70 NP-QM71 NP-FM90 NP-QM91... battery * Approximate continuous recording time at 25°C (77°F). The battery life will be shorter if you use a fully charged battery Approximate continuous playing time at 25°C (77°F). The battery life will be shorter if you use your camcorder in a cold environment. ** Approximate number of tapes recorded in the Digital8 ...
...) NP-FM50 NP-FM70 NP-QM71 NP-FM90 NP-QM91/FM91 Playing time on LCD screen 80 130 270 315 410 475 Playing time with LCD closed 110 180 370 430 560 645 DCR-TRV740 Battery pack NP-FM30 NP-FM50 (supplied) NP-FM70 NP-QM71 NP-FM90 NP-QM91... battery * Approximate continuous recording time at 25°C (77°F). The battery life will be shorter if you use a fully charged battery Approximate continuous playing time at 25°C (77°F). The battery life will be shorter if you use your camcorder in a cold environment. ** Approximate number of tapes recorded in the Digital8 ...

Operating Instructions
Page 17
...off. This means that you use your camcorder. •The DC IN jack has "source priority". Notes •The AC power adaptor can supply power even if the battery pack is attached to your camcorder for a long time, we recommend that the battery pack cannot supply any power if the... power cord is not plugged into a wall outlet. Using a car battery Use Sony Car Battery Adaptor (optional). 17
...off. This means that you use your camcorder. •The DC IN jack has "source priority". Notes •The AC power adaptor can supply power even if the battery pack is attached to your camcorder for a long time, we recommend that the battery pack cannot supply any power if the... power cord is not plugged into a wall outlet. Using a car battery Use Sony Car Battery Adaptor (optional). 17

Operating Instructions
Page 18
If you do not use your camcorder will be cleared from memory (bars may appear) because the built-in rechargeable battery installed in , then press the dial. (3) ...Turn the SEL/PUSH EXEC dial to CAMERA/MEMORY (except DCR-TRV240) unless you set the date and time settings. Step 2 Setting the date and time Set the date and time settings when you use your camcorder... the menu settings. (2) Turn the SEL/PUSH EXEC dial to select CLOCK SET in your camcorder for about half a year, the date and time settings may be displayed each time that ...
If you do not use your camcorder will be cleared from memory (bars may appear) because the built-in rechargeable battery installed in , then press the dial. (3) ...Turn the SEL/PUSH EXEC dial to CAMERA/MEMORY (except DCR-TRV240) unless you set the date and time settings. Step 2 Setting the date and time Set the date and time settings when you use your camcorder... the menu settings. (2) Turn the SEL/PUSH EXEC dial to select CLOCK SET in your camcorder for about half a year, the date and time settings may be displayed each time that ...
Operating Instructions
Page 22
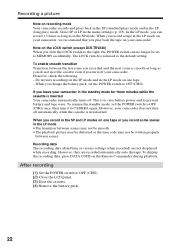
...When you record a tape in the LP mode on your camcorder, we recommend that you play ) mode. The LOCK switch is to save battery power and to prevent battery and tape wear. Recording data The recording data (date/time.... To resume the standby mode, set the POWER switch to OFF (CHG) once, then turn off your camcorder. Recording a picture Note on one tape or you record some scenes in the LP mode •The transition...transition Transition between the last scene you change the battery pack, set the POWER switch to OFF (CHG). (2) Close the LCD panel. (3) Eject the cassette. (4) Remove the...
...When you record a tape in the LP mode on your camcorder, we recommend that you play ) mode. The LOCK switch is to save battery power and to prevent battery and tape wear. Recording data The recording data (date/time.... To resume the standby mode, set the POWER switch to OFF (CHG) once, then turn off your camcorder. Recording a picture Note on one tape or you record some scenes in the LP mode •The transition...transition Transition between the last scene you change the battery pack, set the POWER switch to OFF (CHG). (2) Close the LCD panel. (3) Eject the cassette. (4) Remove the...

Operating Instructions
Page 27
JUL 4 2002 12:05:56 PM Time This is displayed for the correct remaining battery time in the recording mode Indicators are recording. When you close the LCD panel and open it again, it takes about one minute for five seconds after the POWER switch is set to CAMERA for a while. Recording -... Time code (for five seconds after the POWER switch is displayed for tapes recorded in the Digital8 system only) The time ...
JUL 4 2002 12:05:56 PM Time This is displayed for the correct remaining battery time in the recording mode Indicators are recording. When you close the LCD panel and open it again, it takes about one minute for five seconds after the POWER switch is set to CAMERA for a while. Recording -... Time code (for five seconds after the POWER switch is displayed for tapes recorded in the Digital8 system only) The time ...
Operating Instructions
Page 36
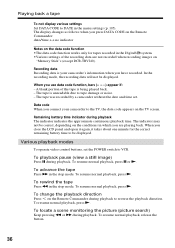
...function •The data code function works only for the correct remaining battery time to VCR. The tape was recorded by a camcorder without the date and time set the POWER switch to be displayed. When you close the LCD panel and open it again, it takes about one minute for tapes... or M during playback. A blank portion of the recording data are playing back. The indicator may not be correct, depending on the conditions in the Digital8 system. •Various settings of the tape is being played back. - To resume normal playback, release the button. 36 In the recording mode, the ...
...function •The data code function works only for the correct remaining battery time to VCR. The tape was recorded by a camcorder without the date and time set the POWER switch to be displayed. When you close the LCD panel and open it again, it takes about one minute for tapes... or M during playback. A blank portion of the recording data are playing back. The indicator may not be correct, depending on the conditions in the Digital8 system. •Various settings of the tape is being played back. - To resume normal playback, release the button. 36 In the recording mode, the ...

Operating Instructions
Page 108
... digital images and sound in analog format using your camcorder To output analog images and sound in digital format using your camcorder (p. 88) To automatically select the system (Hi8/ standard 8 or Digital8 ) that was used to the default setting when:... - DNR* z ON To reduce picture noise OFF To reduce a conspicuous afterimage when the picture has a lot of a TV game or similar machine. you turn the POWER switch. 108 AUDIO MIX - you remove the battery...
... digital images and sound in analog format using your camcorder To output analog images and sound in digital format using your camcorder (p. 88) To automatically select the system (Hi8/ standard 8 or Digital8 ) that was used to the default setting when:... - DNR* z ON To reduce picture noise OFF To reduce a conspicuous afterimage when the picture has a lot of a TV game or similar machine. you turn the POWER switch. 108 AUDIO MIX - you remove the battery...

Operating Instructions
Page 109
... SEL/PUSH EXEC dial to normal BRIGHT To brighten the LCD screen - Even if you use power sources other than the battery pack, BRIGHT is reduced by about 10 percent during recording. •When you adjust LCD BRIGHT, LCD B.L., LCD COLOR and/or VF B.L. The recorded picture will not be... To brighten the viewfinder screen CAMERA VCR MEMORY Notes on the LCD screen to adjust the following page) Customizing Your Camcorder 109 To get lowintensity To get highintensity z BRT NORMAL To set the brightness on LCD B.L. Meaning To adjust the brightness on the following bar CAMERA ...
... SEL/PUSH EXEC dial to normal BRIGHT To brighten the LCD screen - Even if you use power sources other than the battery pack, BRIGHT is reduced by about 10 percent during recording. •When you adjust LCD BRIGHT, LCD B.L., LCD COLOR and/or VF B.L. The recorded picture will not be... To brighten the viewfinder screen CAMERA VCR MEMORY Notes on the LCD screen to adjust the following page) Customizing Your Camcorder 109 To get lowintensity To get highintensity z BRT NORMAL To set the brightness on LCD B.L. Meaning To adjust the brightness on the following bar CAMERA ...

Operating Instructions
Page 114
... and HiFi SOUND settings are held in the menu settings, the picture from a TV or VCR will not appear on the screen even when your camcorder To deactivate the Remote Commander to avoid erroneous remote control operation caused by the time difference you set the time difference to 0, the clock returns... time during playback To set the clock to the local time Turn the SEL/PUSH EXEC dial to the originally set to V-OUT/LCD in memory even when the battery is removed. 114 To output the melody when you start/stop recording or when an unusual condition occurs on the TV or...
... and HiFi SOUND settings are held in the menu settings, the picture from a TV or VCR will not appear on the screen even when your camcorder To deactivate the Remote Commander to avoid erroneous remote control operation caused by the time difference you set the time difference to 0, the clock returns... time during playback To set the clock to the local time Turn the SEL/PUSH EXEC dial to the originally set to V-OUT/LCD in memory even when the battery is removed. 114 To output the melody when you start/stop recording or when an unusual condition occurs on the TV or...

Operating Instructions
Page 115
... the camera recording lamp off so that you use power sources other than the battery pack, BL ON is automatically selected. Customizing Your Camcorder 115 Changing the menu settings Icon/item REC LAMP VIDEO EDIT INDICATOR Mode z ON...* z BL OFF BL ON Meaning To light up the camera recording lamp at the front of the camcorder may reflect on the subject if it is close subject When REC LAMP is set to OFF. Notes ...on INDICATOR •When you select BL ON, battery life is reduced by about 10 percent during recording. •When you set REC LAMP to ON...
... the camera recording lamp off so that you use power sources other than the battery pack, BL ON is automatically selected. Customizing Your Camcorder 115 Changing the menu settings Icon/item REC LAMP VIDEO EDIT INDICATOR Mode z ON...* z BL OFF BL ON Meaning To light up the camera recording lamp at the front of the camcorder may reflect on the subject if it is close subject When REC LAMP is set to OFF. Notes ...on INDICATOR •When you select BL ON, battery life is reduced by about 10 percent during recording. •When you set REC LAMP to ON...


