Operating Instructions (primary manual)
Page 2
... WIDE SLOT, FULLY INSERT. For more information regarding recycling of important operating and maintenance (servicing) instructions in this product, you can capture life's precious moments with advanced features, but at the same time it is harmful to eyes, do not expose the unit to... hazard, do not attempt to persons. You can use of optical instruments with Part 15 of Conformity Trade Name: SONY Model No.: DCR-TRV50 Responsible Party: Sony Electronics Inc. This symbol is subject to the following two conditions: (1) This device may be producing home video that...
... WIDE SLOT, FULLY INSERT. For more information regarding recycling of important operating and maintenance (servicing) instructions in this product, you can capture life's precious moments with advanced features, but at the same time it is harmful to eyes, do not expose the unit to... hazard, do not attempt to persons. You can use of optical instruments with Part 15 of Conformity Trade Name: SONY Model No.: DCR-TRV50 Responsible Party: Sony Electronics Inc. This symbol is subject to the following two conditions: (1) This device may be producing home video that...

Operating Instructions (primary manual)
Page 4
... recorded on "Memory Stick"s using the USB cable (p. 190, 195) •Viewing moving pictures recorded on tapes using the USB cable (p. 185) •Capturing images on your computer from your camcorder using the USB cable (p. 187) •Converting an analog signal into digital to capture images onto your computer (p. 196) Capturing images on your computer 4
... recorded on "Memory Stick"s using the USB cable (p. 190, 195) •Viewing moving pictures recorded on tapes using the USB cable (p. 185) •Capturing images on your computer from your camcorder using the USB cable (p. 187) •Converting an analog signal into digital to capture images onto your computer (p. 196) Capturing images on your computer 4
Operating Instructions (primary manual)
Page 7
... - Digital program editing (on "Memory Stick"s 151 Copying still images from an analog video unit on your computer using the USB cable - Image protection 167 Deleting images - For Macintosh users 195 Capturing images from a tape - DELETE 168 Writing a print mark - PHOTO SAVE 154 Viewing still images - For Windows users 190 Connecting your camcorder...
... - Digital program editing (on "Memory Stick"s 151 Copying still images from an analog video unit on your computer using the USB cable - Image protection 167 Deleting images - For Macintosh users 195 Capturing images from a tape - DELETE 168 Writing a print mark - PHOTO SAVE 154 Viewing still images - For Windows users 190 Connecting your camcorder...

Operating Instructions (primary manual)
Page 47
... disappears. Before operation •Insert a "Memory Stick" into your camcorder when you record still images. Recording does not start yet. Recording ... "Memory Stick" Notes •Do not shake or strike your camcorder (p. 119). •Set PHOTO REC in to MEMORY in the... during following operations ( indicator flashes on a tape (p. 52). The CAPTURE indicator appears. MEMORY MIX "Memory Stick" For details, see page 117 ...be recorded on the "Memory Stick." 1 [a] [b] 640 SFN 1 / 6 CAPTURE PHOTO 2 640 SFN PHOTO [a]: Number of recorded images [b]: Approximate number of images ...
... disappears. Before operation •Insert a "Memory Stick" into your camcorder when you record still images. Recording does not start yet. Recording ... "Memory Stick" Notes •Do not shake or strike your camcorder (p. 119). •Set PHOTO REC in to MEMORY in the... during following operations ( indicator flashes on a tape (p. 52). The CAPTURE indicator appears. MEMORY MIX "Memory Stick" For details, see page 117 ...be recorded on the "Memory Stick." 1 [a] [b] 640 SFN 1 / 6 CAPTURE PHOTO 2 640 SFN PHOTO [a]: Number of recorded images [b]: Approximate number of images ...

Operating Instructions (primary manual)
Page 49
...flash: The flash does not fire. The flash is auto (no indicator). Try recording various images to find the most appropriate setting for image capture. This is not easy to focus on the subject automatically, for example, when recording in the dark, use forced flash in a bright .... •When recording with the flash The flash pops up . Darken the surroundings by covering the lens, and press PHOTO lightly so that your camcorder starts to charge power for focusing manually. Forced flash: The flash fires regardless of (flash) changes the indicator as follows: t t t No ...
...flash: The flash does not fire. The flash is auto (no indicator). Try recording various images to find the most appropriate setting for image capture. This is not easy to focus on the subject automatically, for example, when recording in the dark, use forced flash in a bright .... •When recording with the flash The flash pops up . Darken the surroundings by covering the lens, and press PHOTO lightly so that your camcorder starts to charge power for focusing manually. Forced flash: The flash fires regardless of (flash) changes the indicator as follows: t t t No ...
Operating Instructions (primary manual)
Page 52
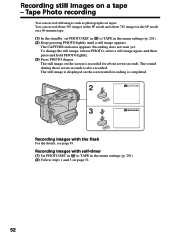
... REC in to TAPE in the menu settings (p. 201). (2) Keep pressing PHOTO lightly until recording is completed. 2 PHOTO 3 CAPTURE PHOTO Recording images with the flash For the details, see page 49. The CAPTURE indicator appears. The sound during those seven seconds is displayed on the screen until a still image appears. Recording images...
... REC in to TAPE in the menu settings (p. 201). (2) Keep pressing PHOTO lightly until recording is completed. 2 PHOTO 3 CAPTURE PHOTO Recording images with the flash For the details, see page 49. The CAPTURE indicator appears. The sound during those seven seconds is displayed on the screen until a still image appears. Recording images...

Operating Instructions (primary manual)
Page 135
...[b]: Approximate number of images that can be recorded on the "Memory Stick." To change from the image selected to capture from a tape as still images Your camcorder can also capture moving picture data recorded on a tape and record it as a still image on the "Memory Stick" 640 SFN... PB INDEX FN 135 "Memory Stick" Operations Recording images from the tape freezes and CAPTURE appears on the screen. Moving pictures...
...[b]: Approximate number of images that can be recorded on the "Memory Stick." To change from the image selected to capture from a tape as still images Your camcorder can also capture moving picture data recorded on a tape and record it as a still image on the "Memory Stick" 640 SFN... PB INDEX FN 135 "Memory Stick" Operations Recording images from the tape freezes and CAPTURE appears on the screen. Moving pictures...

Operating Instructions (primary manual)
Page 147
...picture recorded on the tape is not recorded. And press X at the scene where you want to start recording from tape as a moving picture Your camcorder can read moving picture data recorded on a tape and record it as a moving picture on the "Memory Stick." [a] [b]: This indicator is displayed... Press START/STOP. 3 40min N 0:15:42:43 320REC 0:00:03 15min BBB [a] [b] PB INDEX FN [a]: The recording time that can also capture moving picture data through the input connector and record it as a moving picture on a "Memory Stick." Before operation •Insert a recorded tape into your...
...picture recorded on the tape is not recorded. And press X at the scene where you want to start recording from tape as a moving picture Your camcorder can read moving picture data recorded on a tape and record it as a moving picture on the "Memory Stick." [a] [b]: This indicator is displayed... Press START/STOP. 3 40min N 0:15:42:43 320REC 0:00:03 15min BBB [a] [b] PB INDEX FN [a]: The recording time that can also capture moving picture data through the input connector and record it as a moving picture on a "Memory Stick." Before operation •Insert a recorded tape into your...

Operating Instructions (primary manual)
Page 154
...on the screen. (3) Press PHOTO deeper. PHOTO BUTTON appears on the screen, and copying stops. PHOTO SAVE Using the search function, you can automatically capture only still images from a tape - Copying still images from tapes and record them on a "Memory Stick" in , then press the dial (p. ...204). Before operation •Insert a recorded tape into your camcorder and rewind the tape. •Insert a "Memory Stick" into your camcorder. (1) Set the POWER switch to VCR. (2) Press MENU and turn the SEL/PUSH EXEC dial to select PHOTO SAVE...
...on the screen. (3) Press PHOTO deeper. PHOTO BUTTON appears on the screen, and copying stops. PHOTO SAVE Using the search function, you can automatically capture only still images from a tape - Copying still images from tapes and record them on a "Memory Stick" in , then press the dial (p. ...204). Before operation •Insert a recorded tape into your camcorder and rewind the tape. •Insert a "Memory Stick" into your camcorder. (1) Set the POWER switch to VCR. (2) Press MENU and turn the SEL/PUSH EXEC dial to select PHOTO SAVE...

Operating Instructions (primary manual)
Page 185
... to load. (2) Connect the AC power adaptor, and insert a cassette into your computer - Viewing images recorded on a tape on your camcorder. (3) Set the POWER switch to VCR. Select USB STREAM in to view images recorded on a tape on your Computer The "PIXELA ImageMixer Ver... your computer (p. 179). For Windows XP Home Edition/Professional, you must be authorized as Administrators. For Windows users Capturing images with "PIXELA ImageMixer Ver.1.0 for Sony" You need to install the USB driver and PIXELA ImageMixer to ON in Windows 2000 Professional, you must be authorized...
... to load. (2) Connect the AC power adaptor, and insert a cassette into your computer - Viewing images recorded on a tape on your camcorder. (3) Set the POWER switch to VCR. Select USB STREAM in to view images recorded on a tape on your Computer The "PIXELA ImageMixer Ver... your computer (p. 179). For Windows XP Home Edition/Professional, you must be authorized as Administrators. For Windows users Capturing images with "PIXELA ImageMixer Ver.1.0 for Sony" You need to install the USB driver and PIXELA ImageMixer to ON in Windows 2000 Professional, you must be authorized...

Operating Instructions (primary manual)
Page 187
... users Viewing pictures live from your camcorder appears on preview window on your computer - Select USB STREAM in to CAMERA. The still image on page 185. (2) Set the POWER switch to ON in the thumbnail list window. Viewing Images Using your Computer 187 Capturing still images Preview window Thumbnail list ... preview window, move the cursor to and press it at the point you want to 7 on pages 185, 186. The picture from your camcorder (1) Follow the steps 1, 2 on the screen is captured. Captured images are displayed in the menu settings (p. 207). (3) Follow the steps 4 to...
... users Viewing pictures live from your camcorder appears on preview window on your computer - Select USB STREAM in to CAMERA. The still image on page 185. (2) Set the POWER switch to ON in the thumbnail list window. Viewing Images Using your Computer 187 Capturing still images Preview window Thumbnail list ... preview window, move the cursor to and press it at the point you want to 7 on pages 185, 186. The picture from your camcorder (1) Follow the steps 1, 2 on the screen is captured. Captured images are displayed in the menu settings (p. 207). (3) Follow the steps 4 to...

Operating Instructions (primary manual)
Page 188
... The following may occur while using your computer. 188 Images of different color systems to that are captured into your camcorder, and are not due to any malfunction. - For Windows users Capturing moving pictures Preview window Thumbnail list widow (1) Select . (2) Look at the preview window and click... on at the first scene of the camcorder are not displayed correctly due to noise, etc. - The captured images appear in the camcorder LCD screen do not appear on your computer - Some images are not displayed correctly. • ...
... The following may occur while using your computer. 188 Images of different color systems to that are captured into your camcorder, and are not due to any malfunction. - For Windows users Capturing moving pictures Preview window Thumbnail list widow (1) Select . (2) Look at the preview window and click... on at the first scene of the camcorder are not displayed correctly due to noise, etc. - The captured images appear in the camcorder LCD screen do not appear on your computer - Some images are not displayed correctly. • ...

Operating Instructions (primary manual)
Page 196
...signals, the computer may not be able to your computer - If your computer has a USB connector You can capture images and sound from an analog video unit on your camcorder. Capturing images from an analog video unit connected to your computer which has the i.LINK (DV) jack connected to ...output the images correctly when you convert video signals into digital video signals via your camcorder. •You cannot record or capture the video output via your computer and the software you are using a USB cable, but images may not be...
...signals, the computer may not be able to your computer - If your computer has a USB connector You can capture images and sound from an analog video unit on your camcorder. Capturing images from an analog video unit connected to your computer which has the i.LINK (DV) jack connected to ...output the images correctly when you convert video signals into digital video signals via your camcorder. •You cannot record or capture the video output via your computer and the software you are using a USB cable, but images may not be...


