Operating Instructions (primary manual)
Page 2
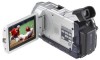
...causes data transfer to constitute a risk of Conformity Trade Name: SONY Model No.: DCR-TRV50 Responsible Party: Sony Electronics Inc. For customers in the U.S.A. Telephone No.: 201-930-6972 This device complies with this Sony Handycam. Congratulations on your Handycam, you can enjoy for the FCC... the product's enclosure that may be of sufficient magnitude to discontinue midway (fail), restart the application or disconnect and connect the USB cable again. Welcome! CAUTION The use . With your purchase of this product will soon be producing home video that you have...
...causes data transfer to constitute a risk of Conformity Trade Name: SONY Model No.: DCR-TRV50 Responsible Party: Sony Electronics Inc. For customers in the U.S.A. Telephone No.: 201-930-6972 This device complies with this Sony Handycam. Congratulations on your Handycam, you can enjoy for the FCC... the product's enclosure that may be of sufficient magnitude to discontinue midway (fail), restart the application or disconnect and connect the USB cable again. Welcome! CAUTION The use . With your purchase of this product will soon be producing home video that you have...

Operating Instructions (primary manual)
Page 4
... •Viewing images recorded on "Memory Stick"s using the USB cable (p. 190, 195) •Viewing moving pictures recorded on tapes using the USB cable (p. 185) •Capturing images on your computer from your camcorder using the USB cable (p. 187) •Converting an analog signal into digital to capture images onto your computer (p. 196) Capturing images...
... •Viewing images recorded on "Memory Stick"s using the USB cable (p. 190, 195) •Viewing moving pictures recorded on tapes using the USB cable (p. 185) •Capturing images on your computer from your camcorder using the USB cable (p. 187) •Converting an analog signal into digital to capture images onto your computer (p. 196) Capturing images...
Operating Instructions (primary manual)
Page 7
...camcorder. Signal convert function 196 Using the Network function (DCR-TRV50 only) Accessing the network 197 For the details, refer to correct trouble 210 Self-diagnosis display 217 Warning indicators and messages .... 218 Additional Information Usable cassettes 220 About the "InfoLITHIUM" battery pack 223 About i.LINK 225 Using your computer using the USB... 166 Preventing accidental erasure - For Windows users 190 Connecting your camcorder to tape 162 Enlarging still images recorded on your computer - Digital program editing (on your Computer Viewing images on "Memory Stick...
...camcorder. Signal convert function 196 Using the Network function (DCR-TRV50 only) Accessing the network 197 For the details, refer to correct trouble 210 Self-diagnosis display 217 Warning indicators and messages .... 218 Additional Information Usable cassettes 220 About the "InfoLITHIUM" battery pack 223 About i.LINK 225 Using your computer using the USB... 166 Preventing accidental erasure - For Windows users 190 Connecting your camcorder to tape 162 Enlarging still images recorded on your computer - Digital program editing (on your Computer Viewing images on "Memory Stick...

Operating Instructions (primary manual)
Page 14
...) 8 Lens hood (1) (p. 30) 9 "Memory Stick" (1) (p. 117) 0 USB cable (1) (p. 180) qa CD-ROM (SPVD-008 USB Driver) (1) (p. 179) qs Cleaning cloth (1) (p. 229) qd Stylus (1) (DCR-TRV50 only) (p. 198) Contents of the recording cannot be compensated if recording or playback is not made due to a malfunction of the camcorder, storage media, etc. 14 Checking supplied accessories...
...) 8 Lens hood (1) (p. 30) 9 "Memory Stick" (1) (p. 117) 0 USB cable (1) (p. 180) qa CD-ROM (SPVD-008 USB Driver) (1) (p. 179) qs Cleaning cloth (1) (p. 229) qd Stylus (1) (DCR-TRV50 only) (p. 198) Contents of the recording cannot be compensated if recording or playback is not made due to a malfunction of the camcorder, storage media, etc. 14 Checking supplied accessories...
Operating Instructions (primary manual)
Page 21
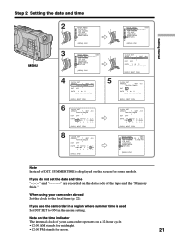
...summer time is used Set DST SET to the local time (p. 22). When using your camcorder operates on a 12-hour cycle. •12:00 AM stands for midnight. •12:00 PM stands for some models. USB STREAM LTR SIZE LANGUAGE DEMO MODE RETURN [MENU] : END 4 CLOCK SET AREA26 R ...-:- -:- - Getting Started Step 2 Setting the date and time MENU 2 SETUP MENU CLOCK SET USB STREAM LTR SIZE LANGUAGE DEMO MODE [MENU] : END 3 SETUP MENU STBY CLOCK SET - -:- -:- - If you use the camcorder in the menu setting. If you do not set the date and time "--:--:--" and are recorded on...
...summer time is used Set DST SET to the local time (p. 22). When using your camcorder operates on a 12-hour cycle. •12:00 AM stands for midnight. •12:00 PM stands for some models. USB STREAM LTR SIZE LANGUAGE DEMO MODE RETURN [MENU] : END 4 CLOCK SET AREA26 R ...-:- -:- - Getting Started Step 2 Setting the date and time MENU 2 SETUP MENU CLOCK SET USB STREAM LTR SIZE LANGUAGE DEMO MODE [MENU] : END 3 SETUP MENU STBY CLOCK SET - -:- -:- - If you use the camcorder in the menu setting. If you do not set the date and time "--:--:--" and are recorded on...
Operating Instructions (primary manual)
Page 78
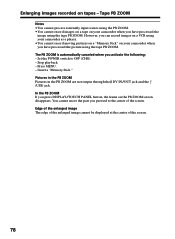
Tape PB ZOOM Notes •You cannot process externally input scenes using the PB ZOOM. •You cannot record images on a tape on your camcorder when you pressed to OFF (CHG). - You cannot move the part you have processed the picture using the tape PB ZOOM. Stop playback. - ...PB ZOOM are not output through the DV IN/OUT jack and the (USB) jack. However, you can record images on a VCR using your camcorder as a player. •You cannot record moving pictures on a "Memory Stick" on your camcorder when you have processed the image using the tape PB ZOOM. Press MENU...
Tape PB ZOOM Notes •You cannot process externally input scenes using the PB ZOOM. •You cannot record images on a tape on your camcorder when you pressed to OFF (CHG). - You cannot move the part you have processed the picture using the tape PB ZOOM. Stop playback. - ...PB ZOOM are not output through the DV IN/OUT jack and the (USB) jack. However, you can record images on a VCR using your camcorder as a player. •You cannot record moving pictures on a "Memory Stick" on your camcorder when you have processed the image using the tape PB ZOOM. Press MENU...
Operating Instructions (primary manual)
Page 117
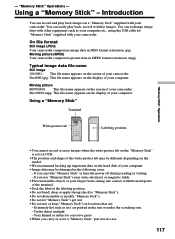
... back, record or delete images. Extremely hot such as your computer etc., using the USB cable for "Memory Stick" supplied with your finger from coming into contact with the metal parts of your camcorder. Very humid or subject to "Memory Stick"s. •Do not disassemble or modify "...let "Memory Stick"s get wet. •Do not use "Memory Stick"s near static electricity or magnetic fields. •Prevent metallic objects or your camcorder. Mov00001.mpg: This file name appears on a "Memory Stick" supplied with your computer. •Image data may be different depending on the ...
... back, record or delete images. Extremely hot such as your computer etc., using the USB cable for "Memory Stick" supplied with your finger from coming into contact with the metal parts of your camcorder. Very humid or subject to "Memory Stick"s. •Do not disassemble or modify "...let "Memory Stick"s get wet. •Do not use "Memory Stick"s near static electricity or magnetic fields. •Prevent metallic objects or your camcorder. Mov00001.mpg: This file name appears on a "Memory Stick" supplied with your computer. •Image data may be different depending on the ...

Operating Instructions (primary manual)
Page 174
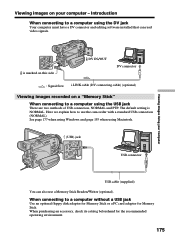
... computer's Memory Stick slot. Viewing images recorded on a computer which has a Memory Stick slot, first eject the "Memory Stick" from the camcorder and then insert it into the end USB connector USB cable (supplied) 174 To view images on a tape When connecting to view images saved on a "Memory Stick" or recorded on tape...
... computer's Memory Stick slot. Viewing images recorded on a computer which has a Memory Stick slot, first eject the "Memory Stick" from the camcorder and then insert it into the end USB connector USB cable (supplied) 174 To view images on a tape When connecting to view images saved on a "Memory Stick" or recorded on tape...
Operating Instructions (primary manual)
Page 175
... read video signals. Here we explain how to use a Memory Stick Reader/Writer (optional). When connecting to a computer without a USB jack Use an optional floppy disk adaptor for Memory Stick or a PC card adaptor for the recommended operating environment. 175 The default ... connecting to a computer using the DV jack Your computer must have a DV connector and editing software installed that can also use the camcorder with a standard USB connection (NORMAL). When purchasing an accessory, check its catalog beforehand for Memory Stick. Viewing Images Using your computer - Viewing images on ...
... read video signals. Here we explain how to use a Memory Stick Reader/Writer (optional). When connecting to a computer without a USB jack Use an optional floppy disk adaptor for Memory Stick or a PC card adaptor for the recommended operating environment. 175 The default ... connecting to a computer using the DV jack Your computer must have a DV connector and editing software installed that can also use the camcorder with a standard USB connection (NORMAL). When purchasing an accessory, check its catalog beforehand for Memory Stick. Viewing Images Using your computer - Viewing images on ...
Operating Instructions (primary manual)
Page 176
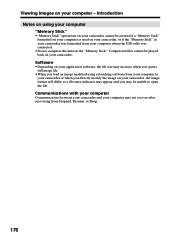
... error indicator may appear and you may be played back on your computer when the USB cable was connected. •Do not compress the data on the "Memory Stick." Communications with your computer Communications between your camcorder and your computer - Viewing images on your computer may not recover after recovering from Suspend...
... error indicator may appear and you may be played back on your computer when the USB cable was connected. •Do not compress the data on the "Memory Stick." Communications with your computer Communications between your camcorder and your computer - Viewing images on your computer may not recover after recovering from Suspend...

Operating Instructions (primary manual)
Page 177
..., Windows XP Home Edition or Windows XP Professional Standard installation is an upgraded OS. Viewing Images Using your Computer Connecting your camcorder to the computer's USB connector. If you connect the camcorder to the computer first, you can process or edit them in the Macintosh environment. 177 However, operation is not assured if...
..., Windows XP Home Edition or Windows XP Professional Standard installation is an upgraded OS. Viewing Images Using your Computer Connecting your camcorder to the computer's USB connector. If you connect the camcorder to the computer first, you can process or edit them in the Macintosh environment. 177 However, operation is not assured if...

Operating Instructions (primary manual)
Page 178
... must be installed (to play back moving pictures). Connecting your camcorder to a single computer at the same time, or when using the USB cable - Furthermore, "TM" and "®" are not mentioned in each case in the United States and/or other countries. •Pentium is trademark or ... is not assured if the above . •Windows and Windows Media are not guaranteed for the Windows environment if you connect two or more USB equipment to your computer using a hub. •Some equipment may be the trademarks or registered trademarks of Microsoft Corporation in this manual. 178
... must be installed (to play back moving pictures). Connecting your camcorder to a single computer at the same time, or when using the USB cable - Furthermore, "TM" and "®" are not mentioned in each case in the United States and/or other countries. •Pentium is trademark or ... is not assured if the above . •Windows and Windows Media are not guaranteed for the Windows environment if you connect two or more USB equipment to your computer using a hub. •Some equipment may be the trademarks or registered trademarks of Microsoft Corporation in this manual. 178
Operating Instructions (primary manual)
Page 179
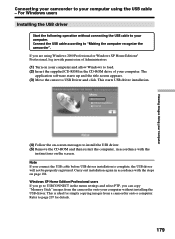
... installation is ideal for details. 179 This is complete, the USB driver will not be properly registered. Viewing Images Using your Computer Connecting your camcorder to "Making the computer recognize the camcorder". For Windows users Installing the USB driver Start the following operation without installing the USB driver. Refer to your computer without connecting the...
... installation is ideal for details. 179 This is complete, the USB driver will not be properly registered. Viewing Images Using your Computer Connecting your camcorder to "Making the computer recognize the camcorder". For Windows users Installing the USB driver Start the following operation without installing the USB driver. Refer to your computer without connecting the...

Operating Instructions (primary manual)
Page 180
... appear, double-click "My Computer" and then "ImageMixer" (CD-ROM Drive). Restart your camcorder. Your computer recognizes the camcorder, and the Windows Add Hardware Wizard starts. (USB) jack Push into the CD-ROM drive of the camcorder and computer using the USB cable - If you must be authorized as Power Users or Administrators. The installation...
... appear, double-click "My Computer" and then "ImageMixer" (CD-ROM Drive). Restart your camcorder. Your computer recognizes the camcorder, and the Windows Add Hardware Wizard starts. (USB) jack Push into the CD-ROM drive of the camcorder and computer using the USB cable - If you must be authorized as Power Users or Administrators. The installation...
Operating Instructions (primary manual)
Page 181
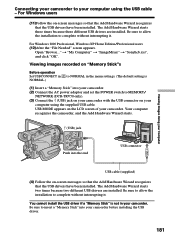
... (supplied) (4) Follow the on "Memory Stick"s Before operation Set USBCONNECT in NORMAL.) to MEMORY/ NETWORK (DCR-TRV50 only). (3) Connect the (USB) jack on your camcorder with the USB connector on your computer using the USB cable - For Windows 2000 Professional, Windows XP Home Edition/Professional users (12)After the "File Needed" screen appears. Be sure...
... (supplied) (4) Follow the on "Memory Stick"s Before operation Set USBCONNECT in NORMAL.) to MEMORY/ NETWORK (DCR-TRV50 only). (3) Connect the (USB) jack on your camcorder with the USB connector on your computer using the USB cable - For Windows 2000 Professional, Windows XP Home Edition/Professional users (12)After the "File Needed" screen appears. Be sure...

Operating Instructions (primary manual)
Page 182
... Windows to load. 2 Connect the AC power adaptor, and set the POWER switch to VCR. 3 Connect the USB connector on your computer to the (USB) jack on your camcorder using the USB cable - If there is no "System" inside "Pick a category" after clicking "Control Panel", click "Switch ...to correctly install the USB driver. Windows 98SE/Windows Me: Select "My Computer" t "Control Panel" t "System", and click "Device Manager...
... Windows to load. 2 Connect the AC power adaptor, and set the POWER switch to VCR. 3 Connect the USB connector on your computer to the (USB) jack on your camcorder using the USB cable - If there is no "System" inside "Pick a category" after clicking "Control Panel", click "Switch ...to correctly install the USB driver. Windows 98SE/Windows Me: Select "My Computer" t "Control Panel" t "System", and click "Device Manager...

Operating Instructions (primary manual)
Page 183
Windows 98SE Windows Me Viewing Images Using your computer using the USB cable - Connecting your camcorder to your Computer Windows 2000 Professional Windows XP Home Edition/Professional 183 For Windows users 5 Select and delete the underlined devices below.
Windows 98SE Windows Me Viewing Images Using your computer using the USB cable - Connecting your camcorder to your Computer Windows 2000 Professional Windows XP Home Edition/Professional 183 For Windows users 5 Select and delete the underlined devices below.
Operating Instructions (primary manual)
Page 184
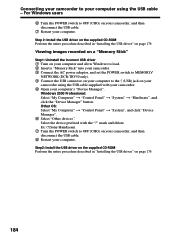
...", and click "Device Manager". 6 Select "Other devices". Ex: (?)Sony Handycam 7 Turn the POWER switch to OFF (CHG) on your camcorder using the USB cable - Viewing images recorded on a "Memory Stick" Step1: Uninstall the incorrect USB driver 1 Turn on your computer and allow Windows to load. 2 ...-TRV50 only). 4 Connect the USB connector on your computer to the (USB) jack on your camcorder, and then disconnect the USB cable. 8 Restart your computer. Select the device prefixed with your camcorder. 5 Open your computer using the USB cable supplied with the "?" Connecting your camcorder to...
...", and click "Device Manager". 6 Select "Other devices". Ex: (?)Sony Handycam 7 Turn the POWER switch to OFF (CHG) on your camcorder using the USB cable - Viewing images recorded on a "Memory Stick" Step1: Uninstall the incorrect USB driver 1 Turn on your computer and allow Windows to load. 2 ...-TRV50 only). 4 Connect the USB connector on your computer to the (USB) jack on your camcorder, and then disconnect the USB cable. 8 Restart your computer. Select the device prefixed with your camcorder. 5 Open your computer using the USB cable supplied with the "?" Connecting your camcorder to...
Operating Instructions (primary manual)
Page 185
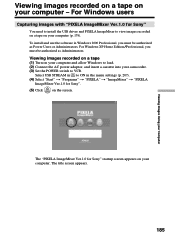
... and allow Windows to load. (2) Connect the AC power adaptor, and insert a cassette into your computer - Viewing images recorded on a tape on your camcorder. (3) Set the POWER switch to VCR. To install and use the software in the menu settings (p. 207). (4) Select "Start" t "Programs" t... "PIXELA" t "ImageMixer" t "PIXELA ImageMixer Ver.1.0 for Sony" You need to install the USB driver and PIXELA ImageMixer to view images recorded on a tape on your computer. Select USB STREAM in to ON in Windows 2000 Professional, you must be authorized as Power Users ...
... and allow Windows to load. (2) Connect the AC power adaptor, and insert a cassette into your computer - Viewing images recorded on a tape on your camcorder. (3) Set the POWER switch to VCR. To install and use the software in the menu settings (p. 207). (4) Select "Start" t "Programs" t... "PIXELA" t "ImageMixer" t "PIXELA ImageMixer Ver.1.0 for Sony" You need to install the USB driver and PIXELA ImageMixer to view images recorded on a tape on your computer. Select USB STREAM in to ON in Windows 2000 Professional, you must be authorized as Power Users ...

Operating Instructions (primary manual)
Page 186
Viewing images recorded on a tape on your computer. 186 The picture from the tape appears on preview window on your computer using the supplied USB cable. (USB) jack Push into the end USB connector USB cable (supplied) (8) Press N to start playback. For Windows users (6) Select . Preview window (7) Connect the (USB) jack on your camcorder with the USB connector on your computer -
Viewing images recorded on a tape on your computer. 186 The picture from the tape appears on preview window on your computer using the supplied USB cable. (USB) jack Push into the end USB connector USB cable (supplied) (8) Press N to start playback. For Windows users (6) Select . Preview window (7) Connect the (USB) jack on your camcorder with the USB connector on your computer -


