Operating Instructions (primary manual)
Page 1
Model No. DCR-TRV Model No. Refer to these numbers whenever you call upon your Sony dealer regarding this manual thoroughly, and retain it for future reference. Serial No. Owner's Record The model and serial numbers are located on the bottom. AC- DCR-TRV50 TM SERIES DCR-TRV40/TRV50 ©2002 Sony Corporation Record the serial number in the space provided below. Serial No. 3-074-375-12 (1) Digital Video Camera Recorder Operating Instructions Before operating the unit, please read this product.
Model No. DCR-TRV Model No. Refer to these numbers whenever you call upon your Sony dealer regarding this manual thoroughly, and retain it for future reference. Serial No. Owner's Record The model and serial numbers are located on the bottom. AC- DCR-TRV50 TM SERIES DCR-TRV40/TRV50 ©2002 Sony Corporation Record the serial number in the space provided below. Serial No. 3-074-375-12 (1) Digital Video Camera Recorder Operating Instructions Before operating the unit, please read this product.
Operating Instructions (primary manual)
Page 2
...only. Congratulations on your purchase of rechargeable batteries, call : Sony Customer Information Center 1-800-222SONY (7669) The number below is harmful to eyes, do not expose the unit to qualified personnel only. DCR-TRV50 only Countries and areas where you can use . Welcome!... the following two conditions: (1) This device may cause undesired operation. 2 CAUTION The use of Conformity Trade Name: SONY Model No.: DCR-TRV50 Responsible Party: Sony Electronics Inc. This symbol is intended to alert the user to the presence of uninsulated "dangerous voltage" within the ...
...only. Congratulations on your purchase of rechargeable batteries, call : Sony Customer Information Center 1-800-222SONY (7669) The number below is harmful to eyes, do not expose the unit to qualified personnel only. DCR-TRV50 only Countries and areas where you can use . Welcome!... the following two conditions: (1) This device may cause undesired operation. 2 CAUTION The use of Conformity Trade Name: SONY Model No.: DCR-TRV50 Responsible Party: Sony Electronics Inc. This symbol is intended to alert the user to the presence of uninsulated "dangerous voltage" within the ...
Operating Instructions (primary manual)
Page 5
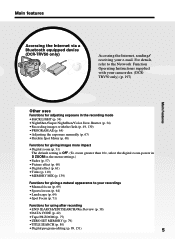
For details, refer to the Network Function Operating Instructions supplied with your camcorder. (DCRTRV50 only) (p. 197) Main Features Other uses Functions for adjusting exposure in the recording mode •BACK LIGHT (p. 34) &#...8226;Fader (p. 57) •Picture effect (p. 60) •Digital effect (p. 61) •Titles (p. 110) •MEMORY MIX (p. 139) Functions for giving a natural appearance to your e-mail. Getting Started Main features Accessing the Internet via a Bluetooth equipped device (DCR-TRV50 only) Accessing the Internet, sending/ receiving your recordings •Manual...
For details, refer to the Network Function Operating Instructions supplied with your camcorder. (DCRTRV50 only) (p. 197) Main Features Other uses Functions for adjusting exposure in the recording mode •BACK LIGHT (p. 34) &#...8226;Fader (p. 57) •Picture effect (p. 60) •Digital effect (p. 61) •Titles (p. 110) •MEMORY MIX (p. 139) Functions for giving a natural appearance to your e-mail. Getting Started Main features Accessing the Internet via a Bluetooth equipped device (DCR-TRV50 only) Accessing the Internet, sending/ receiving your recordings •Manual...
Operating Instructions (primary manual)
Page 7
...a "Memory Stick" on your computer - Signal convert function 196 Using the Network function (DCR-TRV50 only) Accessing the network 197 For the details, refer to your camcorder to the Network Function Operating Instructions supplied with the menu 199 Troubleshooting Types of contents Recording ...the USB cable - Image protection 167 Deleting images - Digital program editing (on "Memory Stick"s - PHOTO SAVE 154 Viewing still images - MPEG movie playback 159 Copying images recorded on "Memory Stick"s to your camcorder to tape 162 Enlarging still images recorded on "Memory ...
...a "Memory Stick" on your computer - Signal convert function 196 Using the Network function (DCR-TRV50 only) Accessing the network 197 For the details, refer to your camcorder to the Network Function Operating Instructions supplied with the menu 199 Troubleshooting Types of contents Recording ...the USB cable - Image protection 167 Deleting images - Digital program editing (on "Memory Stick"s - PHOTO SAVE 154 Viewing still images - MPEG movie playback 159 Copying images recorded on "Memory Stick"s to your camcorder to tape 162 Enlarging still images recorded on "Memory ...
Operating Instructions (primary manual)
Page 11
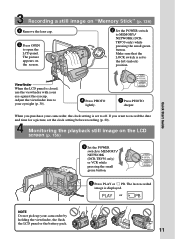
... is displayed. POWER VCR OFF(CHG) CAMERA MEMORY/ NETWORK 2 Press PLAY or PB. If you purchase your camcorder, the clock setting is closed, use the viewfinder with your camcorder by holding the viewfinder, the flash, the LCD panel or the battery pack. 11 The last recorded image is.... 5 Press PHOTO deeper. Quick Start Guide Recording a still image on "Memory Stick" (p. 126) 1 Remove the lens cap. 3 Press OPEN to MEMORY/ NETWORK (DCR-TRV50 only) or VCR while pressing the small green button. When you want to record the date and time for a picture, set to the left (unlock...
... is displayed. POWER VCR OFF(CHG) CAMERA MEMORY/ NETWORK 2 Press PLAY or PB. If you purchase your camcorder, the clock setting is closed, use the viewfinder with your camcorder by holding the viewfinder, the flash, the LCD panel or the battery pack. 11 The last recorded image is.... 5 Press PHOTO deeper. Quick Start Guide Recording a still image on "Memory Stick" (p. 126) 1 Remove the lens cap. 3 Press OPEN to MEMORY/ NETWORK (DCR-TRV50 only) or VCR while pressing the small green button. When you want to record the date and time for a picture, set to the left (unlock...
Operating Instructions (primary manual)
Page 12
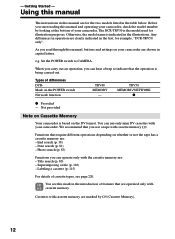
...listed in the table below. e.g. TRV50 MEMORY/NETWORK z z Provided - End search (p. 38) - Title search (p. 80) - Superimposing a title (p. 110) - You see page 220. Using this manual The instructions in capital letters. Not provided Note on Cassette Memory Your camcorder is being carried out. Otherwise, ...the model name is the model used for illustration purposes. Set the POWER switch to indicate that you can use a tape with cassette memory . The DCR-TRV50 is indicated in the introduction of...
...listed in the table below. e.g. TRV50 MEMORY/NETWORK z z Provided - End search (p. 38) - Title search (p. 80) - Superimposing a title (p. 110) - You see page 220. Using this manual The instructions in capital letters. Not provided Note on Cassette Memory Your camcorder is being carried out. Otherwise, ...the model name is the model used for illustration purposes. Set the POWER switch to indicate that you can use a tape with cassette memory . The DCR-TRV50 is indicated in the introduction of...

Operating Instructions (primary manual)
Page 14
Checking supplied accessories Make sure that the following accessories are supplied with your camcorder. 1 2 3 4 5 6 7 8 9 q; qa qs qd 1 AC-L10A/L10B/L10C AC power adaptor (1), power cord (1) (p. 16) 2 NP-FM50 battery pack (1) (p. 15, 16) 3 A/V connecting cable (1) (p. 46) 4...8 Lens hood (1) (p. 30) 9 "Memory Stick" (1) (p. 117) 0 USB cable (1) (p. 180) qa CD-ROM (SPVD-008 USB Driver) (1) (p. 179) qs Cleaning cloth (1) (p. 229) qd Stylus (1) (DCR-TRV50 only) (p. 198) Contents of the recording cannot be compensated if recording or playback is not made due to a malfunction of the...
Checking supplied accessories Make sure that the following accessories are supplied with your camcorder. 1 2 3 4 5 6 7 8 9 q; qa qs qd 1 AC-L10A/L10B/L10C AC power adaptor (1), power cord (1) (p. 16) 2 NP-FM50 battery pack (1) (p. 15, 16) 3 A/V connecting cable (1) (p. 46) 4...8 Lens hood (1) (p. 30) 9 "Memory Stick" (1) (p. 117) 0 USB cable (1) (p. 180) qa CD-ROM (SPVD-008 USB Driver) (1) (p. 179) qs Cleaning cloth (1) (p. 229) qd Stylus (1) (DCR-TRV50 only) (p. 198) Contents of the recording cannot be compensated if recording or playback is not made due to a malfunction of the...
Operating Instructions (primary manual)
Page 20
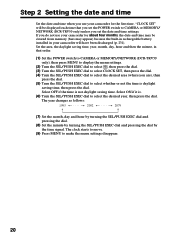
..., the daylight saving time, year, month, day, hour and then the minute, in your camcorder will be cleared from memory (bars may appear) because the built-in rechargeable battery installed in that... settings disappear. 20 The clock starts to move. (9) Press MENU to CAMERA or MEMORY/ NETWORK (DCR-TRV50 only) unless you set the date and time settings. Select OFF if the time is daylight saving...you do not use your camcorder for about four months, the date and time may be displayed each time that order. (1) Set the POWER switch to CAMERA or MEMORY/NETWORK (DCR-TRV50 only), then press MENU...
..., the daylight saving time, year, month, day, hour and then the minute, in your camcorder will be cleared from memory (bars may appear) because the built-in rechargeable battery installed in that... settings disappear. 20 The clock starts to move. (9) Press MENU to CAMERA or MEMORY/ NETWORK (DCR-TRV50 only) unless you set the date and time settings. Select OFF if the time is daylight saving...you do not use your camcorder for about four months, the date and time may be displayed each time that order. (1) Set the POWER switch to CAMERA or MEMORY/NETWORK (DCR-TRV50 only), then press MENU...
Operating Instructions (primary manual)
Page 24
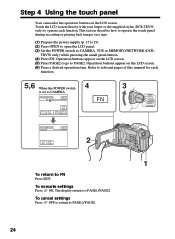
...To cancel settings Press OFF to return to CAMERA, VCR or MEMORY/NETWORK (DCR- TRV50 only) while pressing the small green button. (4) Press FN. To execute ... the POWER switch to PAGE1/PAGE2. 24 Touch the LCD screen directly with your finger or the supplied stylus (DCR-TRV50 only) to FN Press EXIT. Refer to relevant pages of this manual for each function. 5,6 When the POWER...2 1 To return to operate each function. Step 4 Using the touch panel Your camcorder has operation buttons on the LCD screen. (6) Press a desired operation item. Operation buttons appear on the LCD screen.
...To cancel settings Press OFF to return to CAMERA, VCR or MEMORY/NETWORK (DCR- TRV50 only) while pressing the small green button. (4) Press FN. To execute ... the POWER switch to PAGE1/PAGE2. 24 Touch the LCD screen directly with your finger or the supplied stylus (DCR-TRV50 only) to FN Press EXIT. Refer to relevant pages of this manual for each function. 5,6 When the POWER...2 1 To return to operate each function. Step 4 Using the touch panel Your camcorder has operation buttons on the LCD screen. (6) Press a desired operation item. Operation buttons appear on the LCD screen.
Operating Instructions (primary manual)
Page 25
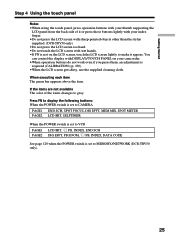
... MEM MIX, SPOT METER PAGE2 LCD BRT, SELFTIMER When the POWER switch is set to MEMORY/NETWORK (DCR-TRV50 only). 25 When executing each item The green bar appears above the item. If the items are not... available The color of it or press those buttons lightly with your camcorder. •When operation buttons do not work even if you press them, an adjustment is set to ... finger. •Do not press the LCD screen with sharp-pointed objects other than the stylus supplied. (DCR-TRV50 only) •Do not press the LCD screen too hard. •Do not touch the LCD screen ...
... MEM MIX, SPOT METER PAGE2 LCD BRT, SELFTIMER When the POWER switch is set to MEMORY/NETWORK (DCR-TRV50 only). 25 When executing each item The green bar appears above the item. If the items are not... available The color of it or press those buttons lightly with your camcorder. •When operation buttons do not work even if you press them, an adjustment is set to ... finger. •Do not press the LCD screen with sharp-pointed objects other than the stylus supplied. (DCR-TRV50 only) •Do not press the LCD screen too hard. •Do not touch the LCD screen ...
Operating Instructions (primary manual)
Page 27
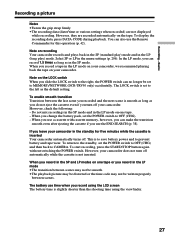
... recording data (date/time or various settings when recorded) are recorded automatically on your camcorder. To display the recording data, press DATA CODE during playback. The LOCK switch is to save battery power and to MEMORY/NETWORK (DCR-TRV50 only) accidentally. This is set to prevent battery and tape wear. When you record...
... recording data (date/time or various settings when recorded) are recorded automatically on your camcorder. To display the recording data, press DATA CODE during playback. The LOCK switch is to save battery power and to MEMORY/NETWORK (DCR-TRV50 only) accidentally. This is set to prevent battery and tape wear. When you record...
Operating Instructions (primary manual)
Page 29
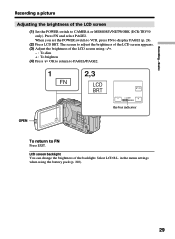
... settings when using -/+. - : To dim + : To brighten (4) Press OK to return to PAGE1/PAGE2. 1 FN 2,3 LCD BRT OK - The screen to CAMERA or MEMORY/NETWORK (DCR-TRV50 only). Select LCD B.L. Basics Recording a picture Adjusting the brightness of the backlight. LCD screen backlight You can change the brightness of the LCD screen (1) Set...
... settings when using -/+. - : To dim + : To brighten (4) Press OK to return to PAGE1/PAGE2. 1 FN 2,3 LCD BRT OK - The screen to CAMERA or MEMORY/NETWORK (DCR-TRV50 only). Select LCD B.L. Basics Recording a picture Adjusting the brightness of the backlight. LCD screen backlight You can change the brightness of the LCD screen (1) Set...
Operating Instructions (primary manual)
Page 31
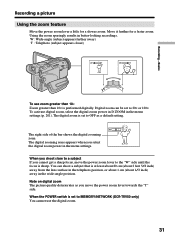
...). The digital zoom is at least about 80 cm (about 2 feet 5/8 inch) away from the lens surface in the telephoto position, or about 1 cm (about 1/2 inch) away in the menu settings. You can be set to OFF as you move the power zoom lever to MEMORY/NETWORK (DCR-TRV50 only) ... the power zoom lever a little for a faster zoom. W : Wide-angle (subject appears farther away) T : Telephoto (subject appears closer) W T W T W T To use the digital zoom. 31 Digital zoom can shoot a subject that is set to the "W" side until the focus is sharp. W T The right side of the bar shows the...
...). The digital zoom is at least about 80 cm (about 2 feet 5/8 inch) away from the lens surface in the telephoto position, or about 1 cm (about 1/2 inch) away in the menu settings. You can be set to OFF as you move the power zoom lever to MEMORY/NETWORK (DCR-TRV50 only) ... the power zoom lever a little for a faster zoom. W : Wide-angle (subject appears farther away) T : Telephoto (subject appears closer) W T W T W T To use the digital zoom. 31 Digital zoom can shoot a subject that is set to the "W" side until the focus is sharp. W T The right side of the bar shows the...
Operating Instructions (primary manual)
Page 32
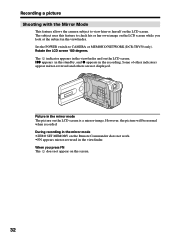
... FN The does not appear on the screen. 32 Rotate the LCD screen 180 degrees. The subject uses this feature to CAMERA or MEMORY/NETWORK (DCR-TRV50 only). When you look at the subject in the recording.
... FN The does not appear on the screen. 32 Rotate the LCD screen 180 degrees. The subject uses this feature to CAMERA or MEMORY/NETWORK (DCR-TRV50 only). When you look at the subject in the recording.
Operating Instructions (primary manual)
Page 34
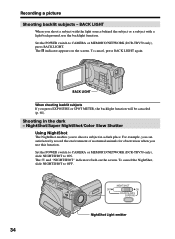
... Slow Shutter Using NightShot The NightShot enables you use the backlight function. Set the POWER switch to CAMERA or MEMORY/NETWORK (DCR-TRV50 only), slide NIGHTSHOT to CAMERA or MEMORY/NETWORK (DCR-TRV50 only), press BACK LIGHT. The and "NIGHTSHOT" indicators flash on the screen. Shooting in a dark place. To cancel the NightShot, slide...
... Slow Shutter Using NightShot The NightShot enables you use the backlight function. Set the POWER switch to CAMERA or MEMORY/NETWORK (DCR-TRV50 only), slide NIGHTSHOT to CAMERA or MEMORY/NETWORK (DCR-TRV50 only), press BACK LIGHT. The and "NIGHTSHOT" indicators flash on the screen. Shooting in a dark place. To cancel the NightShot, slide...
Operating Instructions (primary manual)
Page 36
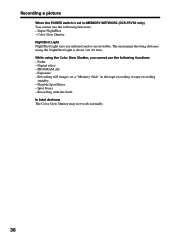
Fader - Digital effect - PROGRAM AE - Flexible Spot Meter - Spot Focus - Color Slow Shutter NightShot Light NightShot Light rays are infrared and so are invisible. The maximum shooting ... with the flash In total darkness The Color Slow Shutter may not work normally. 36 While using the NightShot Light is set to MEMORY/NETWORK (DCR-TRV50 only) You cannot use the following functions: - Recording still images on a "Memory Stick" in the tape recording or tape recording standby - Super NightShot...
Fader - Digital effect - PROGRAM AE - Flexible Spot Meter - Spot Focus - Color Slow Shutter NightShot Light NightShot Light rays are infrared and so are invisible. The maximum shooting ... with the flash In total darkness The Color Slow Shutter may not work normally. 36 While using the NightShot Light is set to MEMORY/NETWORK (DCR-TRV50 only) You cannot use the following functions: - Recording still images on a "Memory Stick" in the tape recording or tape recording standby - Super NightShot...
Operating Instructions (primary manual)
Page 37
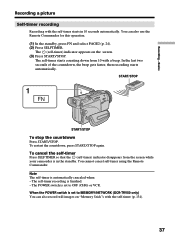
The self-timer starts counting down from the screen while your camcorder is finished. - To restart the countdown, press START/STOP again. You cannot cancel self-timer using the Remote Commander. Recording - Basics Recording a picture Self-timer ... self-timer (p. 134). 37 You can also record still images on the screen. (3) Press START/STOP. Note The self-timer is set to MEMORY/NETWORK (DCR-TRV50 only) You can also use the Remote Commander for this operation. (1) In the standby, press FN and select PAGE2 (p. 24). (2) Press SELFTIMER.
The self-timer starts counting down from the screen while your camcorder is finished. - To restart the countdown, press START/STOP again. You cannot cancel self-timer using the Remote Commander. Recording - Basics Recording a picture Self-timer ... self-timer (p. 134). 37 You can also record still images on the screen. (3) Press START/STOP. Note The self-timer is set to MEMORY/NETWORK (DCR-TRV50 only) You can also use the Remote Commander for this operation. (1) In the standby, press FN and select PAGE2 (p. 24). (2) Press SELFTIMER.
Operating Instructions (primary manual)
Page 54
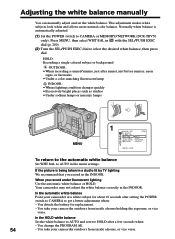
...the white balance to AUTO and reset to HOLD after setting the POWER switch to CAMERA to CAMERA or MEMORY/NETWORK (DCR-TRV50 only). You take your camcorder outdoors from inside a house holding the exposure, or vice versa. Adjusting the white balance manually You can manually adjust... and set the white balance. In the automatic white balance Point your camcorder outdoors from inside a house, or vice versa. HOLD : Recording a single-colored subject or background OUTDOOR : •When recording a sunset/...
...the white balance to AUTO and reset to HOLD after setting the POWER switch to CAMERA to CAMERA or MEMORY/NETWORK (DCR-TRV50 only). You take your camcorder outdoors from inside a house holding the exposure, or vice versa. Adjusting the white balance manually You can manually adjust... and set the white balance. In the automatic white balance Point your camcorder outdoors from inside a house, or vice versa. HOLD : Recording a single-colored subject or background OUTDOOR : •When recording a sunset/...
Operating Instructions (primary manual)
Page 59
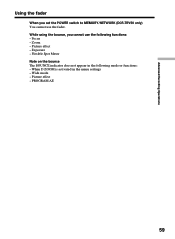
When D ZOOM is activated in the following functions: - PROGRAM AE 59 Wide mode - Focus - Picture effect - Picture effect - Zoom - Advanced Recording Operations Using the fader When you cannot use the fader. While using the bounce, you set the POWER switch to MEMORY/NETWORK (DCR-TRV50 only) You cannot use the following mode or functions: - Flexible Spot Meter Note on the bounce The BOUNCE indicator does not appear in the menu settings - Exposure -
When D ZOOM is activated in the following functions: - PROGRAM AE 59 Wide mode - Focus - Picture effect - Picture effect - Zoom - Advanced Recording Operations Using the fader When you cannot use the fader. While using the bounce, you set the POWER switch to MEMORY/NETWORK (DCR-TRV50 only) You cannot use the following mode or functions: - Flexible Spot Meter Note on the bounce The BOUNCE indicator does not appear in the menu settings - Exposure -
Operating Instructions (primary manual)
Page 65
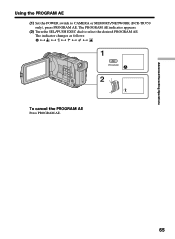
The indicator changes as follows: y yy y y 1 AE PROGRAM 2 To cancel the PROGRAM AE Press PROGRAM AE. 65 The PROGRAM AE indicator appears. (2) Turn the SEL/PUSH EXEC dial to CAMERA or MEMORY/NETWORK (DCR-TRV50 only), press PROGRAM AE. Advanced Recording Operations Using the PROGRAM AE (1) Set the POWER switch to select the desired PROGRAM AE.
The indicator changes as follows: y yy y y 1 AE PROGRAM 2 To cancel the PROGRAM AE Press PROGRAM AE. 65 The PROGRAM AE indicator appears. (2) Turn the SEL/PUSH EXEC dial to CAMERA or MEMORY/NETWORK (DCR-TRV50 only), press PROGRAM AE. Advanced Recording Operations Using the PROGRAM AE (1) Set the POWER switch to select the desired PROGRAM AE.

